Install SalePro on an Online Server or Local Computer
A complete SalePro installation guide for cPanel/shared hosting and Windows localhost environments including XAMPP and Laragon, with database setup, installer fields, screenshots, video help, and troubleshooting.
SalePro is a self-hosted Laravel application. You can install it on an online server so your team can use it through a domain, or on a Windows computer with XAMPP or Laragon for evaluation, training, development, or a local-only setup.
If this is your first installation, read the whole guide once before starting. Most installation failures come from an unsupported PHP environment, incorrect database credentials, missing hidden files such as .env or .htaccess, or a domain/local web server that is not routing requests to SalePro correctly.
Before you begin, complete the SalePro Server Requirements checklist and download the current SalePro installation package supplied with your purchase.
Watch the official installation video#
The previous SalePro documentation referenced LionCoders' official installation walkthrough:
- How to install SalePro POS, Inventory Management System, HRM & Accounting
- LionCoders YouTube channel
The video is useful as a visual walkthrough, but it may show an older interface or installer revision. If a field or screen differs, follow the current written instructions on this page and the requirements shown by your installed version.
Choose where you want to install SalePro#
| Method | Best for | Typical application folder | Typical URL |
|---|---|---|---|
| Online hosting / cPanel | Production use over the internet | Your domain or subdomain document root | https://yourbusiness.com |
| XAMPP on Windows | Local testing, training, development | C:\xampp\htdocs\salepro |
http://localhost/salepro |
| Laragon on Windows | Local development/testing with convenient virtual hosts | C:\laragon\www\salepro |
http://salepro.test or http://localhost/salepro |
A localhost installation does not automatically become available on the internet. That is normally desirable for testing. Internet-dependent features such as payment gateways, webhooks, external APIs, WhatsApp/cloud services, or remote integrations may require internet access and a publicly reachable HTTPS URL even when the core SalePro application itself is running locally.
Pre-installation checklist#
Before opening the installer, make sure you have all of the following:
- The current SalePro ZIP package.
- PHP and database versions that meet the server requirements.
- All required PHP extensions enabled.
- An empty database prepared for SalePro.
- The database host, database name, database username, and database password.
- Permission to write to Laravel's
storageandbootstrap/cachedirectories. .envand.htaccesspresent after extraction.- Your SalePro purchase information available if the installer asks for it.
- For a live server, a domain/subdomain pointing to the installation and HTTPS enabled or ready to enable.
Install SalePro on an online server with cPanel#
The exact names of hosting-panel screens vary between providers. The workflow is the same with cPanel, DirectAdmin, Plesk, or a custom hosting dashboard: choose the supported PHP runtime, create a database, upload the application, make sure the web server can route Laravel URLs, and then run SalePro's installer.
Step 1: Select the supported PHP version#
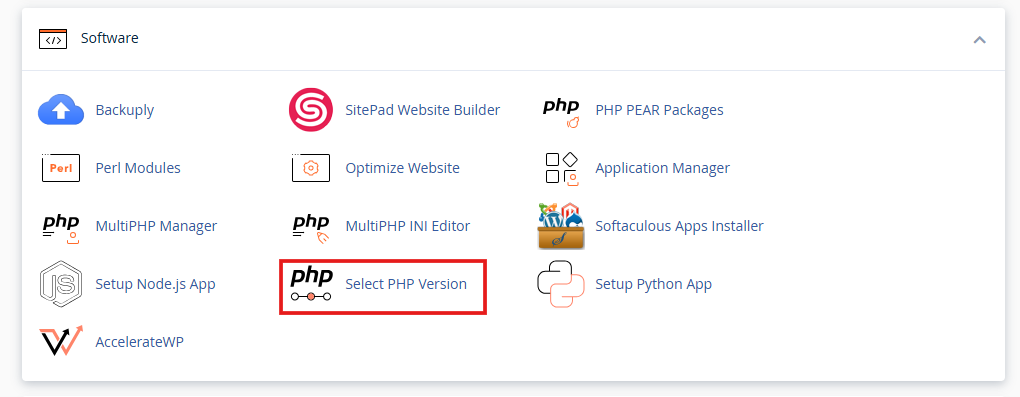
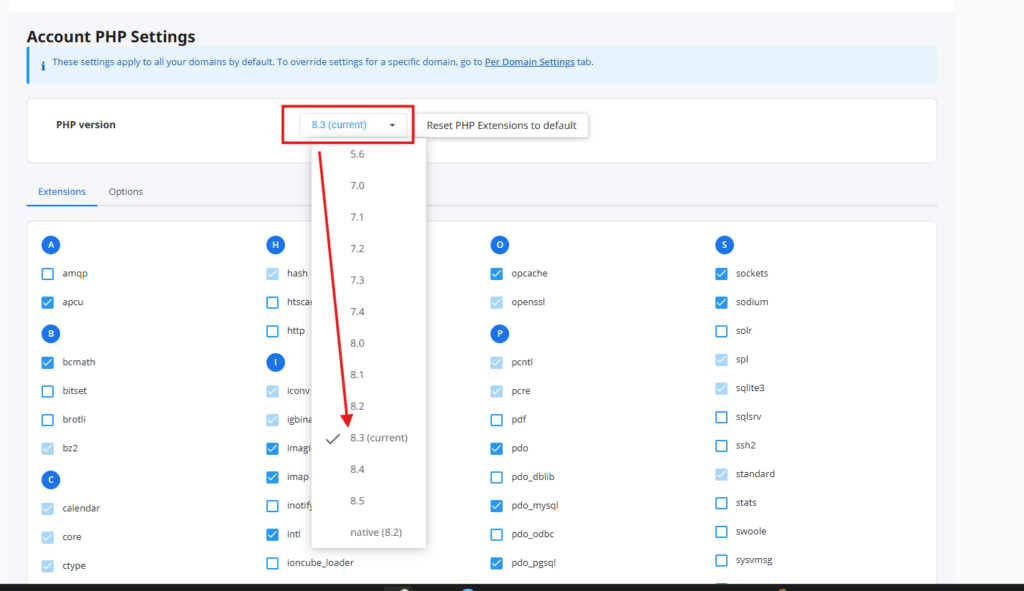
Open Select PHP Version, MultiPHP Manager, or your host's equivalent PHP tool and choose the version required by the current SalePro release.
Confirm the active PHP version after selecting it.
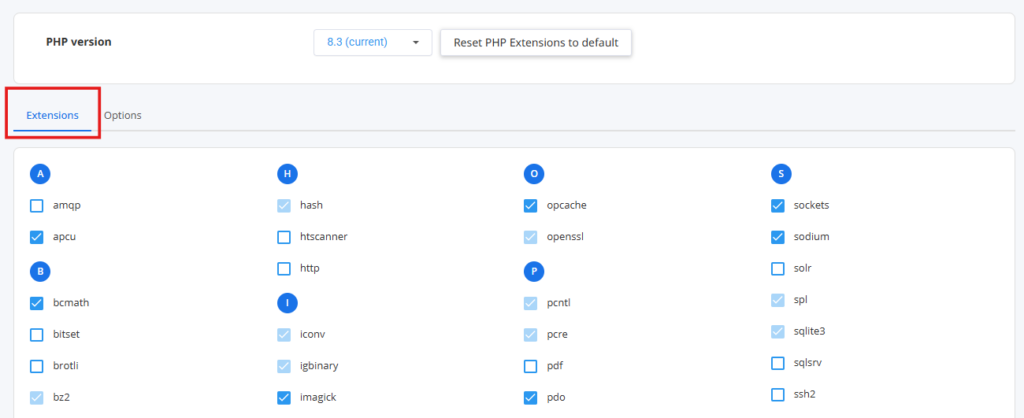
Enable the extensions listed in SalePro Server Requirements. If your provider does not allow you to enable a required extension, ask the host to enable it before continuing.
Important: a VPS can have different PHP versions for the command line and the website. What matters for installation is the PHP runtime used by the web server for your SalePro domain.
Step 2: Create the database#
Open MySQL Databases, Database Wizard, or your host's equivalent database tool.
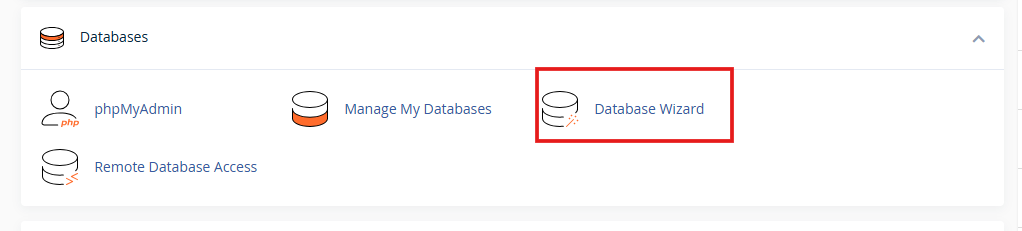
Create an empty database. Record the complete generated database name. On many cPanel accounts the final name includes your account prefix, for example account_salepro rather than only salepro.
Create a dedicated database user with a strong password.
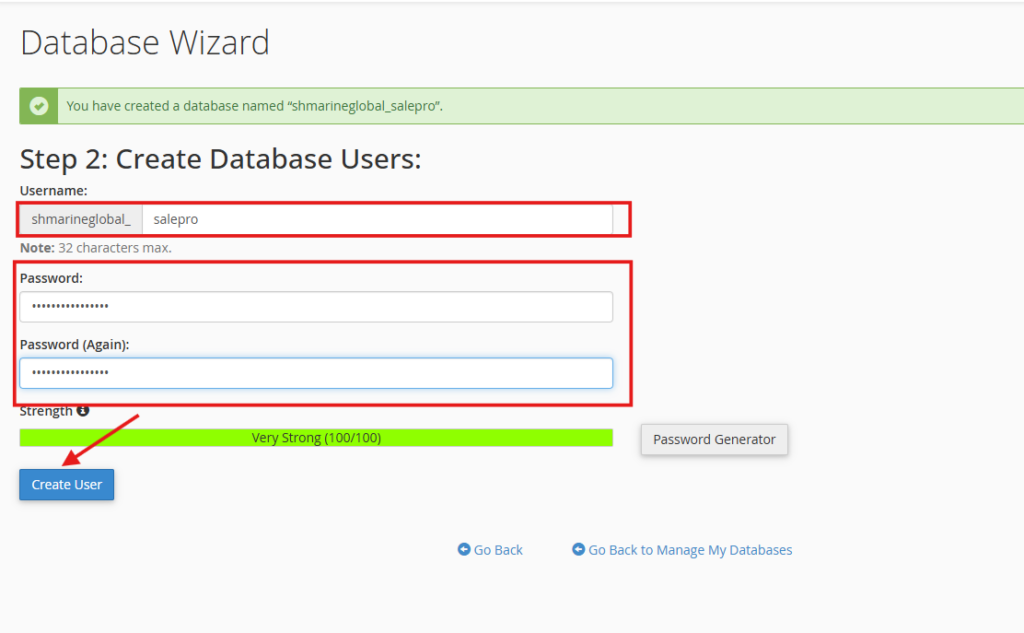
Assign that user to the SalePro database and grant the privileges required to create, alter, read, and write the application's tables. On a standard dedicated SalePro database, cPanel's All Privileges option is normally the simplest choice.
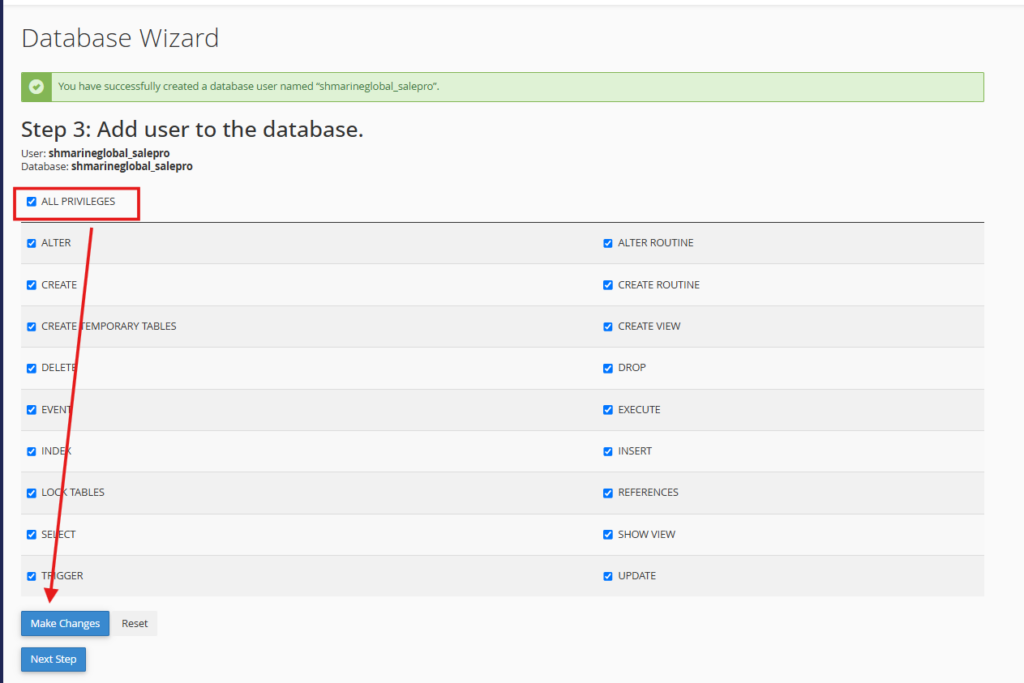
Keep these four values ready:
- Database Host — usually
localhostor127.0.0.1; use the value supplied by your host if different. - Database Name — the full database name created above.
- Database Username — the full user name assigned to the database.
- Database Password — the password for that database user.
Step 3: Upload and extract SalePro#
- Open File Manager in your hosting panel.
- Open the document root for the domain/subdomain where SalePro will run. This is often
public_html, but it may be another directory. - Upload the SalePro ZIP package.
- Extract the ZIP in that directory.
- Make sure the actual SalePro files are directly in the intended application directory and not inside an accidental extra folder such as
public_html/salepro-package/salepro-package/.... - Remove the uploaded ZIP after you have confirmed the extraction is complete, unless you intentionally keep a private backup outside the public web root.
Step 4: Make hidden files visible#
This is a frequent source of failed cPanel installations.
In cPanel File Manager, open Settings and enable Show Hidden Files (dotfiles). Confirm that files beginning with a dot—especially .env and .htaccess—were extracted or moved with the rest of the application.
If you extract into one directory and then move the files into another directory while hidden files are not displayed, cPanel can leave these files behind. SalePro may then return a 404, 403, 500, or fail to load the installer correctly.
Step 5: Check writable directories#
Laravel needs to write cache, session, compiled-view, and log data. Confirm that the web-server user can write to:
storagebootstrap/cache
Do not solve a permission problem by making the entire SalePro installation world-writable. Use the hosting provider's normal ownership/permission model and grant write access only where Laravel requires it.
Step 6: Confirm the domain and HTTPS#
Open the domain or subdomain in your browser.
If you see a hosting placeholder, directory listing, unrelated website, or server-generated 404 instead of SalePro, correct the domain's document root before running the installer.
For a public production installation, enable SSL/HTTPS. After installation, confirm login, POS, checkout, payment, API, and webhook URLs remain on HTTPS.
Step 7: Run the SalePro installation wizard#
Browse to the SalePro URL. The setup wizard should open.
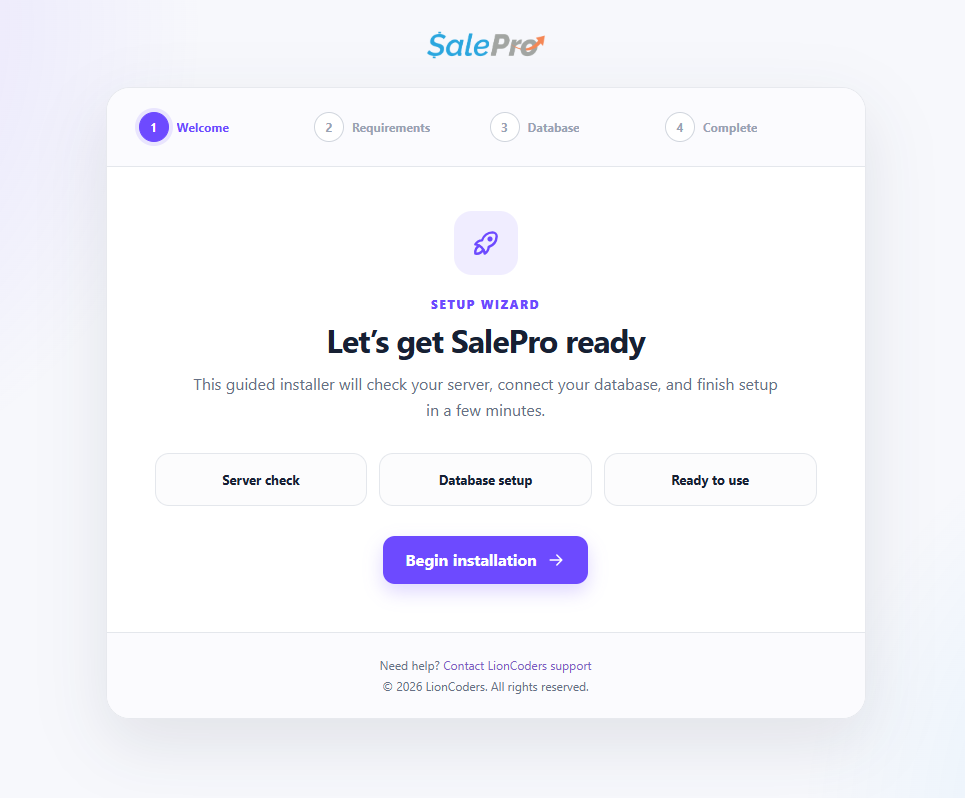
Follow the requirement check first. Do not ignore a failed requirement and continue hoping it will work later.
When the database step appears, enter the exact values created earlier:
| Installer field | What to enter |
|---|---|
| Database Host | Usually localhost or 127.0.0.1, unless your host specifies another address |
| Database Name | Full database name from the hosting panel |
| Database Username | Full user assigned to that database |
| Database Password | Password belonging to that database user |
If the installer requests your SalePro purchase code, enter the purchase information associated with your SalePro license.
Complete the administrator/account fields shown by the installer. Use an email address you control and a strong password.
During the final database setup, keep the browser tab open. Do not repeatedly submit the form, refresh the page, close the browser, or start another installation against the same database.
Install SalePro locally with XAMPP on Windows#
XAMPP is useful when you want to learn SalePro, test customization, train staff, or evaluate hardware such as a barcode scanner before deploying online.
Step 1: Install a compatible XAMPP environment#
Install XAMPP with a PHP version that meets the current SalePro Server Requirements. A XAMPP installation with an older PHP version is not sufficient just because Apache and MySQL start successfully.
Open XAMPP Control Panel and start:
- Apache
- MySQL
Both services should remain in the running state.
If Apache does not start, another program may already be using port 80/443. If MySQL does not start, check whether another MySQL/MariaDB service is already using the configured database port. Fix the local service conflict before installing SalePro.
Step 2: Verify PHP and required extensions#
XAMPP uses its own PHP installation. Check the PHP version and required extensions in the XAMPP environment rather than another PHP installation that may also exist on Windows.
If you change php.ini or enable an extension, restart Apache from the XAMPP Control Panel before testing again.
Step 3: Extract SalePro into htdocs#
Create:
C:\xampp\htdocs\salepro
Extract the SalePro ZIP directly into that folder.
The result should be the SalePro application files inside C:\xampp\htdocs\salepro, not another nested directory such as C:\xampp\htdocs\salepro\salepro.
Windows Explorer can hide dotfiles less aggressively than some hosting file managers, but still confirm .env and .htaccess are present in the package/application where expected.
Step 4: Create the local database#
Open:
http://localhost/phpmyadmin
Then:
- Open the Databases tab.
- Create an empty database such as
salepro_db. - Use an
utf8mb4-compatible character set/collation if phpMyAdmin asks you to choose one; the normal modern MySQL default is usually suitable.
On a fresh development XAMPP installation, MySQL often uses root as the local user and may have no password. Do not assume those defaults. Use the actual credentials configured on your computer.
Step 5: Open the local installer#
Browse to:
http://localhost/salepro
If Apache is running on a custom port, include it, for example:
http://localhost:8080/salepro
The SalePro installation wizard should open.
Typical local database values are:
| Field | Common XAMPP value | Important note |
|---|---|---|
| Database Host | localhost or 127.0.0.1 |
Use the host your local MySQL accepts |
| Database Name | salepro_db |
Must match the database you created |
| Database Username | Often root on a fresh XAMPP setup |
Use your actual configured user |
| Database Password | Sometimes blank on a fresh XAMPP setup | Leave blank only if your MySQL user really has no password |
Finish the administrator fields and allow the installer to complete.
Step 6: If XAMPP opens the home page but SalePro routes return 404#
This normally points to Apache rewrite configuration rather than a SalePro database problem.
Check that Apache's rewrite module is enabled and that your Apache configuration permits .htaccess overrides for the XAMPP web directory. If you change Apache configuration, restart Apache before retesting.
Do not rename or remove SalePro's .htaccess to hide the symptom; Laravel depends on URL rewriting for normal application routes.
Step 7: If the page is blank or shows a PHP error#
Check these first:
- XAMPP is using the required PHP version.
- Required PHP extensions are enabled in XAMPP's
php.ini. - Apache was restarted after changing PHP configuration.
- The database service is running.
storageandbootstrap/cacheare writable by your Windows user/web-server process.- SalePro files were fully extracted and not blocked/quarantined by security software.
Install SalePro locally with Laragon on Windows#
Laragon is especially convenient for Laravel/PHP development because it can create friendly local .test domains automatically.
Step 1: Select compatible PHP and database versions#
Open Laragon and select a PHP runtime that satisfies SalePro Server Requirements. Also confirm your MySQL/MariaDB version is supported by the SalePro release you are installing.
Start the web server and database service from Laragon.
Step 2: Extract SalePro into Laragon's www directory#
Create:
C:\laragon\www\salepro
Extract the SalePro ZIP directly into that directory.
Confirm there is no extra nested package directory and that .env and .htaccess are present where expected.
Step 3: Reload Laragon and open the local project#
If Laragon's automatic virtual-host feature is enabled, reload/restart Laragon after creating the new project folder. The project will normally become available at:
http://salepro.test
Depending on your Laragon configuration, this may also work:
http://localhost/salepro
If salepro.test does not resolve, reload Laragon and check that its automatic virtual-host/hosts-file integration is enabled. Windows may require Laragon to have permission to update the local hosts file.
Step 4: Create the database#
Use Laragon's Database menu, HeidiSQL, phpMyAdmin if installed, or another MySQL client.
Create an empty database such as:
salepro_db
Use the actual MySQL username and password configured in your Laragon environment. Laragon installations are customizable, so do not copy XAMPP credentials without checking them.
Step 5: Complete the SalePro installer#
Open http://salepro.test (or your configured local URL), enter the local database credentials, and complete the administrator setup.
If the installer cannot connect using localhost, try the local host value configured by your database service, commonly 127.0.0.1.
Step 6: Local HTTPS and LAN access are optional#
For ordinary local development/testing, HTTP on .test or localhost is sufficient unless the feature you are testing specifically requires HTTPS.
If you later expose a local SalePro installation to other computers on your LAN, treat that as a separate networking/security task: use the correct local IP/hostname, configure the Windows firewall carefully, and do not expose a development stack directly to the public internet.
Localhost troubleshooting checklist#
localhost/salepro shows 404#
Confirm Apache/Laragon is running, the folder exists in the correct web root, and Laravel rewrite rules are being honored. In XAMPP, verify Apache mod_rewrite and .htaccess overrides. In Laragon, reload the web server after creating the project.
salepro.test does not open in Laragon#
Reload/restart Laragon, confirm automatic virtual hosts are enabled, and confirm Windows allowed Laragon to update the hosts file. Try http://localhost/salepro as a diagnostic alternative if your configuration supports it.
phpMyAdmin does not open#
Confirm MySQL is running. For XAMPP, use the Admin button beside MySQL or open http://localhost/phpmyadmin. For Laragon, use its Database menu/HeidiSQL if phpMyAdmin is not installed.
Database connection fails locally#
Verify the database exists, MySQL is running, and the installer values match the actual local username/password. A blank password is not a universal localhost rule.
Apache will not start#
Another web server/application may already be using Apache's configured ports. Resolve the port conflict or configure XAMPP/Laragon to use an available port, then use that port in the browser URL.
Installation stops with a PHP extension error#
Enable the extension in the PHP runtime actually used by XAMPP/Laragon, then restart the web server. Re-open the installer requirement check before proceeding.
What happens during the installation wizard#
The exact screens can change between SalePro releases, but the workflow is generally:
- SalePro checks the server/PHP environment.
- You provide database connection information.
- The installer connects to the empty database and creates the application schema/data required for the installed version.
- You create or confirm the initial administrator account and other setup information requested by that release.
- The installer completes and you proceed to the application login/setup workflow.
Never point a fresh installation wizard at a production database that already contains business data unless the specific SalePro upgrade/migration documentation tells you to do so.
What to verify immediately after installation#
- Sign in with the administrator account created during setup.
- Confirm the dashboard and navigation load without PHP/server errors.
- Check the browser console/network panel if CSS/JavaScript looks incomplete.
- Set business identity, currency, date/time, number formats, tax, and other core settings.
- Create or verify warehouses and user roles/permissions.
- Configure accounting/payment settings required for your workflow before entering real transactions.
- Test product creation, one purchase, and one sale before importing production data.
- On a live server, confirm HTTPS remains active on login, POS, checkout, API/webhook, and payment-related pages.
- Configure backups before entering real business data.
- Remove installer ZIPs, temporary test files, or credentials you no longer need.
Continue with Get Started with SalePro for the recommended business-configuration order.
Common online-server installation problems#
The installer opens with a 500 Internal Server Error#
Common causes include an unsupported PHP version, missing PHP extensions, missing .env/.htaccess, incorrect permissions, or a domain/document root that is not routing Laravel correctly.
Check the hosting error log and SalePro/Laravel application log where available. The exact error is much more useful than repeatedly retrying the installer.
The installer returns 404 or application routes do not work#
Confirm the domain/subdomain points to the correct SalePro directory and that Apache/LiteSpeed/Nginx/OpenLiteSpeed is loading the required Laravel routing/rewrite configuration.
On LiteSpeed/OpenLiteSpeed environments, remember that rewrite configuration can be cached or require a reload/restart after .htaccess changes. If Laravel routes exist but the public URL still behaves like an older configuration, reload the server's rewrite configuration before changing application code.
Database Connection Failed#
Re-enter the database host, full database name, full username, and password exactly as created. On cPanel, remember that database/user names frequently include the account prefix. Also verify the database user was actually assigned to the database with sufficient privileges.
Maximum execution time exceeded or blank page during final setup#
The host may be terminating the installation while database work is still running. Check PHP memory_limit, max_execution_time, and relevant server logs. If your provider controls those values, ask them to raise the limits temporarily or provide an environment suitable for the installation.
If an installation stopped midway, do not blindly submit the installer again against a partially populated database. If the database contains only disposable failed-installation data, start again with a new/clean empty database. If you are unsure whether the database contains anything valuable, back it up and ask support before deleting anything.
Storage or cache directory is not writable#
Correct ownership/permissions for Laravel's writable directories (storage and bootstrap/cache). Do not make the complete project 777 or world-writable.
CSS, JavaScript, or images are missing after installation#
Confirm the domain/document root and public-asset routing are correct. Check the browser Network/Console panels for 403/404 responses. Also clear/reload any LiteSpeed/CDN/static-asset cache after changing rewrite rules or moving application files.
Need installation help?#
Read Get SalePro Support and Request Customization, then open a LionCoders support ticket.
For installation-specific problems, include:
- your SalePro purchase code;
- the affected URL;
- whether the installation is cPanel/shared hosting, VPS, XAMPP, or Laragon;
- PHP and database versions;
- a clear description of what happened;
- the exact error text;
- screenshots where useful;
- relevant server/application-log excerpts with secrets removed.
Share temporary hosting or administrator credentials only through the official private support channel and revoke/change them after the investigation is complete.
If something is unclear, tell support which guide and section you were following.