Installation#
You will receive vCardPro as a ZIP installation package. Upload that ZIP to your hosting account, extract the application into the folder assigned to your domain or subdomain, and open that address in your browser. On a correctly configured server, a fresh copy opens the vCardPro installation window automatically. The wizard then guides you through the remaining setup.
In short: Receive ZIP → Upload → Extract into the application folder → Open your application URL → Complete the installation wizard → Sign in as Super Admin. The sections below explain each step, including the hosting and empty-database preparation required before the wizard can finish.
Important: These instructions are for a fresh installation, not an upgrade or a reset. Do not upload over a working installation or point the installer at a database containing existing customer data. Back up the application files, environment configuration, uploaded media, and database before changing an existing deployment.
Note: The screenshots below show the software’s original installer screens rendered in an isolated, read-only preview. No existing installation was reset, no database credentials were submitted, and no new administrator was created to produce them. The application URL shown is an example; use your own domain.
Before You Start#
Prepare your hosting and access#
- A domain or subdomain pointing to your hosting account, with a valid HTTPS certificate.
- The complete vCardPro application package and access to upload/extract files through your hosting file manager or SFTP.
- A MySQL or MariaDB server and a new, empty database dedicated to this installation.
- The database hostname, full database name, username, password, and any non-default port supplied by the hosting provider.
- A PHP runtime compatible with the package, the required extensions, and writable application storage/cache directories.
- Access to cron jobs and a queue worker, or a hosting administrator who can configure them. Shell access is needed if dependencies or frontend assets must be built.
Check the PHP version before uploading#
Use PHP 8.3 or a later version supported by the supplied package for the build reviewed here. Although the installer’s own requirements screen checks PHP 8.2+, the installed Composer dependency check in this package requires PHP 8.3+. A PHP 8.2 server can therefore fail before the wizard opens. Do not edit or disable Composer’s platform check; use a compatible PHP version.
| Component | Requirement or preparation |
|---|---|
| Database | MySQL or MariaDB. Create an empty database before opening the wizard; the installer does not replace the hosting panel’s database-creation step. |
| Blocking PHP capabilities | PDO MySQL, OpenSSL, Fileinfo, GD, and XML/DOM processing (DOMDocument or SimpleXML). |
| Recommended PHP capabilities | cURL and a memory limit of at least 128 MB; allow more resources if your workload requires them. |
| Web routing | A correctly configured web server/front controller. On Apache, retain the package’s .htaccess files and enable the required rewrite support. |
| Dependency and asset files | The vendor directory and the compiled public/build files, including manifest.json, must be present. |
| Uploads and background work | Writable storage and cache directories, support for the public-storage link, and scheduler/queue execution. |
Upload, Extract the ZIP, and Open Your URL#
1. Receive the software ZIP#
Download the vCardPro software ZIP supplied to you and keep an untouched copy on your computer. Use the application installation ZIP, not the documentation ZIP containing HTML guides and screenshots. Do not rename the ZIP to PHP or HTML. You do not open the ZIP address in the browser to install the software.
2. Choose the installation folder#
Sign in to your hosting control panel and open File Manager. Locate the directory assigned to the domain/subdomain where you want vCardPro to run. Your hosting panel shows this as the document root. A main domain often uses public_html, while a subdomain may have a separate directory. The actual folder name depends on your host.
Use a dedicated empty destination. Do not extract the application over an existing WordPress site or another working application. If your main domain already hosts a website, create a separate subdomain or an appropriate empty subfolder for vCardPro.
3. Upload and extract the ZIP#
- Open the chosen destination folder in File Manager and choose Upload. Select the software ZIP and wait until upload completes.
- Select the uploaded ZIP and choose Extract (the exact menu label varies by hosting panel). Check the extraction destination before confirming it.
- Open the extracted directory and locate the actual application files:
index.php,artisan,app/,bootstrap/,public/,resources/, andstorage/. Preserve the entire application structure, including.htaccessand other required hidden files. - If extraction adds an extra outer folder, such as
vCardPro-package/application/, identify the folder that actually contains those application files. Move its complete contents into the intended empty application directory, or update the domain mapping with your host. Do not leave the application one folder deeper than the URL you intend to use. The example packaging folder names are illustrative; your ZIP may be organized differently. - Check that the supplied production package includes
vendor/autoload.phpandpublic/build/manifest.json. If either is missing, request the complete ready-to-install release from the supplier; the advanced build instructions below are for a developer, not a normal ZIP-installation step. - Keep the original ZIP privately as a backup. Once extraction is verified, do not leave an installation archive containing application files or private configuration publicly downloadable from your site.
4. Open the correct application address#
Type the domain/subdomain or configured subfolder address into your browser. Do not type a hosting filesystem path such as public_html into the URL. The following examples assume the package’s supplied Apache root entry point is used and the destination is correctly mapped:
| Where the application is extracted | Address to open | Installer address if needed |
|---|---|---|
| The empty web directory mapped to your main domain | https://yourdomain.com |
https://yourdomain.com/install |
| The empty web directory mapped to your cards subdomain | https://cards.yourdomain.com |
https://cards.yourdomain.com/install |
| A dedicated cards subfolder beneath the main domain’s web directory | https://yourdomain.com/cards |
https://yourdomain.com/cards/install |
For a fresh copy, the application checks its installation state and opens the Welcome / Installation Wizard window. Choose Begin Installation, then follow Requirements, Permissions, Database, Application Setup, and Create Super Admin. Uploading and extracting the ZIP makes the wizard available; you still need to finish the wizard before the software is ready to use.
Create an Empty Database#
- Open the database-management tool supplied by your hosting provider. Create a new MySQL or MariaDB database for vCardPro.
- Create or select a database user intended for this application and assign it the permissions needed to create and alter tables and read/write data within this database. Do not use a broadly privileged server administrator account for normal application access.
- Record the exact database name and username. Shared hosting commonly adds an account prefix; use the full names displayed by the hosting panel.
- Record the database host and port. Use
localhostonly if the hosting provider instructs you to do so. Keep the password private.
Important: Use a new database without existing application tables. A connection test only checks connectivity; it is not proof that the selected database is empty or safe to install into.
Welcome#
Open your application URL in the browser. A fresh, uninstalled copy redirects to the wizard; you can also open https://your-domain.example/install. If installed in a subdirectory, include that subdirectory before /install.
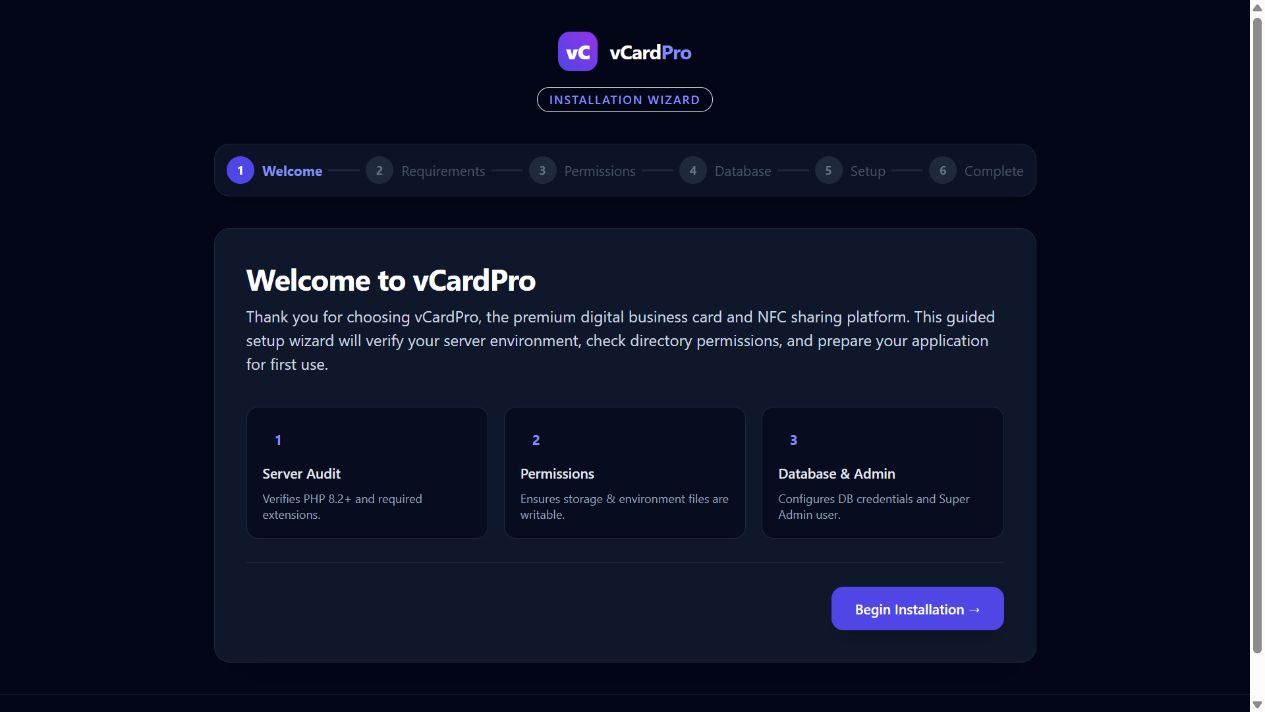
Choose Begin Installation. The progress bar shows Welcome, Requirements, Permissions, Database, Setup, and Complete. Setup contains two forms: Application Setup and Create Super Admin.
Note: If the site takes you to Sign In instead, the application may already be installed. Do not delete its installation marker or database to reopen the wizard. Check the deployment with the site owner first.
Server Requirements#
The wizard checks the running PHP version, database extension, encryption, upload/image capabilities, XML processing, cURL, and memory limit. Review every row; the detected values belong to the server running that page.
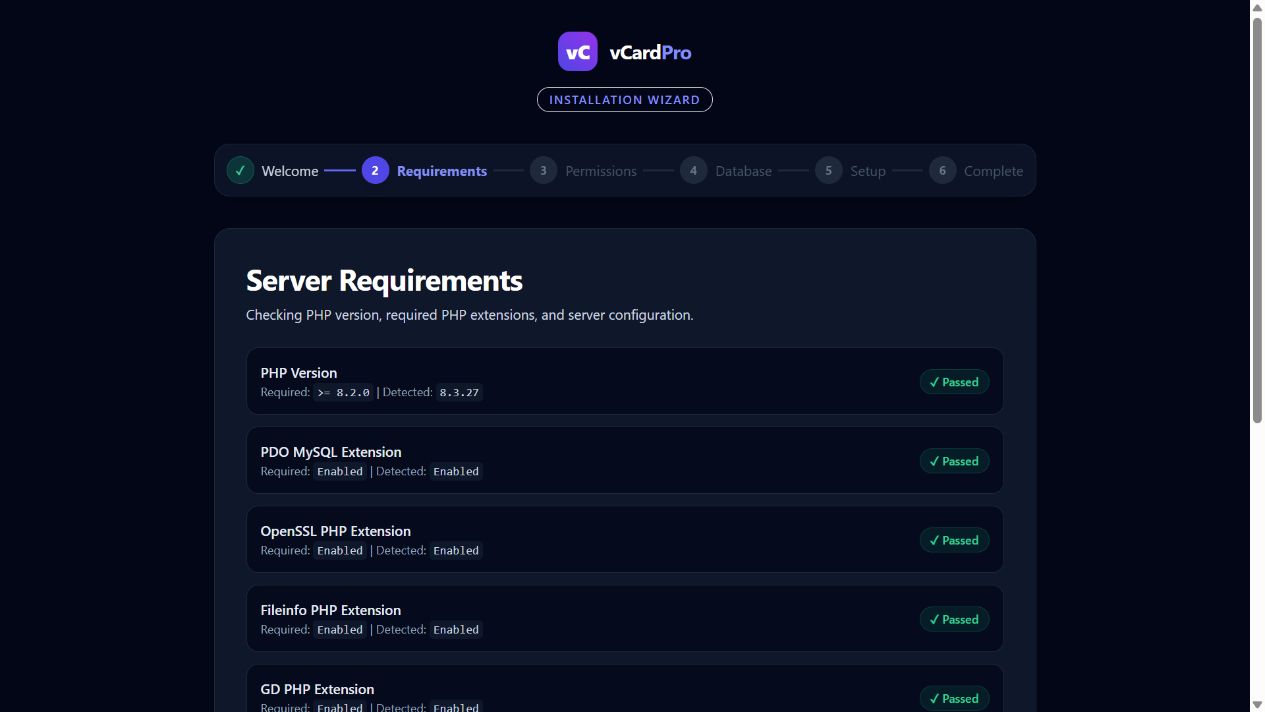
- Resolve each blocking Failed item through your hosting PHP configuration or hosting support.
- Review warnings as well, including cURL and memory. A warning is not the same as a blocking failure, but it can affect production use.
- Refresh the requirements page after the host has applied the changes. Check the PHP version used by the website itself, not only the command-line PHP version.
- When blocking requirements pass, choose Continue to Permissions.
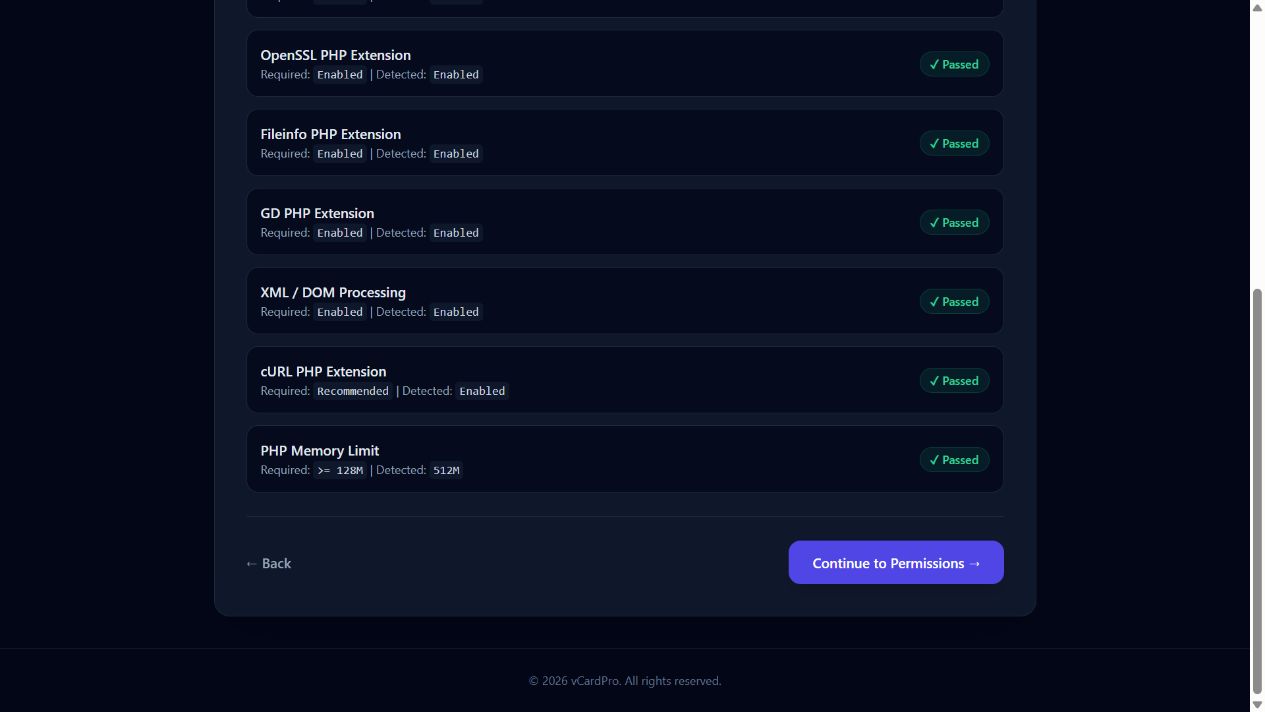
Note: The PHP 8.2+ label in the wizard is less strict than the reviewed package’s PHP 8.3+ dependency requirement. Follow the stricter package requirement described above.
Directory Permissions#
The installer checks whether the web-server process can write to the locations it needs. Every listed check must pass before continuing.
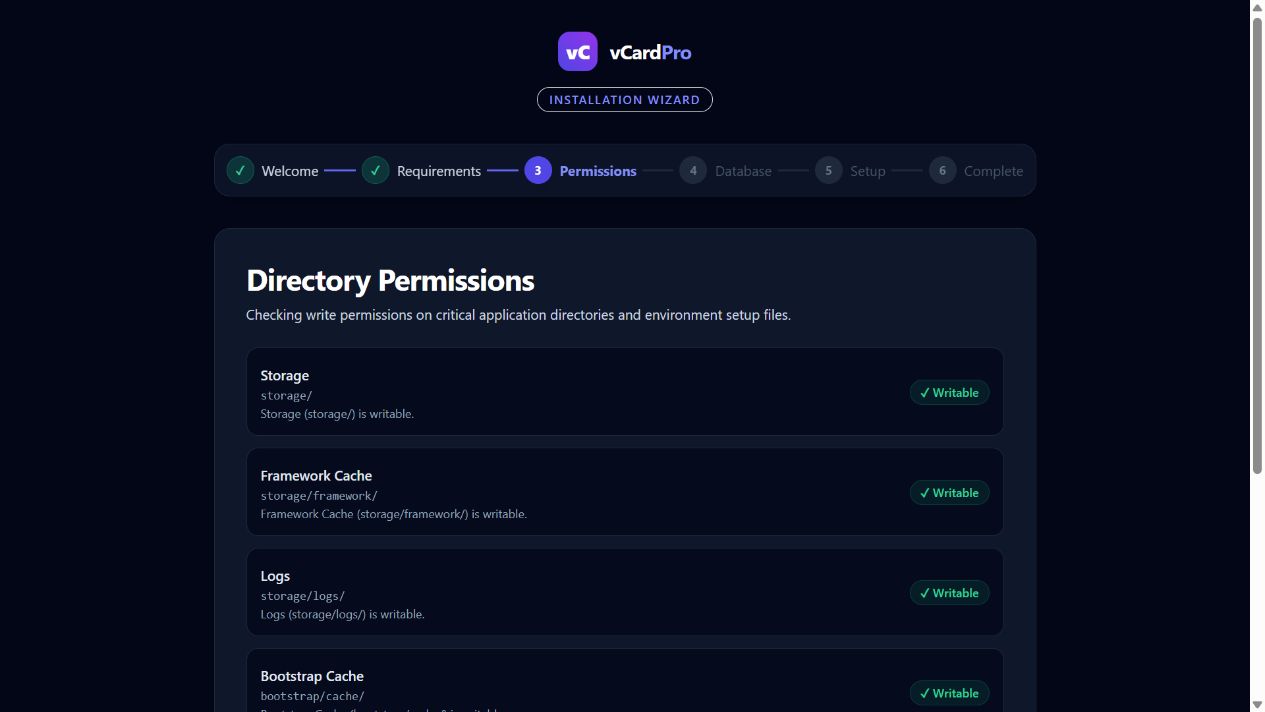
storage/: application-generated files.storage/framework/: framework runtime files.storage/logs/: application logs.bootstrap/cache/: framework cache files..env: writable if it exists; otherwise the application directory must permit the installer to create it.
If a check says Not Writable, ask your host to correct the owner/group or targeted write permission, then refresh the page. Choose Continue to Database after all checks pass.
Important: Do not make the whole application world-writable or apply blanket 777 permissions. Use the least access required by the web-server account, and keep private files protected from web access.
Database Configuration#
Enter the connection details for the empty database you prepared. The visible fields in this version are Host, Database name, Username, and Password.
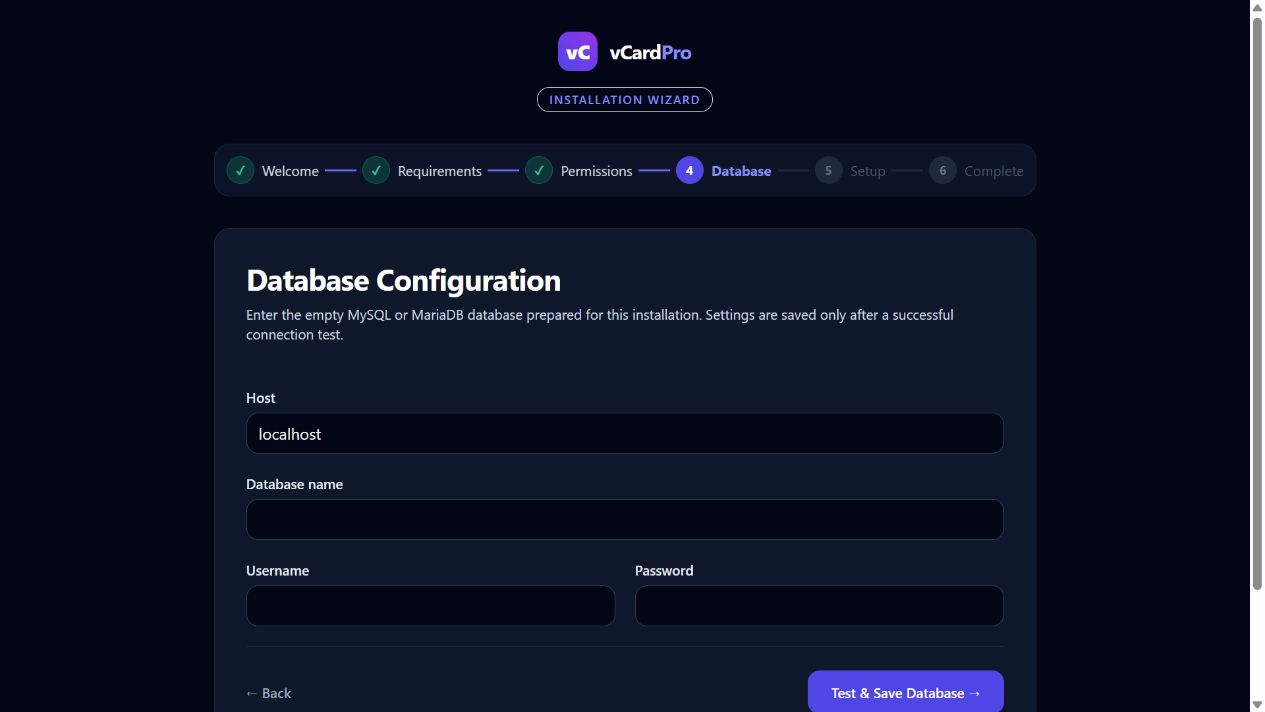
| Field | What to enter |
|---|---|
| Host | The database hostname supplied by your host. |
| Database name | The complete database name, including any hosting-account prefix. |
| Username | The database user assigned to this database, including any prefix. |
| Password | That database user’s password. This is not your hosting-panel password or your future Super Admin password. |
- Double-check the target database before submitting.
- Choose Test & Save Database. The application tests the connection before persisting the database settings to the environment file.
- If the connection fails, verify the database server, hostname, full names, password, and user privileges with your host; correct the fields and try again.
- If the connection passes but settings cannot be saved, return to the permissions issue instead of repeatedly changing correct credentials. A successful save takes you to Application Setup.
Note: Database type and port are present in the implementation but hidden in this build’s form. It supports MySQL/MariaDB and uses configured defaults (commonly port 3306). If your host uses a different port or needs a different connection selection, ask the installer maintainer or hosting administrator to configure it before testing. Do not look for a visible Port selector that this screen does not provide.
When returning to a successfully configured database step, the application can offer “Leave blank to keep the saved password.” Use that behavior only when the message is displayed; do not assume a blank password is correct for the first connection.
Application Setup#
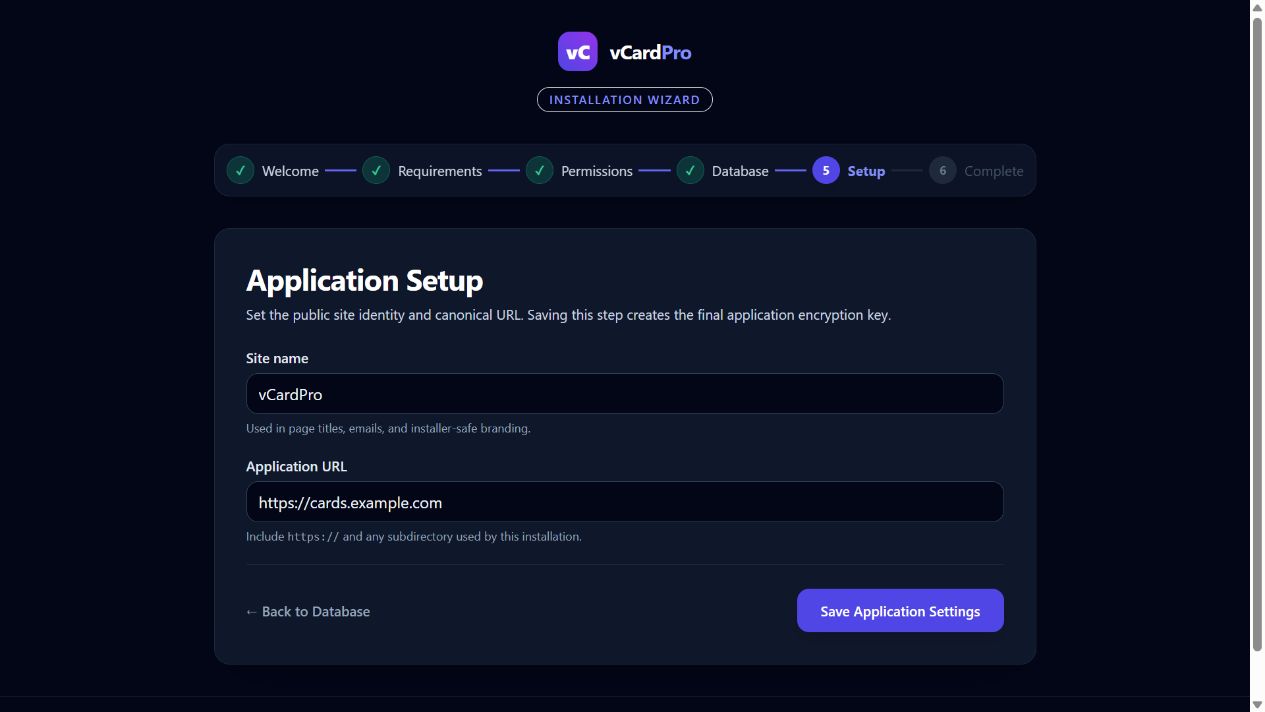
- Enter the Site name that should identify your platform in page titles, emails, and installer-safe branding.
- Enter the canonical Application URL, such as
https://cards.yourdomain.com. Include a subdirectory only if that is where the application will actually run. Do not include login credentials, a query string, or a fragment. - Choose Save Application Settings. The application saves its production identity, disables debug output, and creates the final encryption key.
- Continue to the Create Super Admin form. If you return to this step, its button may read Update Application Settings.
Important: Keep a secure backup of the final environment configuration, including APP_KEY. Do not publish it, reuse another site’s key, or regenerate it after installation as a troubleshooting shortcut; existing encrypted data can depend on it.
Create Super Admin#
Create the first account that will administer the entire platform. Use an email address you control and a unique, strong password; there is no public default login to copy from this guide.
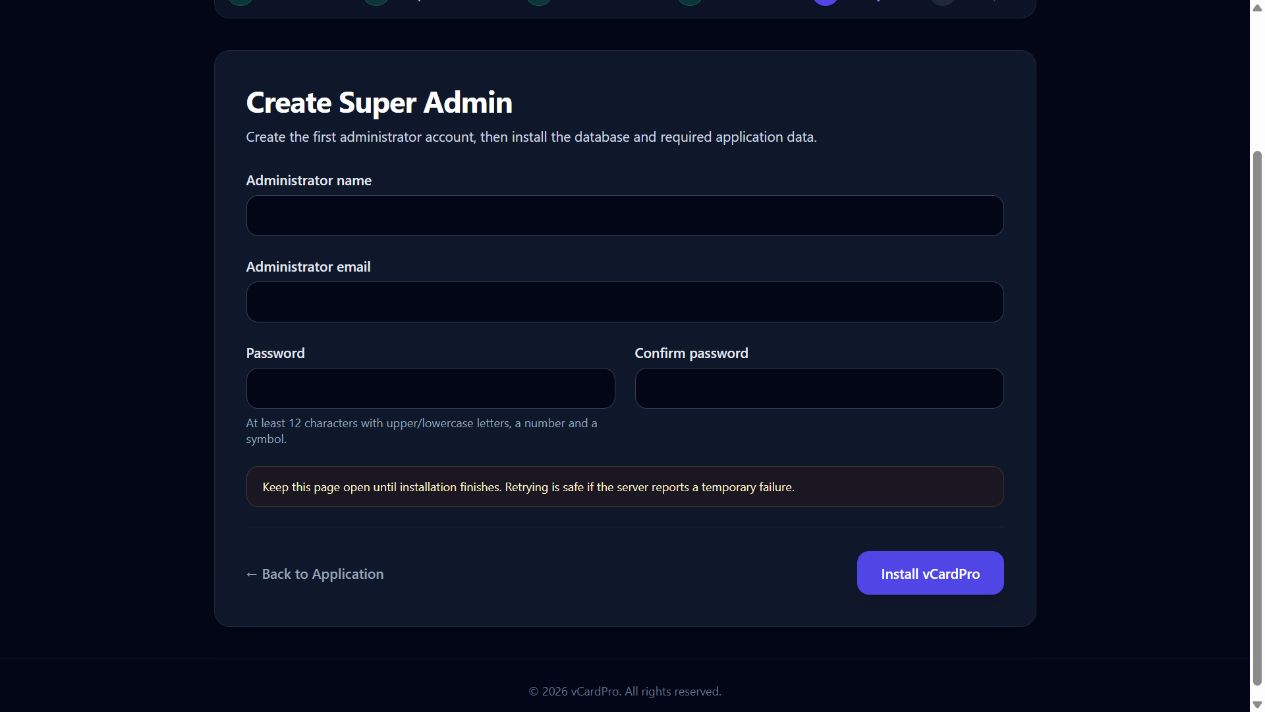
- Enter the Administrator name and Administrator email. Use a lowercase email address.
- Enter a password of at least 12 characters, containing uppercase and lowercase letters, a number, and a symbol. Repeat it exactly in Confirm password.
- Review the details, then choose Install vCardPro once. Keep the page open while the installation runs.
- The installer runs migrations, installs required reference data, creates the Super Admin, prepares/verifies public storage, and records successful installation. It does not populate customer demo tenants, invoices, payments, or tickets.
- If it reports a temporary failure, have the host resolve the underlying database, filesystem, or storage-link problem, then retry the existing setup. Do not clear the database or installation files to force a restart.
Note: The final setup action changes the database and creates privileged access. It was not executed for these screenshots. The preview shows the actual application form, not a newly completed installation.
Installation Complete#
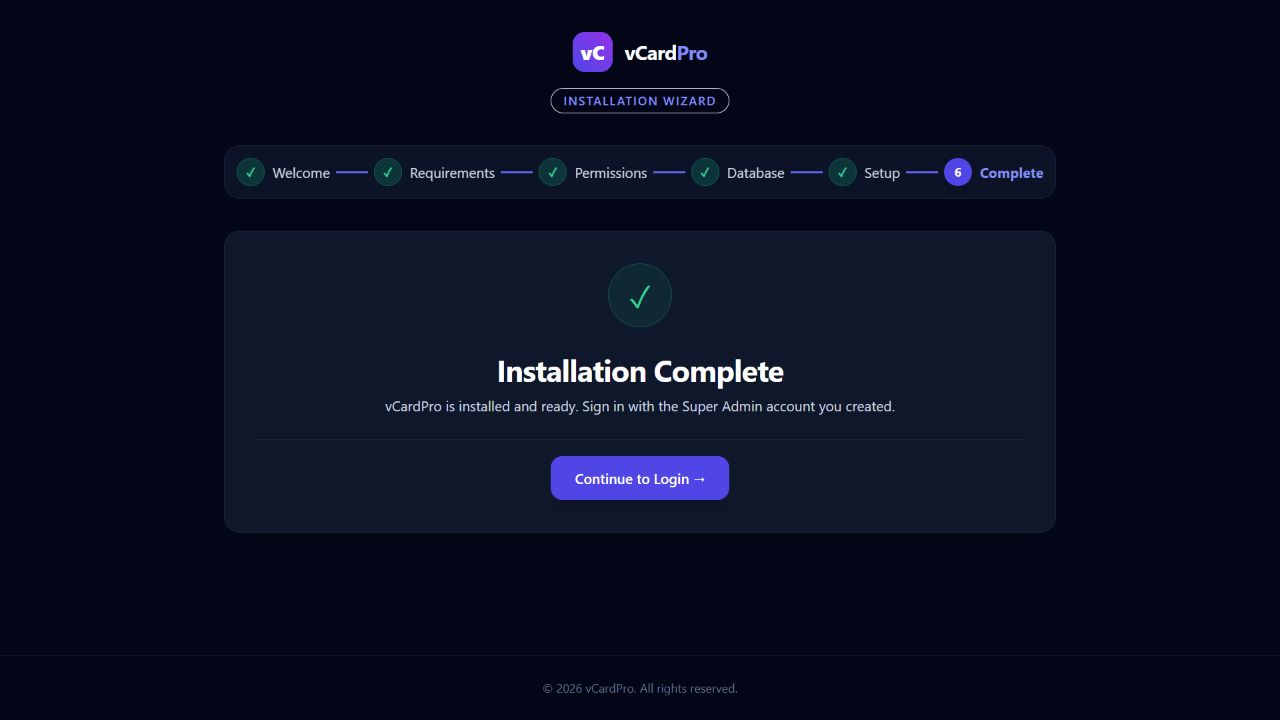
When your installation reaches this screen, choose Continue to Login and sign in using the Super Admin account you just created. Confirm that the Dashboard opens. Installer setup routes are blocked after a healthy installation, so you should not need to remove the installer lock manually.
Verify the first login#
- Check the site address and branding.
- Confirm the expected base plans, features, and template catalogue exist.
- Review Settings and configure business-specific defaults before onboarding tenants.
- Do not treat zero revenue, zero tenants, or an empty support queue as an installation failure; a fresh production installation intentionally starts without customer demo activity.
After Installation#
Configure the scheduler and queue worker#
Background tasks are part of the production setup. Ask your hosting administrator to run both the Laravel scheduler and a queue worker from the application directory, using the same compatible PHP runtime as the website. Replace the example filesystem path and PHP executable with your host’s values.
Scheduler cron entry, once per minute:
* * * * * cd /path/to/vcardpro && php artisan schedule:run > /dev/null 2>&1Persistent worker under your host’s process manager:
php artisan queue:work --sleep=3 --tries=3 --timeout=90If the host does not support a persistent worker, the project’s documented shared-hosting alternative is a once-per-minute cron that drains the queue and exits:
* * * * * cd /path/to/vcardpro && php artisan queue:work --stop-when-empty --tries=3 --timeout=90 > /dev/null 2>&1Note: Choose the worker arrangement appropriate to your host; the scheduler is still required. Without background processing, queued messages, invoice PDFs, subscription lifecycle tasks, and reminders may not complete.
Finish the platform configuration#
- Open Settings and verify the site URL, timezone, branding, language, currency, invoice prefix, registration choice, and default plan.
- Configure real email delivery and verify it with an approved test recipient. Log/Array mail drivers do not deliver production mail.
- Configure payment gateways and public webhook URLs only when ready to accept payments; use the intended test/live mode.
- Review Plans, feature values, template tiers, and Landing Page CMS content before advertising the service.
- Verify public media delivery and the storage link, HTTPS links, queued processing, and a representative tenant workflow.
- Set up recurring backups of the database, private environment configuration, and uploaded media. Keep backups and logs out of public web access.
Continue with the Dashboard and other Super Admin sections below for detailed instructions on each module.
Installation Troubleshooting#
| Problem | What to check |
|---|---|
| Composer reports PHP incompatibility before the wizard opens | Use the PHP version required by the supplied dependencies. This reviewed package requires PHP 8.3+, even though the wizard label says 8.2+. |
| Page not found or an unstyled wizard | Check the selected document root, rewrite rules, complete upload, and public/build assets. Verify that hidden .htaccess files were preserved on Apache. |
| Database connection could not be established | Confirm the database exists, the full prefixed database/user names are correct, the host/port is correct, and that user has access. Never paste database passwords into a public support post. |
| Settings verified but could not be saved | Check environment-file and application-directory write permissions and available disk space. |
| Final installation fails | Review server logs privately with the host. Check database schema privileges, writable runtime directories, and ability to create/verify the public-storage link. Retry only after correcting the underlying issue. |
| Installation State Could Not Be Verified | The database and installation metadata do not agree, or database state could not be confirmed. Verify connectivity and the correct database/configuration with the maintainer. Preserve the data and marker; do not delete them to bypass recovery protection. |
| Installer redirects to Sign In | A healthy completed installation prevents rerunning setup. Sign in instead of resetting the installation. |
| Login/session problems after setup | Use the final canonical HTTPS address. If necessary, start a fresh browser session after checking the domain and cookie configuration. Do not regenerate APP_KEY on a working installation. |
| Messages, PDFs, or renewal tasks do not run | Verify the configured mail transport, queue worker, scheduler, and any failed jobs rather than reinstalling. |
When requesting installation support, include the step, exact visible error, package version, PHP version, and hosting type. Remove passwords, tokens, APP_KEY, and private server paths from screenshots and diagnostic extracts.
Dashboard#
The Super Admin panel is the platform-wide control center. Use it to manage tenants, subscriptions, billing, templates, the public landing page, notifications, and support. Its records span all tenant workspaces; always check the tenant name before making a change.
Sign in and get oriented#
- Open your vCardPro website and choose Sign In. Enter your Super Admin email address and password, then choose Log in.
- Use the left sidebar to open a module. The page heading identifies the current screen. Sidebar group labels such as Billing and Configuration organize links; they are not separate pages.
- If sign-in fails, recheck your credentials. Use Forgot your password? when email delivery is configured, or ask the platform owner for assistance. Do not share your administrator password.
Read the dashboard#
| Area | How to use it |
|---|---|
| Tenants, users, and vCards | Check adoption and compare recent registrations with the workspaces you expect to exist. |
| Subscriptions and plans | Review active, trial, and expired subscription counts, then use Subscriptions for the underlying records. |
| Revenue and invoices | Compare paid invoices, revenue, outstanding balances, and overdue amounts. A payment attempt is not the same as a completed payment. |
| Support and gateways | Look for open, pending, or urgent tickets and check active versus disabled payment gateways. |
| Lower dashboard panels | Scroll to Recent Registrations, Subscription Overview, and Recent Activity for context behind the totals. |
Work with tables throughout the panel#
Use a page’s search box to narrow the list. Click sortable column headings to change the order, and use pagination to see additional records. Where available, Columns controls visible columns and Export offers the export formats supported by that table. Clear search and status filters before concluding that a record is missing. An empty table means no matching records were returned; it is not a request to create test transactions.
Profile, password, appearance, and sign out#
Open your name in the top-right corner and choose Profile. Profile Information and Update Password have separate Save buttons. For a password change, enter the current password, a new password, and its confirmation. Use the moon/sun control to switch appearance. Choose Log Out from the account menu when finished, particularly on a shared computer.
Important: Delete Account is permanent. It is not the way to sign out or disable a tenant. Download any information you need and confirm the consequences before deleting an account.
Notification Center — accessed from the bell#
Choose the notification bell to open Notification Center. Review existing notices and their target tenant or user. Choose Send Notification to compose a notice.
- Enter a concise title and select a type: Info, System Notice, Announcement, Billing, Subscription, Warning, Success, or Support.
- Select the target audience: Broadcast, Specific Tenant, or Specific User. For a targeted notice, select the intended recipient.
- Write the message, check the audience again, and choose Send Notification only when it is ready for delivery.
Important: Broadcast targets all tenants and users. Test a targeted notice first if you are verifying wording or delivery; never place passwords or payment secrets in a notification.
Plans#
Plans define pricing, billing cycles, trial periods, and feature entitlements. This list also shows plan totals, active/inactive counts, and monthly-equivalent recurring revenue. The names and prices in the screenshots are examples from this installation, not fixed product pricing.
Create a plan#
- Choose Create plan.
- Enter the plan Name and a unique Slug. Use a stable identifier, such as
business. - Set Price, Billing Cycle (Monthly, Yearly, or Lifetime), and Trial Days. Use zero trial days when no trial is intended.
- Choose Active or Inactive, configure the feature values below, then choose Save Plan.
- Return to Plans and verify the name, price, cycle, and status. If the page displays errors, correct the indicated fields before saving again.
Configure feature values correctly#
Each feature has a toggle and, when enabled, a value field. The value determines the entitlement; switching the toggle on alone is not sufficient. Use the following conventions for the built-in features.
| Feature code | Value to use | Meaning |
|---|---|---|
vcard_limit |
A non-negative number, such as 5, or unlimited |
The maximum number of tenant vCards. Inactive cards also count. |
custom_domain |
1 or 0 |
Enable or disable the custom-domain entitlement; domain setup is separate. |
premium_templates |
1 or 0 |
Allow or disallow selecting premium templates. |
remove_branding |
1 or 0 |
Allow or disallow removal of platform branding. |
nfc_sharing |
1 or 0 |
Allow or disallow the NFC-ready sharing controls. |
Important: The new-plan feature field may initially display true. Replace it with the correct numeric limit, unlimited, or 1/0 as appropriate. Do not assume the word “true” grants a working numeric quota or boolean entitlement.
Review, edit, or retire a plan#
Use the row’s view or edit action to inspect an existing plan. Recheck all feature values before saving changes to a plan already assigned to tenants. Use an inactive status when you need to stop offering a plan without intentionally deleting its record. The delete action requires particular care around existing subscriptions; review dependencies and any confirmation before proceeding.
Subscriptions#
A subscription connects one tenant to a plan and records its status and service period. Use this module to inspect or administratively manage that relationship. A subscription record, invoice, transaction, and payment attempt serve different purposes; do not treat one as proof of another.
Create an administrative subscription#
- Choose the create action in Subscriptions.
- Select the correct tenant and plan. Check the tenant’s existing subscription before adding another record.
- Set the start date/time and expiry date/time. Leave expiry blank only when no scheduled expiry is intended.
- Choose the available status and save. Reopen the record to verify the assignment and dates.
Important: An administrative assignment is not evidence that money was received. Reconcile paid service with Invoices, Transactions, and Payment Approvals as appropriate.
View and edit a subscription#
Open a subscription to review its tenant, plan, billing cycle, status, start, and expiry. Choose Edit to correct the fields. The form offers Active, Canceled, and Expired states; choose the state that reflects the actual service decision. Do not cancel or expire a tenant’s service simply to remove a row from the list.
Transactions#
Transactions is the platform-wide financial activity register. It shows summary amounts and a searchable table of transaction reference, tenant, amount, type, gateway, status, and date.
Find and reconcile a transaction#
- Search using a known reference or tenant and inspect the matching row.
- Compare the amount and currency with the relevant invoice and payment attempt.
- Check the transaction status and date, not only the fact that a record exists. Use the displayed record action when details are available.
- Use the table’s export control when you need an offline reconciliation record, and store that export securely.
When a payment does not appear#
Check Payment Approvals for manual transfers, Notification Logs for related delivery issues, and the payment provider’s confirmed result through your normal finance process. Refresh after processing completes. Do not approve a second payment or request another transfer solely because a list is temporarily empty. The demonstration environment had no transactions, so no completed transaction was simulated for this guide.
Invoices#
Invoices records billing documents and their lifecycle. Search by invoice details and use the status filter to narrow Draft, Issued, Paid, Overdue, Cancelled, or Void records. Export is available from the list.
Review an invoice#
- Open the invoice using its row action.
- Check the billed tenant/customer, invoice number, currency, issue and due dates, line items, tax, and total.
- Use the PDF download action to retain or share the billing document through your approved process.
Understand invoice actions#
| State or action | How to use it |
|---|---|
| Draft / Issue | A draft has not yet been issued. Review the billing details before using Issue. |
| Issued | A billing document has been issued and is not yet recorded as paid. |
| Overdue | Payment is past the due date; investigate before following up. |
| Mark Paid | Offered on issued or overdue invoices. Use only after independently confirming the payment. |
| Paid | The invoice has been recorded as settled. |
| Cancelled / Void | Non-payable lifecycle states visible in the filter. Do not pay or recreate these without reviewing their history. |
Note: The invoice list was visited, but this installation contained no invoices. Detail and status-action instructions were checked against the application’s invoice screens and handlers; no invoice was issued or marked paid during documentation.
Payment Approvals#
Use this queue to review manual bank-transfer payment attempts awaiting a decision. It is not a shortcut for approving card or PayPal payments.
Review a manual transfer#
- Open an available attempt and confirm the tenant, invoice/reference, amount, currency, gateway, and status.
- Download or view the submitted proof. Compare it with your actual bank records; an uploaded receipt alone is not confirmation that funds arrived.
- If the transfer is valid, add relevant notes and use Approve. Manual approval requires an uploaded proof file that is still available.
- If you reject the attempt, enter a clear reason (up to 255 characters), then confirm the rejection.
- Recheck the attempt, related invoice, and subscription after processing.
Important: Approval changes financial records and may enable service. Do not approve missing proof, a duplicate transfer, or an amount that has not been verified. The guide does not include a staged payment or fake proof image.
Tenants#
A tenant is a separate customer workspace. Tenant account details, the workspace’s primary administrator, and the optional initial subscription are created together here.
Create a tenant and its administrator#
- Choose the create action. Enter the tenant name, unique URL slug, email, phone, and active status. The slug is shown under the site’s
/t/address pattern. - Enter the primary administrator’s name and email. Set a strong initial password and repeat it in the confirmation field. The administrator email is used to sign in.
- If you want service assigned immediately, select an initial plan. Review the selected plan’s quota and entitlements first.
- Save the tenant and open its details. Verify the organization, slug, administrator, and status.
- Provide the login address and initial credentials to the intended administrator through a private channel. Never include real credentials in public documentation.
Inspect or edit a tenant#
The detail screen identifies the tenant, workspace URL, status, primary administrator, and creation/update timestamps. Edit allows changes to the tenant and administrator details. Leave the password field blank when keeping the existing administrator password.
Check the initial subscription#
If you assigned an initial plan, open Subscriptions and verify the generated service period. In this build, a free or lifetime plan is created without a scheduled expiry; paid monthly/yearly initial assignments use the corresponding service period. Confirm dates on the record instead of assuming all plans expire monthly.
Important: Changing tenant status or removing a tenant can affect the entire workspace. Check ownership and business impact first. Disabling a tenant is different from logging out its administrator.
Payment Gateways#
This page controls the payment methods the platform can offer. The current installation includes Manual Bank Transfer, Stripe, and PayPal. Each gateway has its own edit action, Active setting, and Sandbox setting.
Set up a gateway safely#
- Open the gateway’s Edit action.
- Check its display name, Active state, and Sandbox state. Use test credentials in sandbox mode and live credentials only for an intentional production setup.
- Enter that gateway’s required settings, save, and return to the list to verify its state.
- Arrange an approved end-to-end payment test before offering the method to customers. An Active switch alone does not prove provider connectivity.
Manual Bank Transfer#
Enter the payment instructions customers should follow. Complete the bank name, account name, account number, and routing/SWIFT information as applicable. Ensure the instructions identify how a customer should reference the payment. Proof submissions are reviewed in Payment Approvals.
Stripe#
Enter the Stripe secret key and webhook secret for the intended environment. The page displays the application webhook URL; use that exact URL when arranging the provider integration. A local .test address is a development address, not a publicly reachable production webhook endpoint.
PayPal#
Enter the client ID, client secret, and webhook ID for the intended environment. Use the webhook URL displayed by the application. Verify the environment and callback configuration with the person responsible for the payment-provider account.
Important: Keys and webhook secrets are confidential. Do not paste them into support tickets, screenshots, HTML guides, or public WordPress posts. Do not change live credentials while documenting the panel.
Features#
Features is the registry of entitlement names and codes that plans can use. For example, the user-facing name “vCard Limit” corresponds to vcard_limit. The code is the technical identifier; the name is what people read.
Create or edit a feature definition#
- Choose the create action or edit an existing feature.
- Enter a descriptive Name, a unique Code, and a short Description explaining what the feature controls.
- Save, then open Plans to configure that feature’s value for each relevant plan.
Important: Adding a registry entry does not implement a new capability in the software. New feature codes need corresponding application support. Do not rename or delete built-in codes without a developer reviewing their use in plans and entitlement checks.
vCard Templates#
The template catalogue lets the Super Admin classify the supplied vCard designs as Free or Premium. This installation contains 20 designs, with a preview, category, current tier, and usage information.
Change a template tier#
- Find the template and inspect its preview and current usage.
- Choose Free or Premium in that template’s tier selector.
- Choose Save Tier for that row. Review the resulting tier before editing another template.
- Check the tenant gallery: premium selection depends on the tenant plan’s
premium_templatesentitlement.
Note: This screen manages the catalogue’s access tiers; it does not provide a custom-template upload or visual template-code editor. The application can retain a tenant’s existing premium selection after eligibility changes, so do not assume changing a tier immediately replaces every existing card design.
Landing Page CMS#
Landing Page CMS edits the public marketing homepage. Work through the six tabs, then choose Save Landing CMS Settings. Use Preview Homepage to inspect the result. Switching tabs is not a substitute for saving.
Important: Saving changes updates public-facing content. Replace demonstration testimonials and contact details with approved information before launch. Do not promise a feature merely because it appears in marketing copy.
Hero & Visibility#
Edit the hero badge, title, and subtitle. Use the section visibility controls to show or hide the hero, template showcase, features, pricing, testimonials, FAQs, and contact section. Hiding a section changes the homepage presentation, not the underlying product capability.
Check before saving#
Keep the title concise, make the subtitle explain the product benefit, and preview the homepage at narrow and wide browser widths. Check that enabled sections have complete content.
Featured Templates#
Choose the catalogue templates to highlight on the homepage. The UI recommends featuring six to eight designs. Mix relevant categories and confirm that your selection represents the plans you actually offer.
Note: Featuring a design does not change its Free/Premium tier. Manage access tiers in vCard Templates.
Features Grid#
Choose Add Feature Item to add a homepage feature. Enter its title, supported icon key, and description. Use Remove on the intended item to remove it from the page, then save the CMS settings. Keep descriptions aligned with the released software.
Testimonials#
Choose Add Testimonial, then enter the person’s name, role, company, and quote. Review spelling and permission to publish the quote. Remove placeholder testimonials before using the homepage for a real business.
FAQs#
Choose Add FAQ Item, enter a question and its answer, and remove obsolete entries. Answer the customer’s question directly and avoid claiming functionality that the tenant interface does not yet expose.
Important: The default homepage copy says customers can switch plans. In the reviewed tenant Subscription Center, plan switching and proration are explicitly deferred. Update that FAQ to match the service you currently provide.
Contact Info#
Enter the support email address, phone contact, and office address to display publicly. Use monitored business contact channels rather than private staff details. Save the CMS settings and use Preview Homepage to check the displayed contact section.
Settings#
The Configuration Center contains eleven category links. Open a category, edit its fields, and use that page’s Save Changes button. These are platform settings; tenant-specific settings live in the tenant panel. Save before leaving a category.
Note: A saved setting is not always a complete integration. Mail transport, public DNS, HTTPS, queue workers, and payment-provider accounts can also require server-side configuration.
General#
| Field | What to enter |
|---|---|
| Site Name | The platform name displayed by the application. |
| Company Name | The business/operator name. |
| Site URL | The correct application base URL, beginning with http:// or https://. Use the real public HTTPS address in production. |
| Timezone | The intended platform timezone; verify the identifier and the effect on displayed dates. |
Important: Do not replace a working Site URL casually. Incorrect host or scheme values can affect generated links and callbacks.
Branding#
Upload the primary logo and favicon, and set the primary brand color. The UI recommends a 250 × 50 logo with a maximum size of 2 MB, and a square 32 × 32 favicon. Use a valid hexadecimal color such as #4F46E5. Check contrast against light and dark backgrounds.
Localization#
Choose the default language and, where needed, enable right-to-left layout. Language availability depends on the translation resources installed with the application. Verify key screens after saving; selecting a language does not create missing translations.
Billing#
Choose the default currency and currency-symbol position, set the global tax percentage, and define the invoice prefix. Enter tax as a percentage value: for example, enter 20 for 20%, not 0.20. Coordinate tax configuration with the person responsible for your billing rules.
Note: Changing defaults does not by itself prove that historical invoices were recalculated. Check a new billing document before relying on a changed default.
System#
Use Public Registration to control whether new visitors can register. Set the default plan slug to the exact identifier of an appropriate active plan, such as free when that is your intended entry plan. Verify the plan in Plans before saving.
Mail#
Select the mail driver and set the sender name and sender email. SMTP is for configured email delivery. Log (Local Development) records messages instead of delivering them, and Array (Testing) is for testing. The screen does not expose all SMTP host/port/credential settings; ask the server administrator to configure the transport when needed.
Important: Do not assume password resets or billing emails are being delivered when the driver is Log or Array. Verify with an approved test recipient.
Security#
Set the maximum failed login attempts according to your access policy. Avoid weakening this protection merely to work around an account issue. If a legitimate user cannot sign in, investigate their credentials and any lockout condition first.
Notifications#
Enable or disable the mail and database/in-app notification channels and configure notification-log retention. A retention value of zero keeps logs indefinitely. Consider storage growth and your organization’s retention policy before using indefinite retention.
Queue#
Set retention for failed jobs and job batches. Execution logging is optional and can produce a high volume of records; enable it only when the additional diagnostic detail is useful. Configure execution-log retention as well. The displayed defaults in this installation are 90 days for failed jobs, 7 days for batches, and 30 days for execution logs.
Note: Retention settings do not start a worker or scheduler. Use Queue Monitoring and your server-management process to check background processing.
Tools#
Tools shows configuration diagnostics and settings export/import utilities. Read diagnostic results and investigate warnings before changing settings.
Back up or restore settings#
- Download a settings export before a major configuration change. Store it as potentially sensitive configuration data.
- For an import, select an appropriate settings-export file. Review whether Replace existing is selected.
- Import only a trusted file intended for this installation. Replacement can overwrite working values.
- Reopen the affected categories, check critical values, and rerun the diagnostics.
Inventory#
Inventory is the table view of stored setting groups, keys, values, types, and update times. It provides a group filter, export/column controls, and settings export/import access. Prefer the named category forms for routine edits because they explain each field.
Important: During this review, Inventory returned an “Invalid JSON response” table warning. If this occurs, use the working category pages and report the Inventory error to the application maintainer. No inventory rows were verified through the failed table.
Notification Templates#
Notification Templates controls reusable messages generated by application events. The reviewed registry has Billing, Core, and Support groups covering invoice events, subscription events, account messages, system notifications, tenant creation, and support-ticket activity.
Edit a message template#
- Open the intended event template; check the event name so you do not edit a different message with similar wording.
- Update the subject and HTML content. Preserve required placeholders and use only variables offered for that event.
- Review whether the template is Active and whether Mail and/or Database channels are enabled.
- Save the template. If using Send Test, choose an authorized recipient and review the rendered message before relying on it for real events.
Use placeholders without breaking the message#
Placeholders use double braces, such as {{tenant_name}}, {{invoice_number}}, {{amount}}, {{due_date}}, and {{company_name}} in the invoice-created template. Variables differ by event, so do not copy a variable into an unrelated template without checking its available list.
Note: In the reviewed build, some variable-insertion buttons display raw template code instead of friendly tokens. Preserve the existing valid double-brace placeholders or type the supported token manually, and report malformed buttons to the maintainer.
Notification Logs#
Use Notification Logs to inspect attempted deliveries and troubleshoot why a recipient did not receive a message. The status filter includes Pending, Processing, Sent, Failed, and Skipped. The channel filter also lists several channel types; a listed type does not prove that its delivery integration is configured.
Investigate a missing message#
- Find the relevant recipient/event using the available filters and search controls.
- Check the status: Pending or Processing may indicate background work; Failed needs investigation; Skipped may reflect channel/template rules.
- Verify the template is active and the desired channel is enabled in both the template and Settings.
- For email, confirm the mail driver and sender setup. For delayed processing, inspect Queue Monitoring.
- Inspect any available detail/error information. Retry only when the underlying problem is understood and duplicate delivery is acceptable.
Note: A “Sent” application log should not be treated as proof that a person read a message. Check the configured delivery channel and provider outcome when delivery assurance matters.
Queue Monitoring#
Queue Monitoring gives a background-processing overview: queue health, failed jobs, recent failures, pending/failed batches, and scheduler inventory. The reviewed page’s top title says Dashboard, but the sidebar entry is Queue Monitoring.
Review and recover failed processing#
- Look for failed-job or failed-batch counts and open any available diagnostic detail.
- Identify the underlying cause, such as unavailable mail transport, invalid configuration, or a stopped worker. Ask the server administrator to resolve infrastructure problems.
- Use a retry control only when rerunning the job is appropriate. Some jobs can produce another message or repeat an external action.
- Confirm the failure clears and the intended business outcome completes.
Important: Delete or flush actions remove diagnostic records; they do not fix the failure that caused them. Preserve useful error information first. A PASS badge or an empty failed-job table alone is not proof that the server worker and scheduler are running correctly.
Activity Logs#
Activity Logs provides an audit trail of actions recorded by the platform. Use it when investigating a login, administrative change, or unexpected record update. Search for the relevant user/event and compare timestamps with the affected business record.
Read logs in context#
Check who performed the action, what event was recorded, and when it happened. System-generated activity may not have a normal user name. A repeated event may require investigation rather than assuming a single human action. Some descriptions in this installation appear as translation keys; include the event and timestamp when reporting that issue.
Important: Audit logs can contain personal and operational information. Restrict exported copies and avoid posting real customer logs in a public guide or support forum.
Support Tickets#
Support Tickets is the platform-wide help queue. The list identifies the ticket number, subject, tenant, category, priority, status, assignee, and creation time. Search, sort, export, or adjust columns to organize the work.
Handle an incoming ticket#
- Open the ticket and confirm the tenant and original request. Read the whole conversation and relevant attachments before replying.
- Assign it to the appropriate available Super Admin when ownership is needed.
- Write a clear response and attach only the files necessary to resolve the issue. Submit the reply when it is ready for the tenant.
- Set the appropriate status: Open, Pending, Answered, or Closed. Use Close after resolution, or Reopen when further work is required.
- Return to the queue and verify status and ownership.
Attachments and safe support practice#
The application accepts PDF, JPG/JPEG, PNG, WebP, TXT, CSV, DOC/DOCX, XLS/XLSX, and ZIP attachments, up to 10 MB per file. Do not ask tenants to attach passwords, secret keys, or full payment-card details. Treat received files as untrusted and use your organization’s safe file-review process.
Note: No tickets existed during the walkthrough. The list was visited, and reply, assignment, status, close/reopen, and attachment instructions were checked against the ticket implementation. No support message was sent solely to populate screenshots.
Need a hand?
Our support team can help you continue.
Tell us which step you are on and include a screenshot when possible.