SalePro + SalePro SaaS (All-in-one solution)
Revolutionize the way you run your software subscription business with SalePro SAAS, the ultimate software as a service (SaaS) solution for inventory management, point of sale (POS), and accounting.
This guide explains the SalePro SaaS Super Admin area—the central workspace used to manage tenants, subscription packages, payments, marketing content, support, affiliates, platform settings, themes, and add-ons. It intentionally excludes tenant-side POS and business operations.
New installation? Start with Server requirements and Installation in the Documentation section. Existing operators can go directly to the sidebar sections below.
Sign in: Open /superadmin-login, enter the Super Admin username and password created during installation, and select LogIn. Keep Super Admin credentials private and use a strong replacement password after the initial setup.
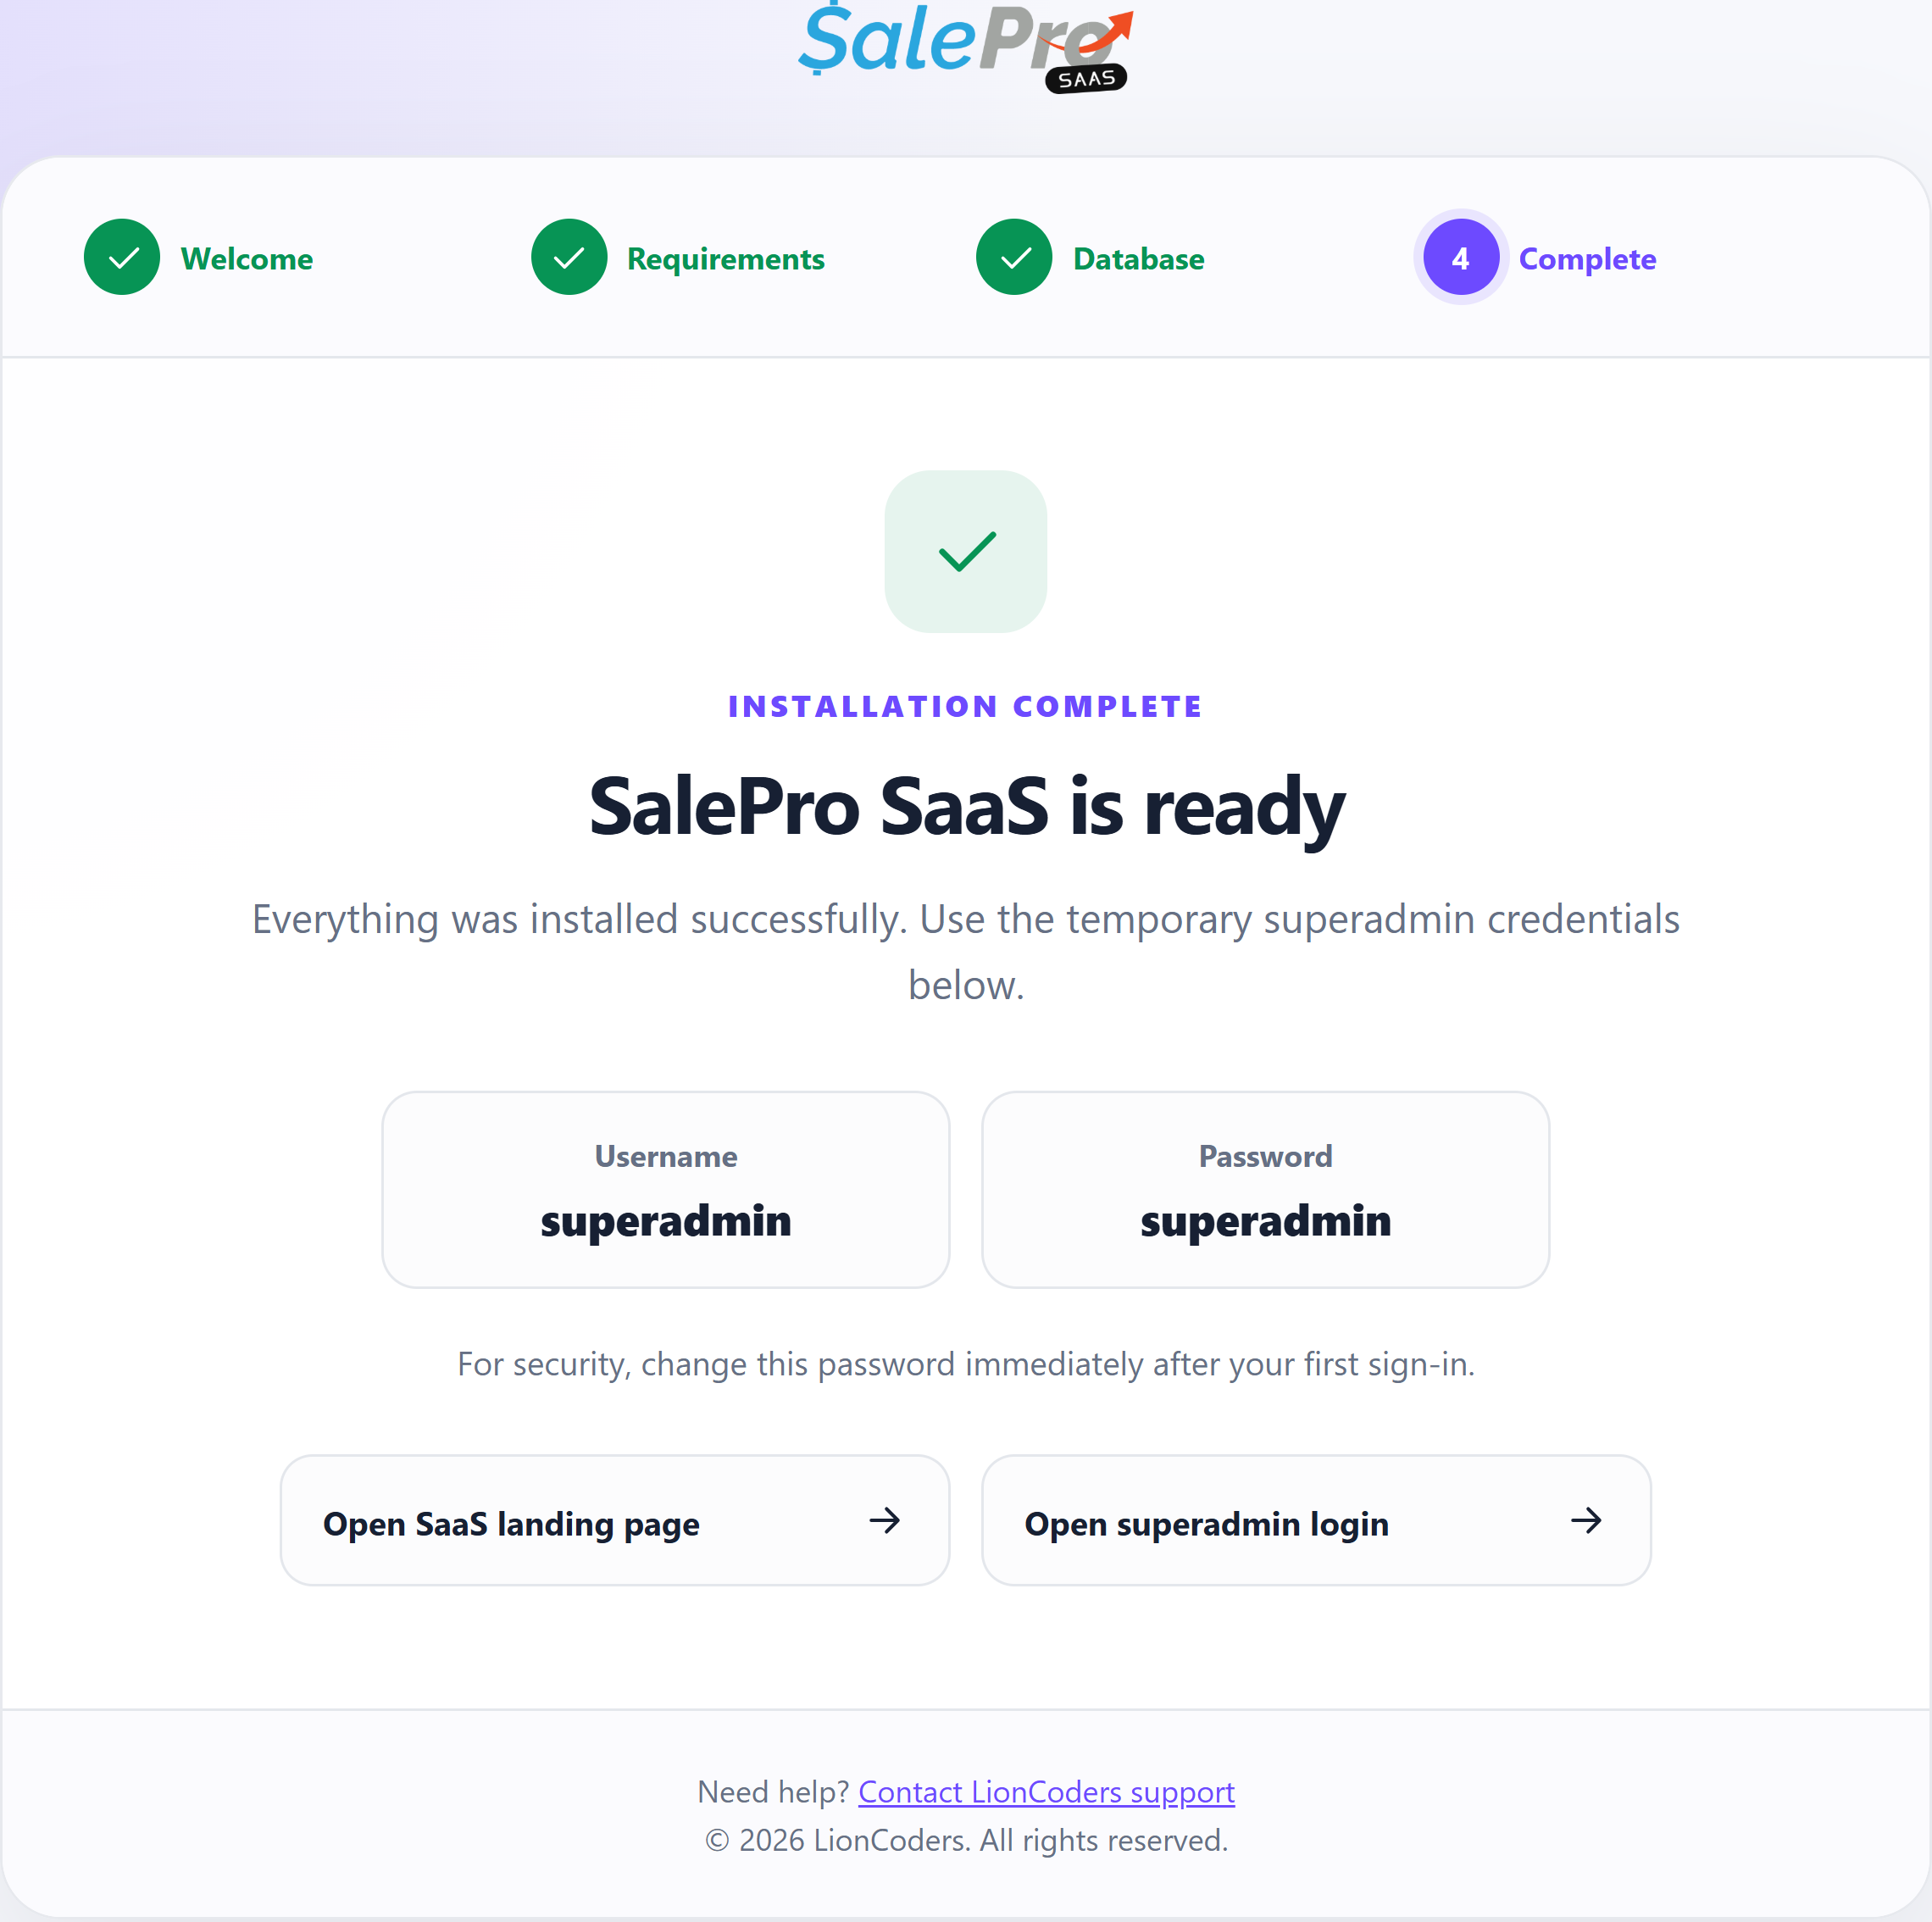
The current installer supplies the temporary username superadmin and password superadmin. These defaults apply only to an unchanged fresh installation. Replace the password immediately after signing in and never include real credentials in published screenshots.
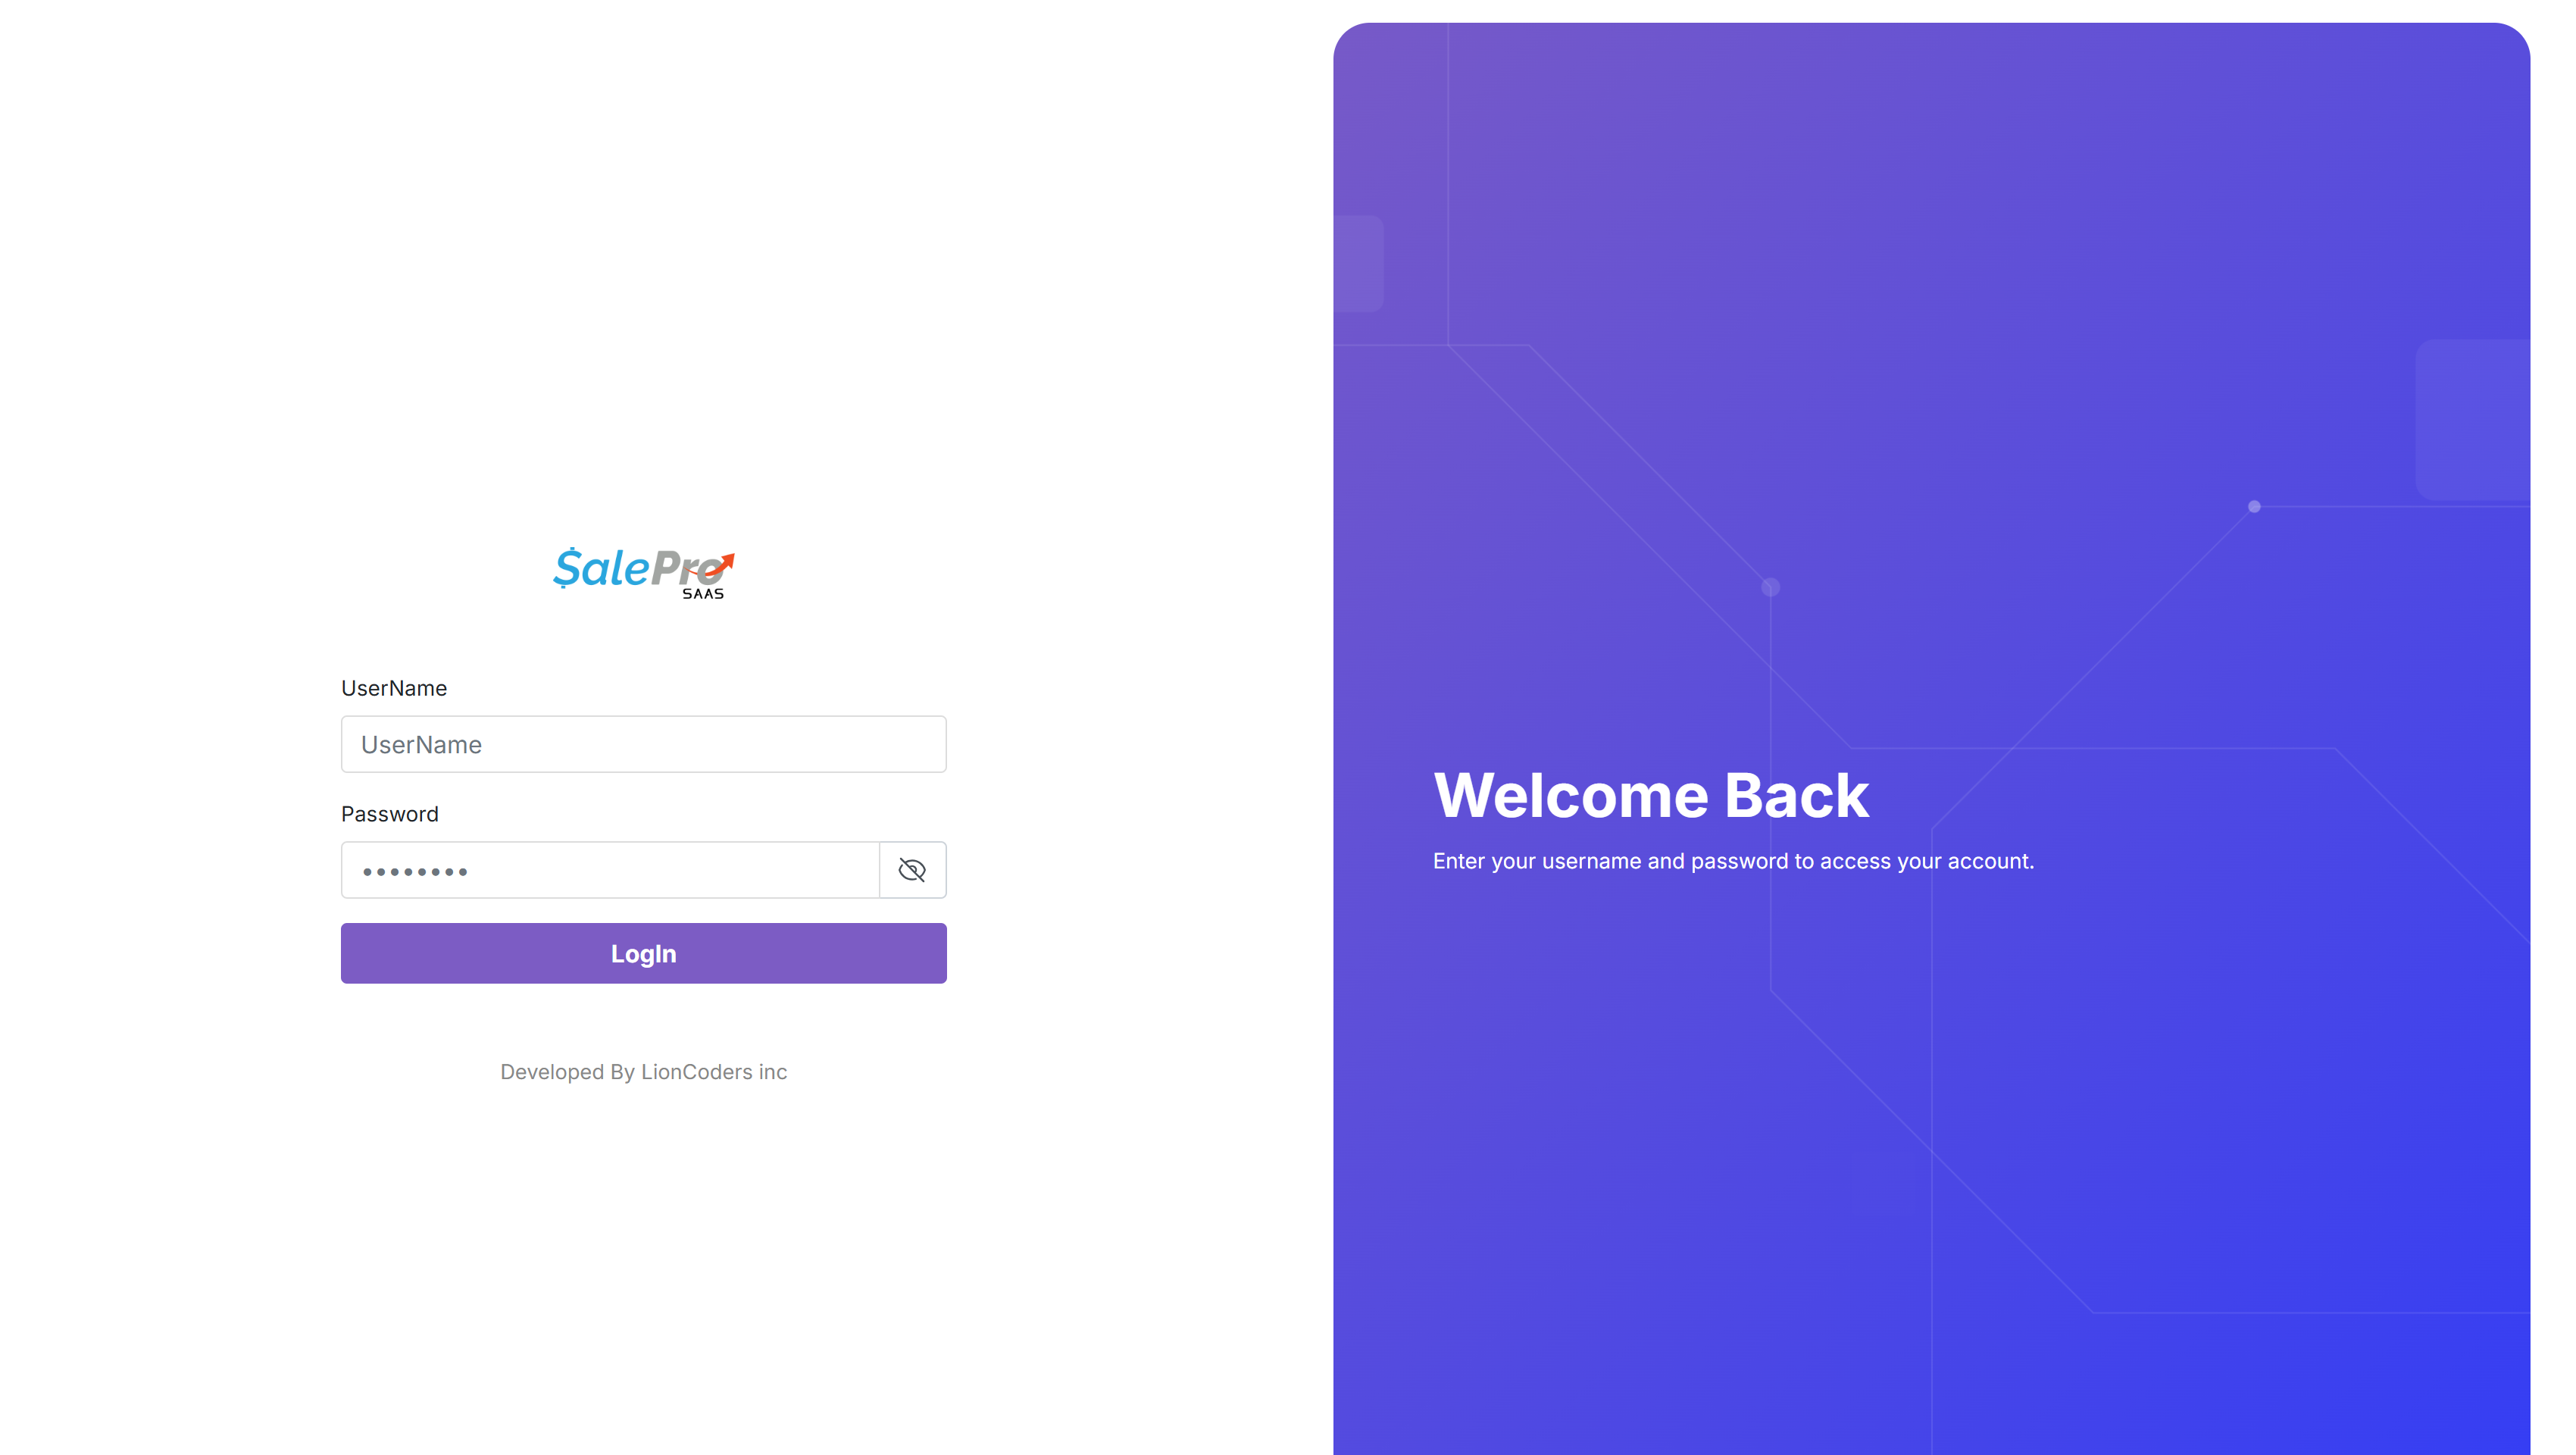
Interface conventions: Fields marked with an asterisk are required. List pages commonly provide record-count controls, search, pagination, export buttons, column visibility, and an Action menu. Save only after checking the selected language, plan, tenant, payment provider, or theme target.
Dashboard#
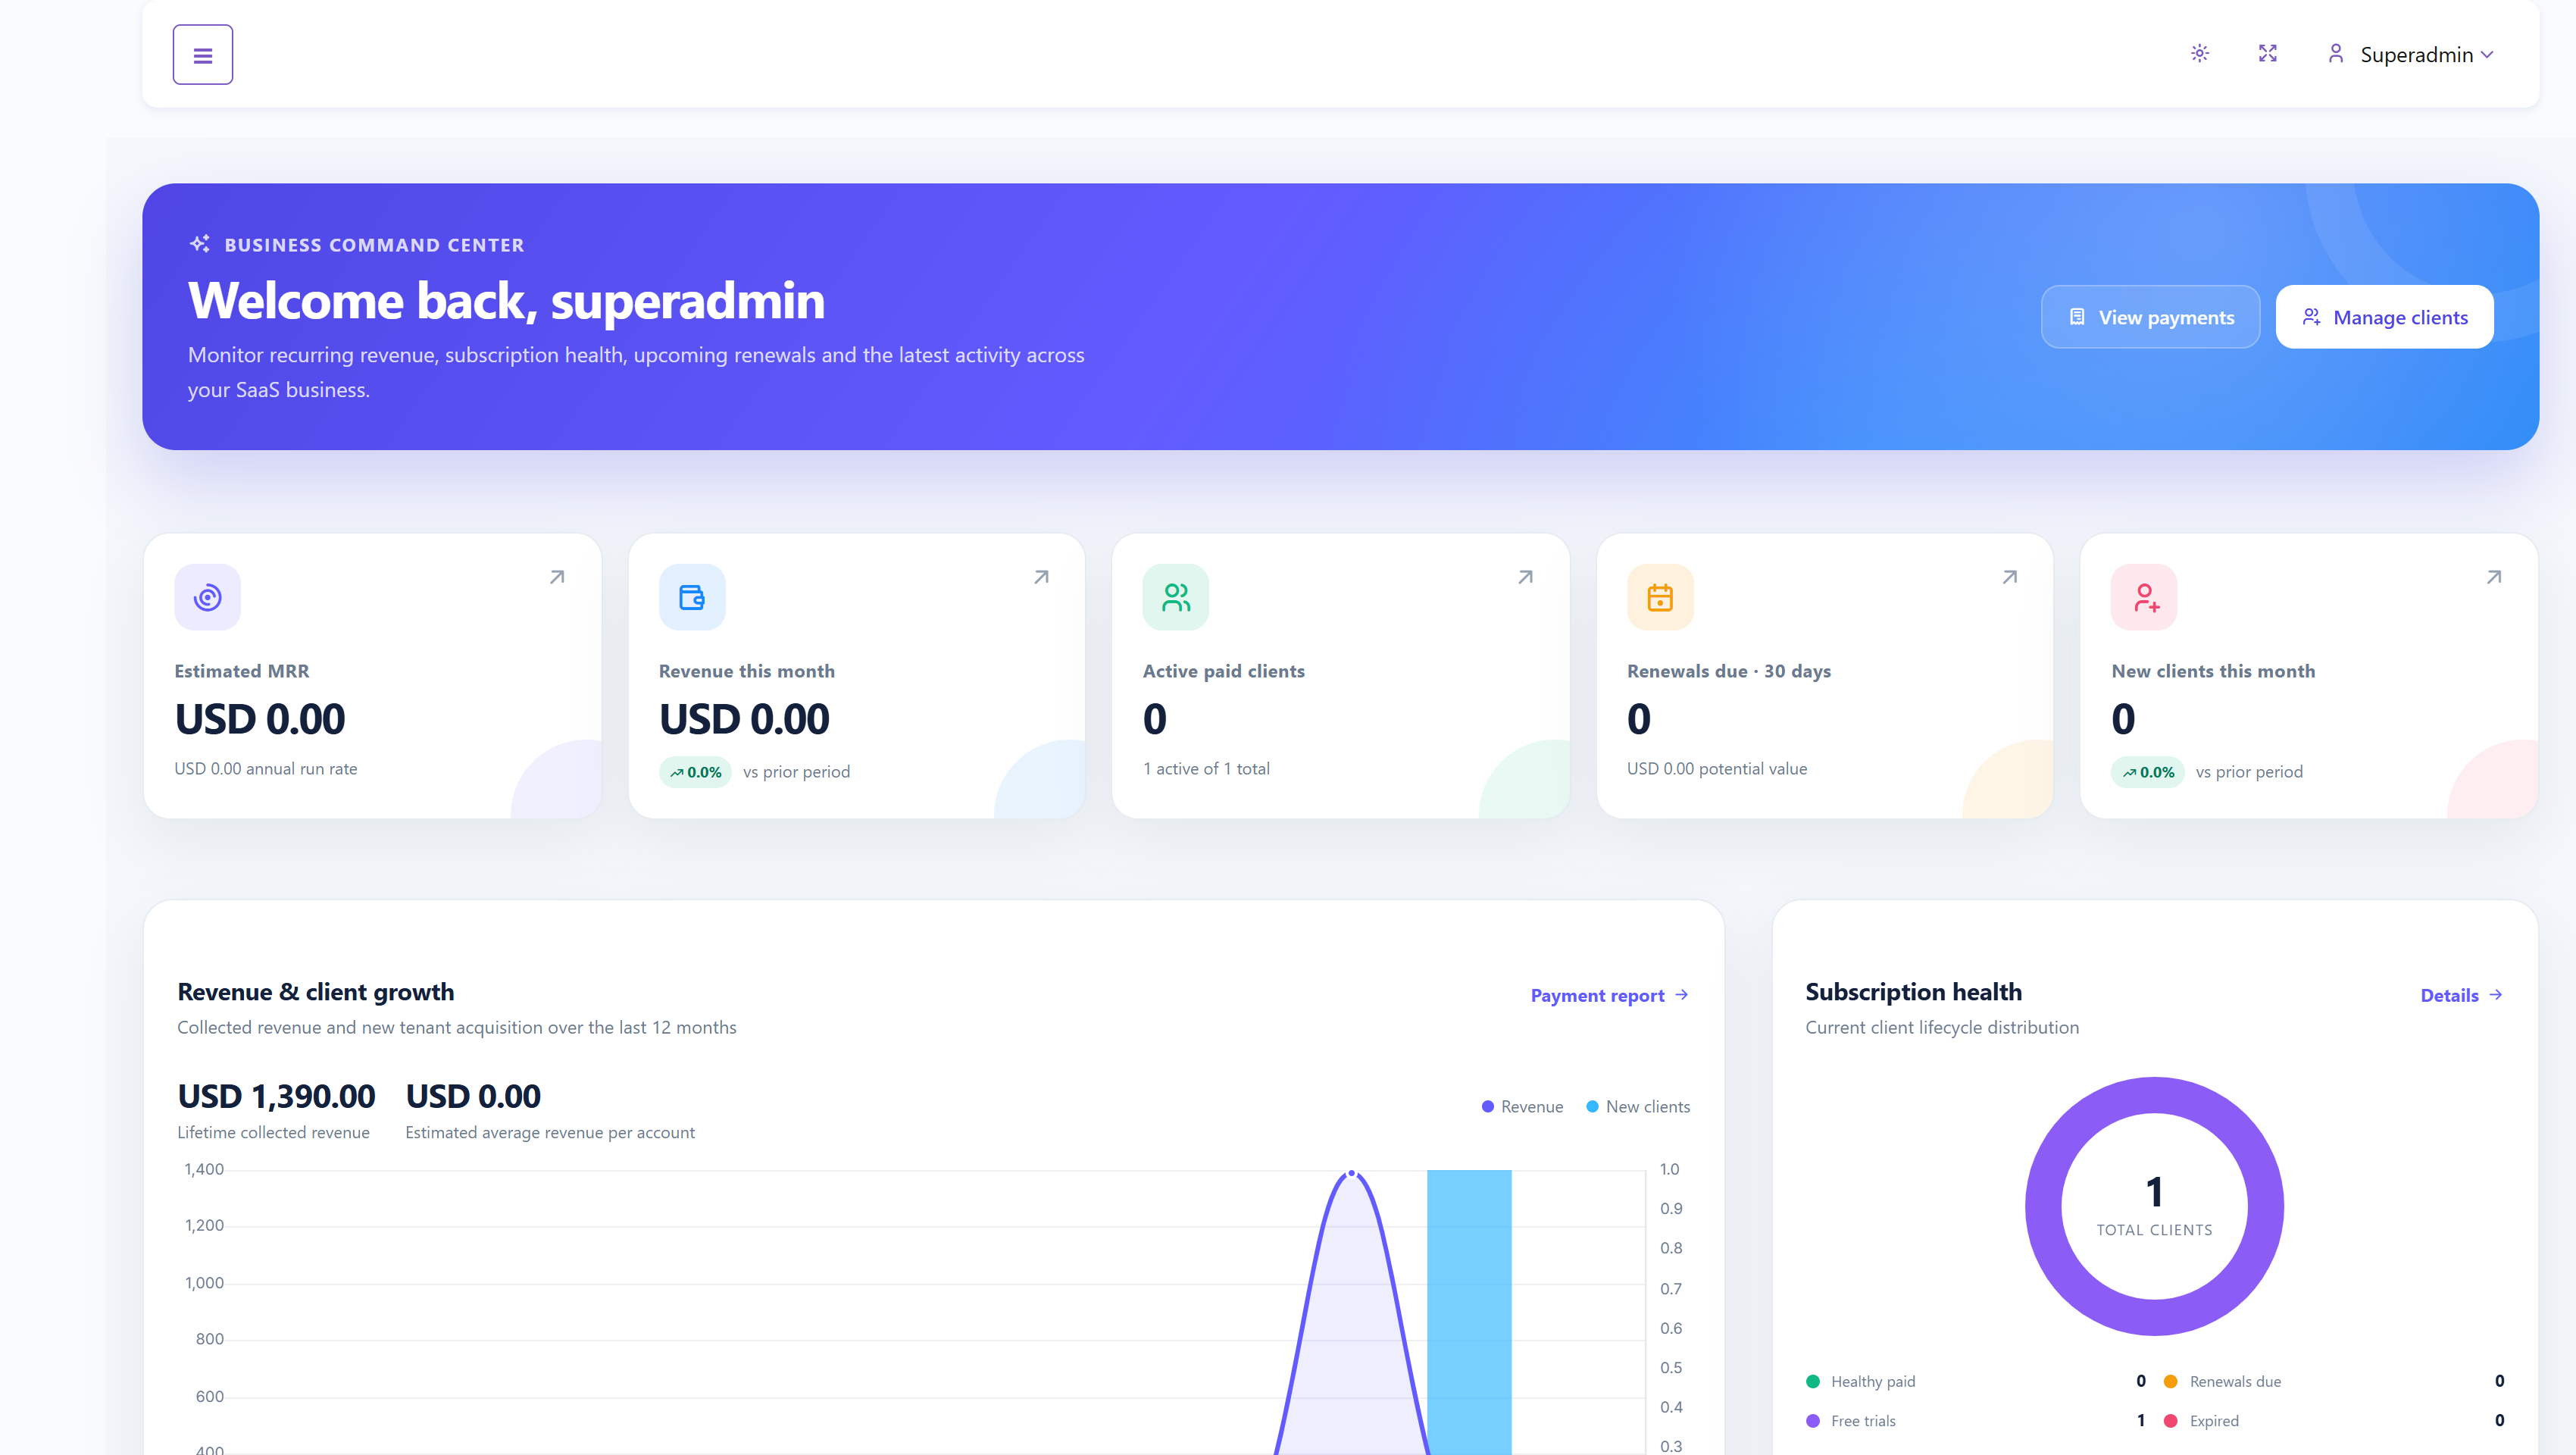
The Dashboard is the Super Admin command center. It summarizes subscription revenue, client health, upcoming renewals, recent activity, and items needing attention.
Reading the business metrics#
- Estimated MRR estimates monthly recurring revenue from active paid subscriptions.
- Revenue this month shows successful collections recorded during the current month.
- Active paid clients compares paid active tenants with the total client count.
- Renewals due identifies paid subscriptions expiring within the next 30 days.
- New clients this month tracks recent tenant acquisition.
- Revenue & client growth, Subscription health, and Plan performance visualize business trends and plan contribution.
- Recent payments, Newest clients, and Operational pulse provide shortcuts to records that may need review.
Select links such as View payments, Manage clients, Payment report, or Packages to open the corresponding administration page.
Header and account controls#
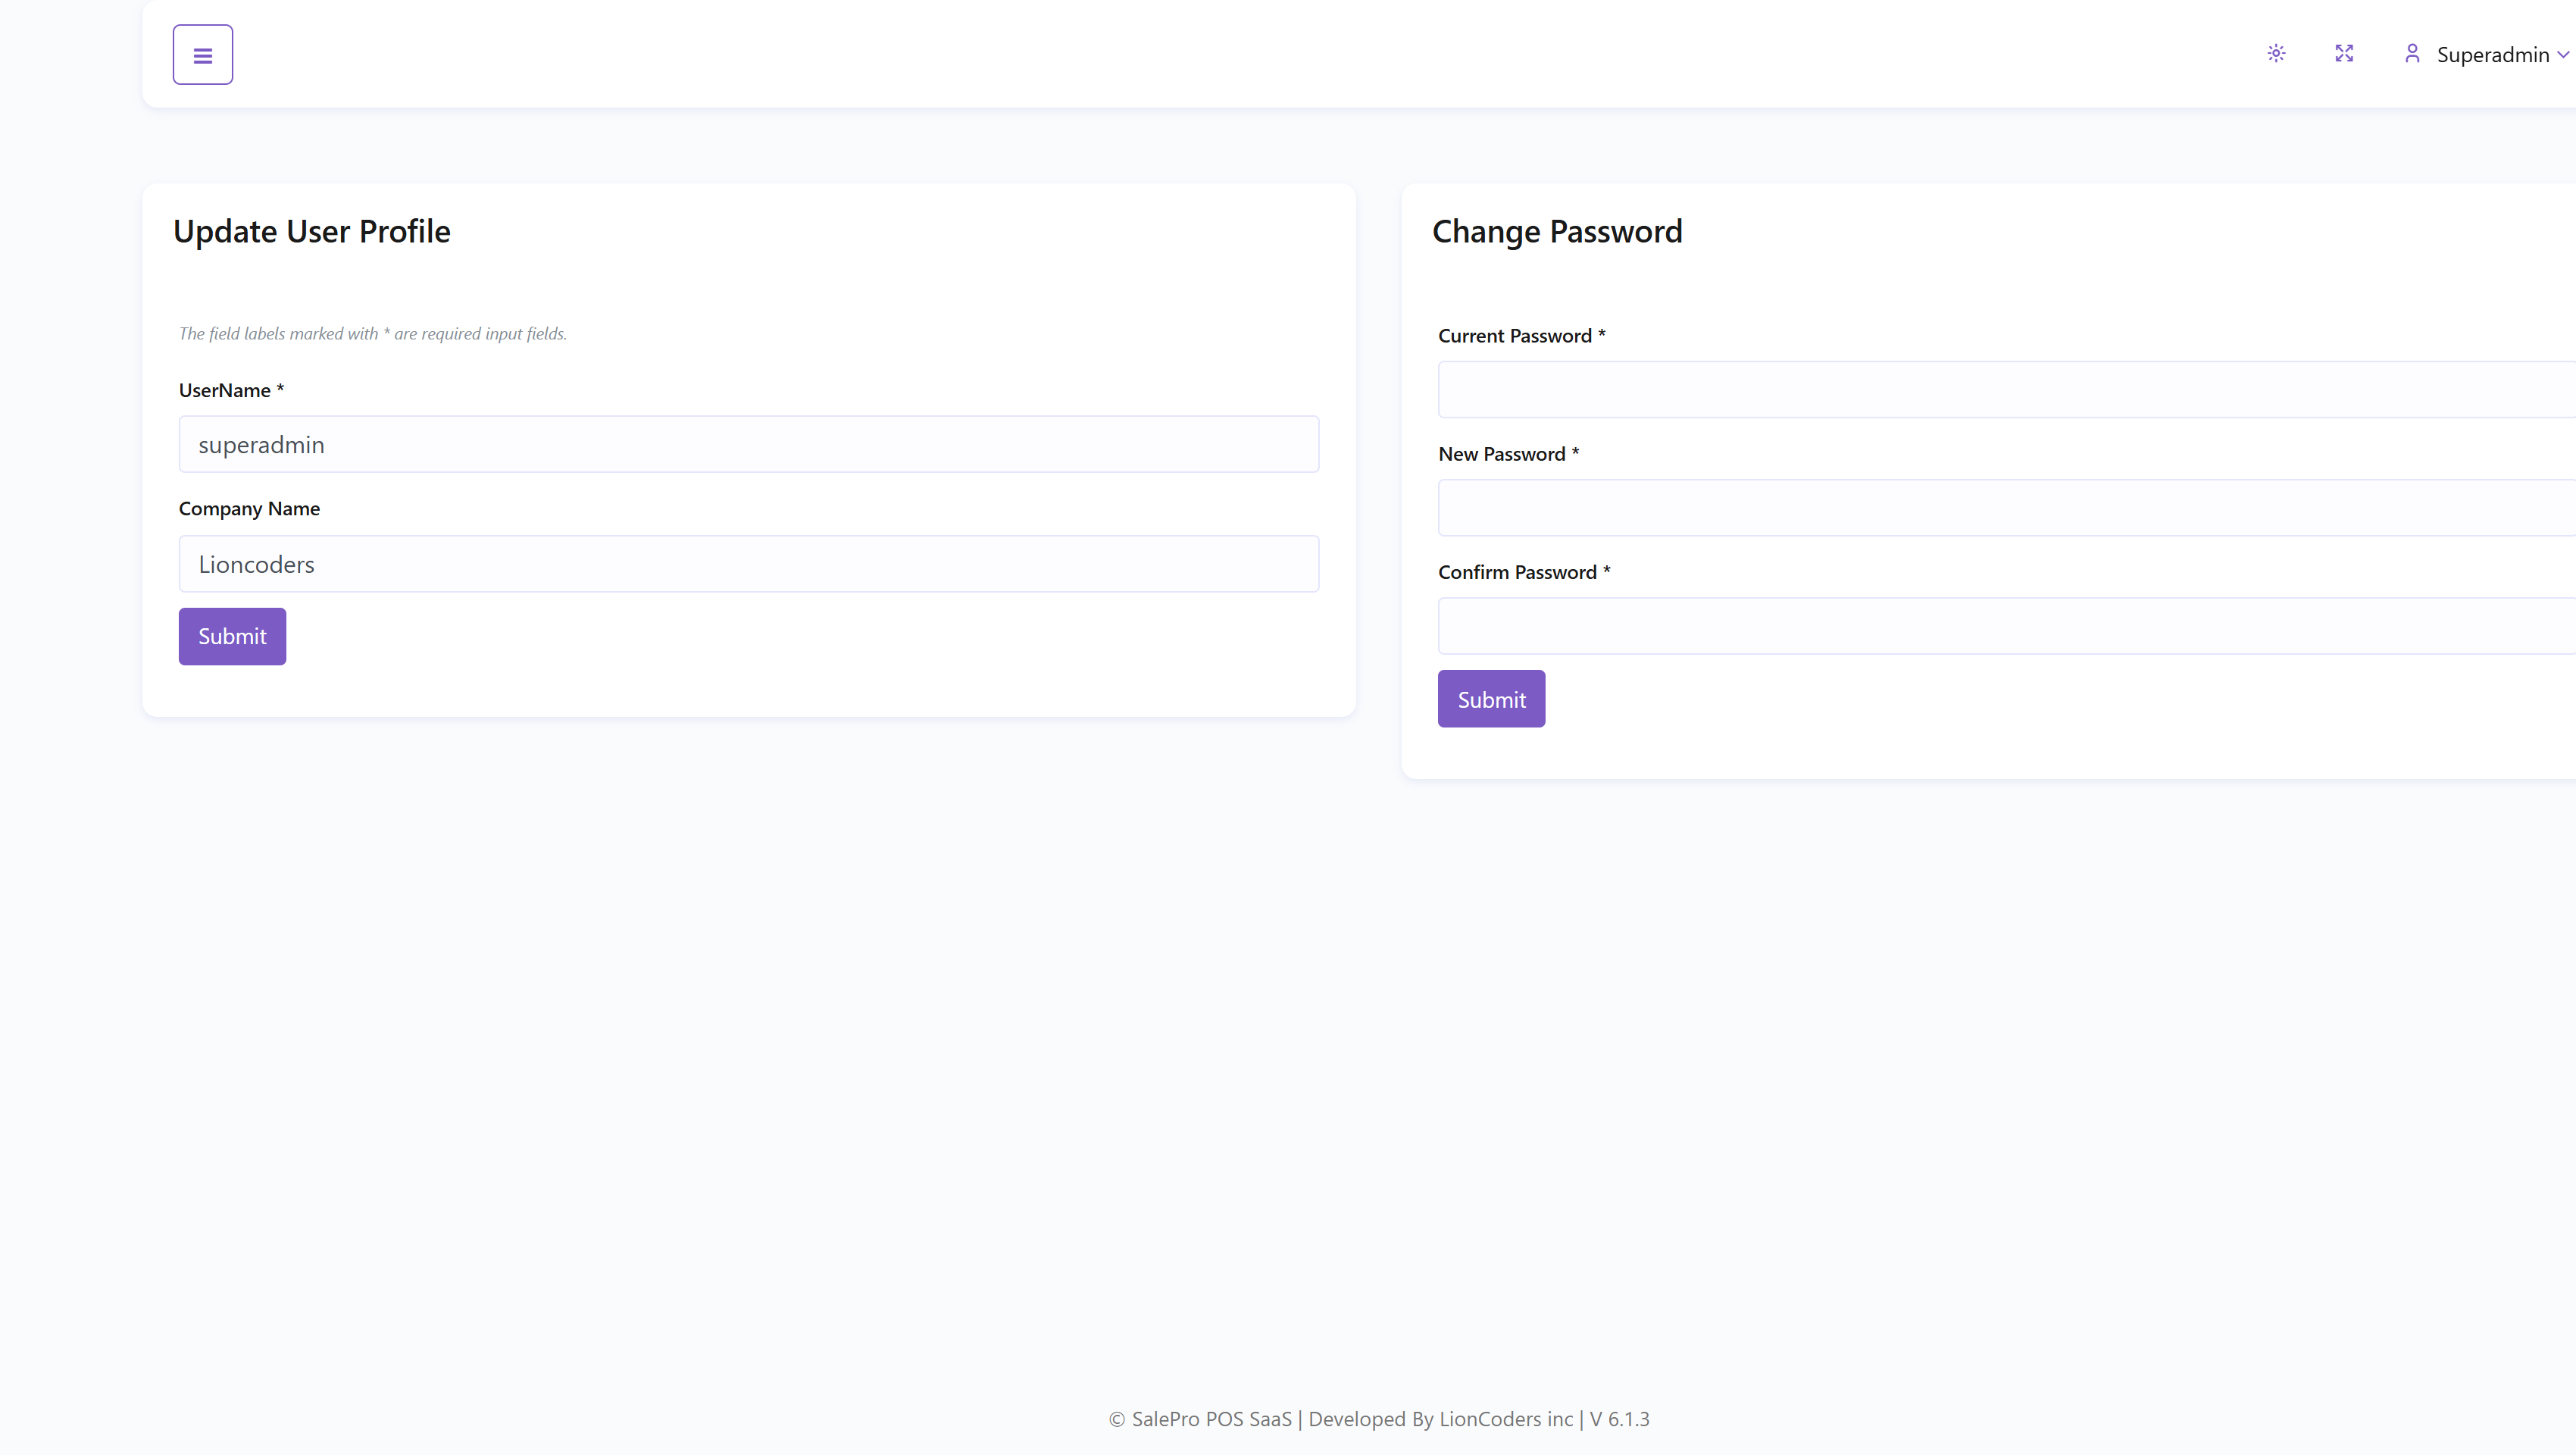
The header contains the sidebar toggle, light/dark theme switch, full-screen control, and the Super Admin account menu. The account menu provides Profile, a shortcut to Settings, and Logout.
In Profile, update the Super Admin username, email, phone number, and company name. The password form requires the current password, the new password, and confirmation. Store the new password securely before submitting the change.
Datatable Options#
Most Super Admin lists use a searchable table. The available controls depend on the page; not every list offers every export or action.
- Records per page: choose how many rows to display, then use pagination to move between pages.
- Search and filters: narrow the records by a keyword or a page-specific status, package, tenant, or date filter.
- Sorting: select a sortable column header to change the order.
- Selection: review exactly which rows are selected before exporting or using any bulk action. A selection on one page may not include every matching record.
- Exports and printing: use the available PDF, spreadsheet, CSV, or print control. Check the generated output and keep private client information out of public documents.
- Column visibility: show or hide supported columns to focus on the information you need.
- Action: open the row menu to view, edit, or delete a record where offered. Deletion is not the same as deactivation and may be permanent.
Frontend#
Frontend opens the public SaaS website in a new browser tab. Use it as a preview after changing CMS content, packages, SEO data, theme settings, contact information, or signup availability.
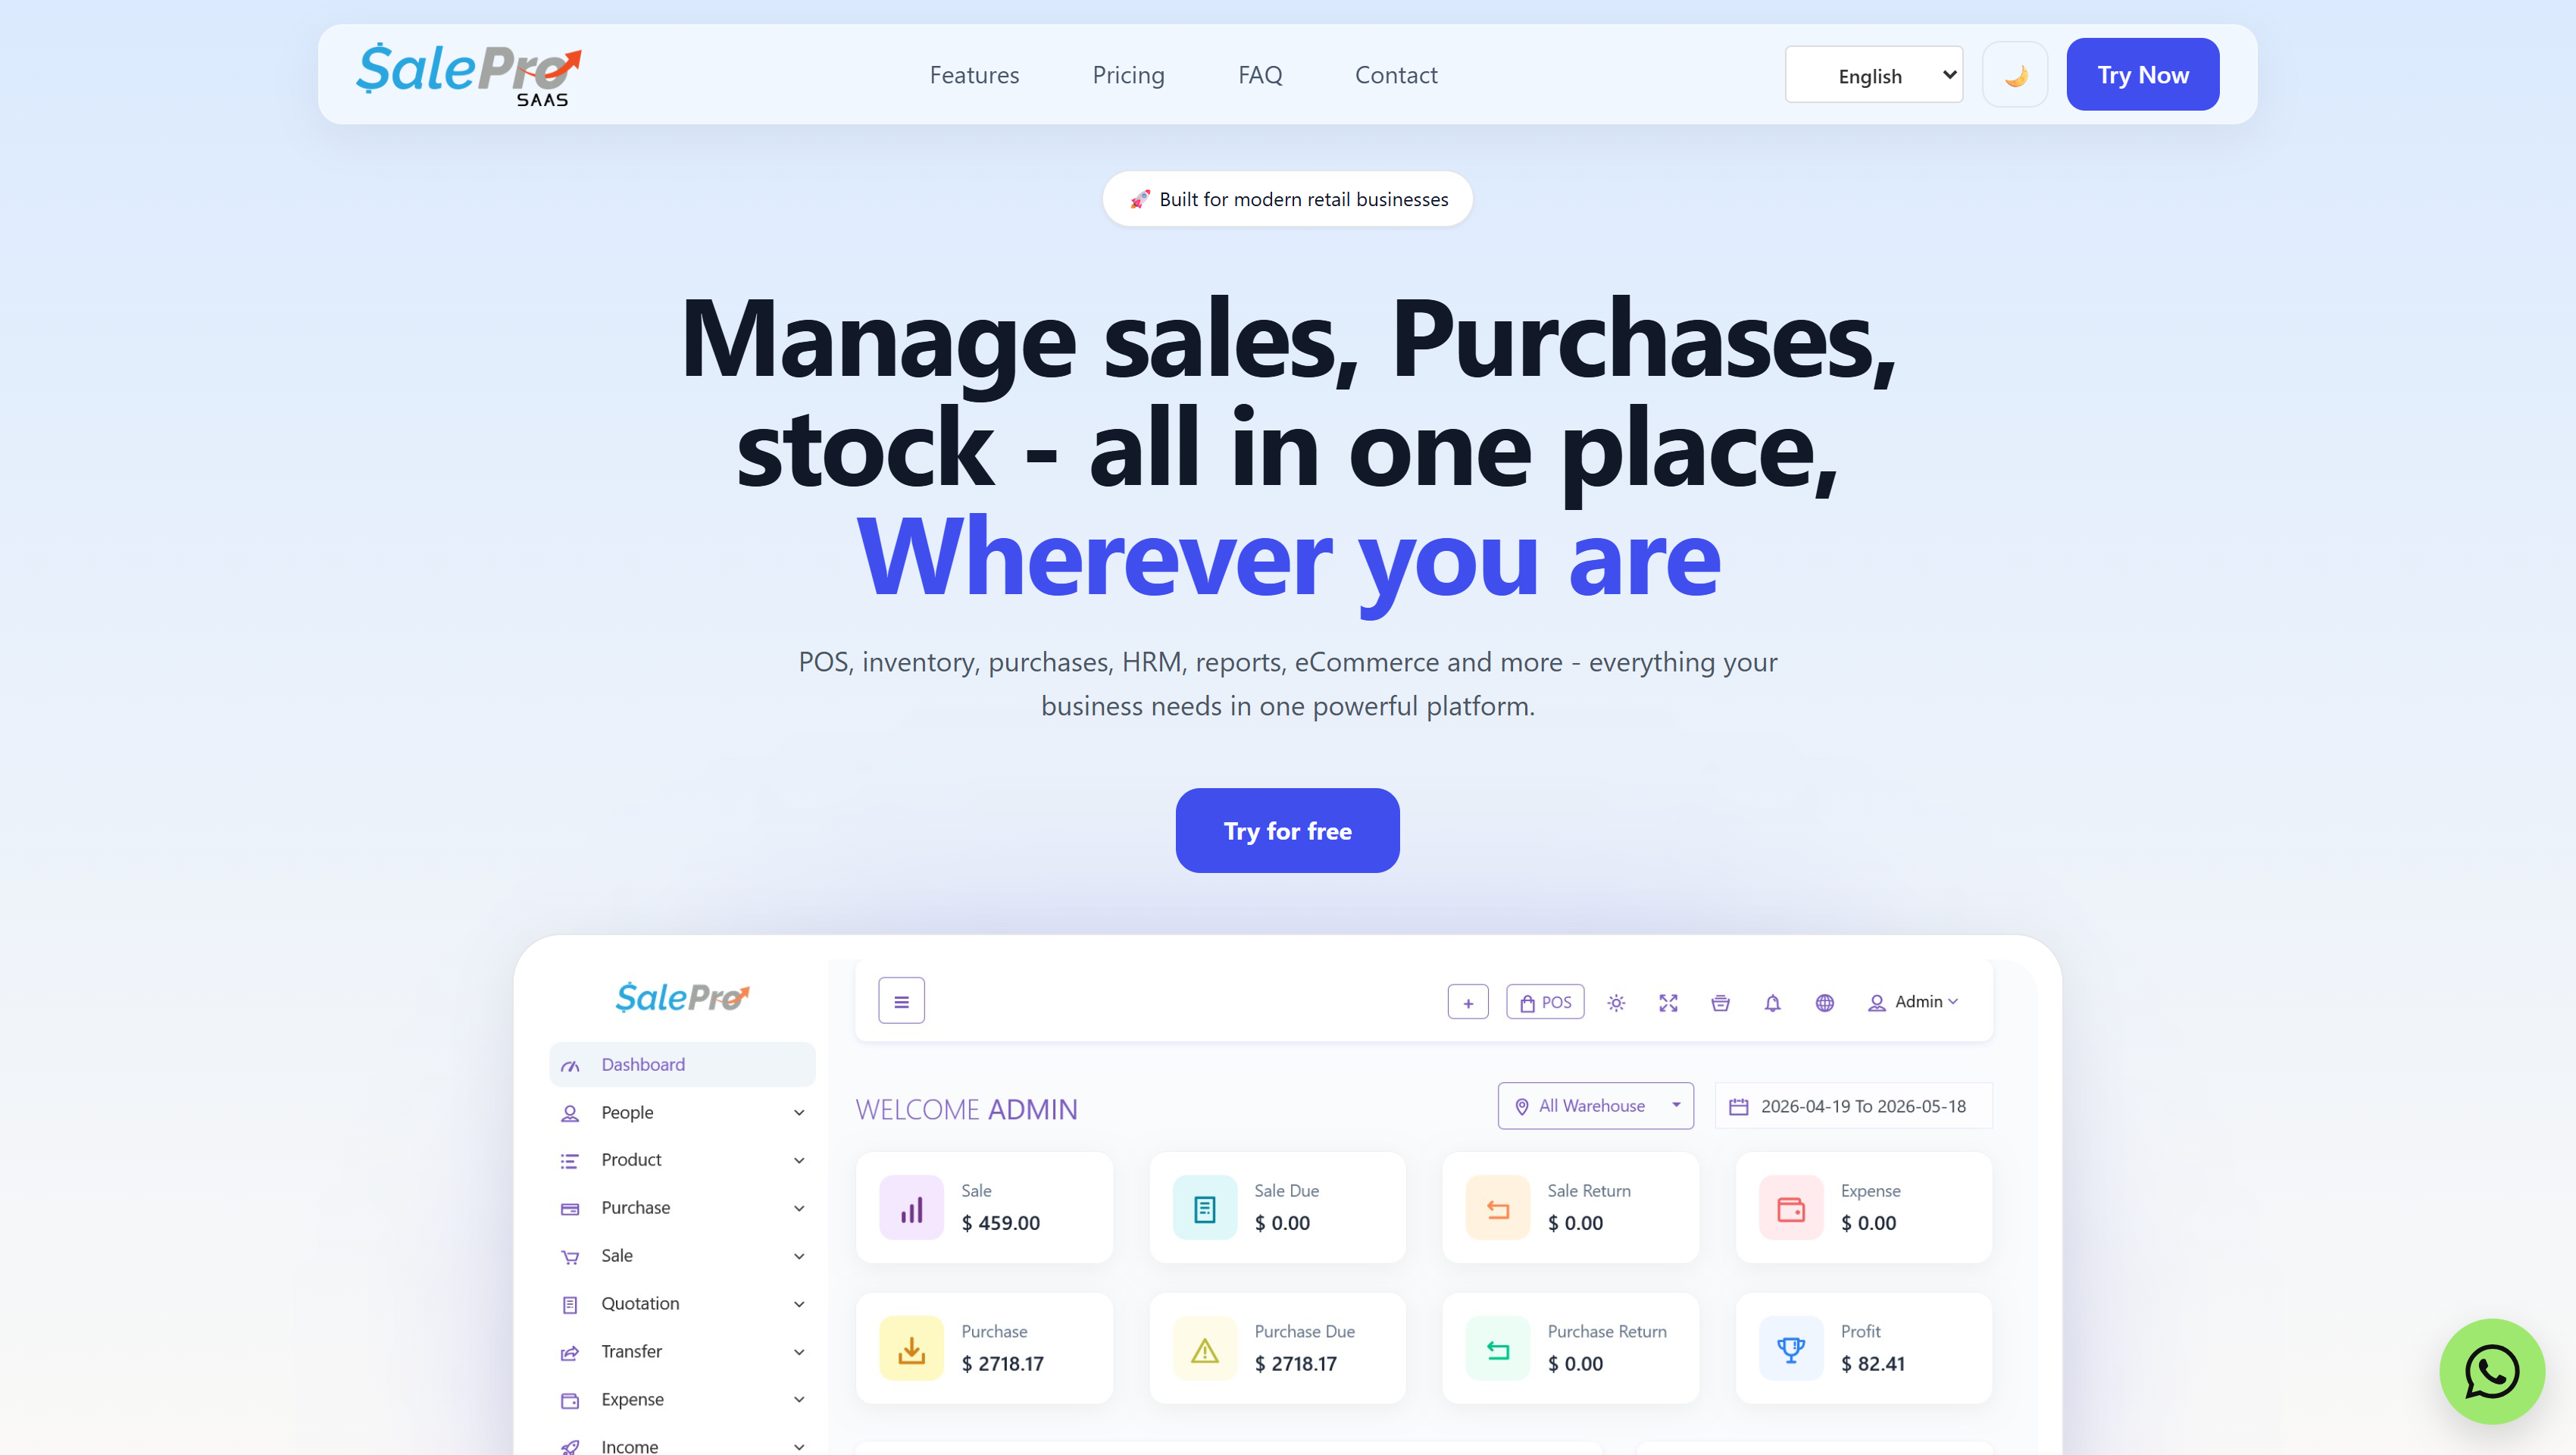
Check desktop and mobile layouts, all configured languages, pricing buttons, links, uploaded images, and forms. The Frontend page is a preview destination; content is edited from the CMS and Settings menus.
Client List#
Client List is the tenant-management workspace. It displays each client’s account details, domain, package, subscription type, expiry date, and status, with summary cards for total, active, trial, and expired clients.
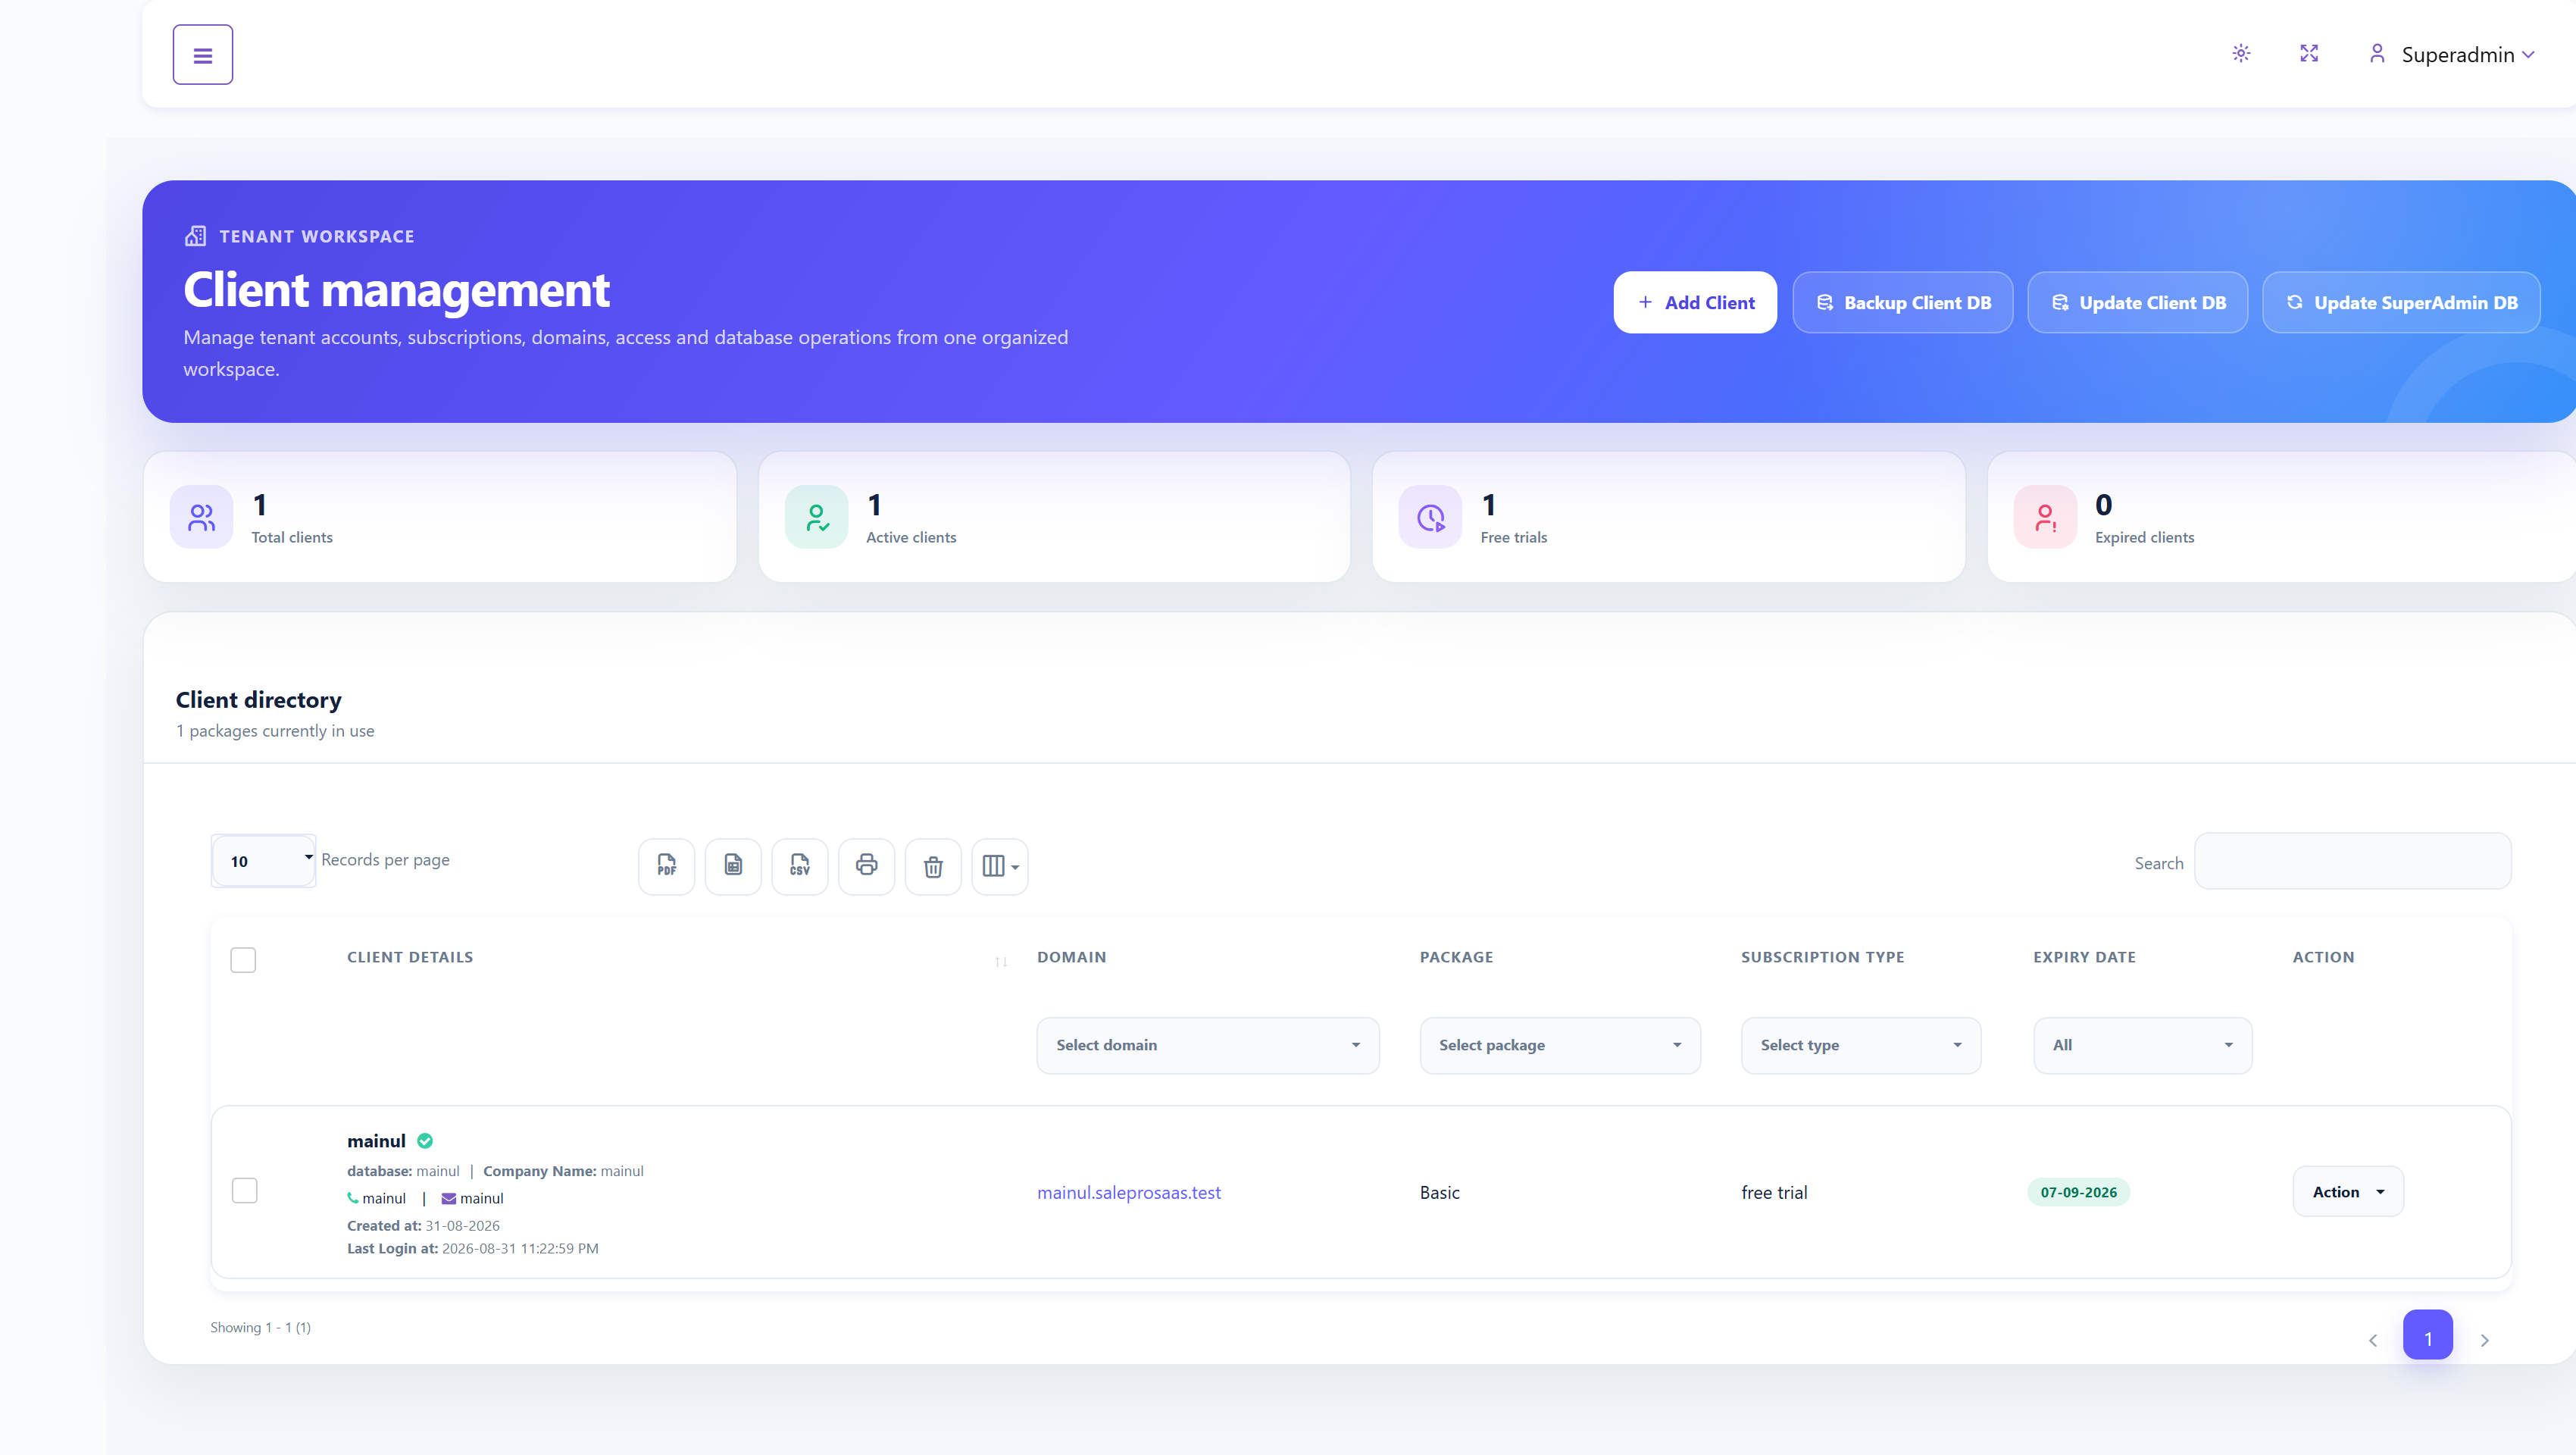
Add a client#
- Select Add Client.
- Choose a package and subscription type: Free Trial, Monthly, or Yearly.
- Enter the company name, phone number, tenant administrator username, password, and email.
- Enter the required subdomain. Confirm it is short, unique, and suitable for a URL.
- Submit the form and verify that the tenant appears in the directory.
Share new tenant credentials only through a secure channel. Confirm DNS and wildcard-subdomain configuration before promising that a new subdomain is publicly reachable.
Manage an existing client#
Open the row’s Action menu to:
- Renew Subscription: set the new expiry date and Monthly or Yearly subscription type.
- Change Package: move the tenant to a different package. Review resource limits and enabled features first.
- Change Password: load a user from the tenant database and assign a new password.
- Add Custom Domain: enter a fully qualified domain such as
pos.example.com. Configure its DNS to point to the SaaS installation separately. - Activate/Deactivate: control tenant access without deleting its records.
- Delete: permanently remove the client. Back up data and confirm the target tenant before proceeding.
Database maintenance#
Backup Client DB creates client database backups. Update Client DB applies tenant database updates, and Update SuperAdmin DB updates the landlord database. Take verified backups first, use a maintenance window, and test upgrades on staging whenever possible.
Custom Domain For Tenants#
A custom domain maps a client’s own hostname to its existing tenant. It is different from the wildcard subdomain used when creating the tenant.
- Confirm the exact tenant and the hostname the client controls, for example
pos.example.com. - Arrange the DNS record and hosting-domain mapping so the hostname reaches the same SaaS installation. Use the destination supplied by your hosting administrator.
- In Client List → Action → Add Custom Domain, enter the hostname in the format requested by the form.
- Provision a valid SSL certificate for that hostname. A wildcard certificate for the SaaS root domain does not cover a client’s unrelated domain.
- After DNS propagation, verify HTTPS and confirm that the hostname opens the intended tenant. Keep the existing tenant subdomain available while checking the change.
The following existing video is retained as a deployment reference. Hosting screens may vary by provider.
Existing SalePro as a Tenant#
This is an administrator-led data migration, not a normal tenant operation. Test on a copy first and confirm that the standalone SalePro release and the SaaS tenant schema are compatible. The historical process below is not a guarantee that every old database can be imported unchanged into the current build.
- Back up the source database, application files, uploads, and the target tenant database. Stop writes during the final migration and test how you will restore both systems.
- From Super Admin, choose a package with the required modules and create a new tenant. Use its newly created database as the target, never the landlord database.
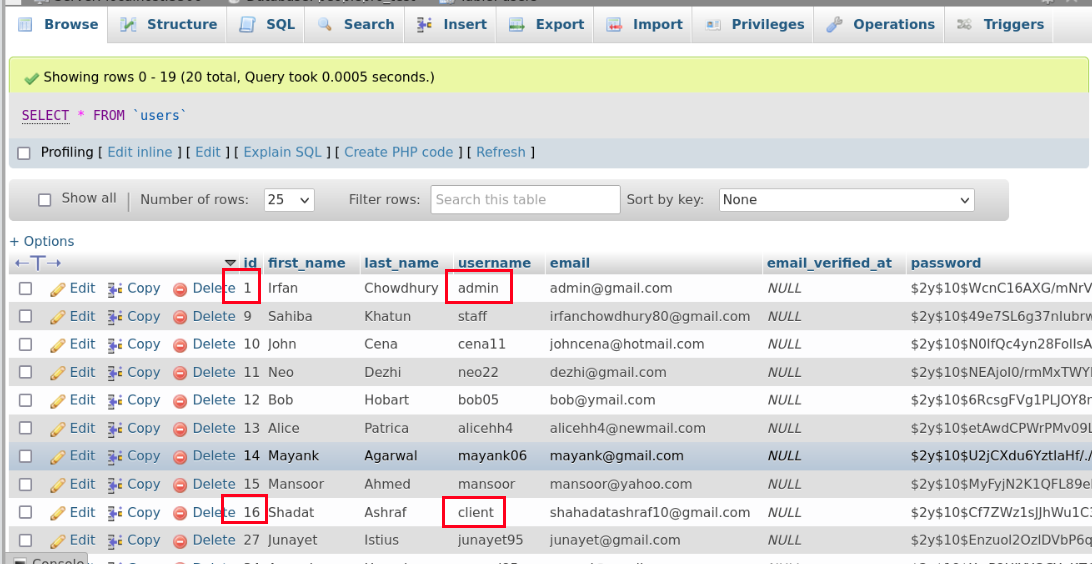
- Work on a copy of the source database. Review source users named
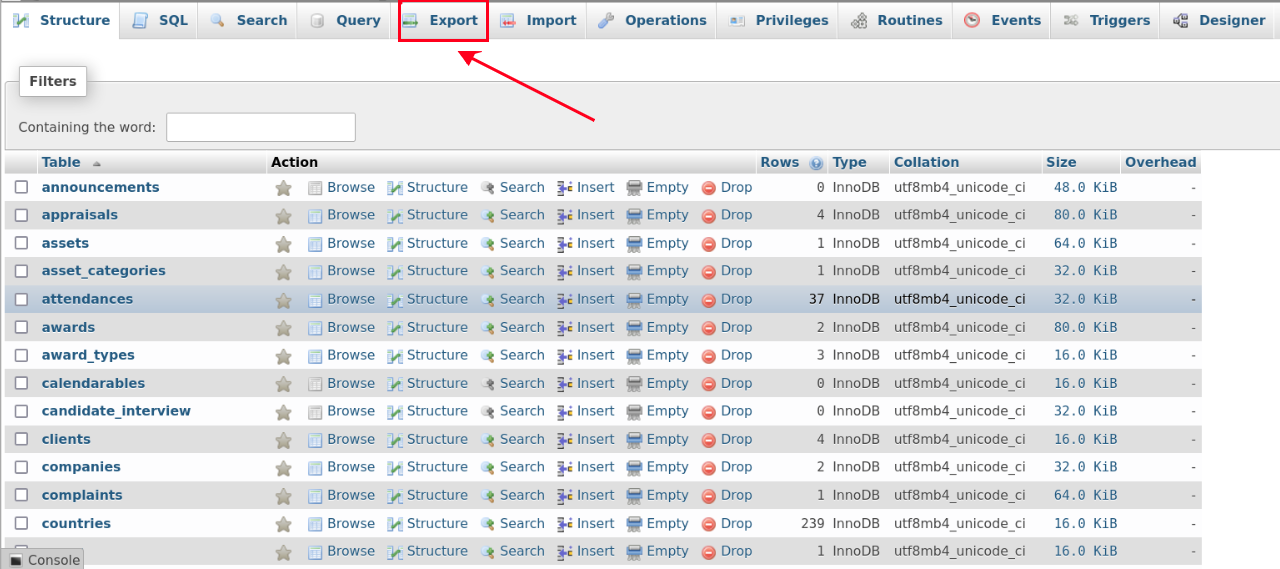
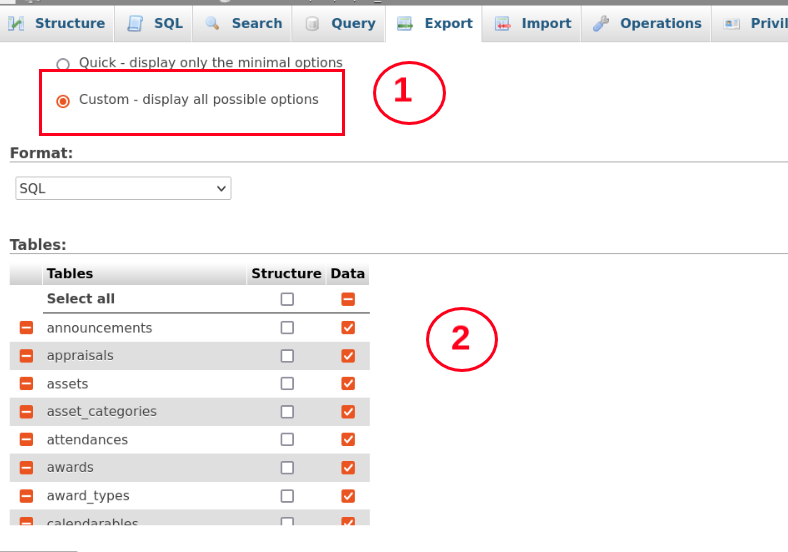
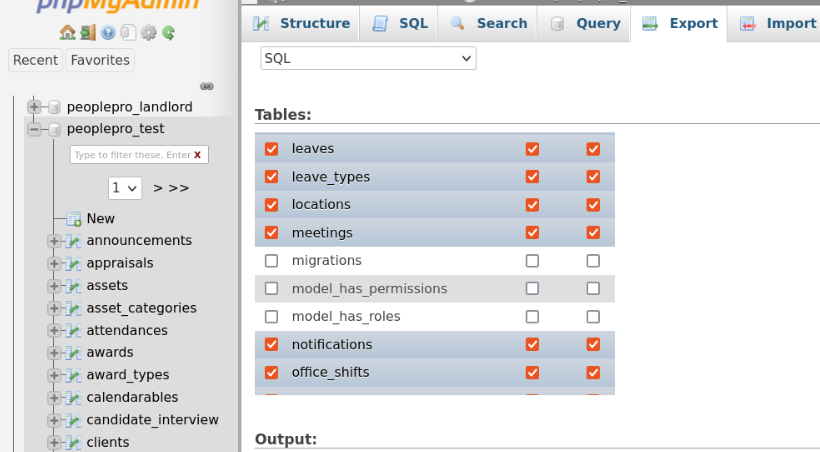
adminorclientand their IDs for conflicts with seeded target accounts. Resolve account ownership, ID mapping, and dependent records deliberately; do not delete live users or rows merely to make an import succeed. - In phpMyAdmin, choose Export → Custom and export data only, not table structure. The legacy guide excludes the tables listed below so the tenant keeps its current settings, migrations, and permission framework.
- Import the reviewed data into the new tenant database on staging. If duplicate-key or missing-column errors occur, stop and reconcile the data/schema mappings before retrying. Do not blindly remove duplicate records.
- Reassign employee roles and permissions, migrate any required uploaded files, and verify logins, stock quantities, opening balances, invoices, and package access before switching users to the tenant.
Tables excluded by the legacy migration procedure: general_settings, migrations, model_has_permissions, model_has_roles, permissions, roles, and role_has_permissions. Additional exclusions or mappings may be required for your version.
Payments#
Payments is the Super Admin subscription-payment ledger. It shows the date, client, amount, payment channel, and transaction reference or payment proof where available.
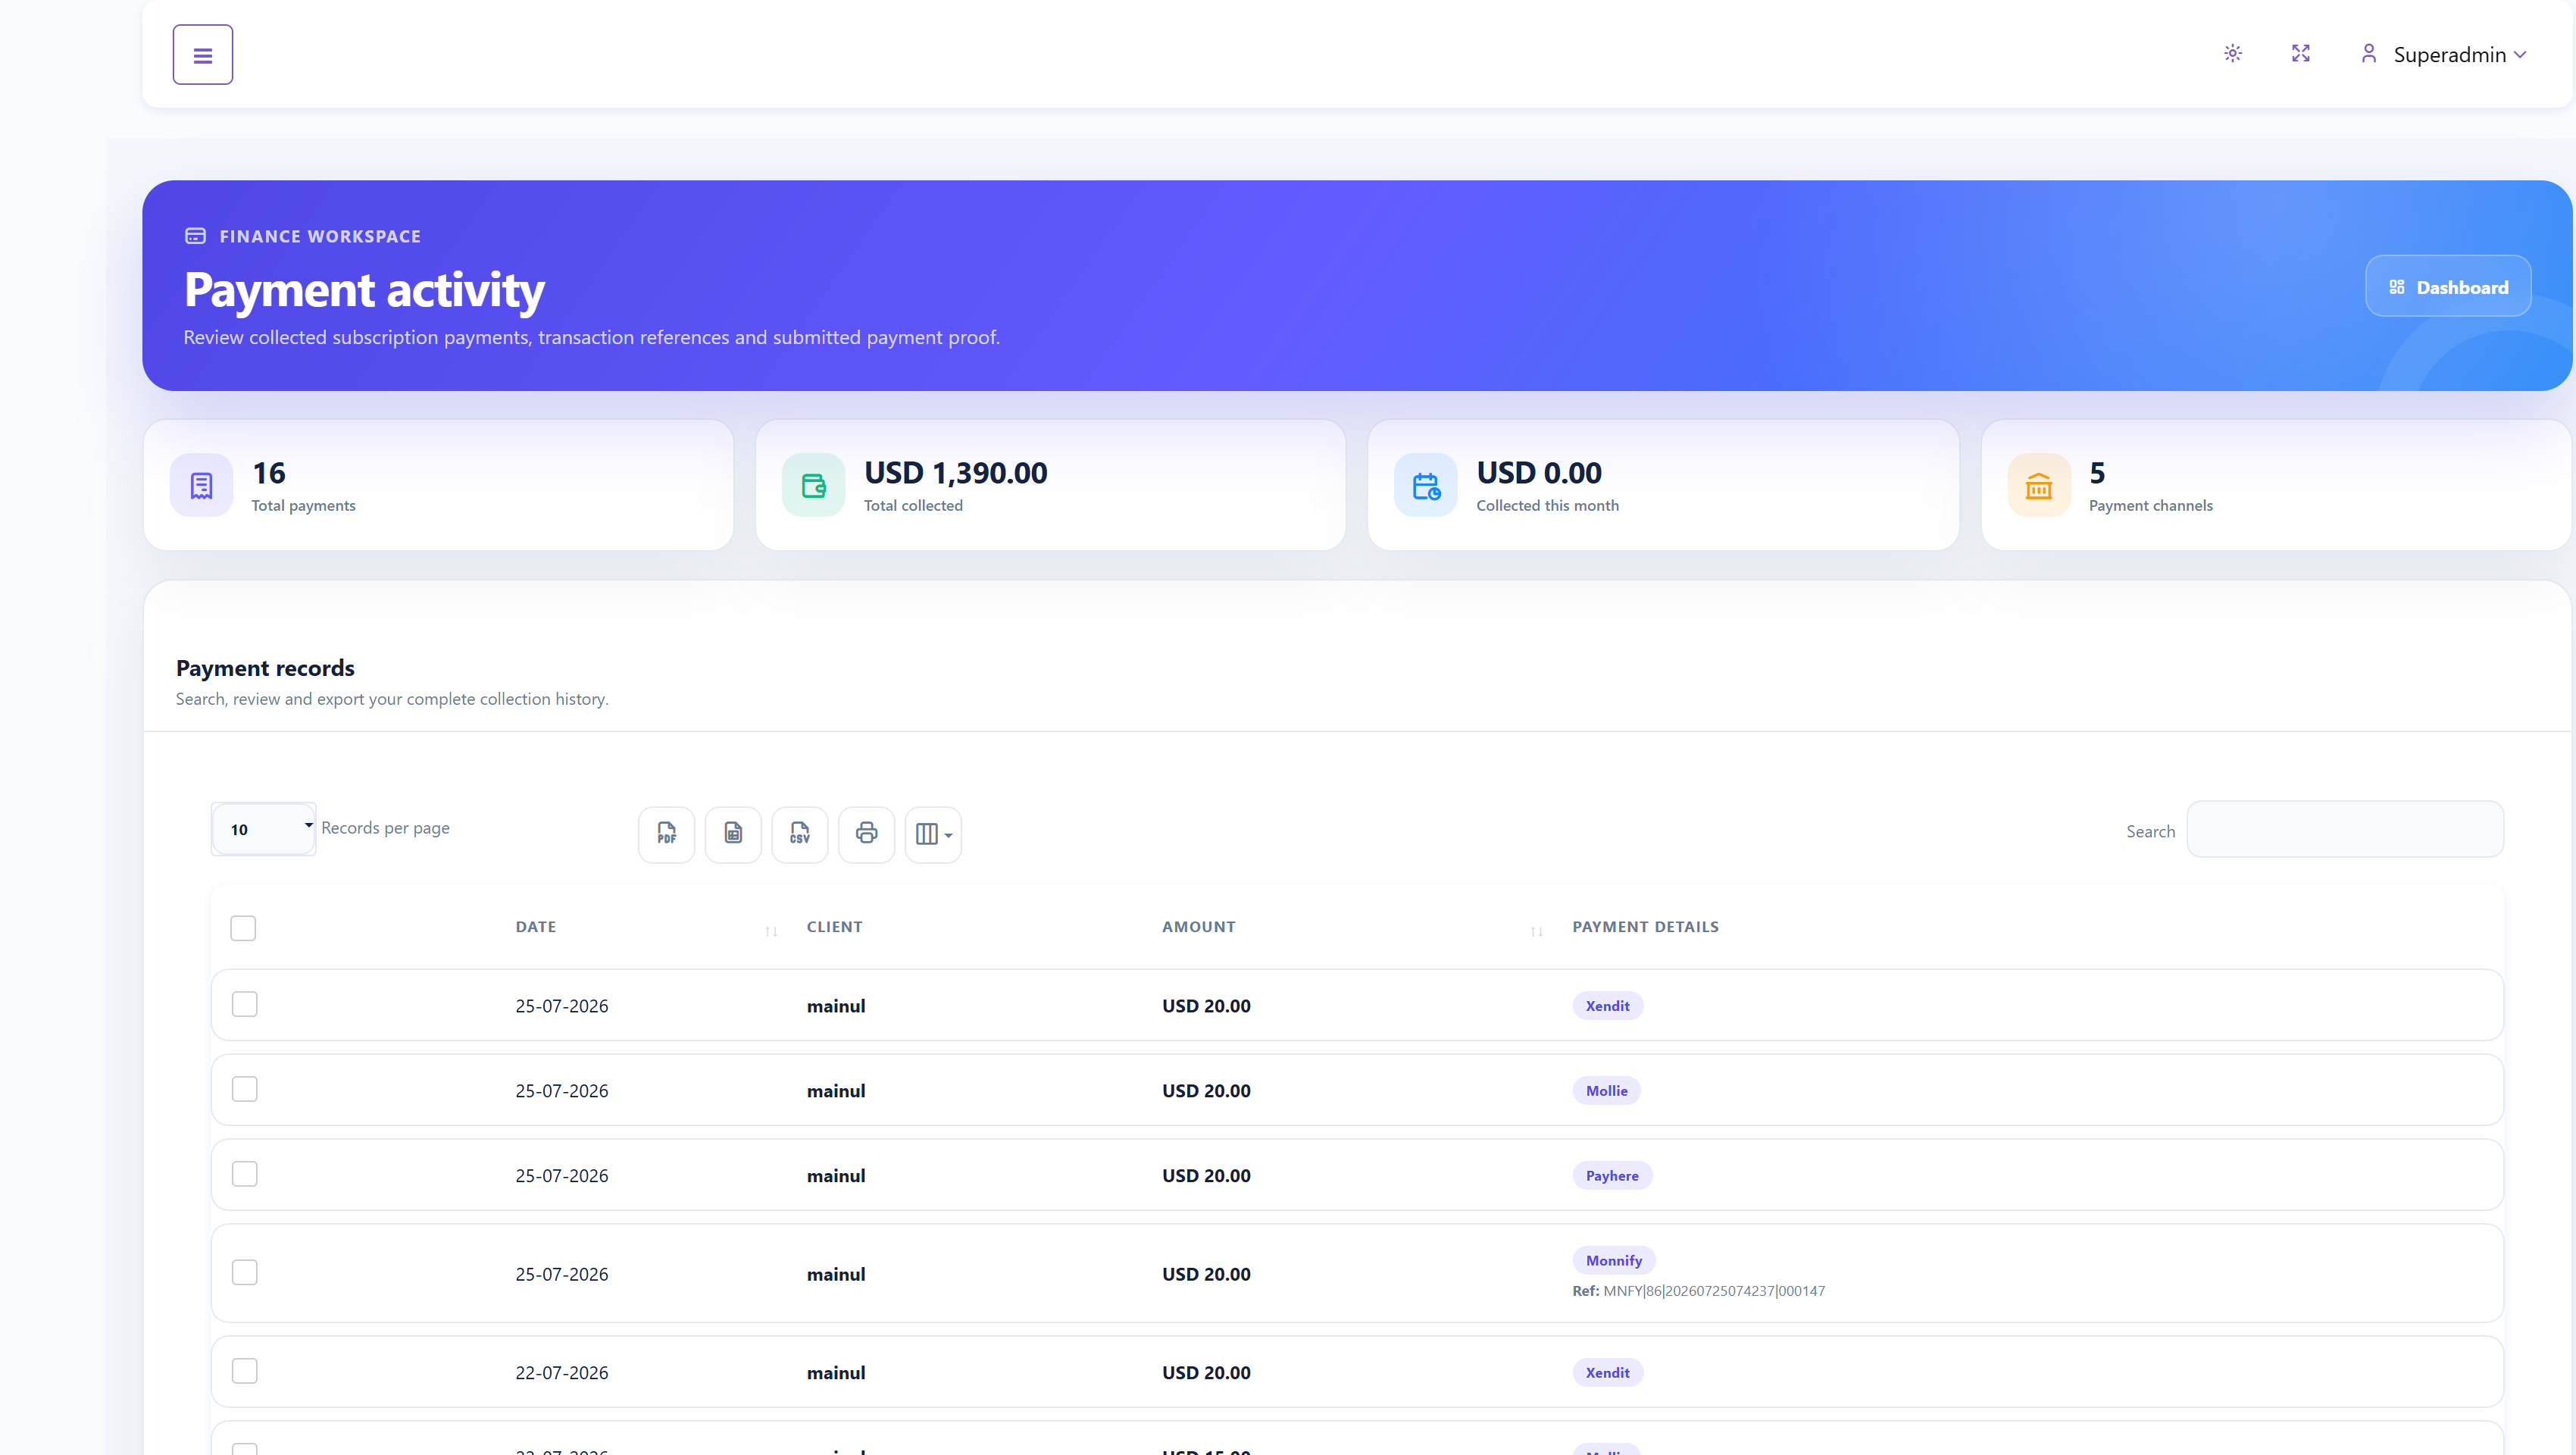
Use the summary cards to compare total collections with the current month. Search for a tenant, date, provider, or reference, then use the table export controls when a PDF, spreadsheet, CSV, printout, or reduced column set is required. This menu records subscription collections; gateway credentials are maintained under Settings → Payment Setting.
Coupon List#
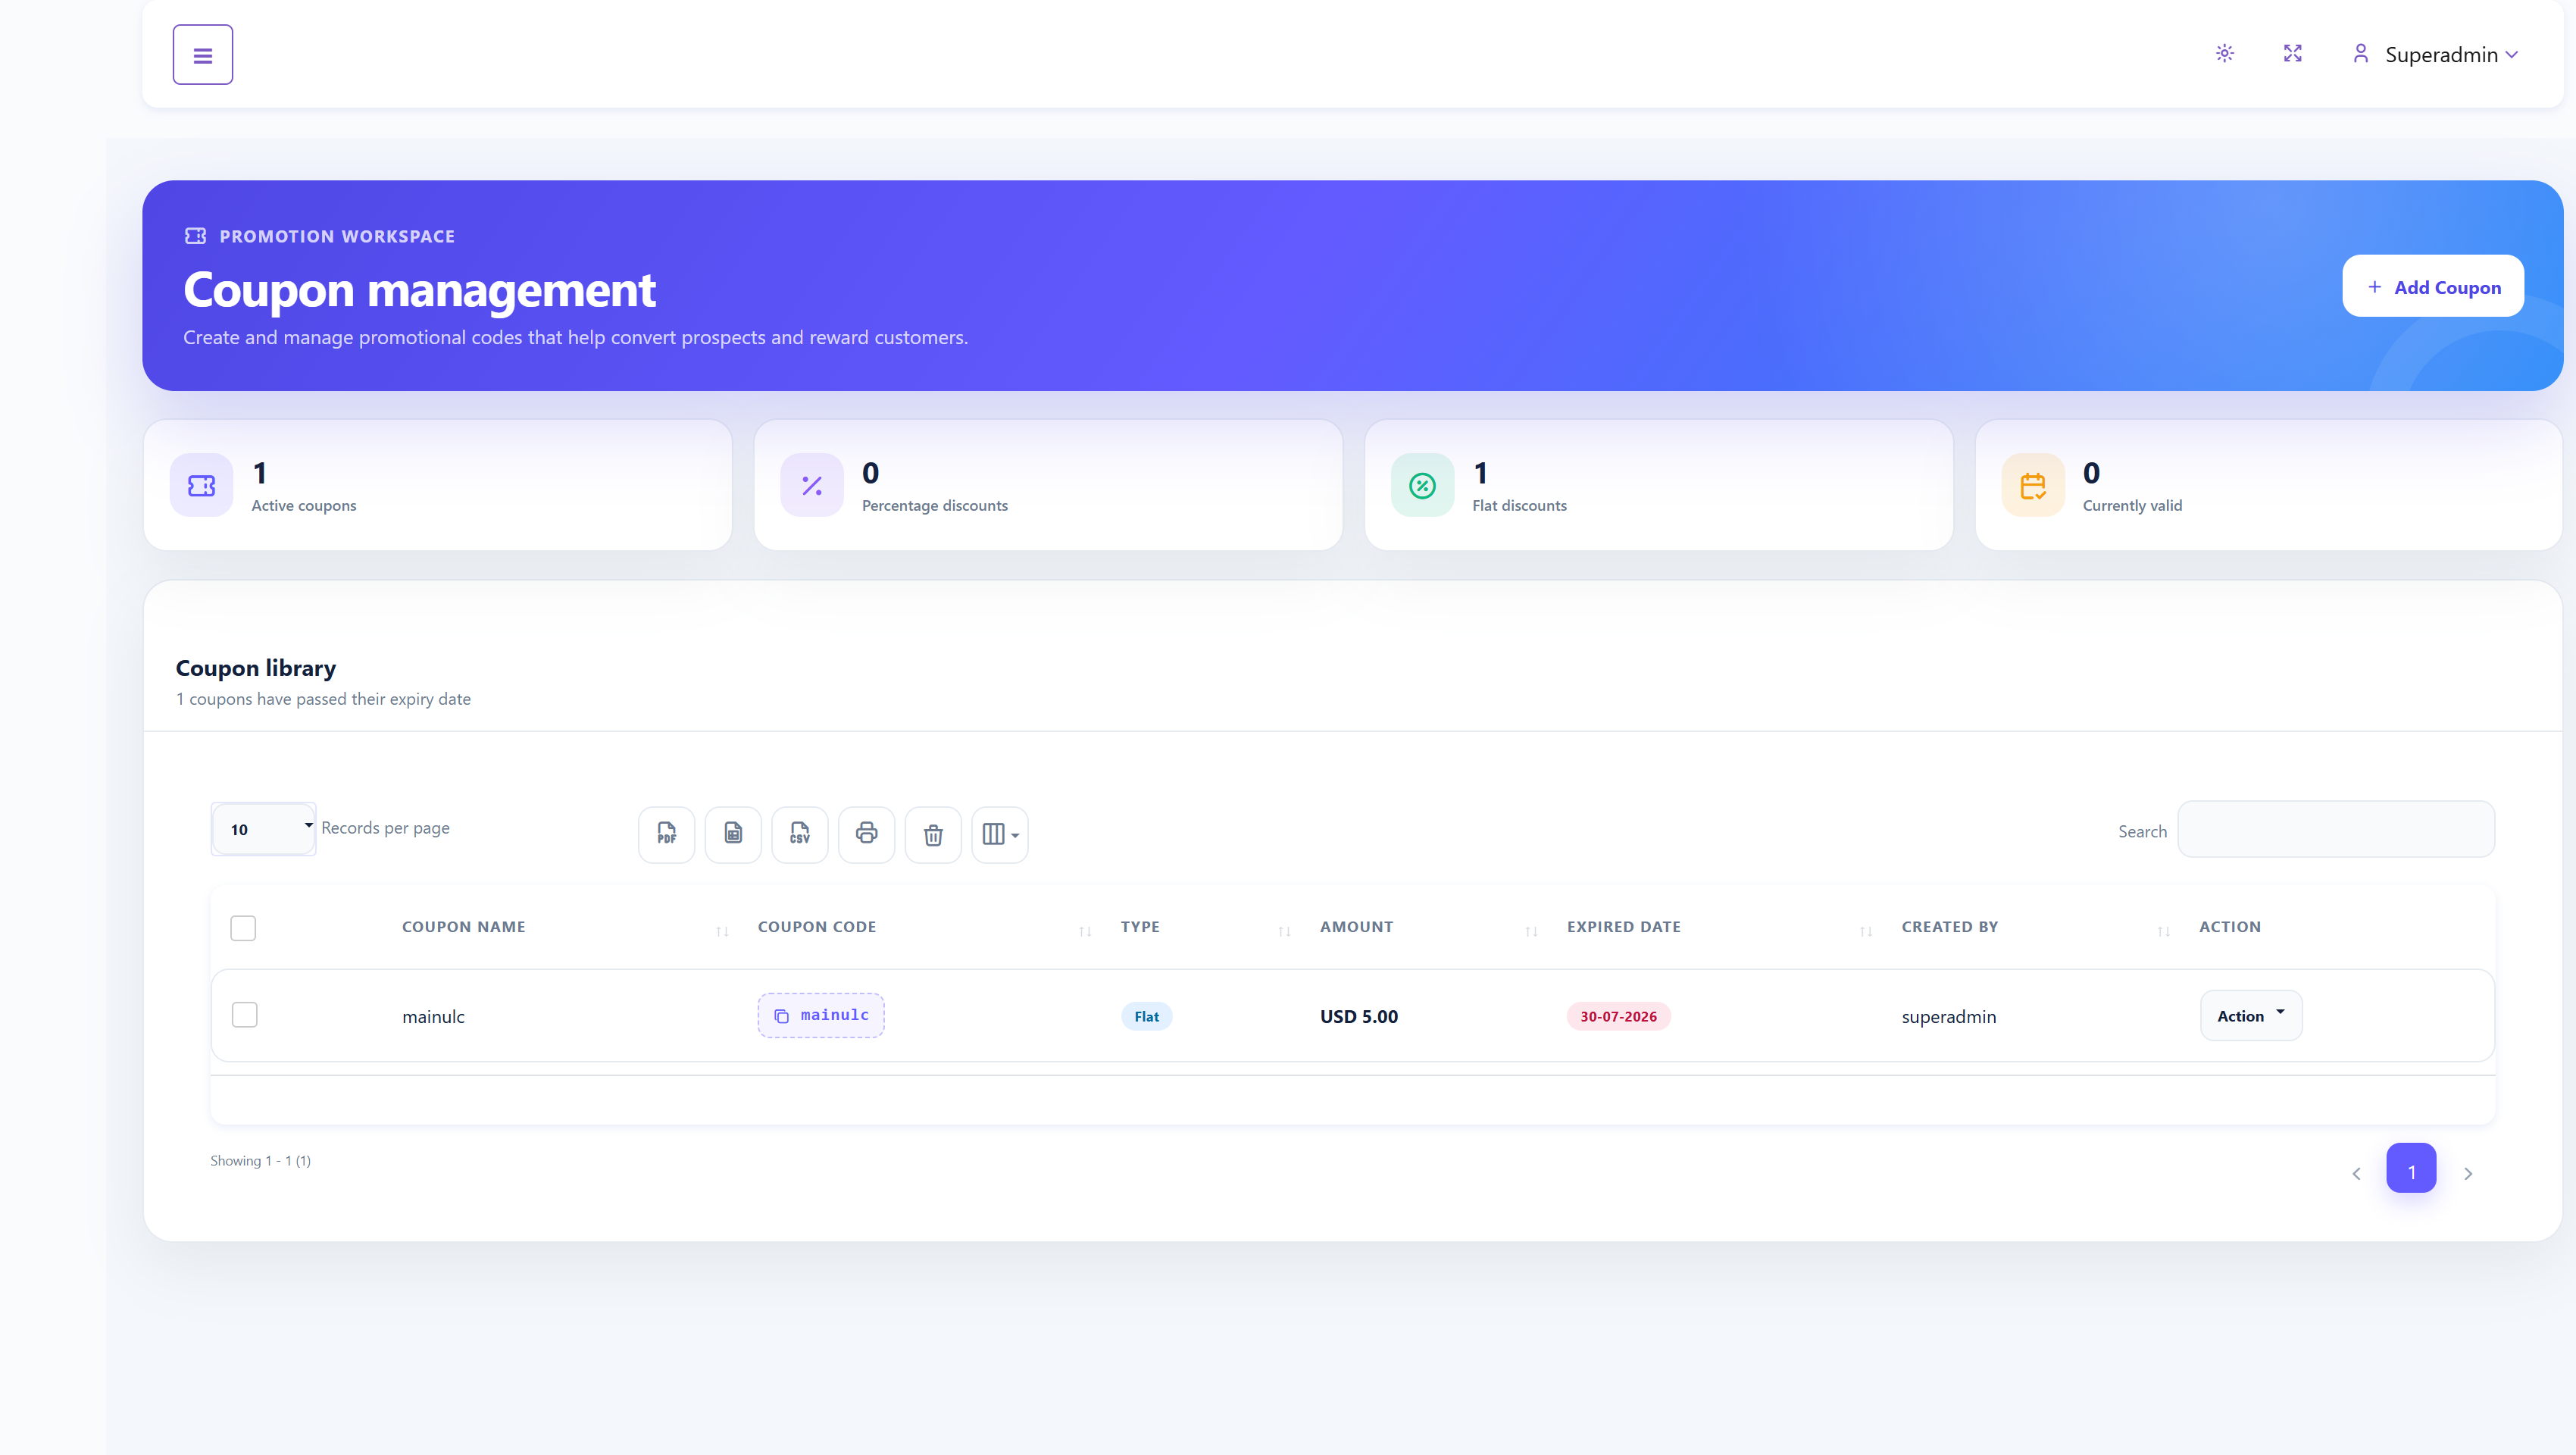
Coupon List manages promotional discount codes used during SaaS subscription checkout.
Create or update a coupon#
- Select Add Coupon.
- Enter a recognizable coupon name.
- Enter a unique coupon code or use Generate.
- Choose Percentage or Flat, then enter the amount in the appropriate unit.
- Set the expiry date and submit.
Use the row Action menu to edit or delete a coupon. Before publishing a promotion, test the code against the intended package and billing period and confirm that the expiry date and discount type are correct.
Package#
Package contains the subscription-plan catalog and the form used to create plans.
Package List#
The package catalog compares plan names, free-trial settings, monthly and yearly fees, resource limits, and included features.
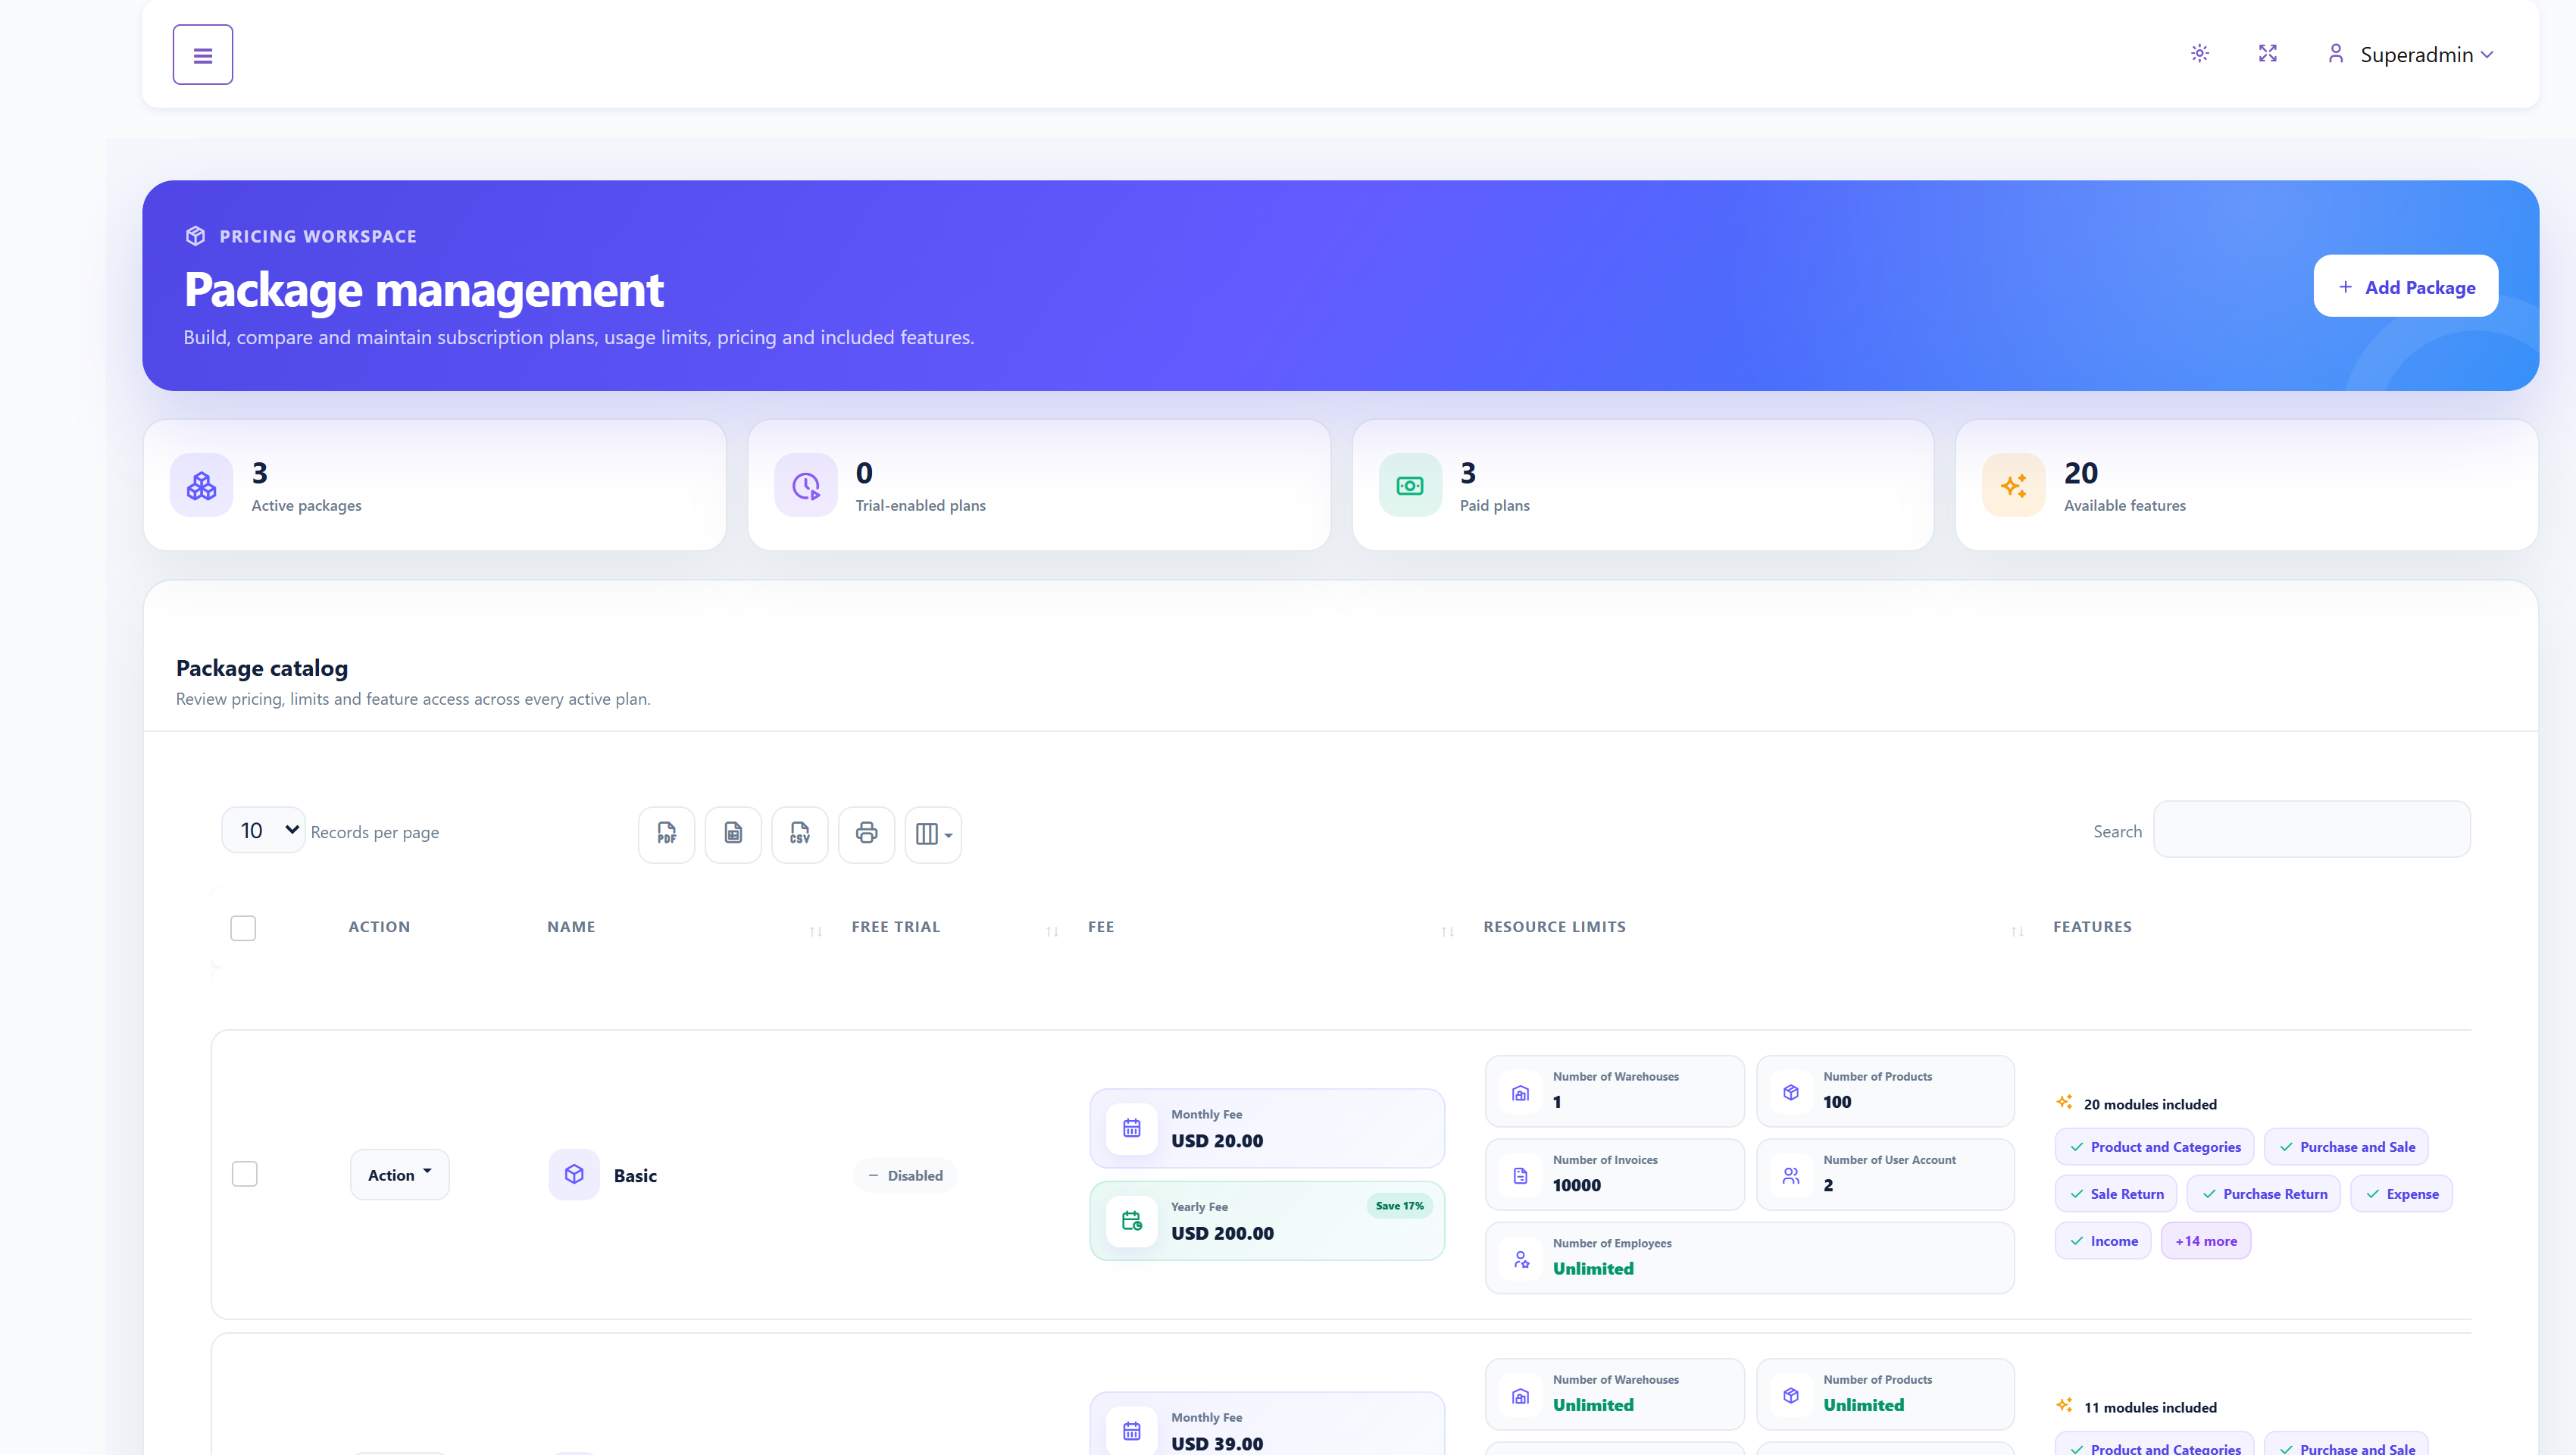
Use Action → Edit to revise a plan or Delete to remove it. Before changing a live package, check how many tenants use it. If the edit form offers synchronization with existing clients, enable it only when those tenants should receive the new limits and features.
Add Package#
Add Package creates a subscription offer.
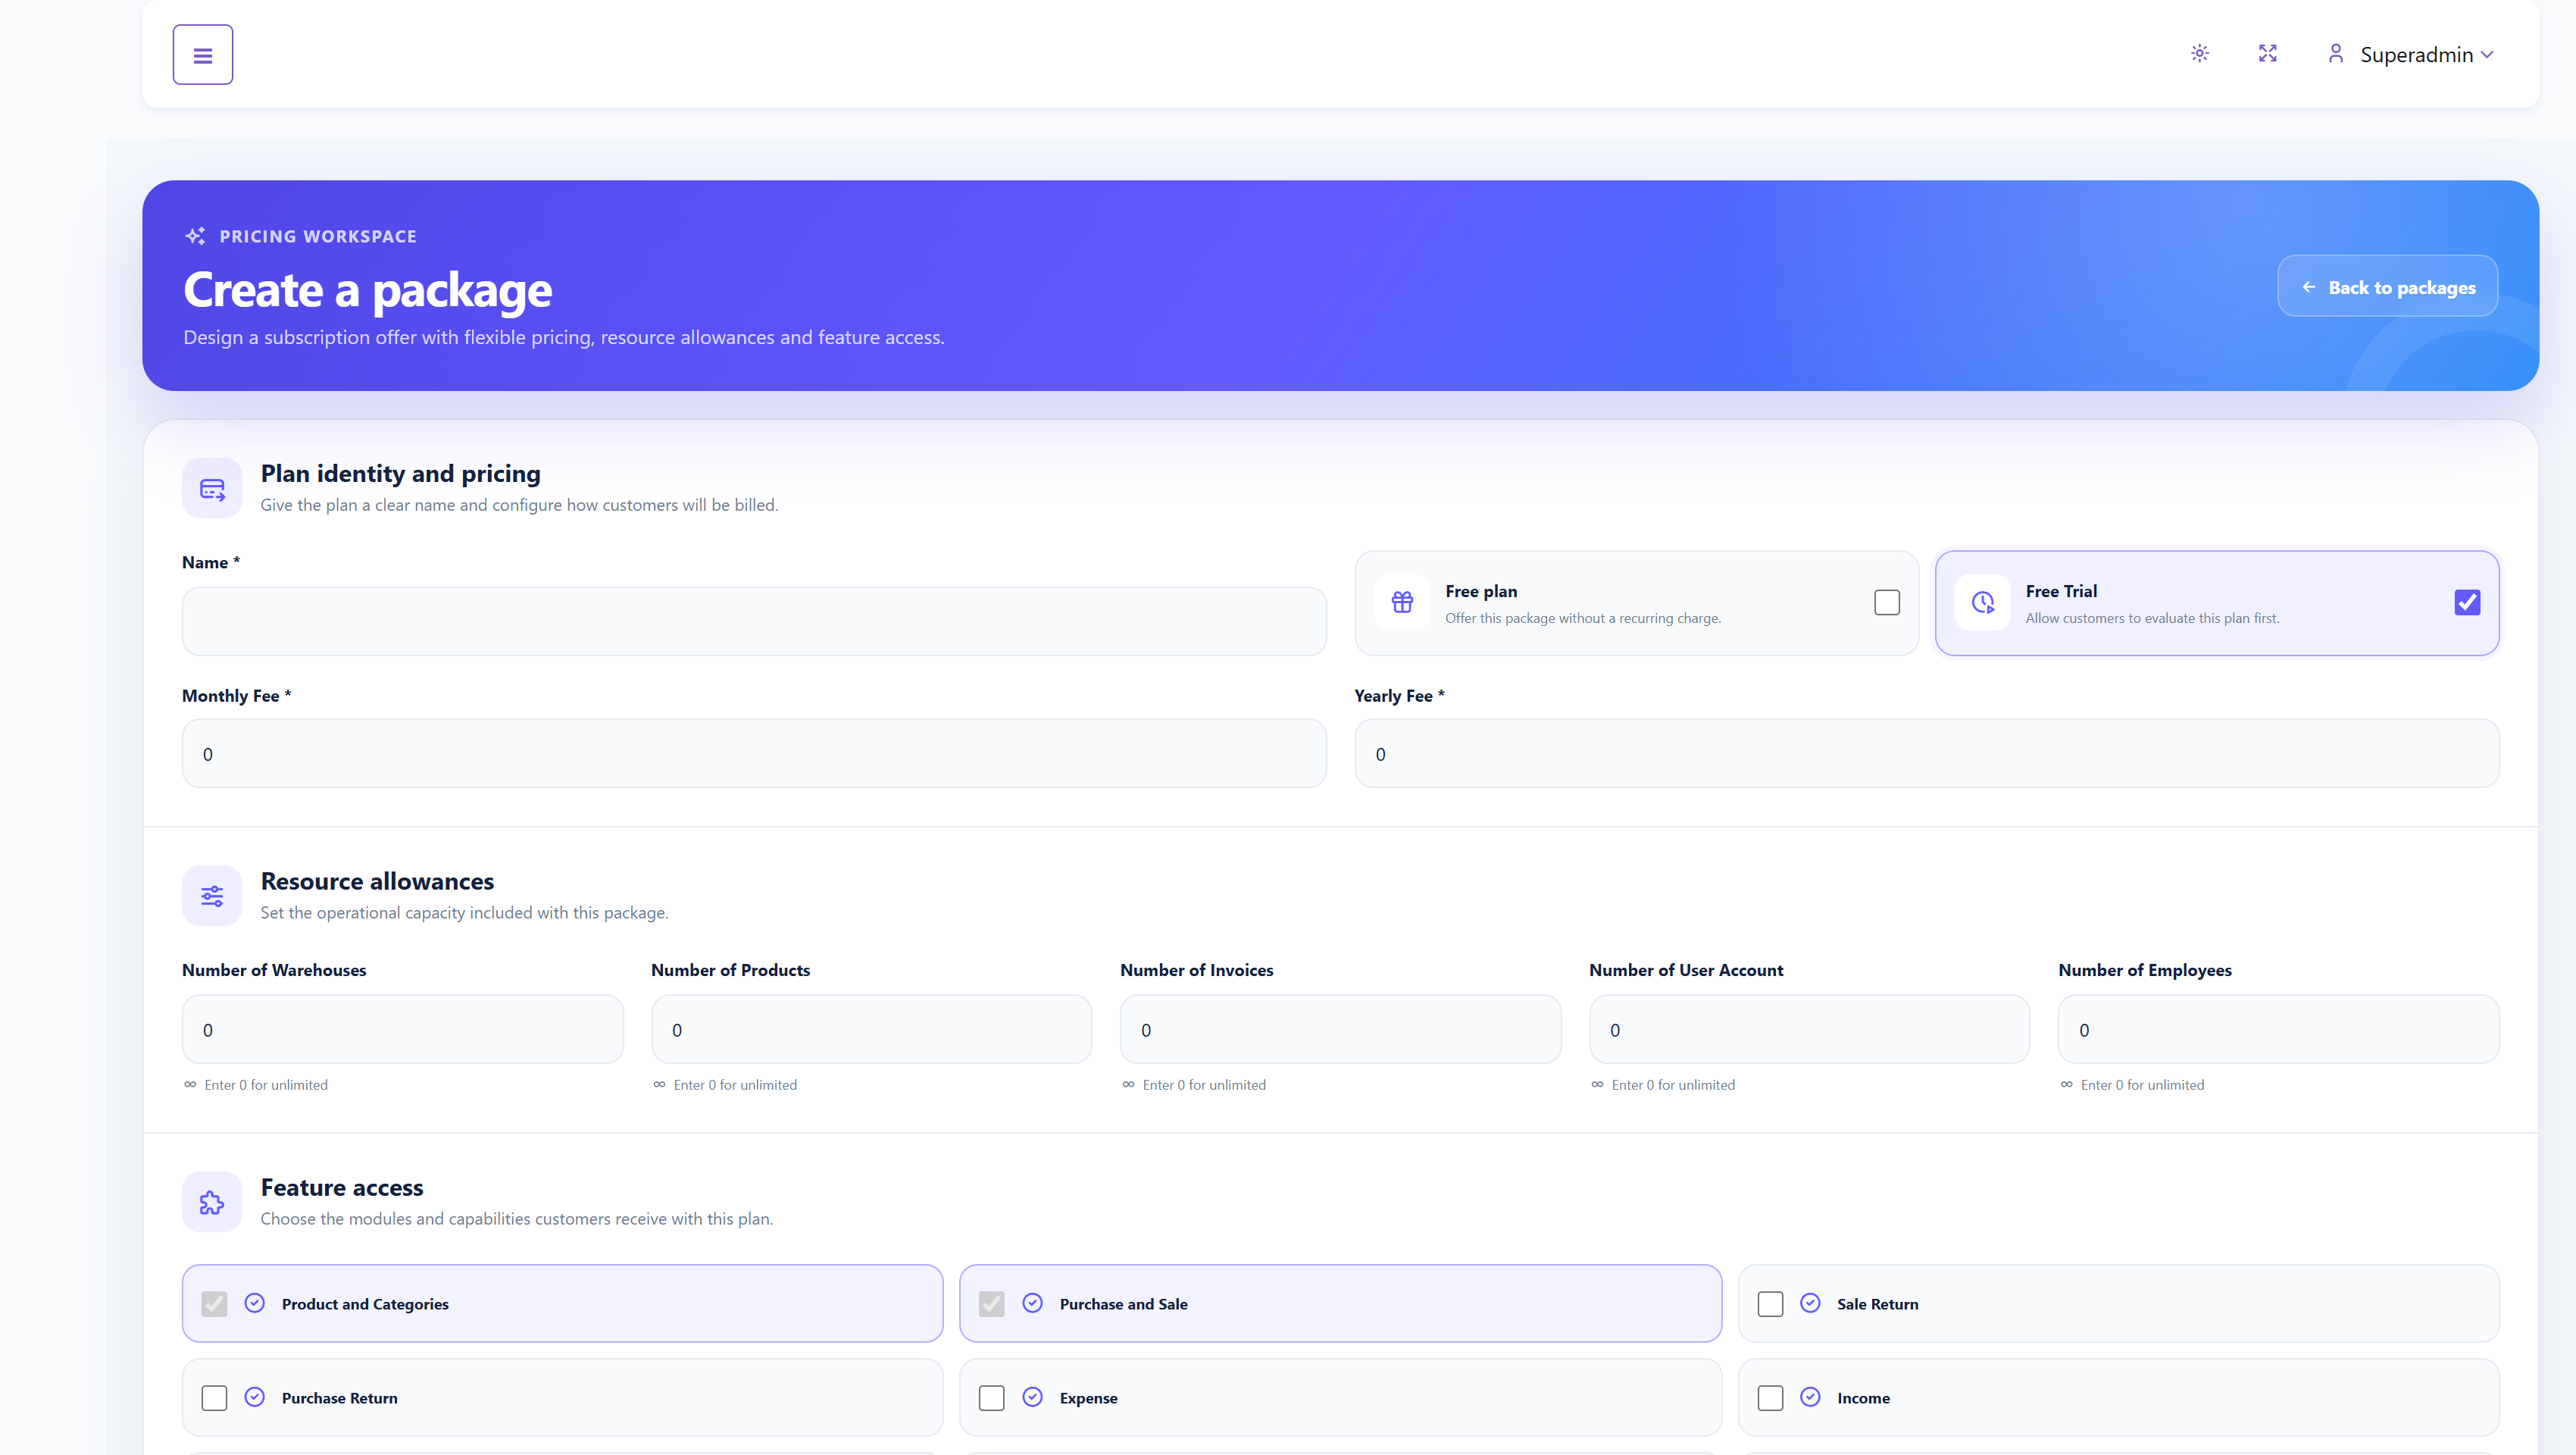
- Enter the package name.
- Enable Free plan when the package has no recurring fee, or enable Free Trial for a trial-enabled paid plan.
- Enter monthly and yearly fees for a paid package.
- Set limits for warehouses, products, invoices, user accounts, and employees. A value of
0represents unlimited usage where stated by the form. - Select every module the package should include.
- Select Save package, then verify the result in Package List and on the Frontend pricing section.
Package permissions define tenant access. Avoid removing a module from an active customer plan until the commercial and data-access impact is understood.
CMS#
CMS controls the public marketing website. Most screens provide one tab per configured language; the currently selected language determines which translated fields are being edited. Common images, icons, links, and numeric values usually apply to every language.
Languages#
Languages defines the language set used by public CMS forms and translations.
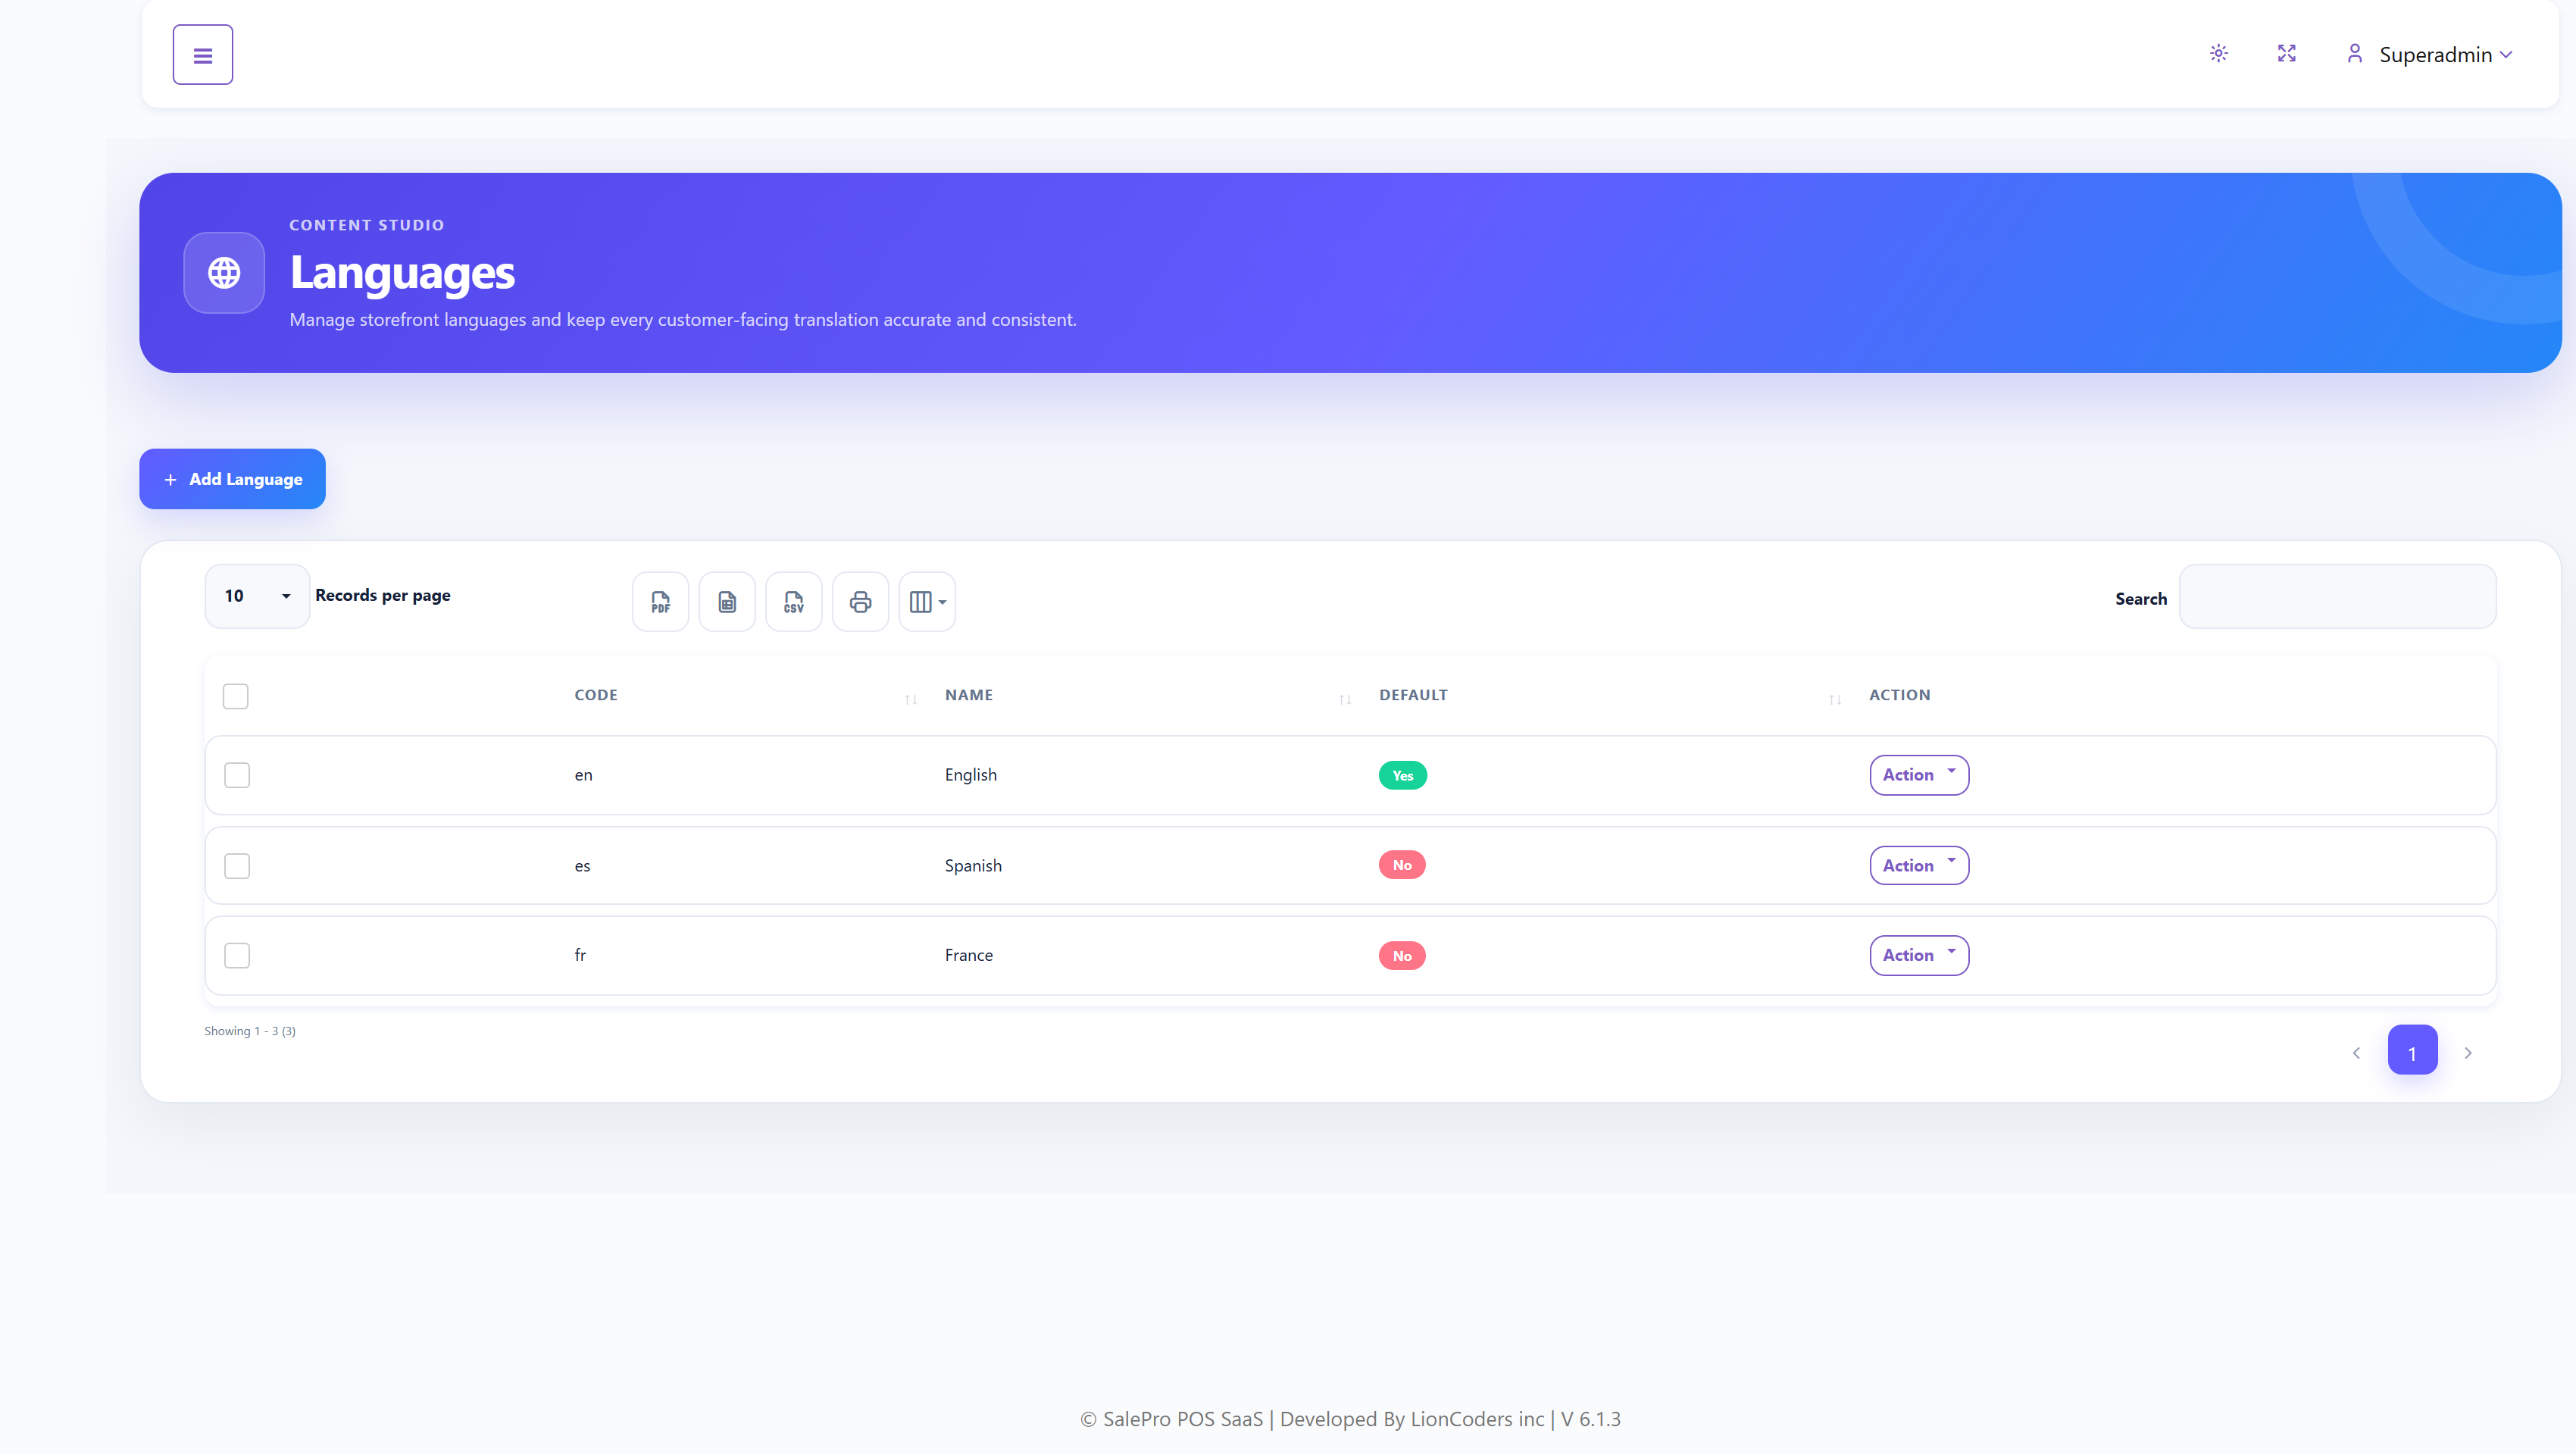
Select Add Language, enter the language code and name, and optionally mark it as default. From Action, use Edit Translations to maintain translated strings, Edit to change language details, or Delete when a language is no longer required. Do not delete the active default language before assigning another default.
Hero Section#
The Hero Section controls the first major message on the public home page.
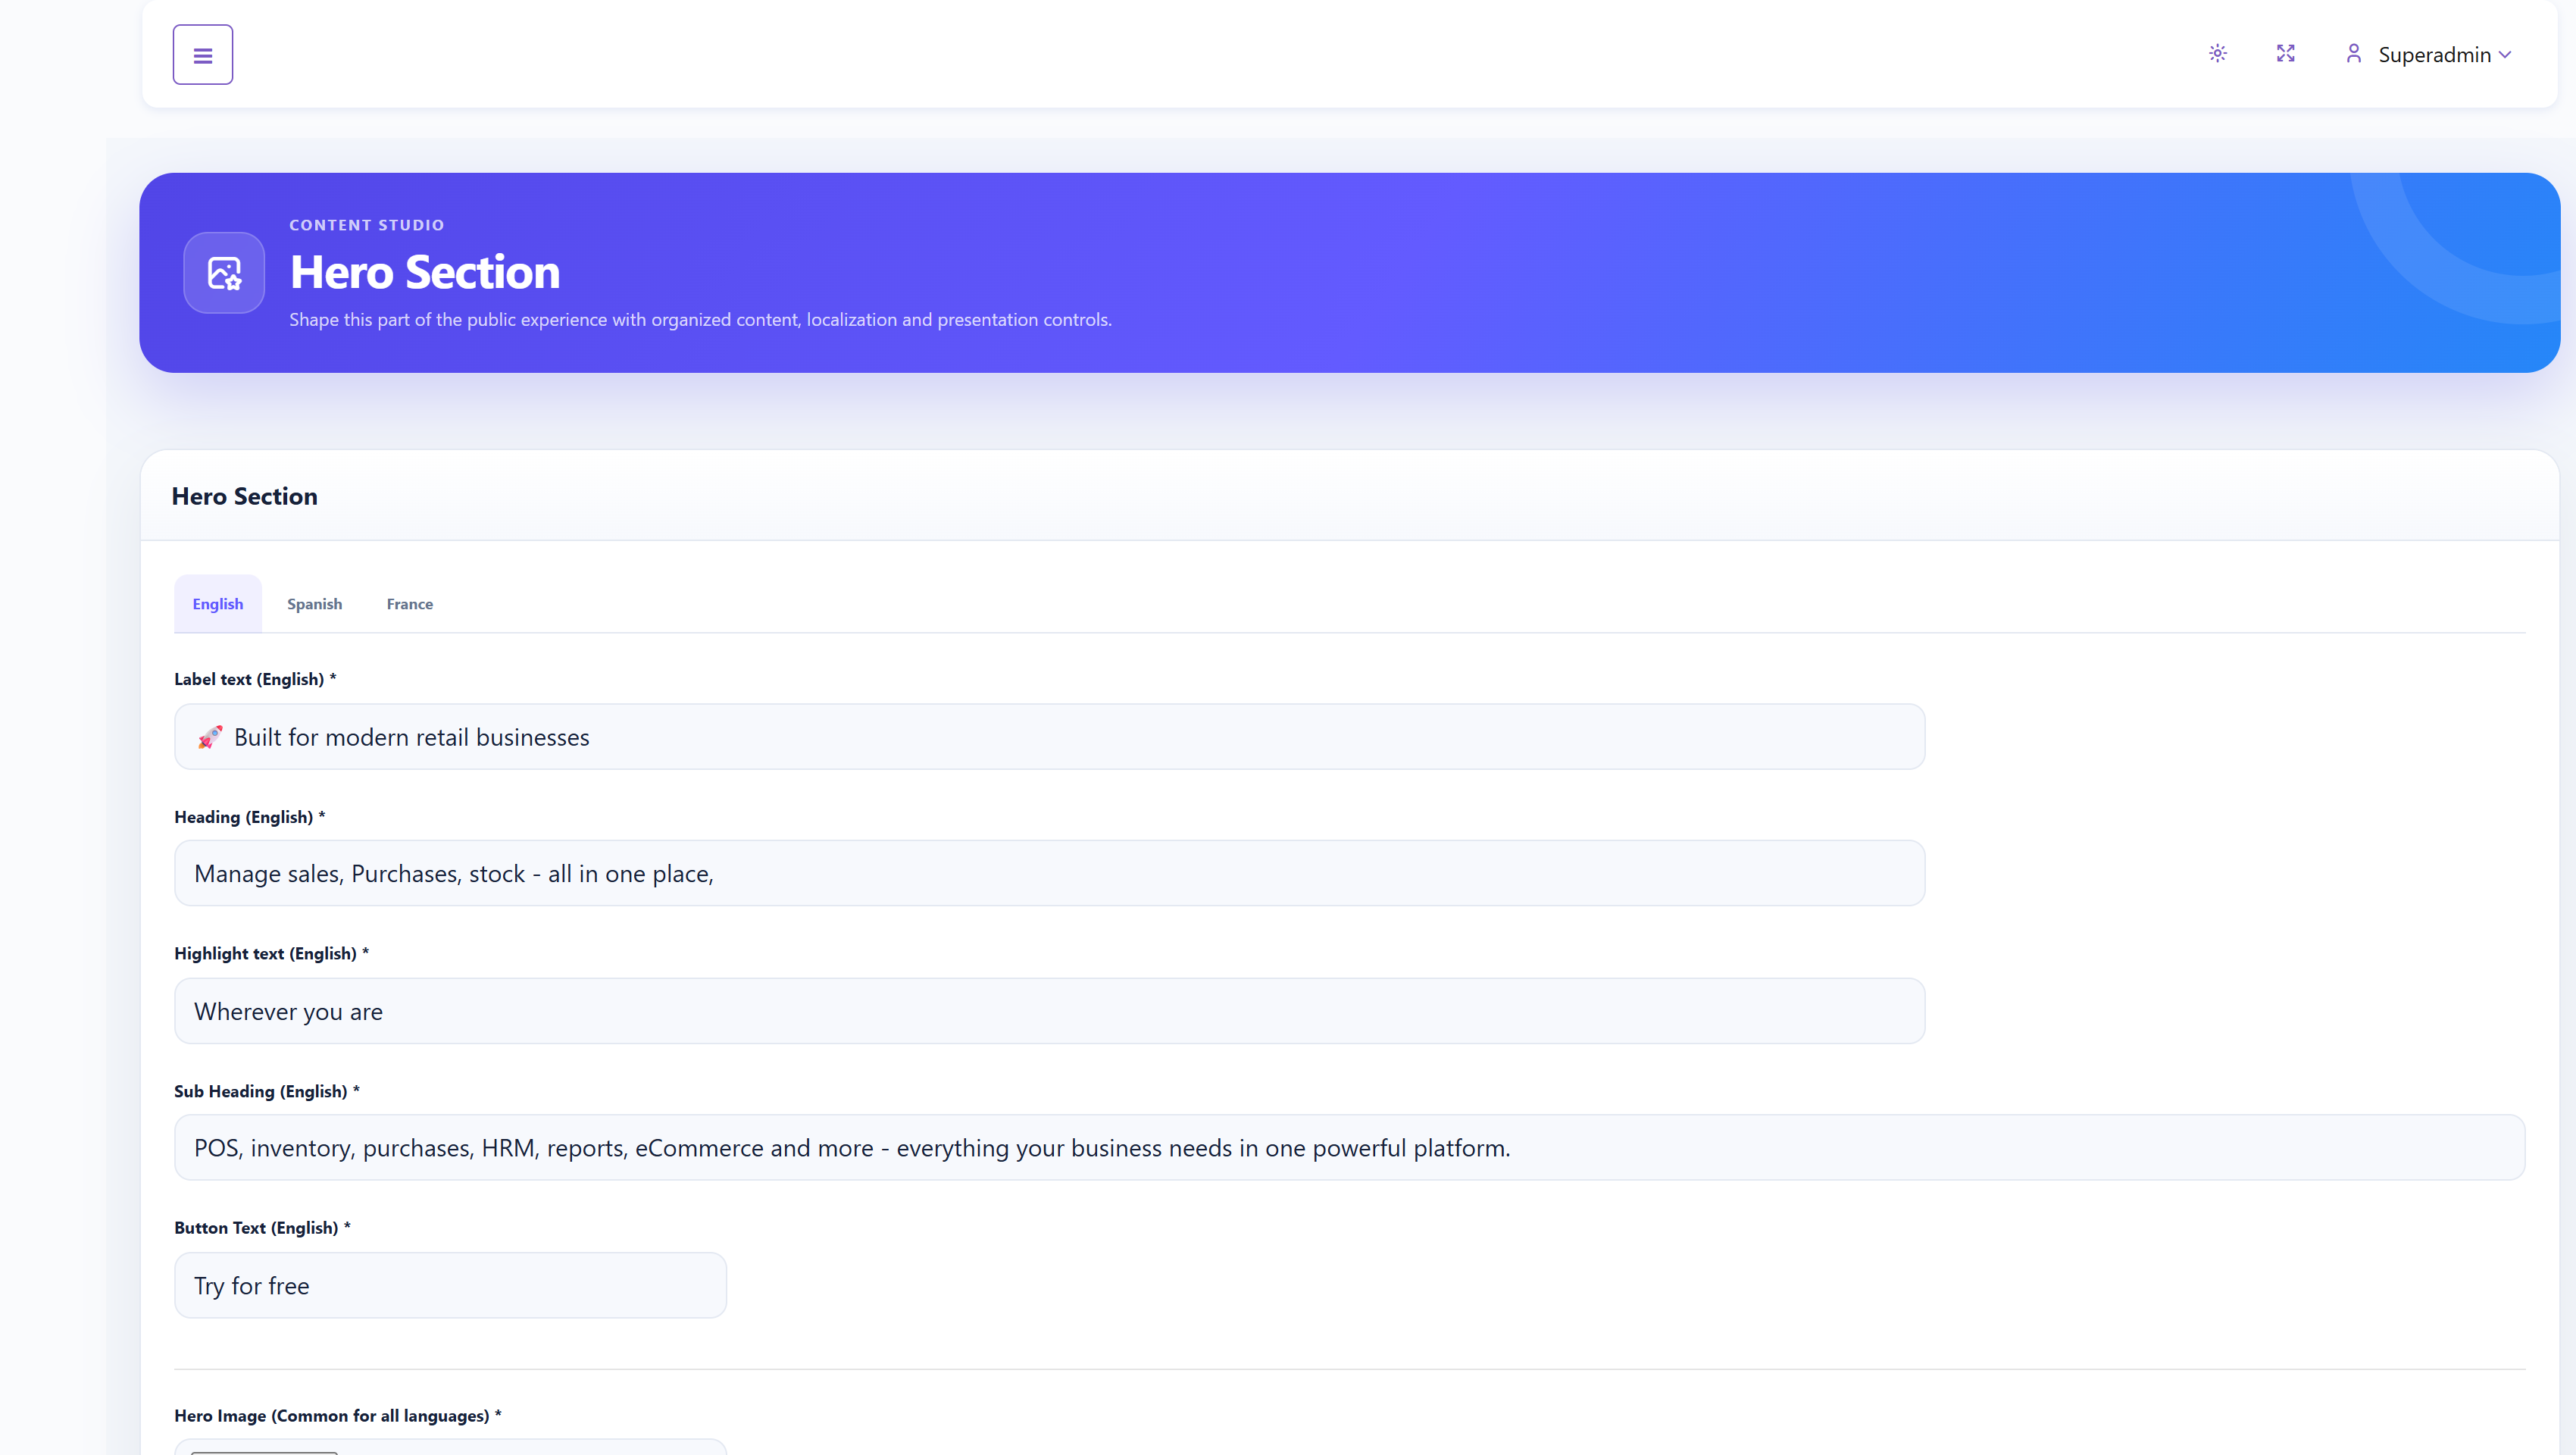
For each language, enter the label, heading, highlighted text, subheading, and button text. Upload the common hero image once. Keep the heading concise, make the button wording action-oriented, and preview the result from Frontend.
Module Section#
Module Section presents the platform’s major capabilities on the public site.
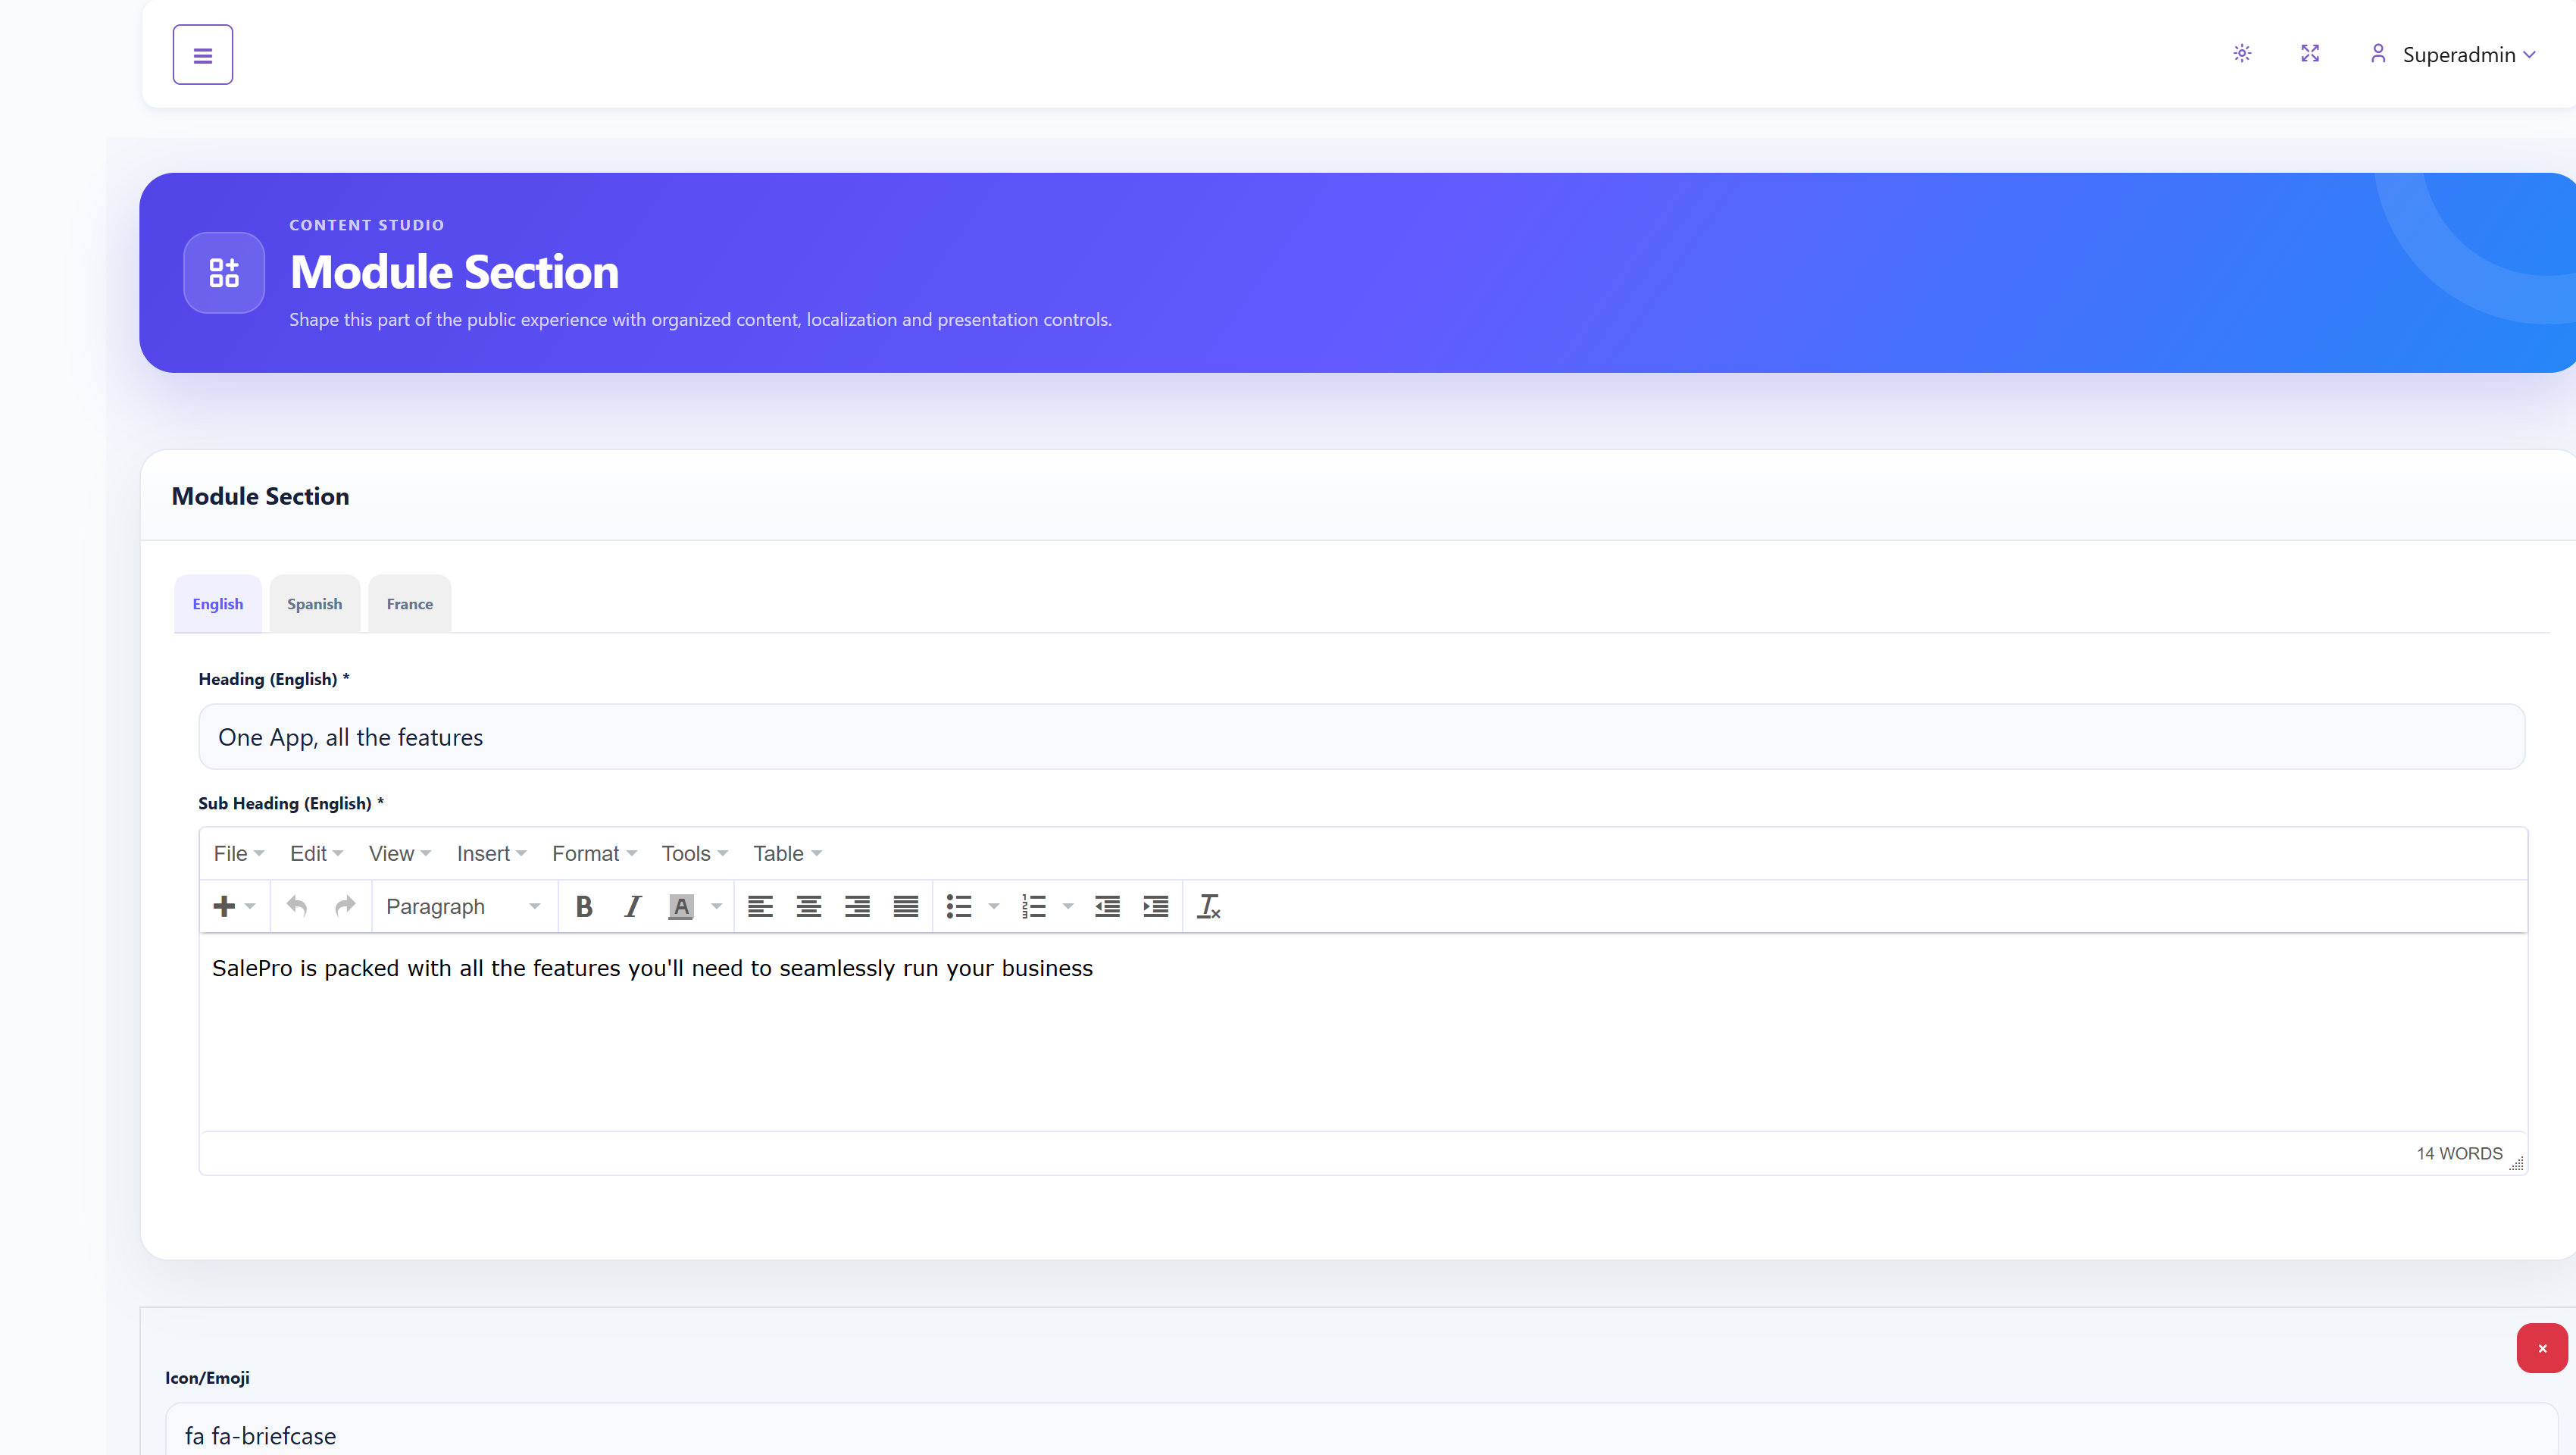
Maintain the localized section heading and subheading, then edit each module’s icon or emoji, localized name, and localized description. Use Add More to create another module and the remove control to discard an unwanted row. Keep descriptions consistent with modules actually available in your packages.
Testimonial Section#
Testimonial Section manages customer quotes displayed on the marketing website.
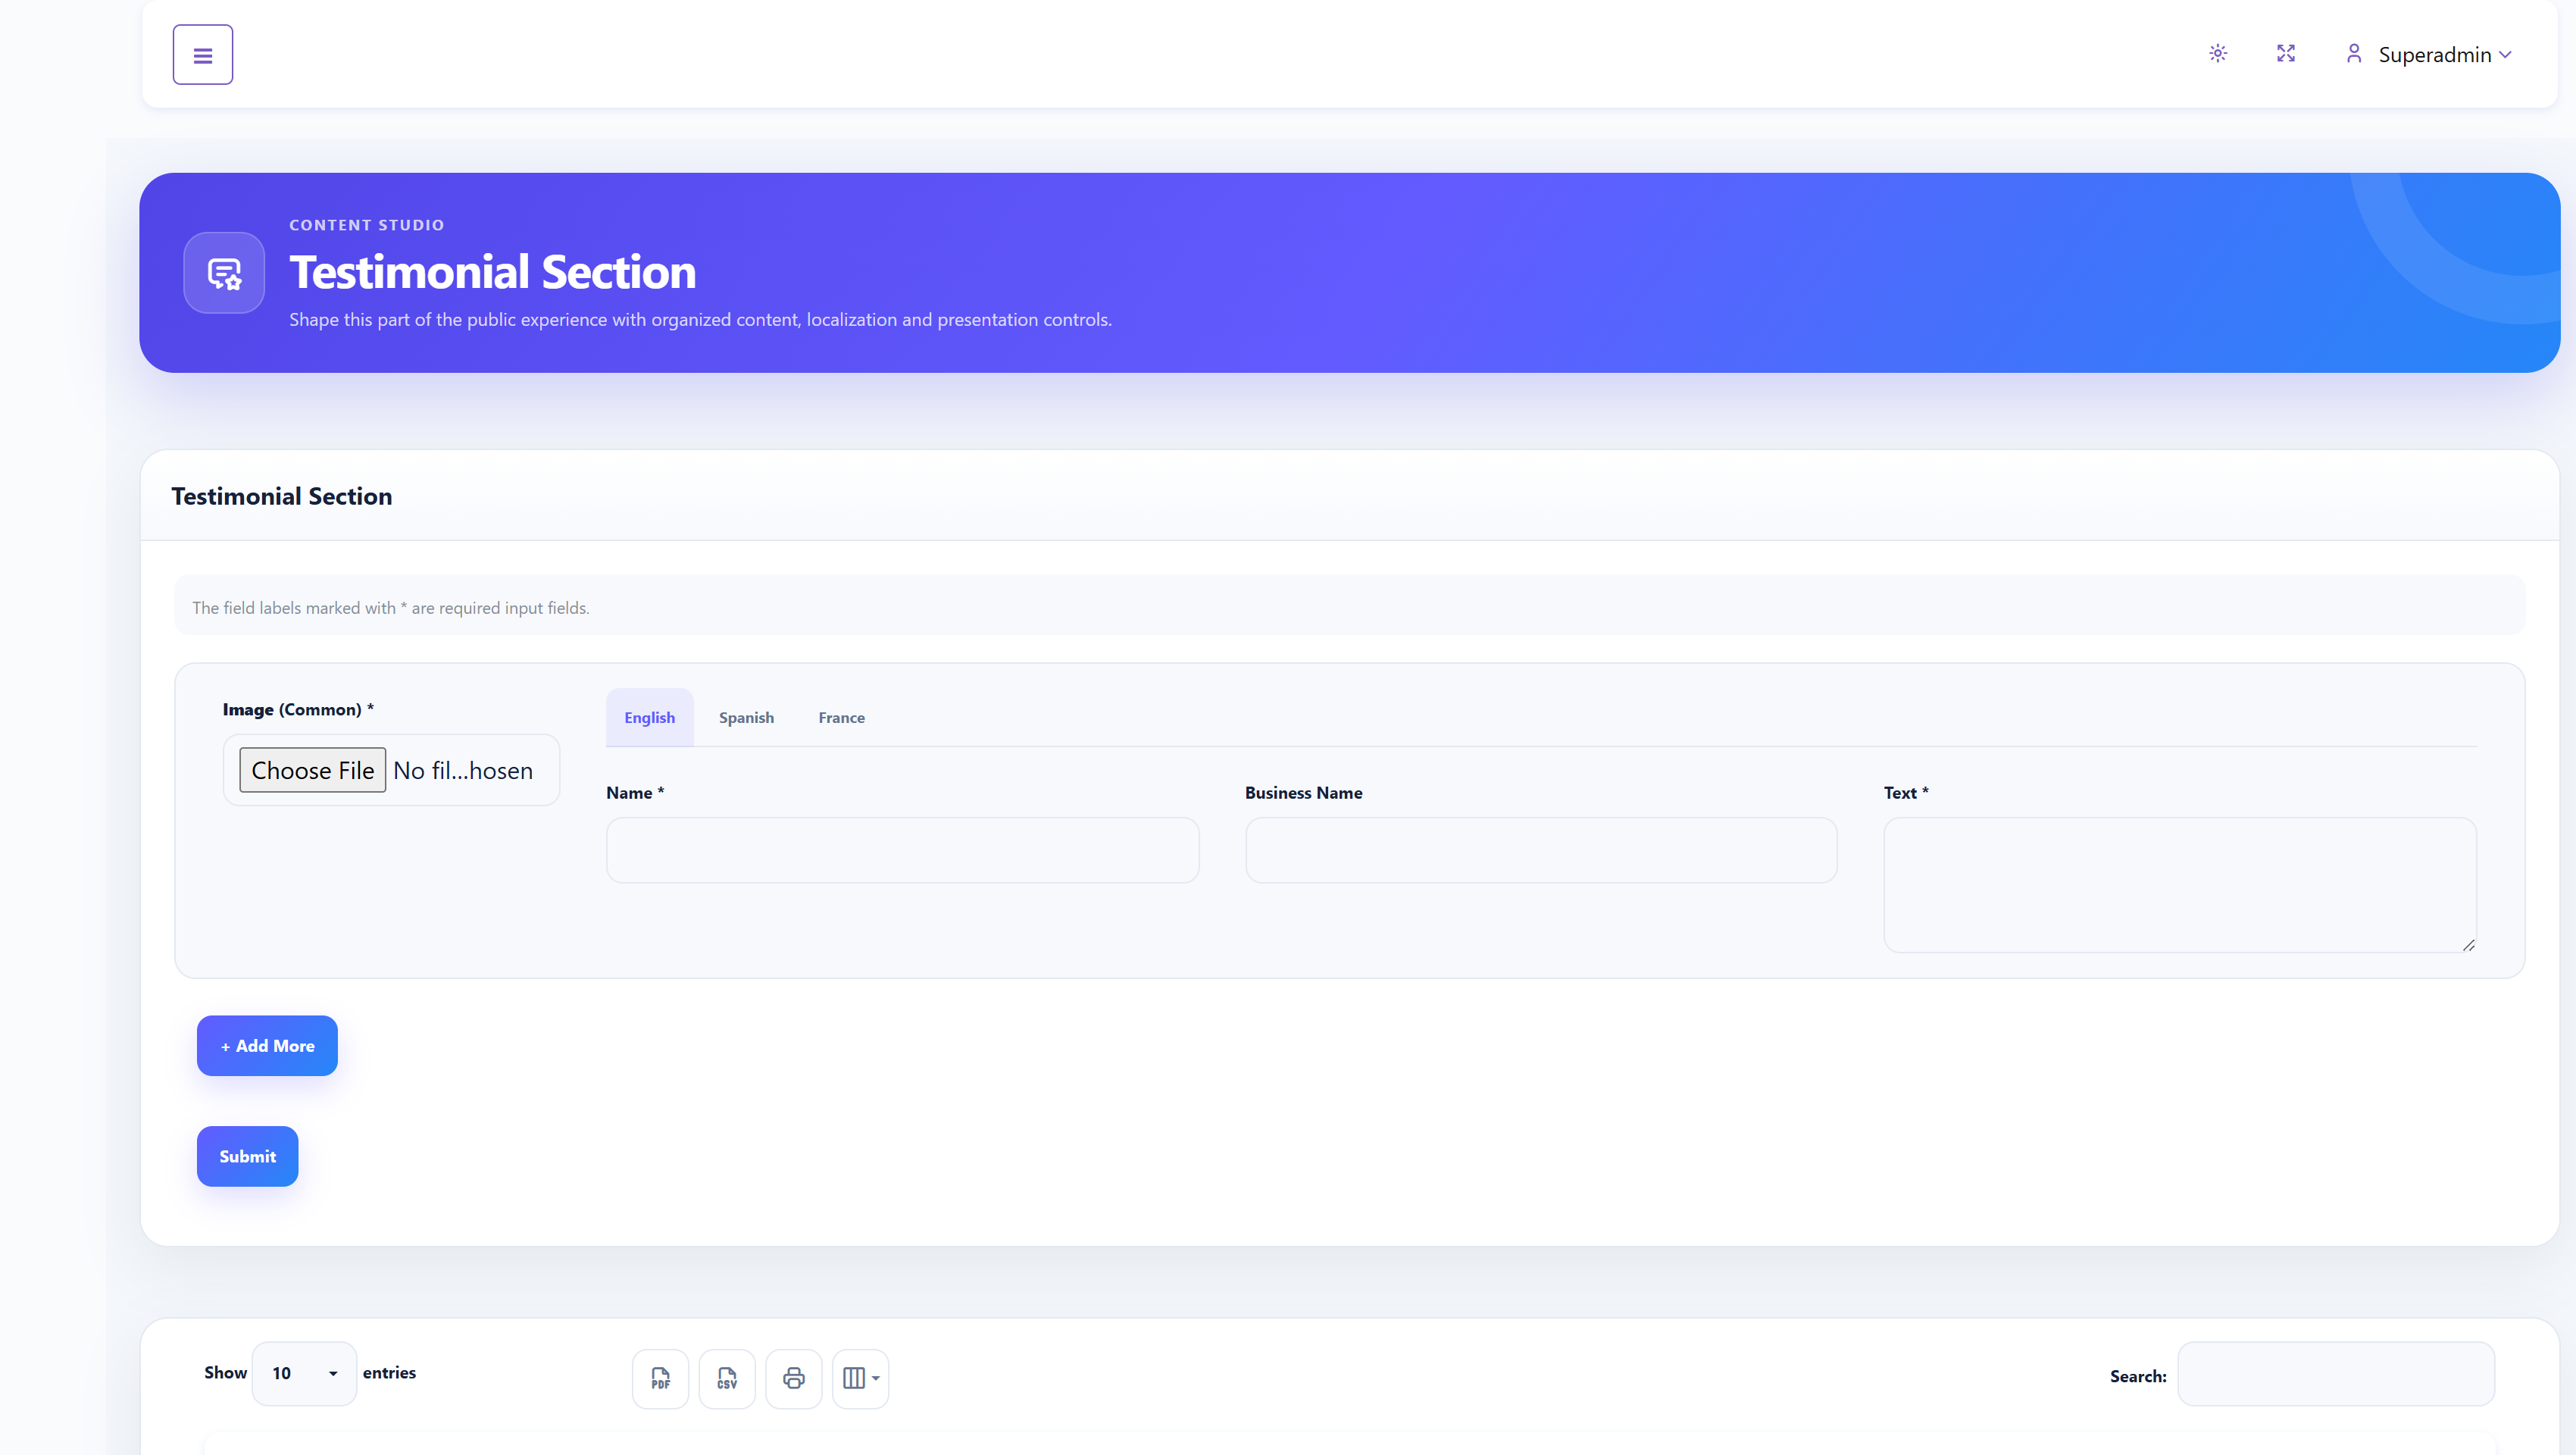
Provide a common customer image and localized name, business name, and testimonial text. Use Add More for additional entries. The table can be searched and used to edit, remove, or reorder existing testimonials. Publish only approved quotes and images.
Earlier-version reference images
Statistics Section#
Statistics Section manages compact proof points such as uptime, transaction volume, or support availability.
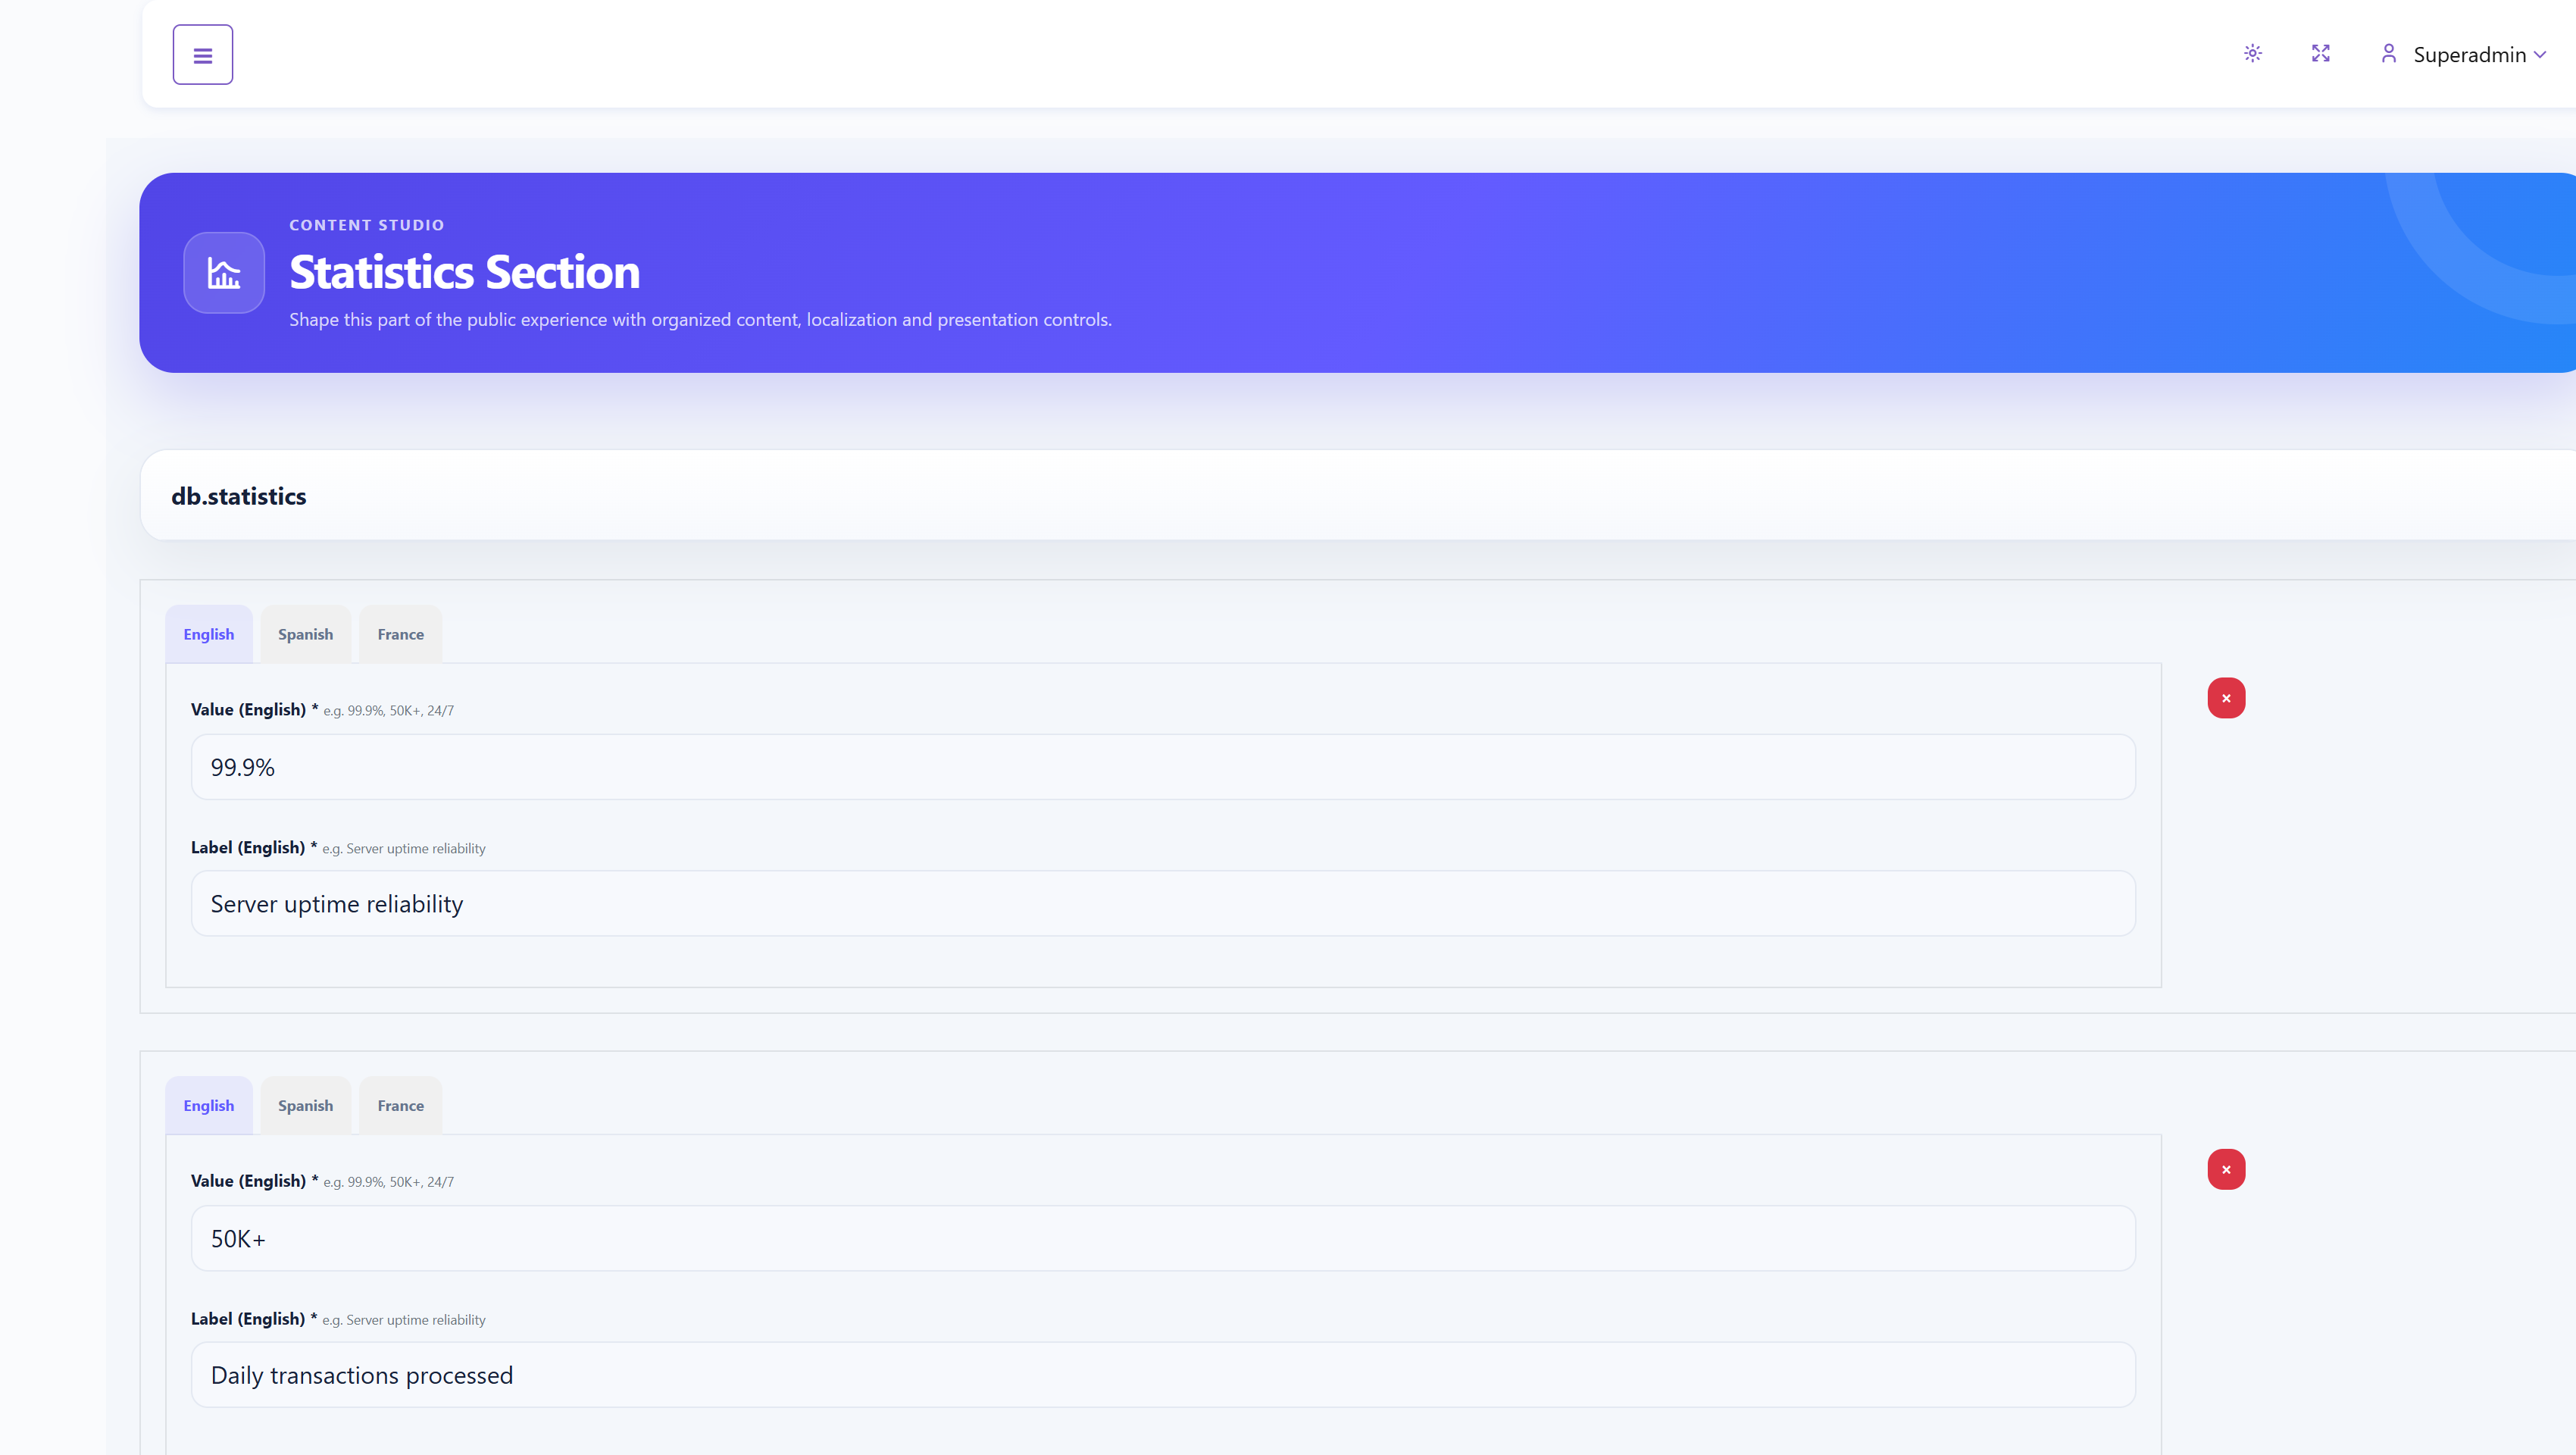
For every statistic, enter the value and label in each language. Use Add More to create another item and Save to publish. Use verifiable figures and update time-sensitive claims regularly.
FAQ Section#
FAQ Section manages the public frequently asked questions.
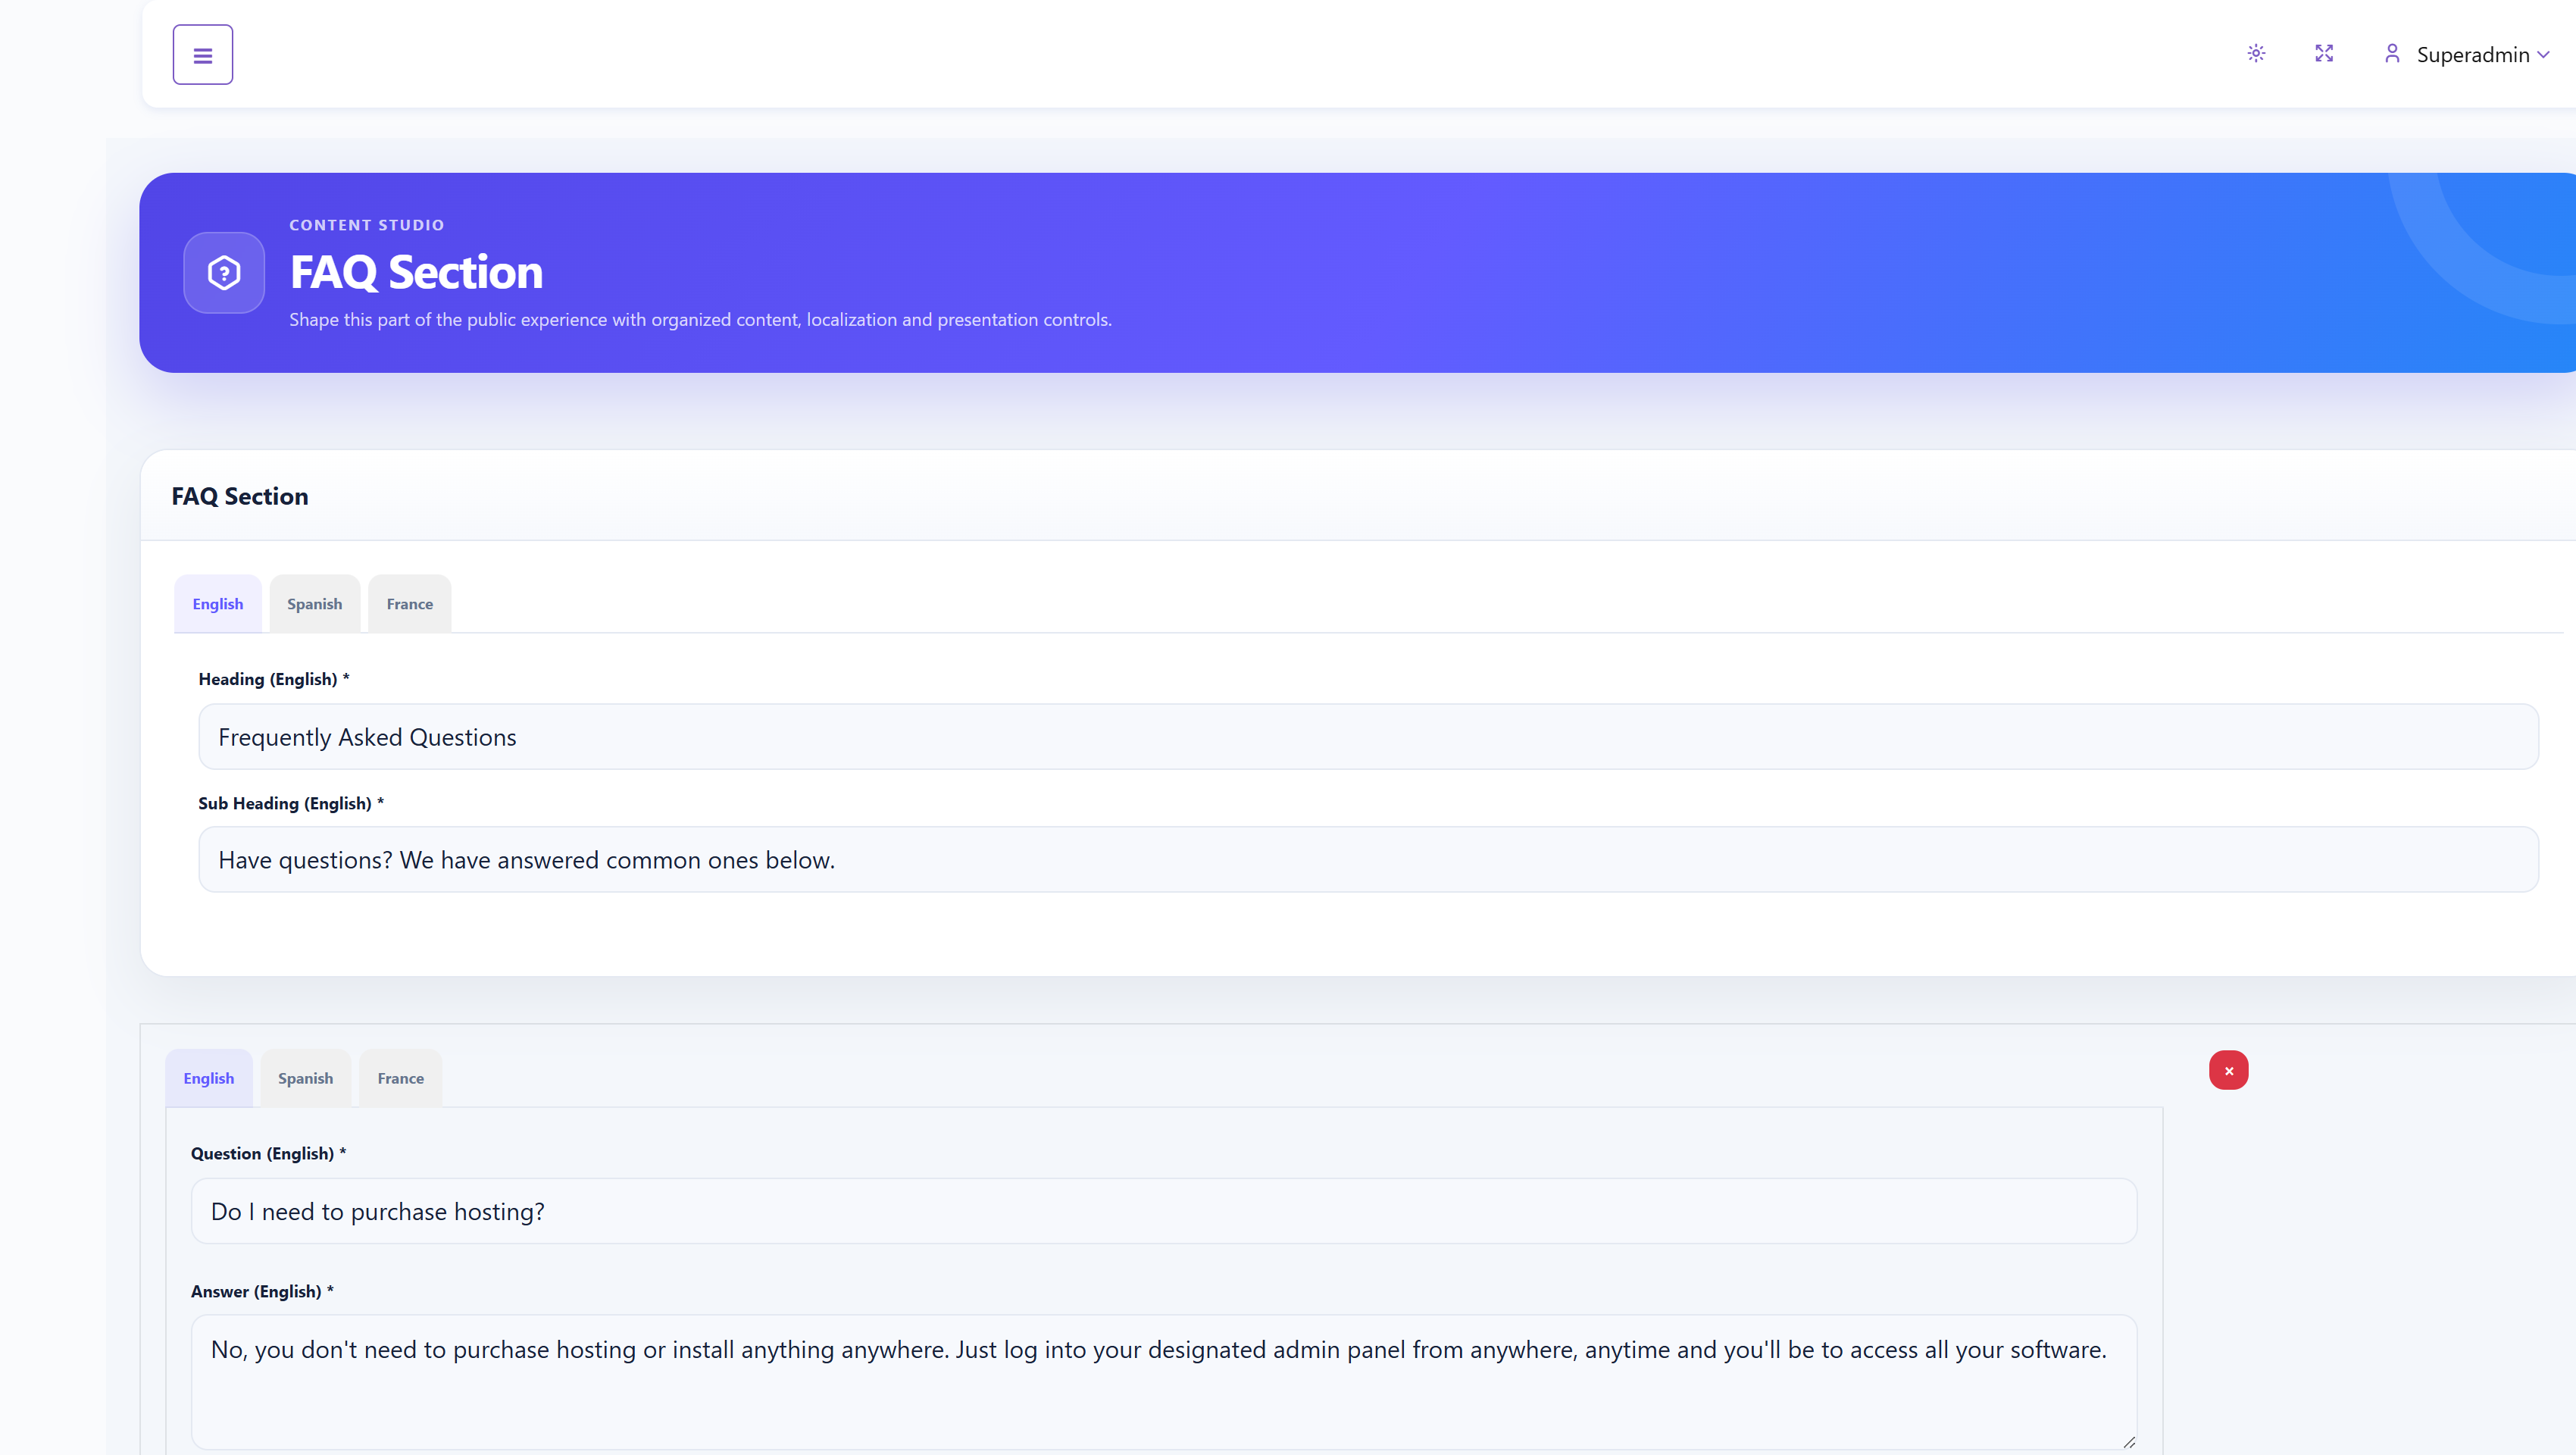
Enter the localized section heading and subheading. For each FAQ row, provide the question and answer in every language. Use Add FAQ to add an item, the remove control to discard one, and Save when complete. Keep answers aligned with current plans, hosting arrangements, and support policies.
Mobile App Section#
Mobile App Section controls the public mobile-app promotion area and its phone mockup.
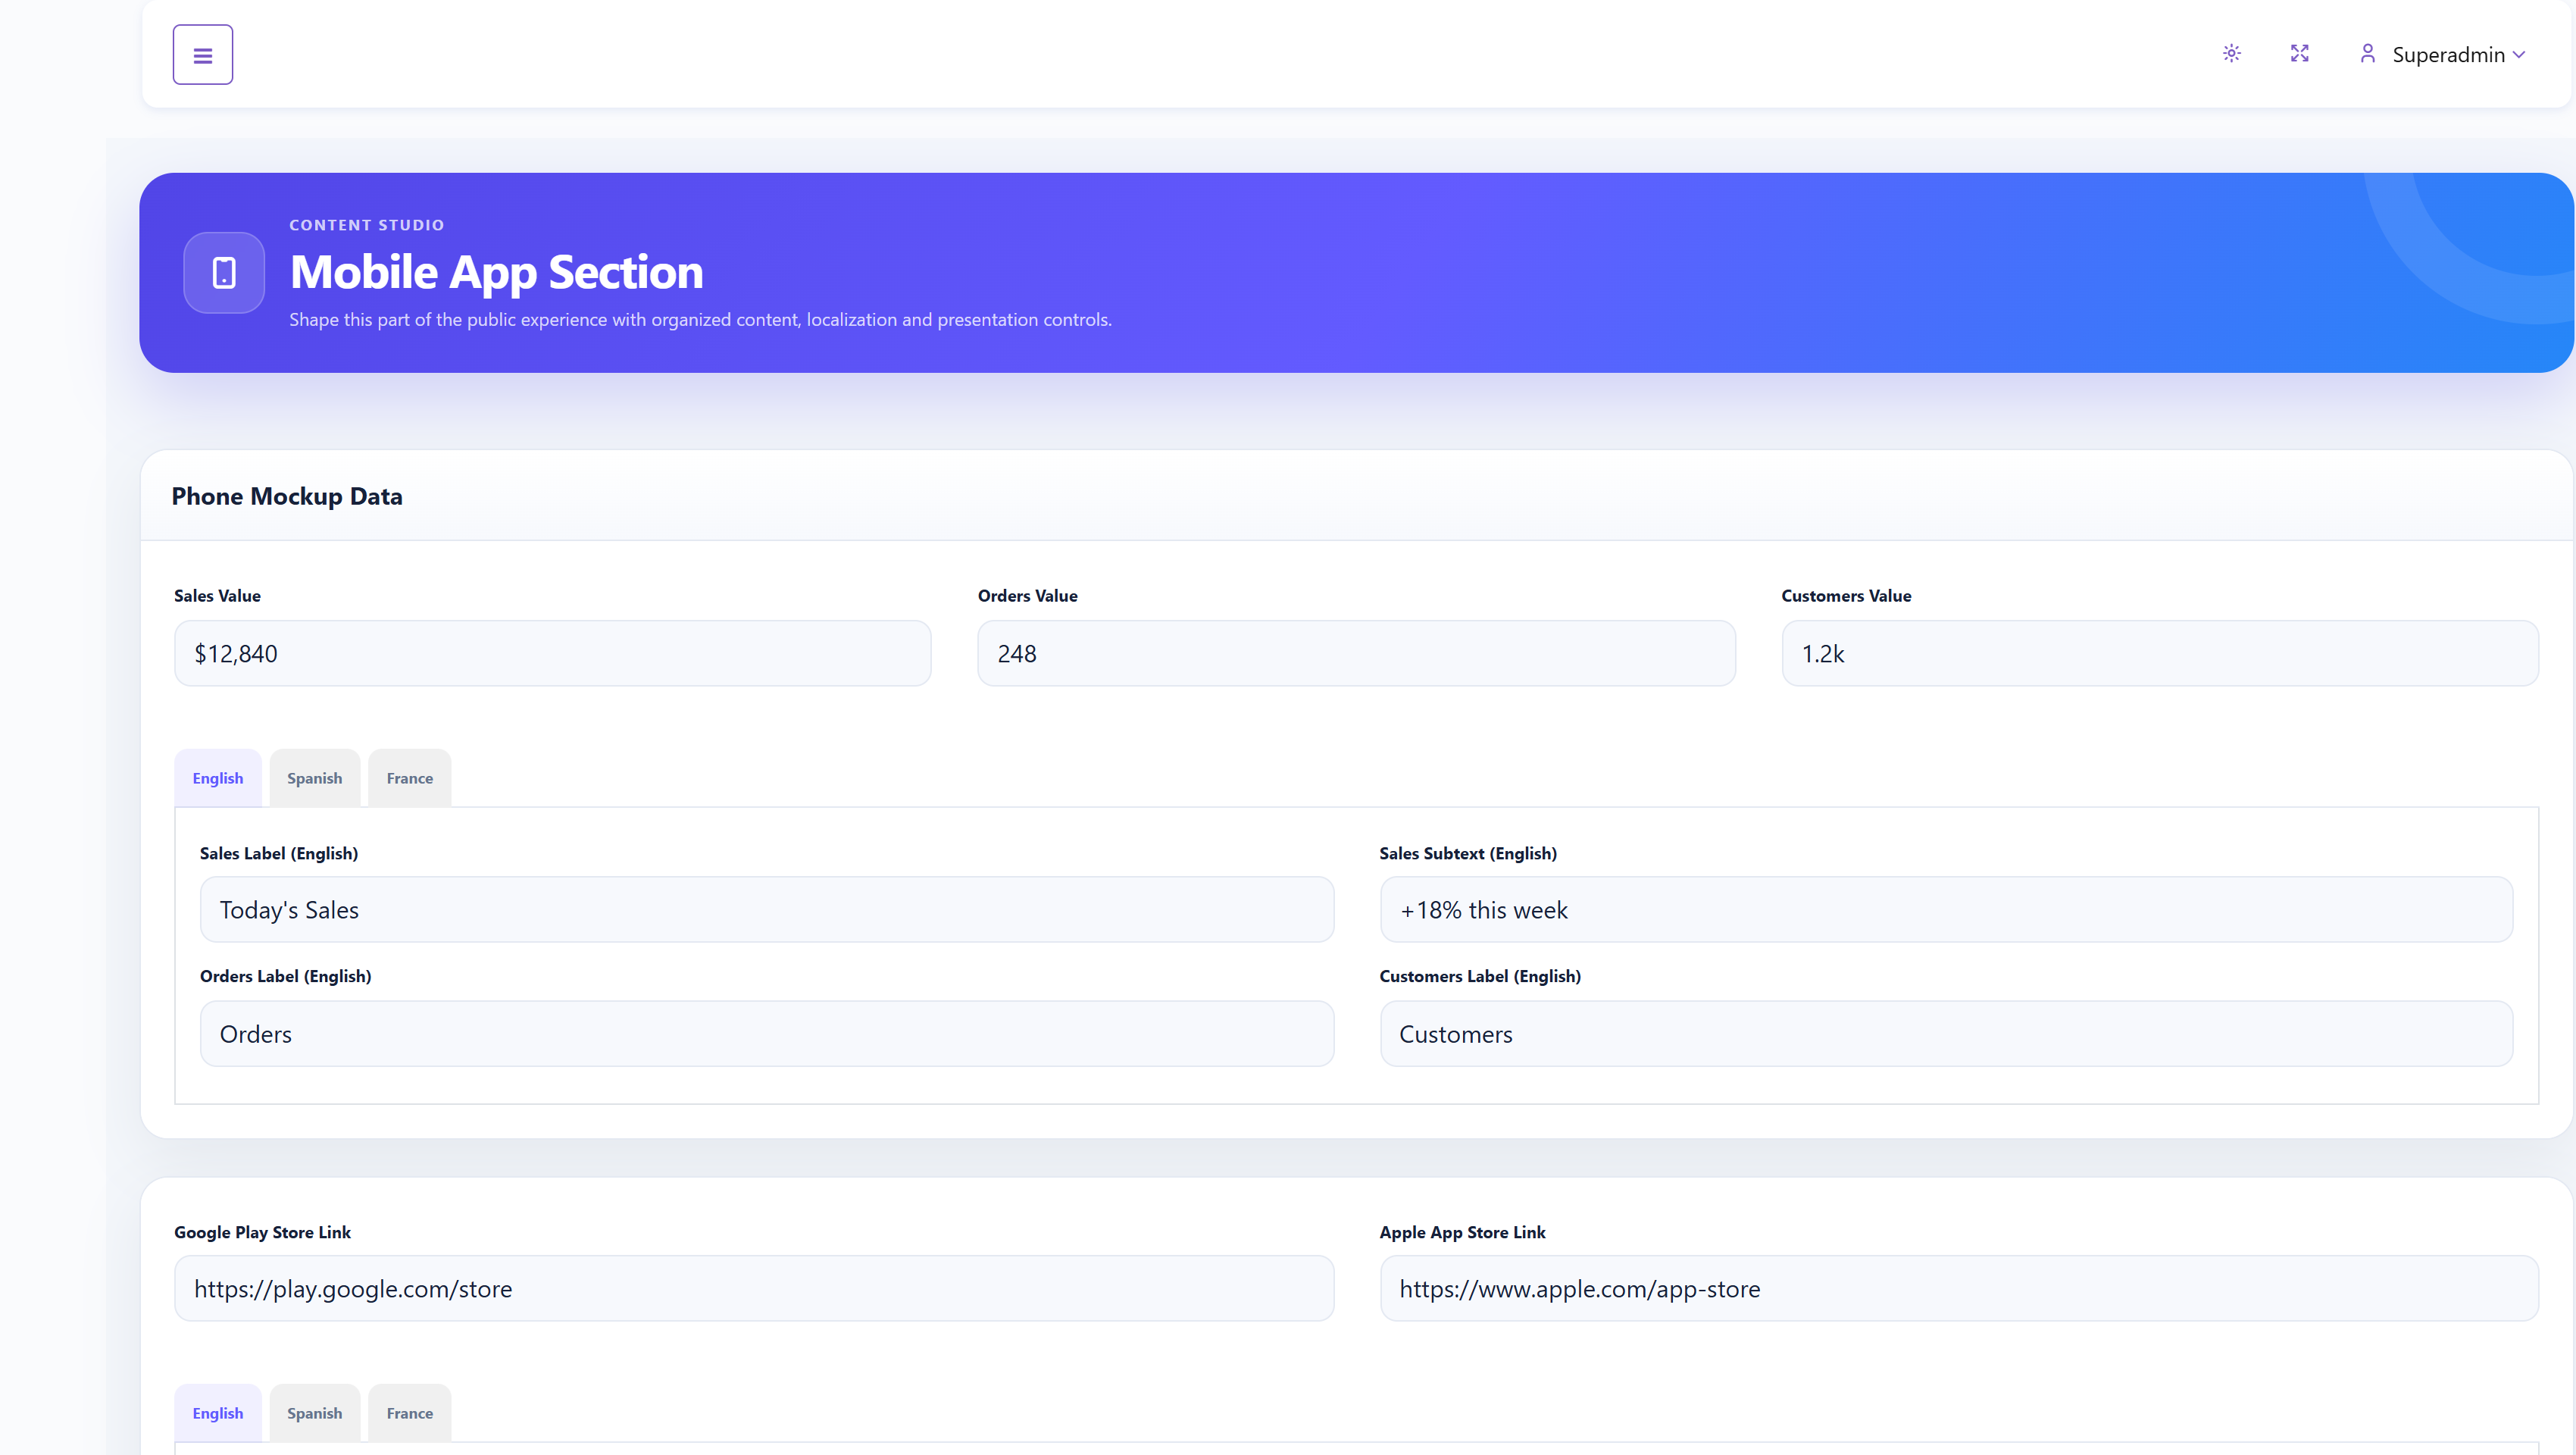
Set the mockup’s sales, orders, and customer values; translate their labels and supporting text; add Google Play and Apple App Store links; translate the section heading and subheading; and maintain feature items with an icon or emoji, title, and description. Use Add More as needed and verify every store URL from the Frontend.
Blog Section#
Blog Section manages public articles used for product education, updates, and organic search.
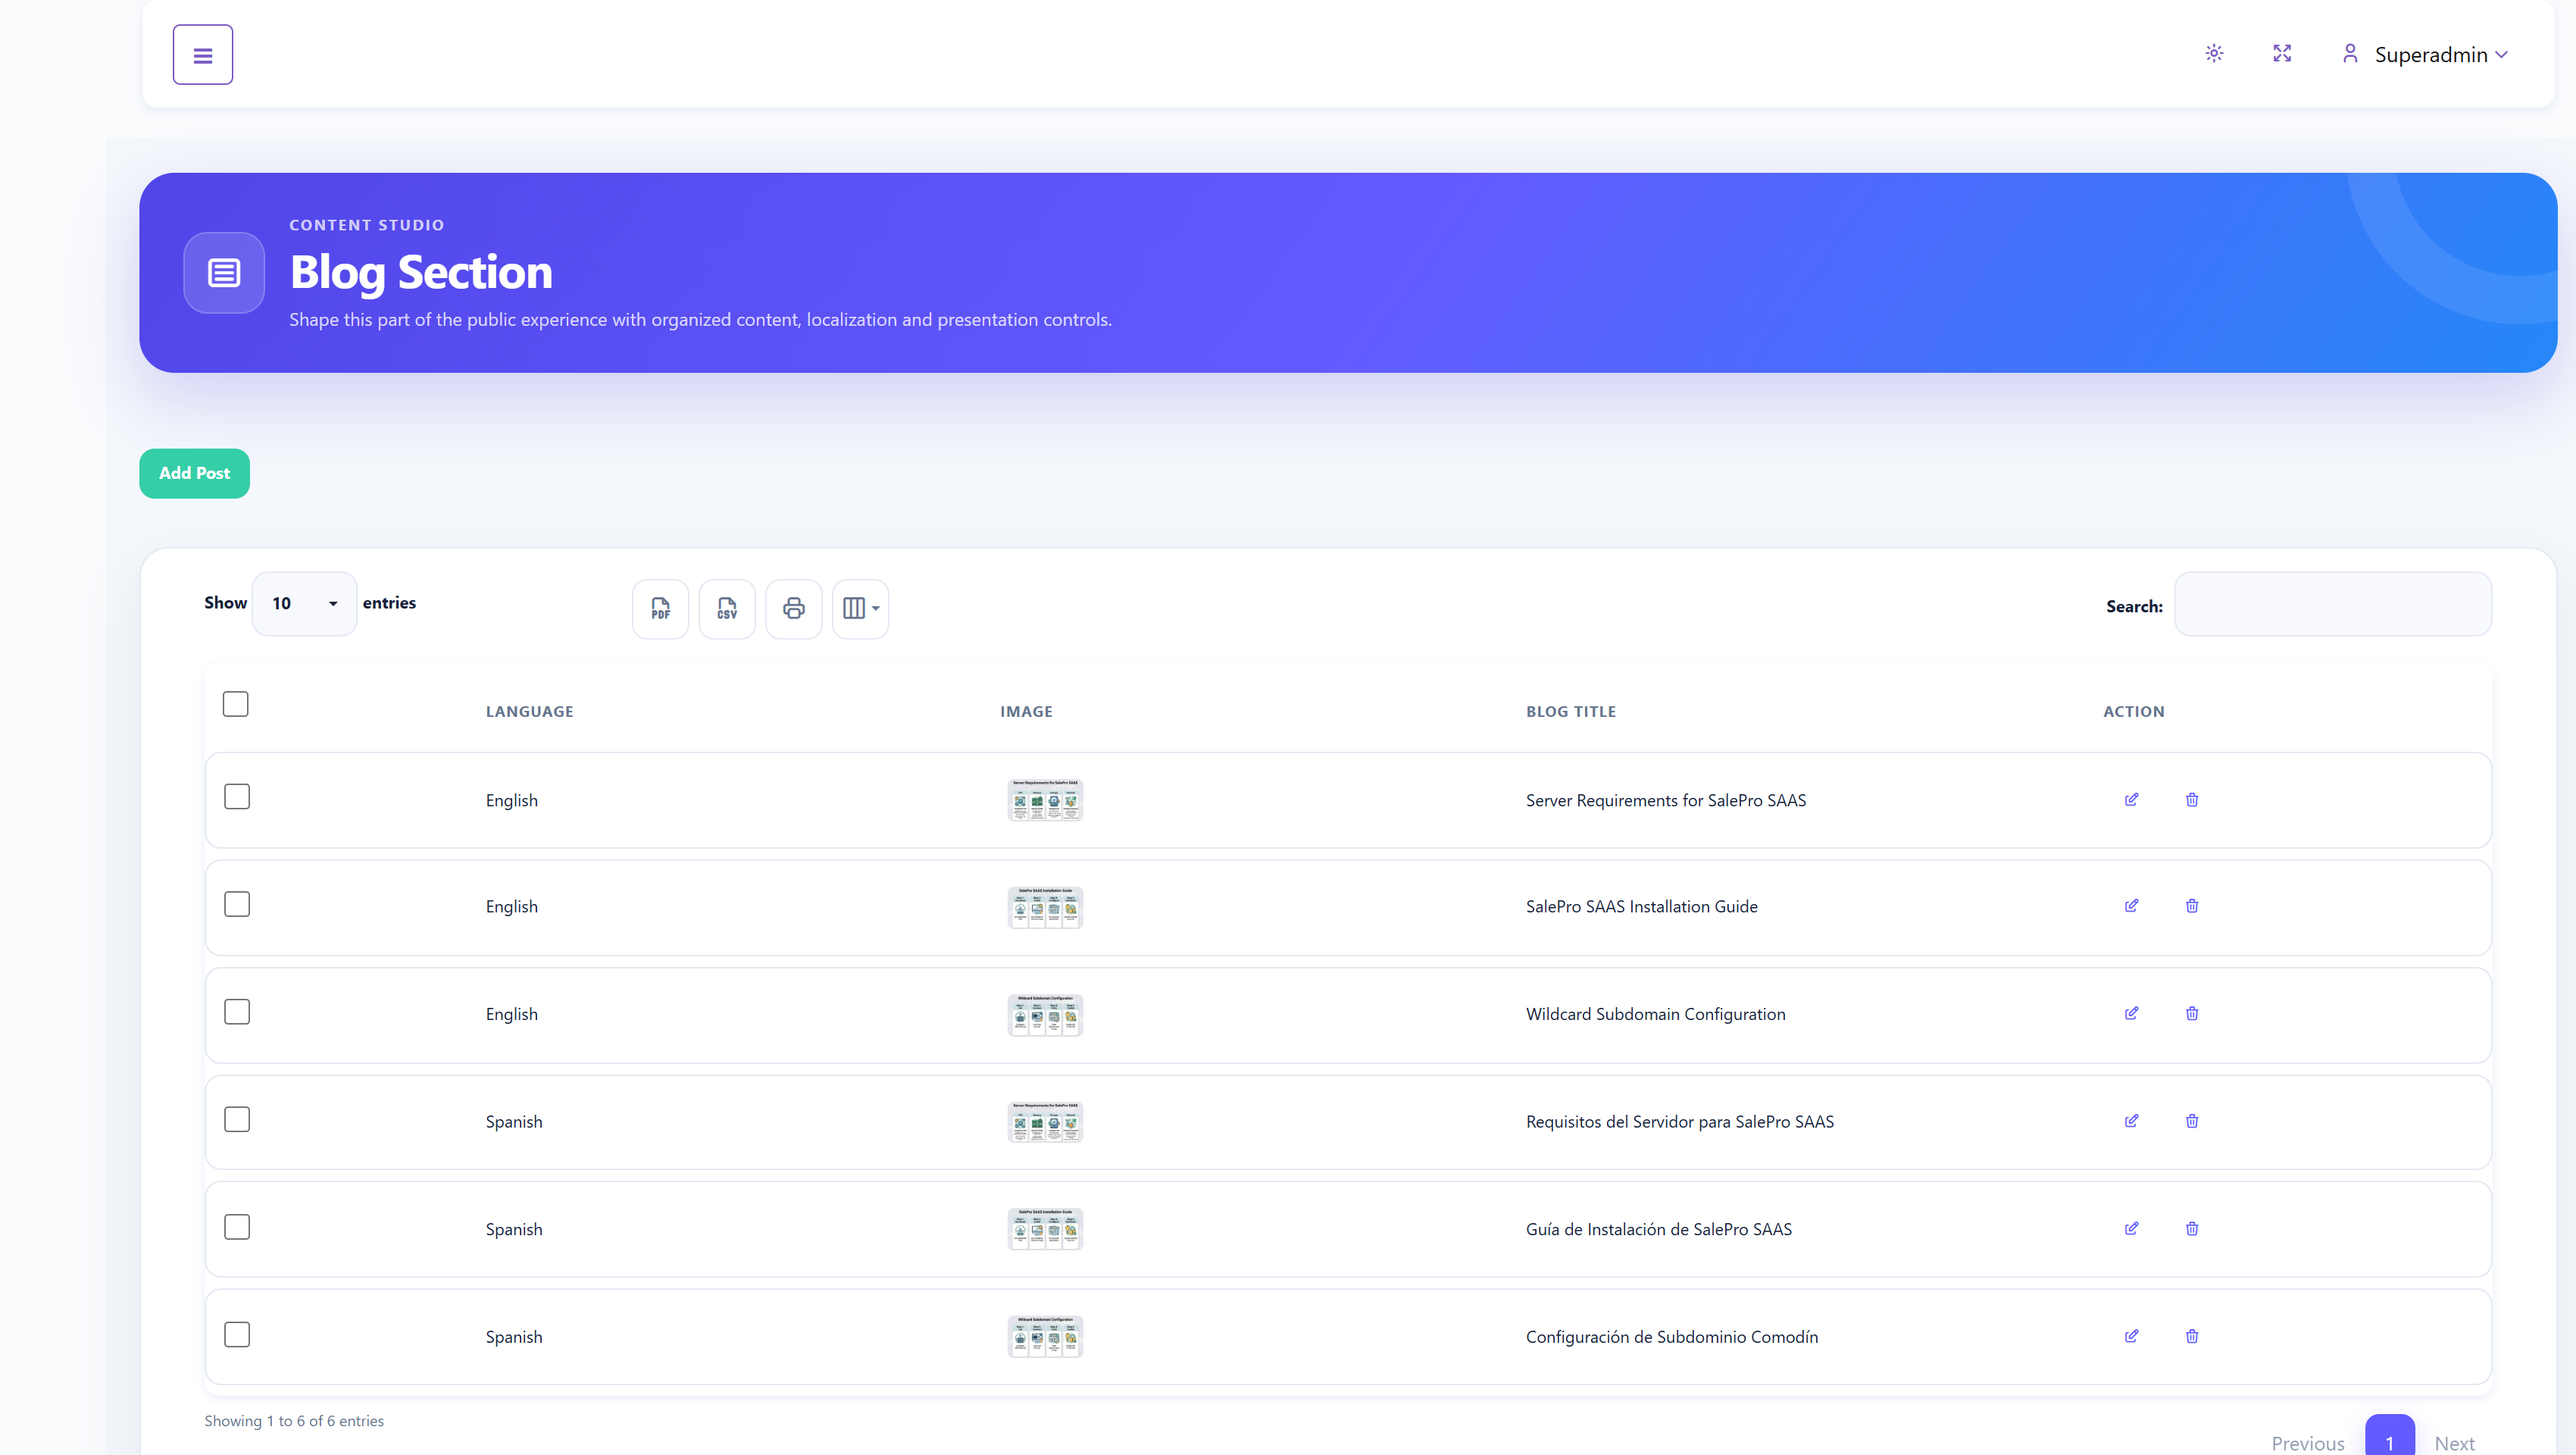
Select Add Post, choose the language, upload an image, and provide the title and formatted description. Complete the Meta Title, Meta Description, Open Graph Title, and Open Graph Description fields where available. Existing rows can be edited, deleted, and reordered. Preview the public post and verify the URL, image crop, formatting, and metadata before promotion.
Contact Section#
Contact Section controls the public contact area and form wording.
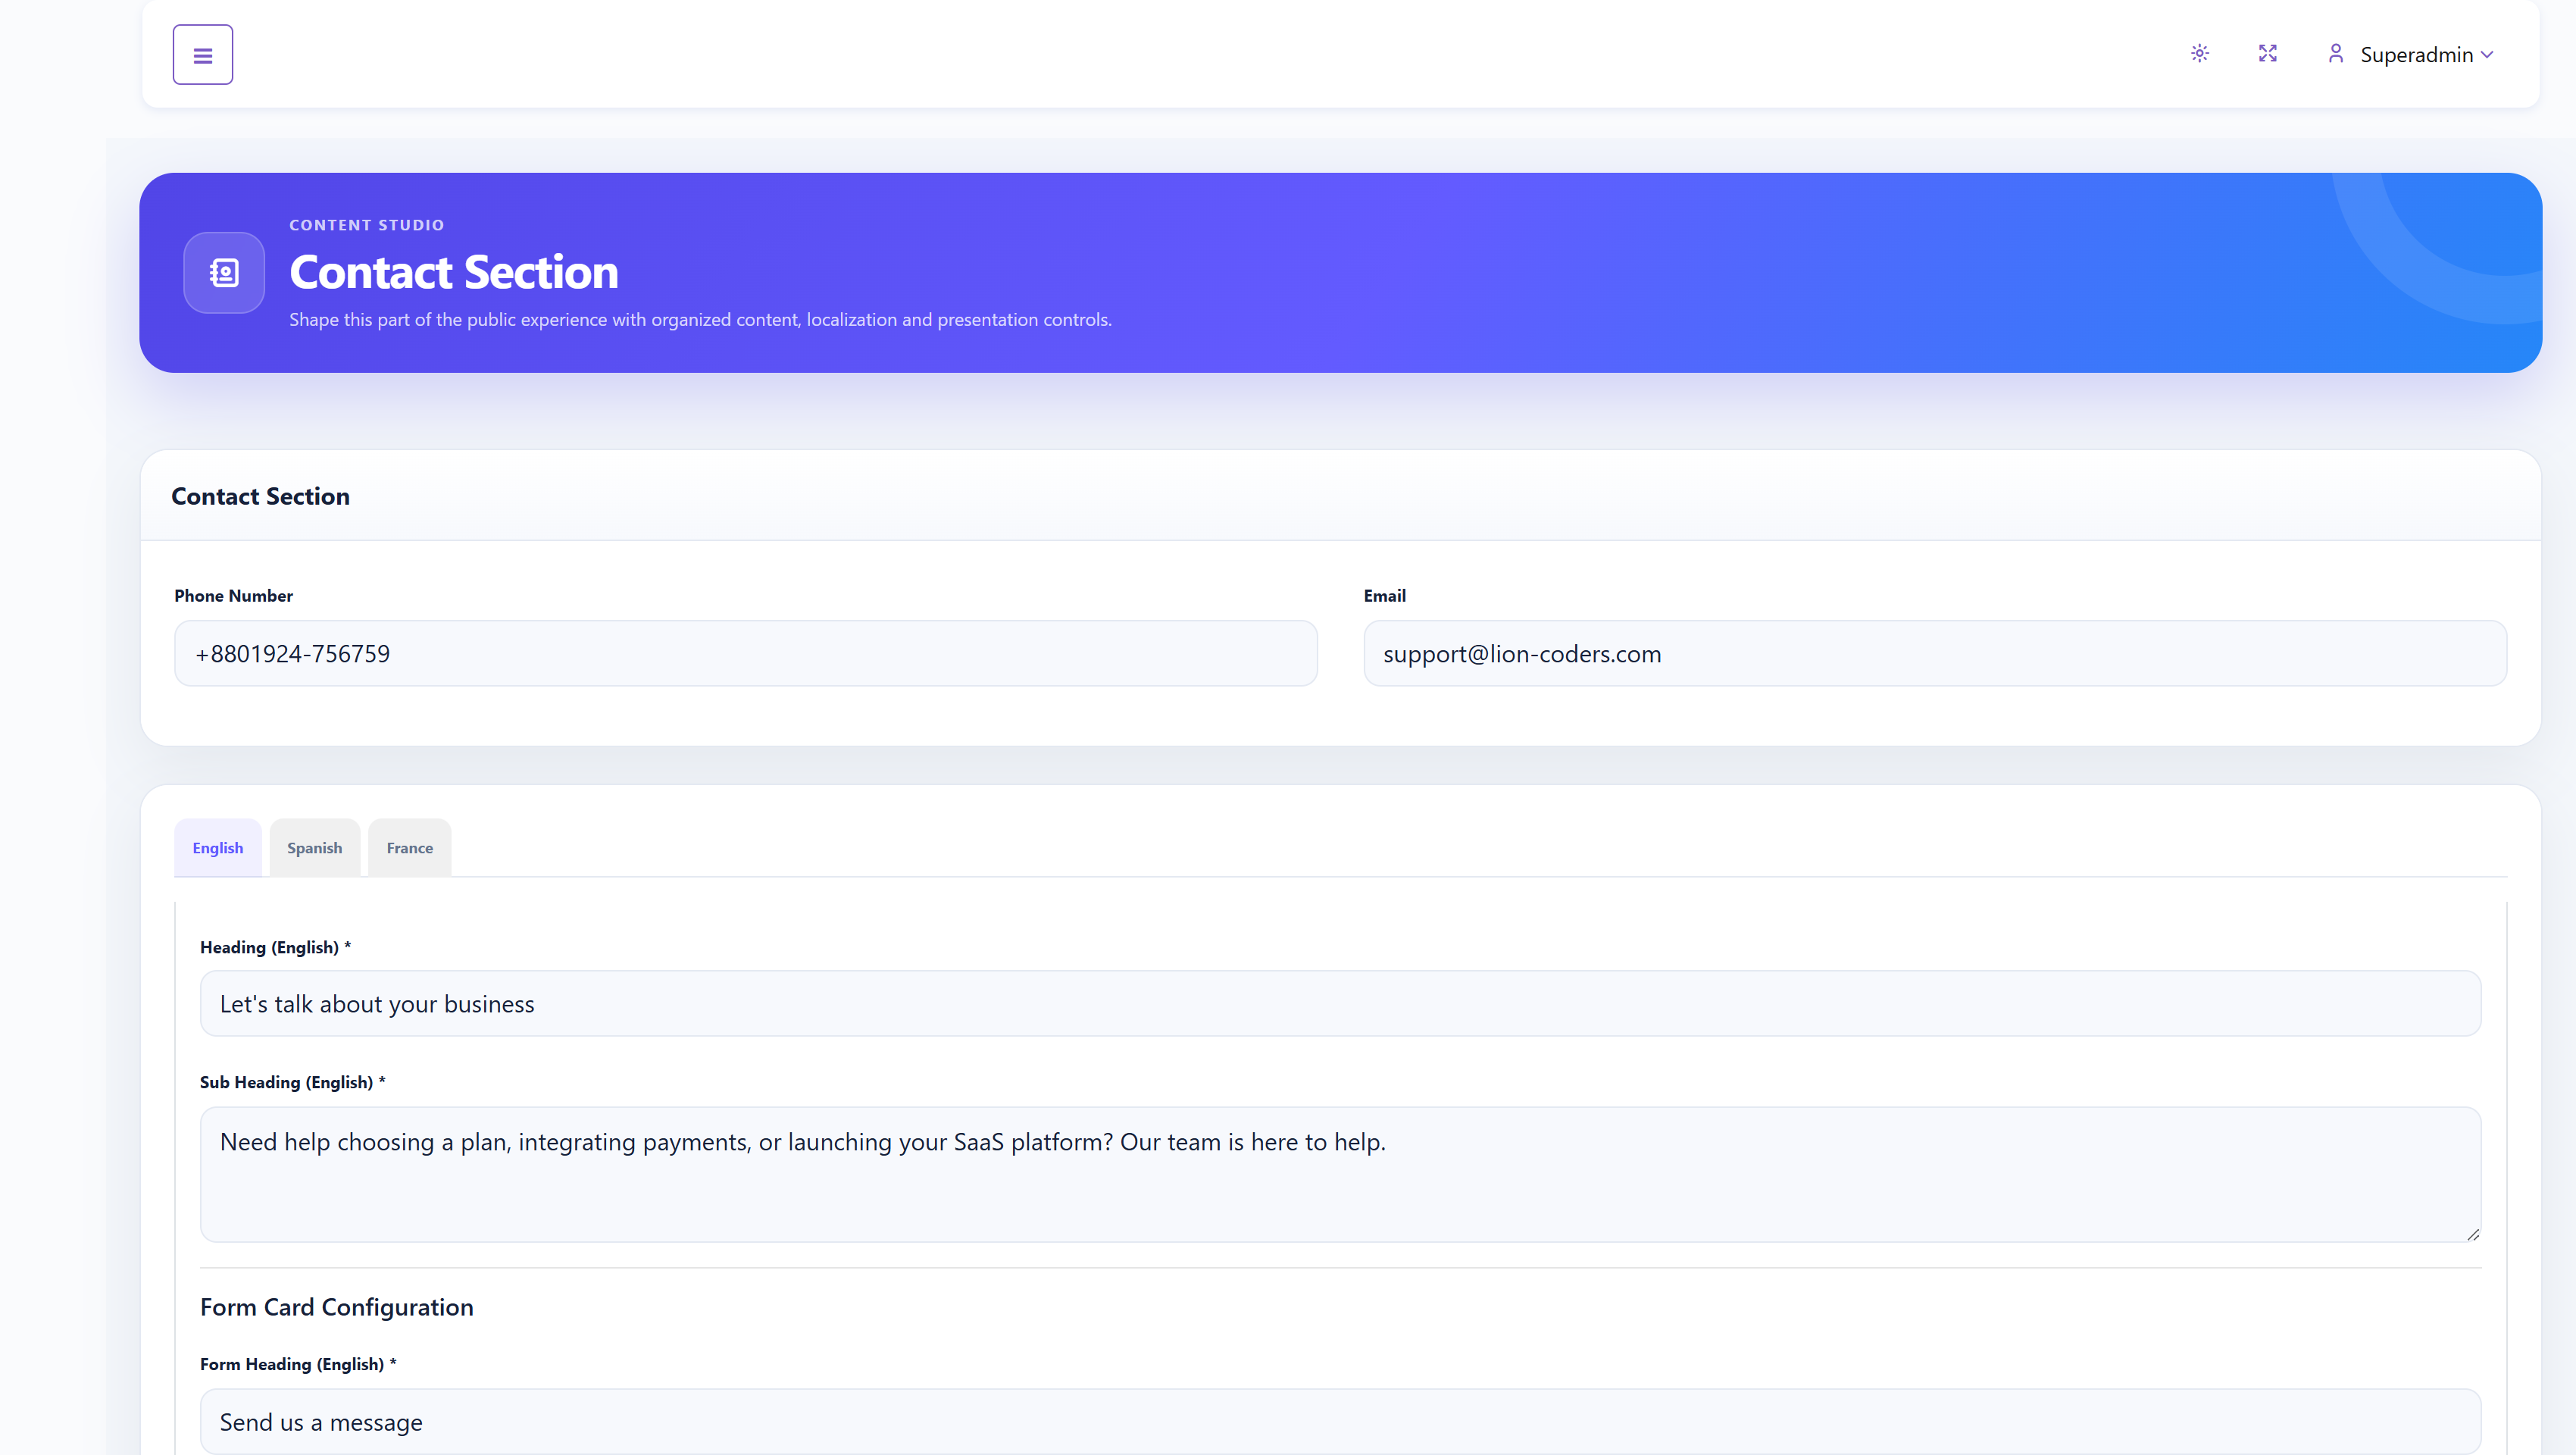
Enter the public phone number and email address. For every language, maintain the section heading and subheading, form heading and subheading, button text, name/phone/email/message placeholders, phone and email card titles, and CAPTCHA instruction label. Save, then submit a controlled test through the public form and confirm delivery to the expected mailbox.
Social Section#
Social Section manages the social-network links displayed on the public site.
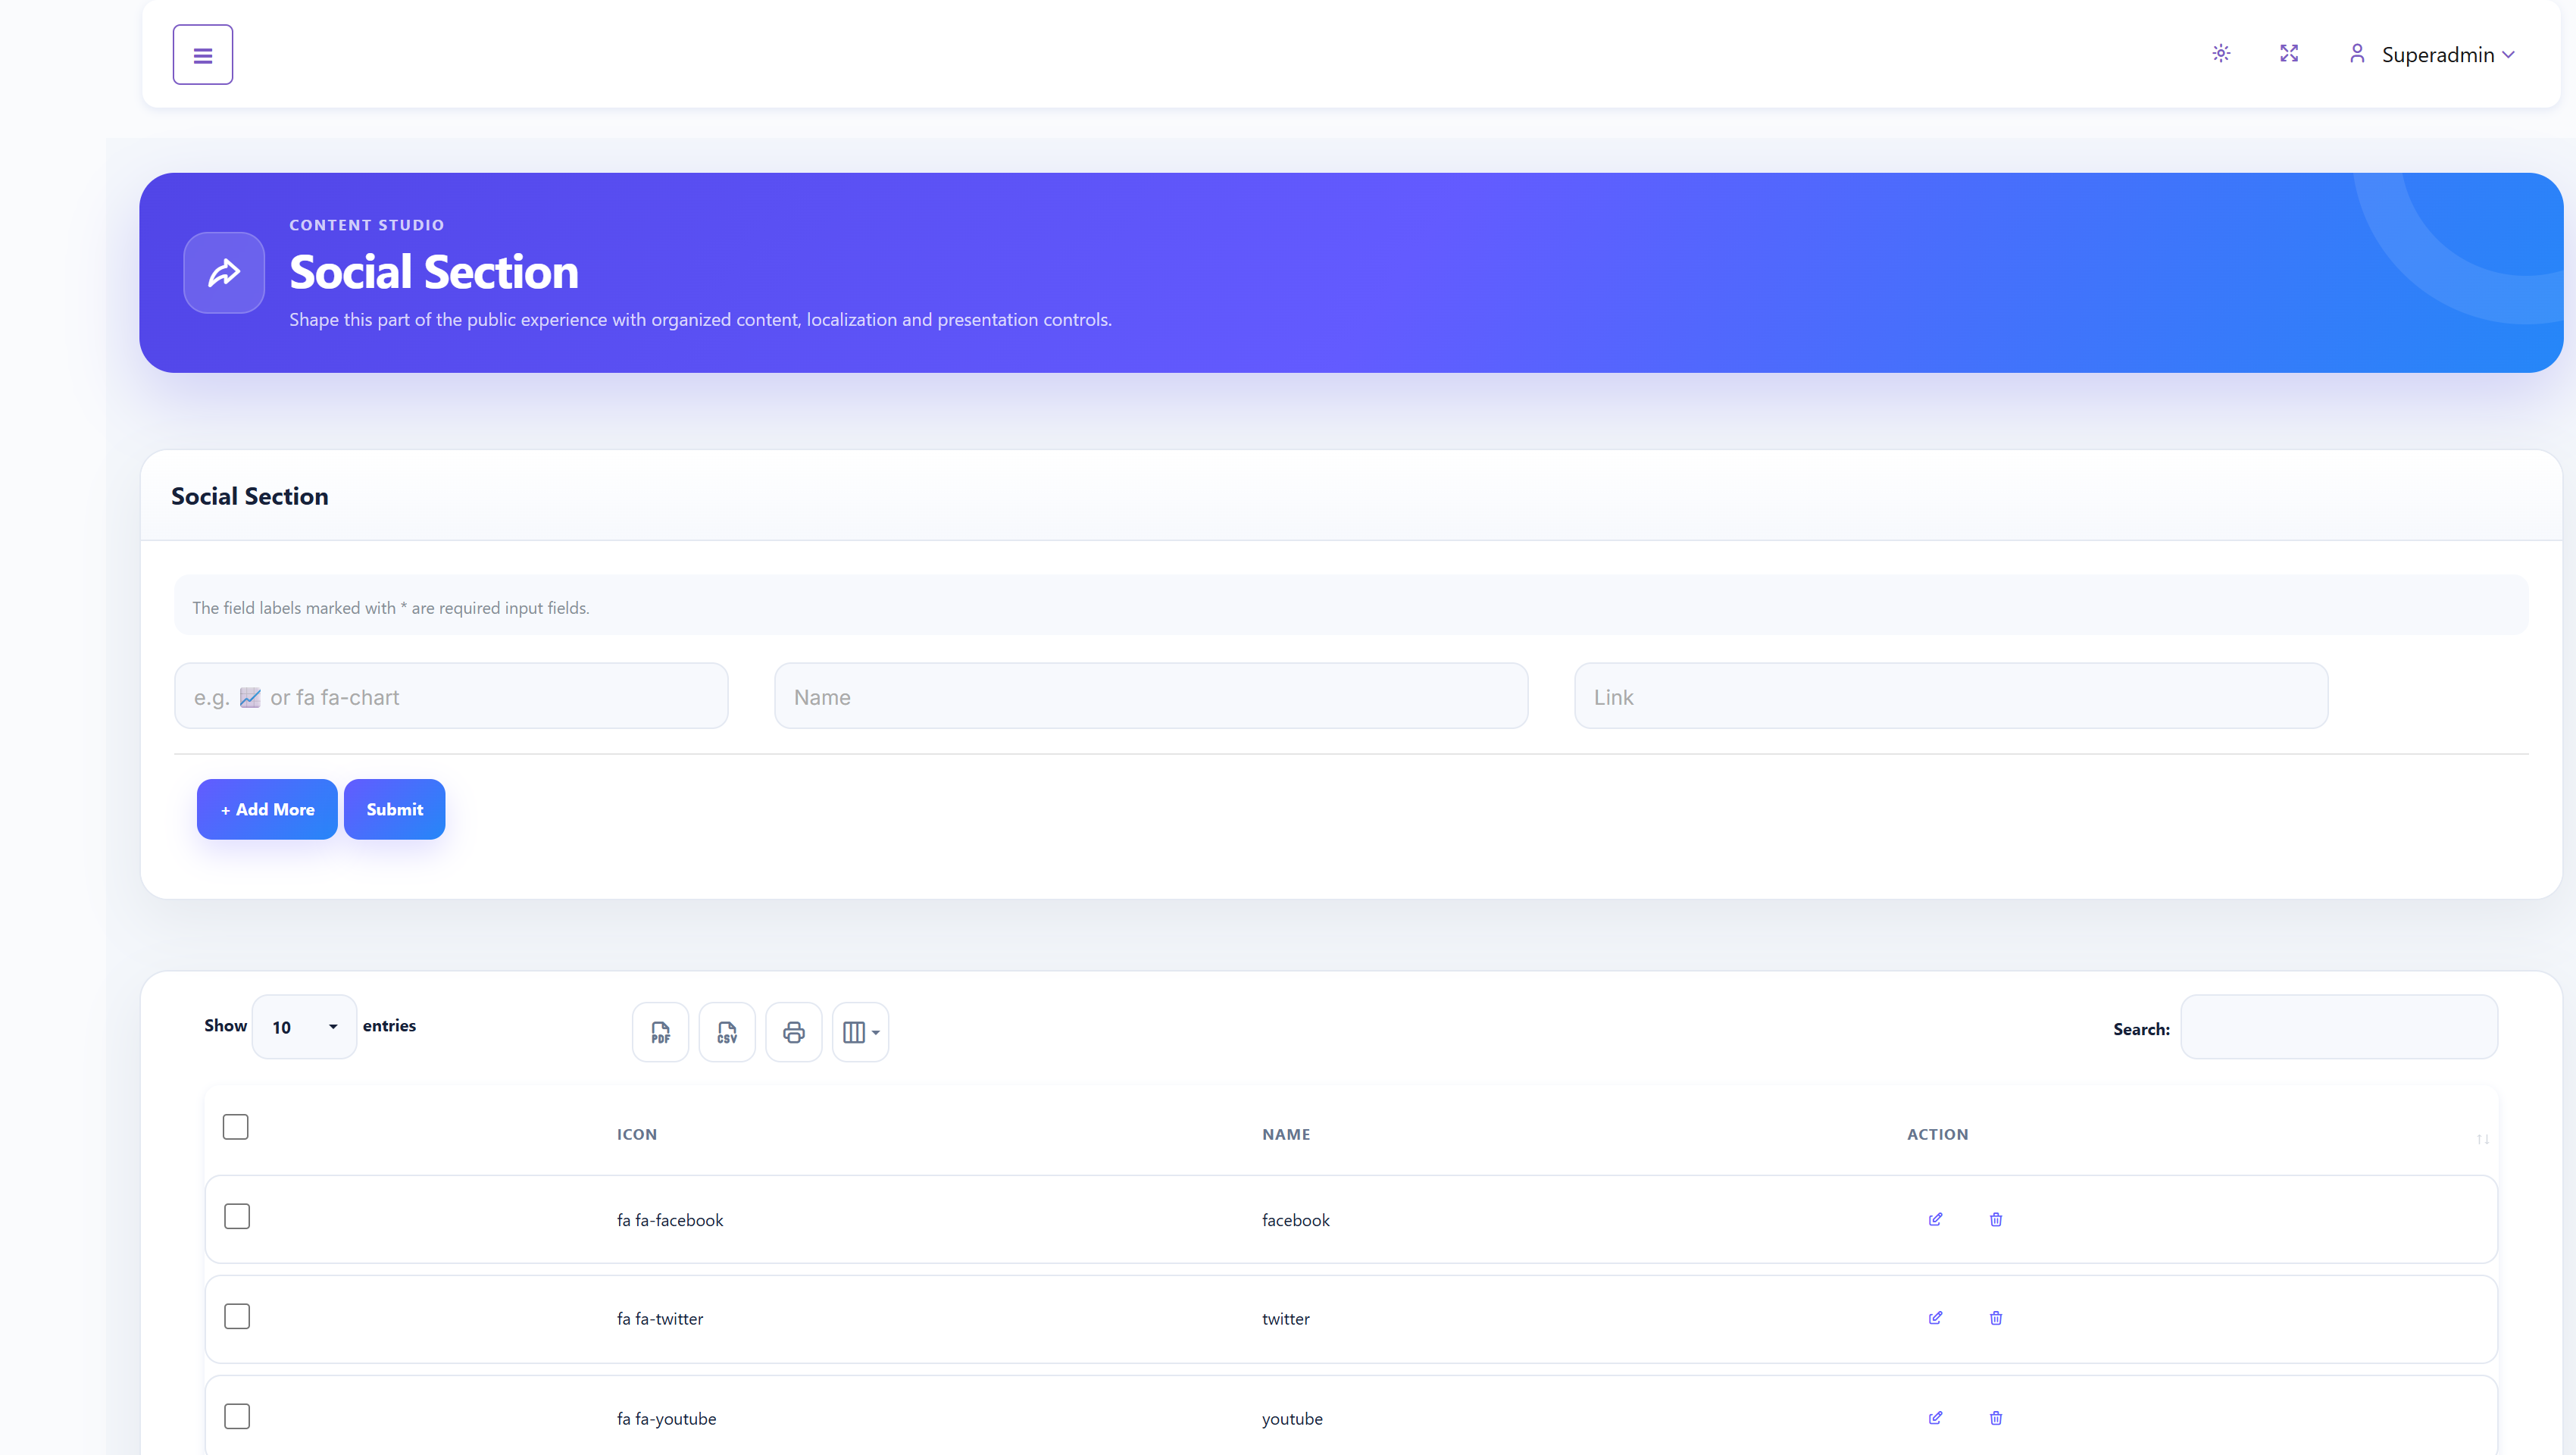
For each network, enter the icon class or supported icon value, a recognizable name, and the full profile URL. Add, edit, delete, or reorder entries as needed. Open every link from the Frontend to confirm it reaches the correct official profile.
CTA Section#
CTA Section manages the prominent call-to-action block on the public website.
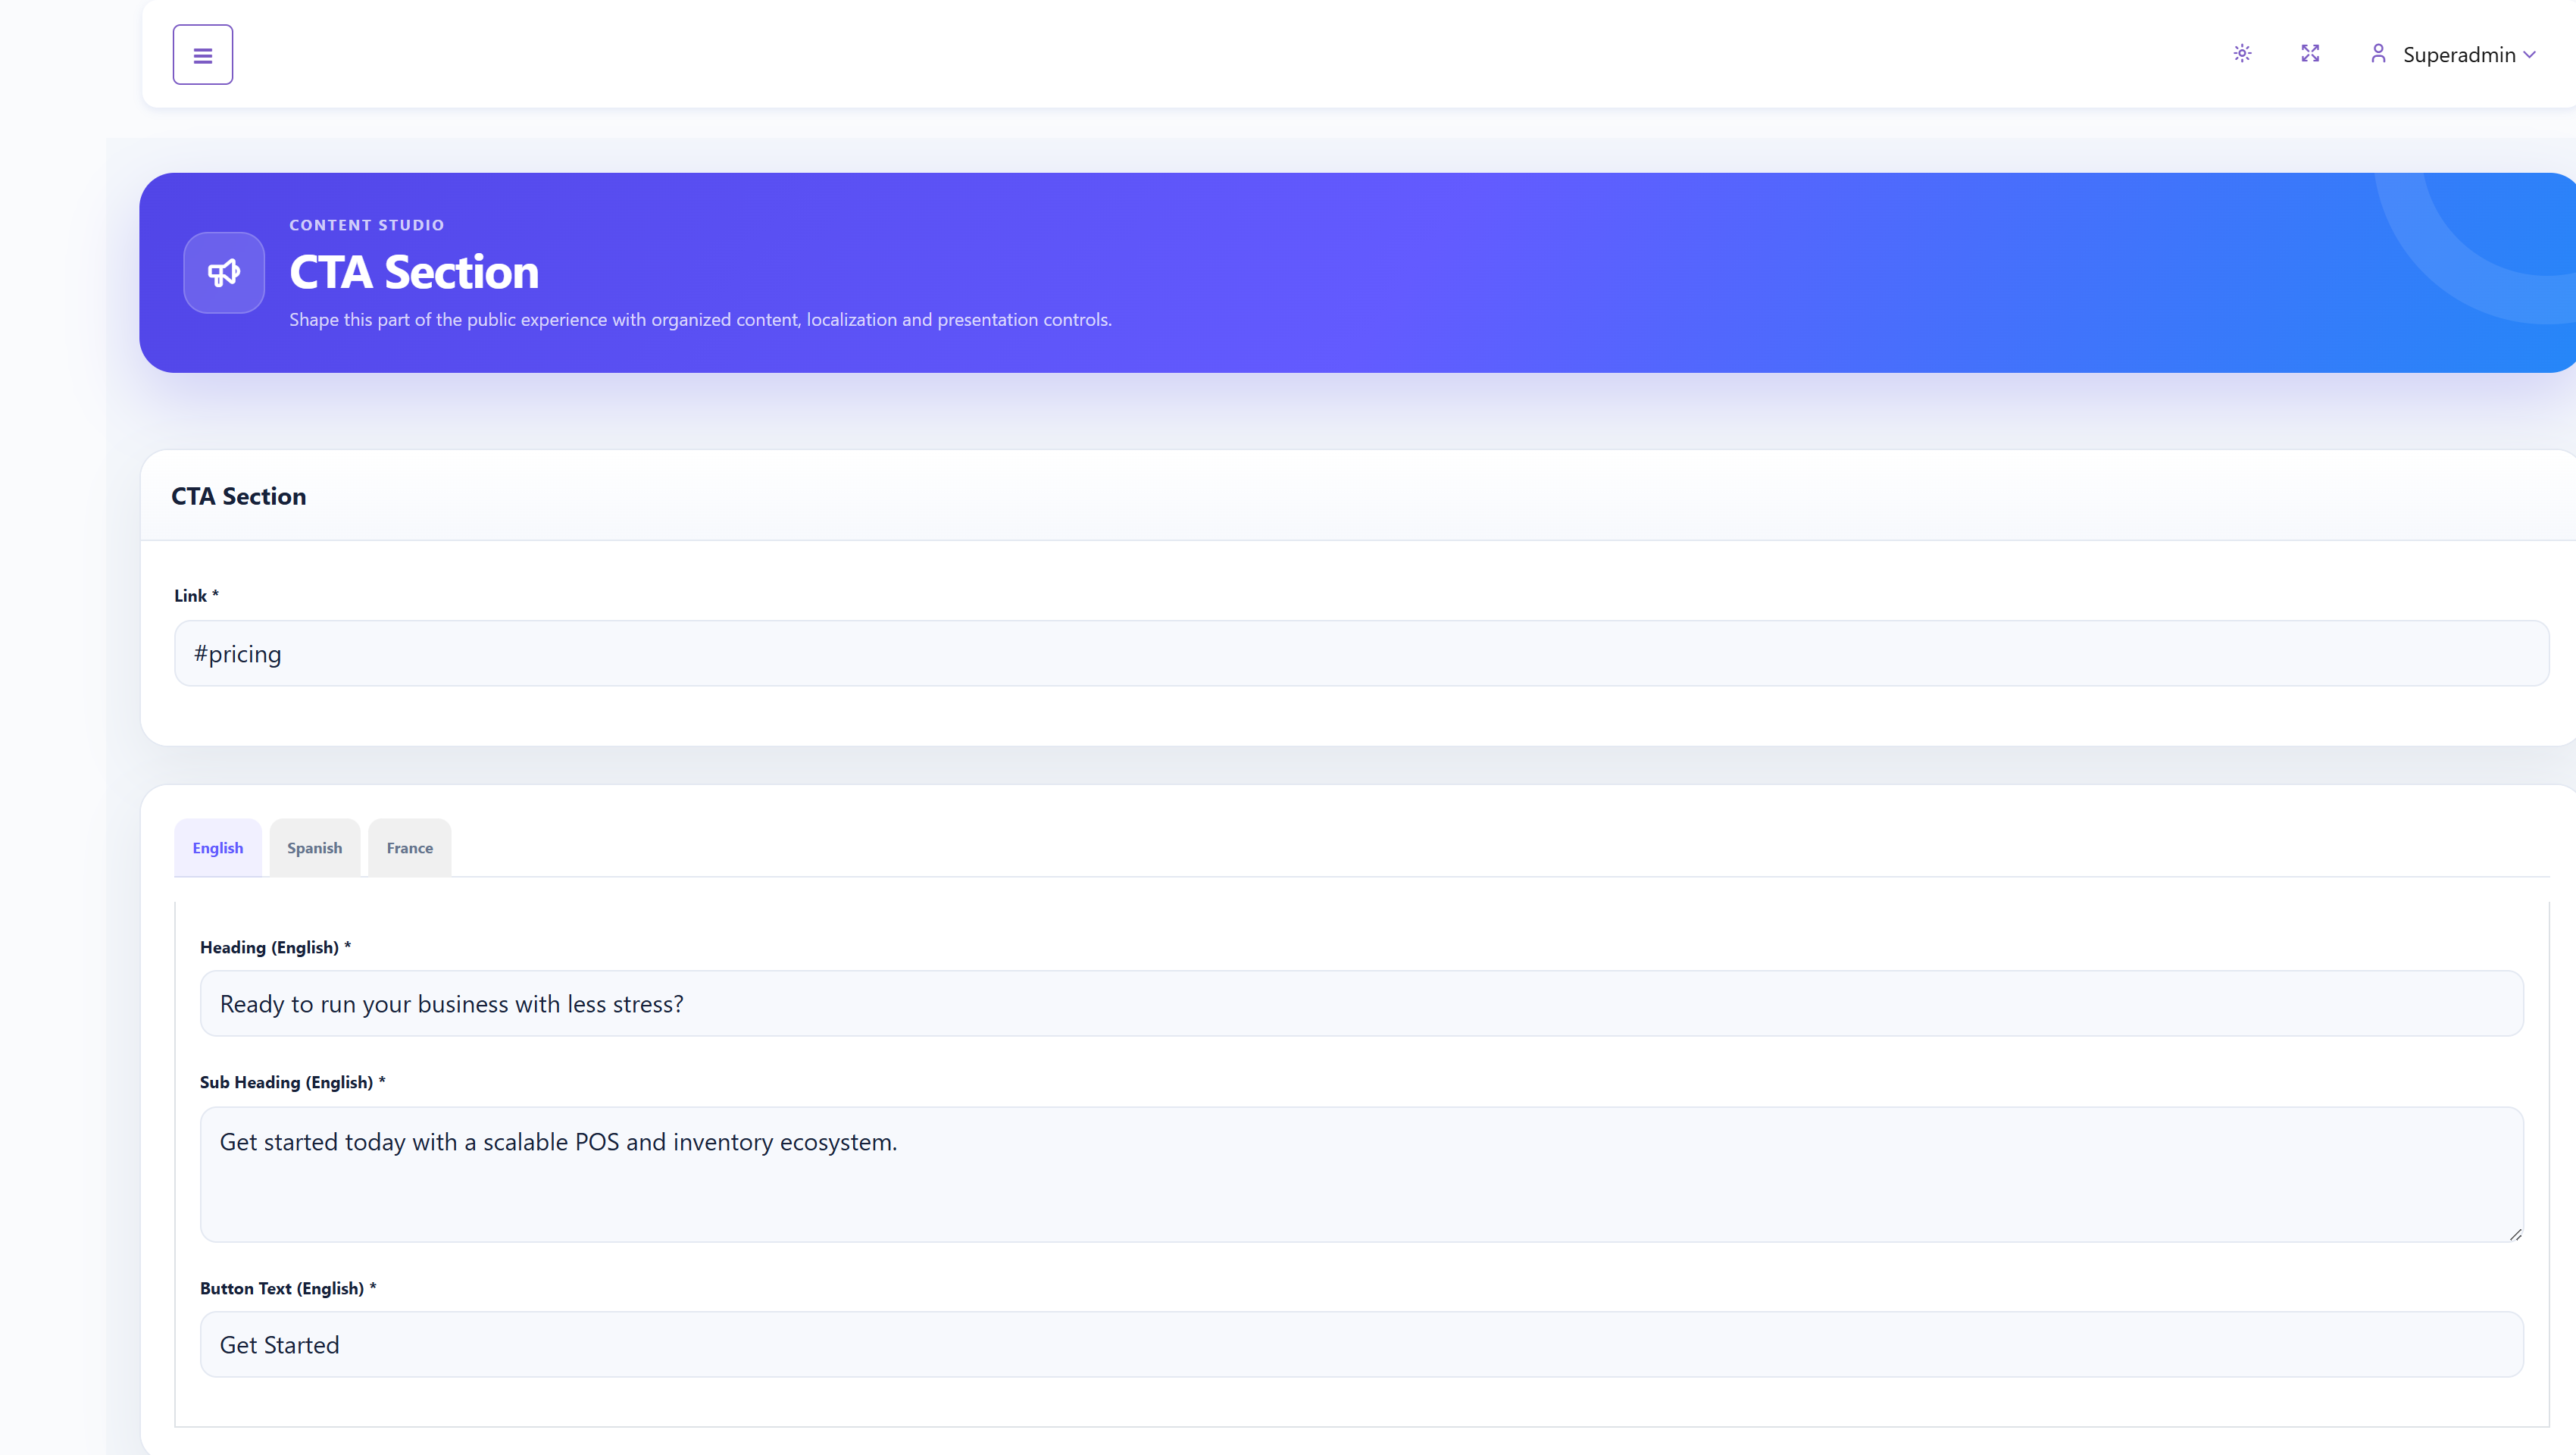
Enter the destination link, then provide the heading, subheading, and button text in every language. Use a destination that matches the promise in the button—normally signup, pricing, or contact—and test it from the Frontend.
Footer Section#
Footer Section controls the three text columns in the public footer.
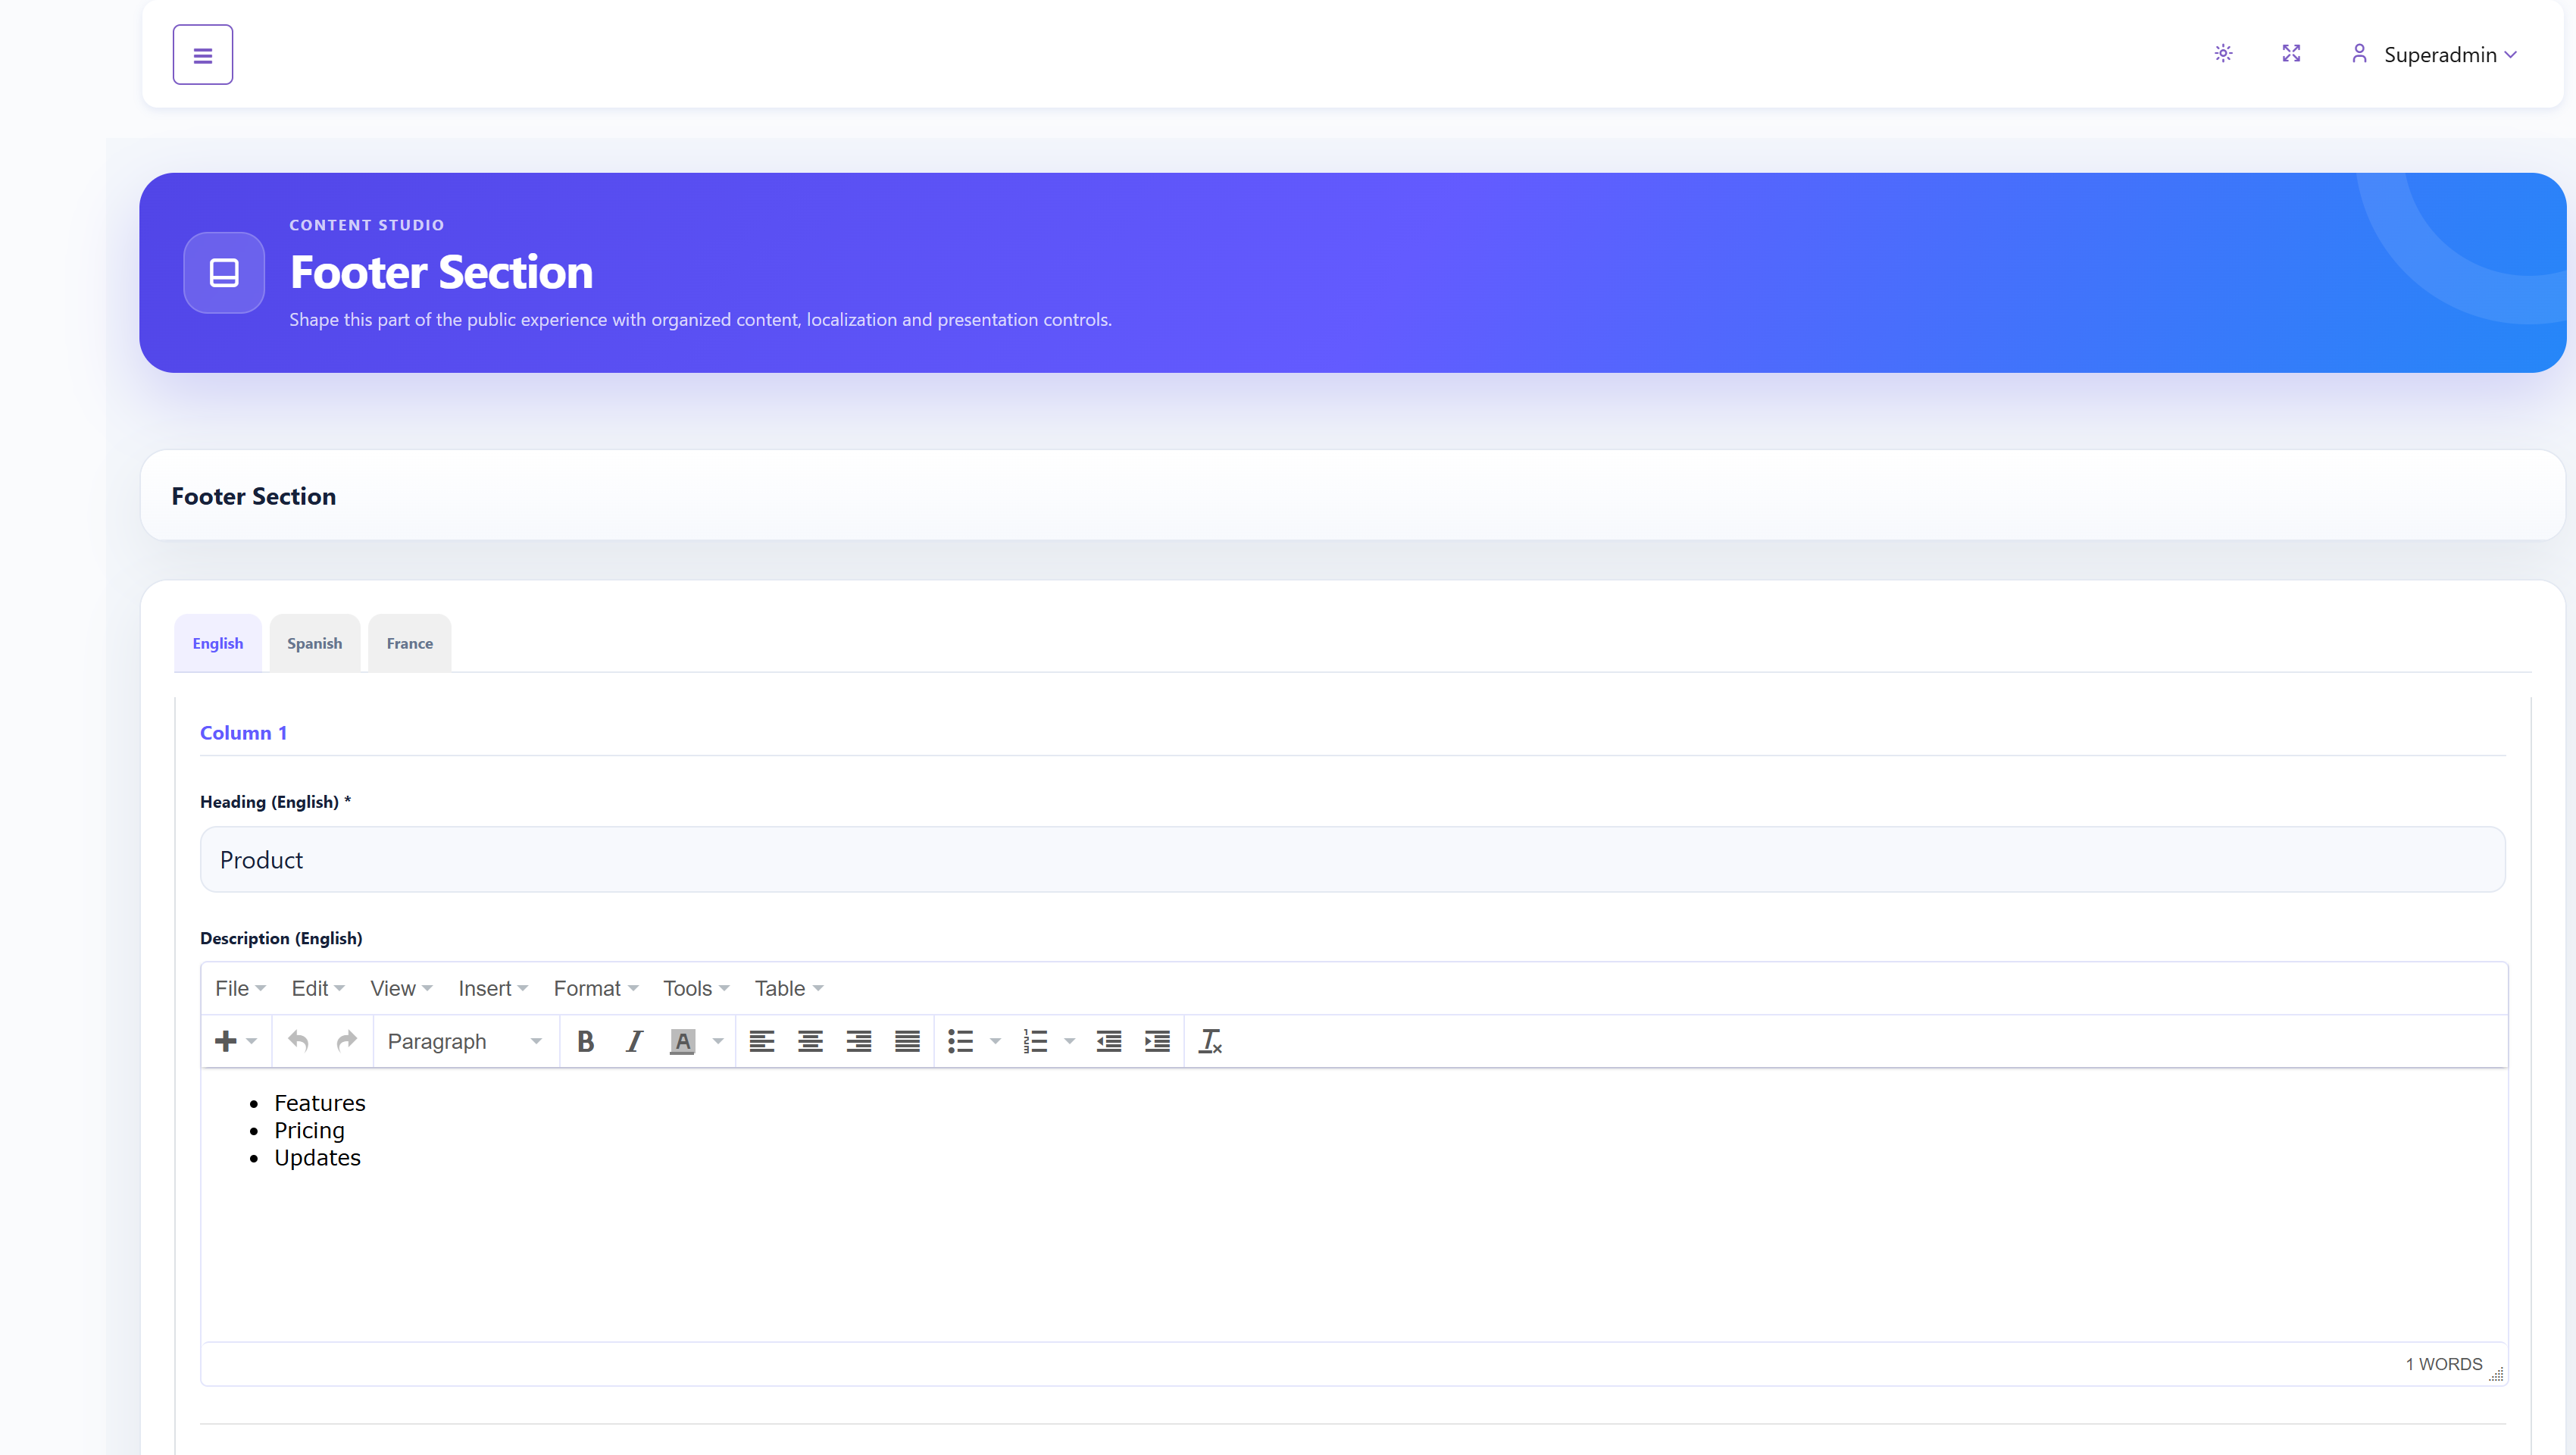
For each language, complete the heading and formatted description for Columns 1, 2, and 3. Keep essential product, company, and legal links easy to find, and check the footer on both desktop and mobile after saving.
Tenant Signup Description#
Tenant Signup Description controls the heading and supporting copy shown during customer registration.
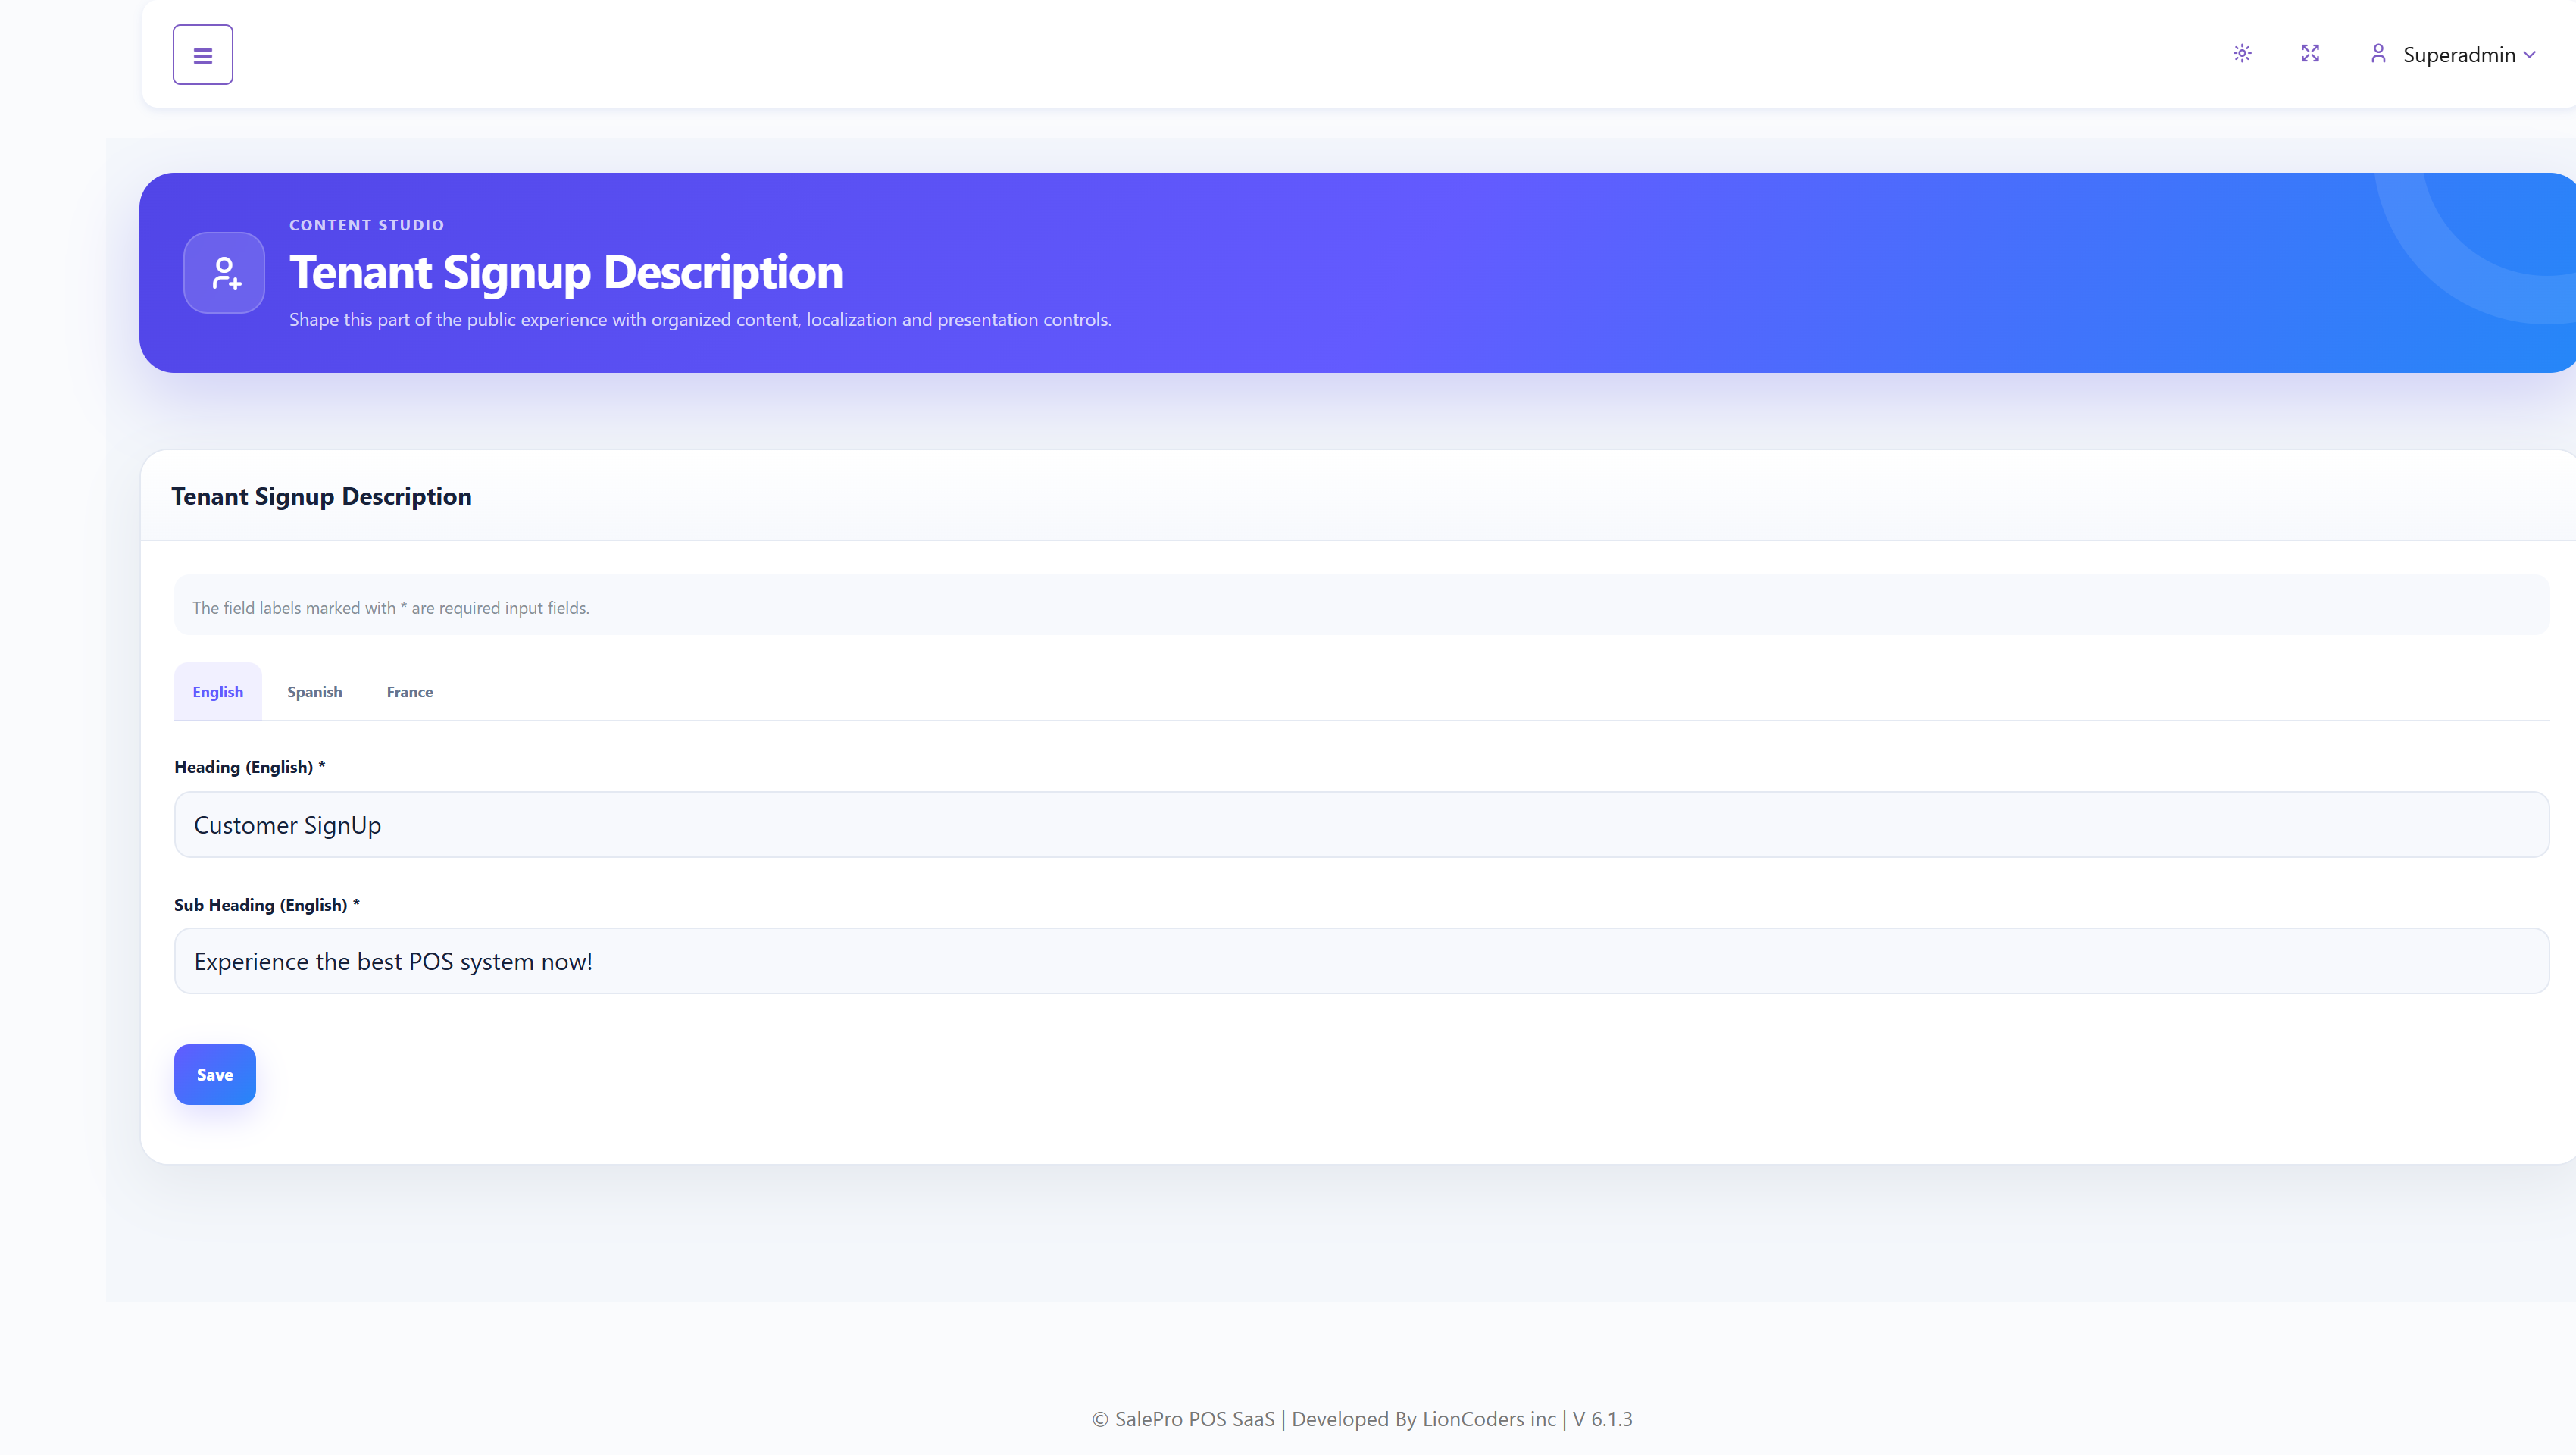
Enter the heading and subheading for each language. Explain the signup process accurately and avoid promising trial lengths or features that conflict with General Settings or Package configuration.
Page Section#
Page Section manages standalone public pages such as Terms & Conditions, Privacy Policy, Refund Policy, and Affiliate Program information.
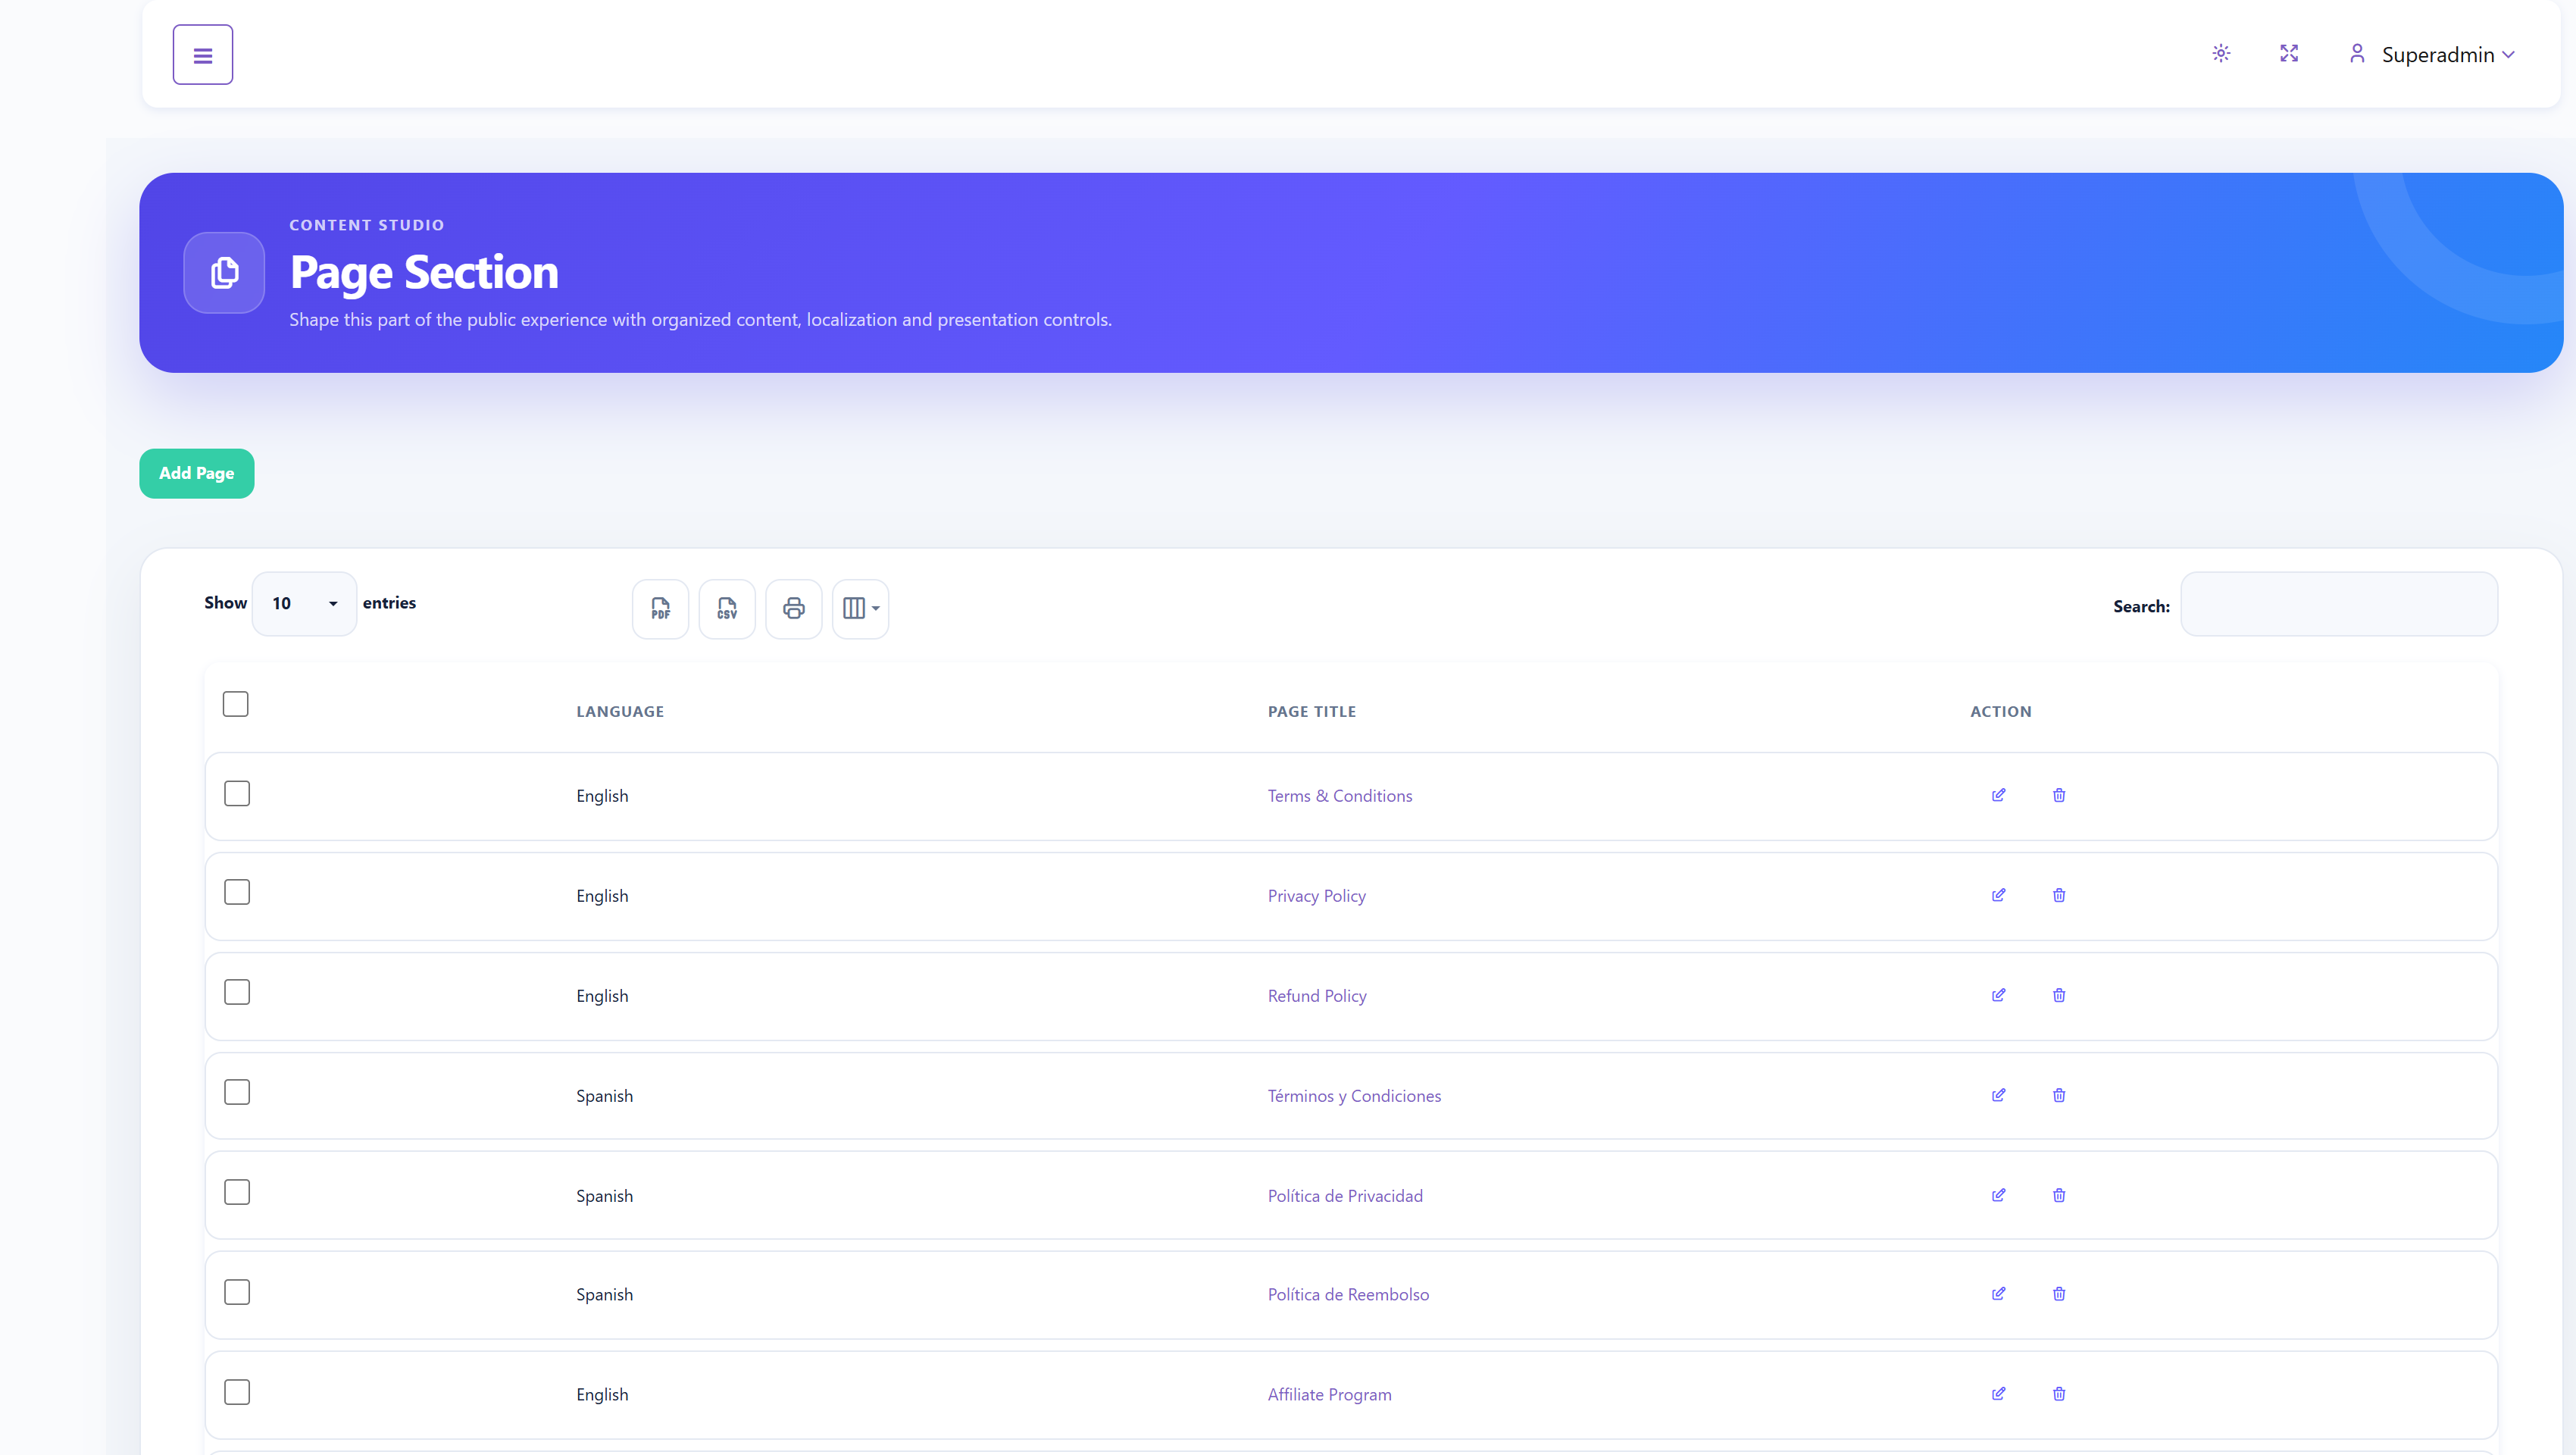
Select Add Page, choose the language, enter the title and formatted description, and complete the meta title and meta description. Existing pages can be edited, deleted, and reordered. Review legal pages with an appropriate professional and ensure translated versions remain equivalent.
Support Tickets#
Support Tickets lists tenant-submitted support conversations with the subject, tenant identifier, and available actions.
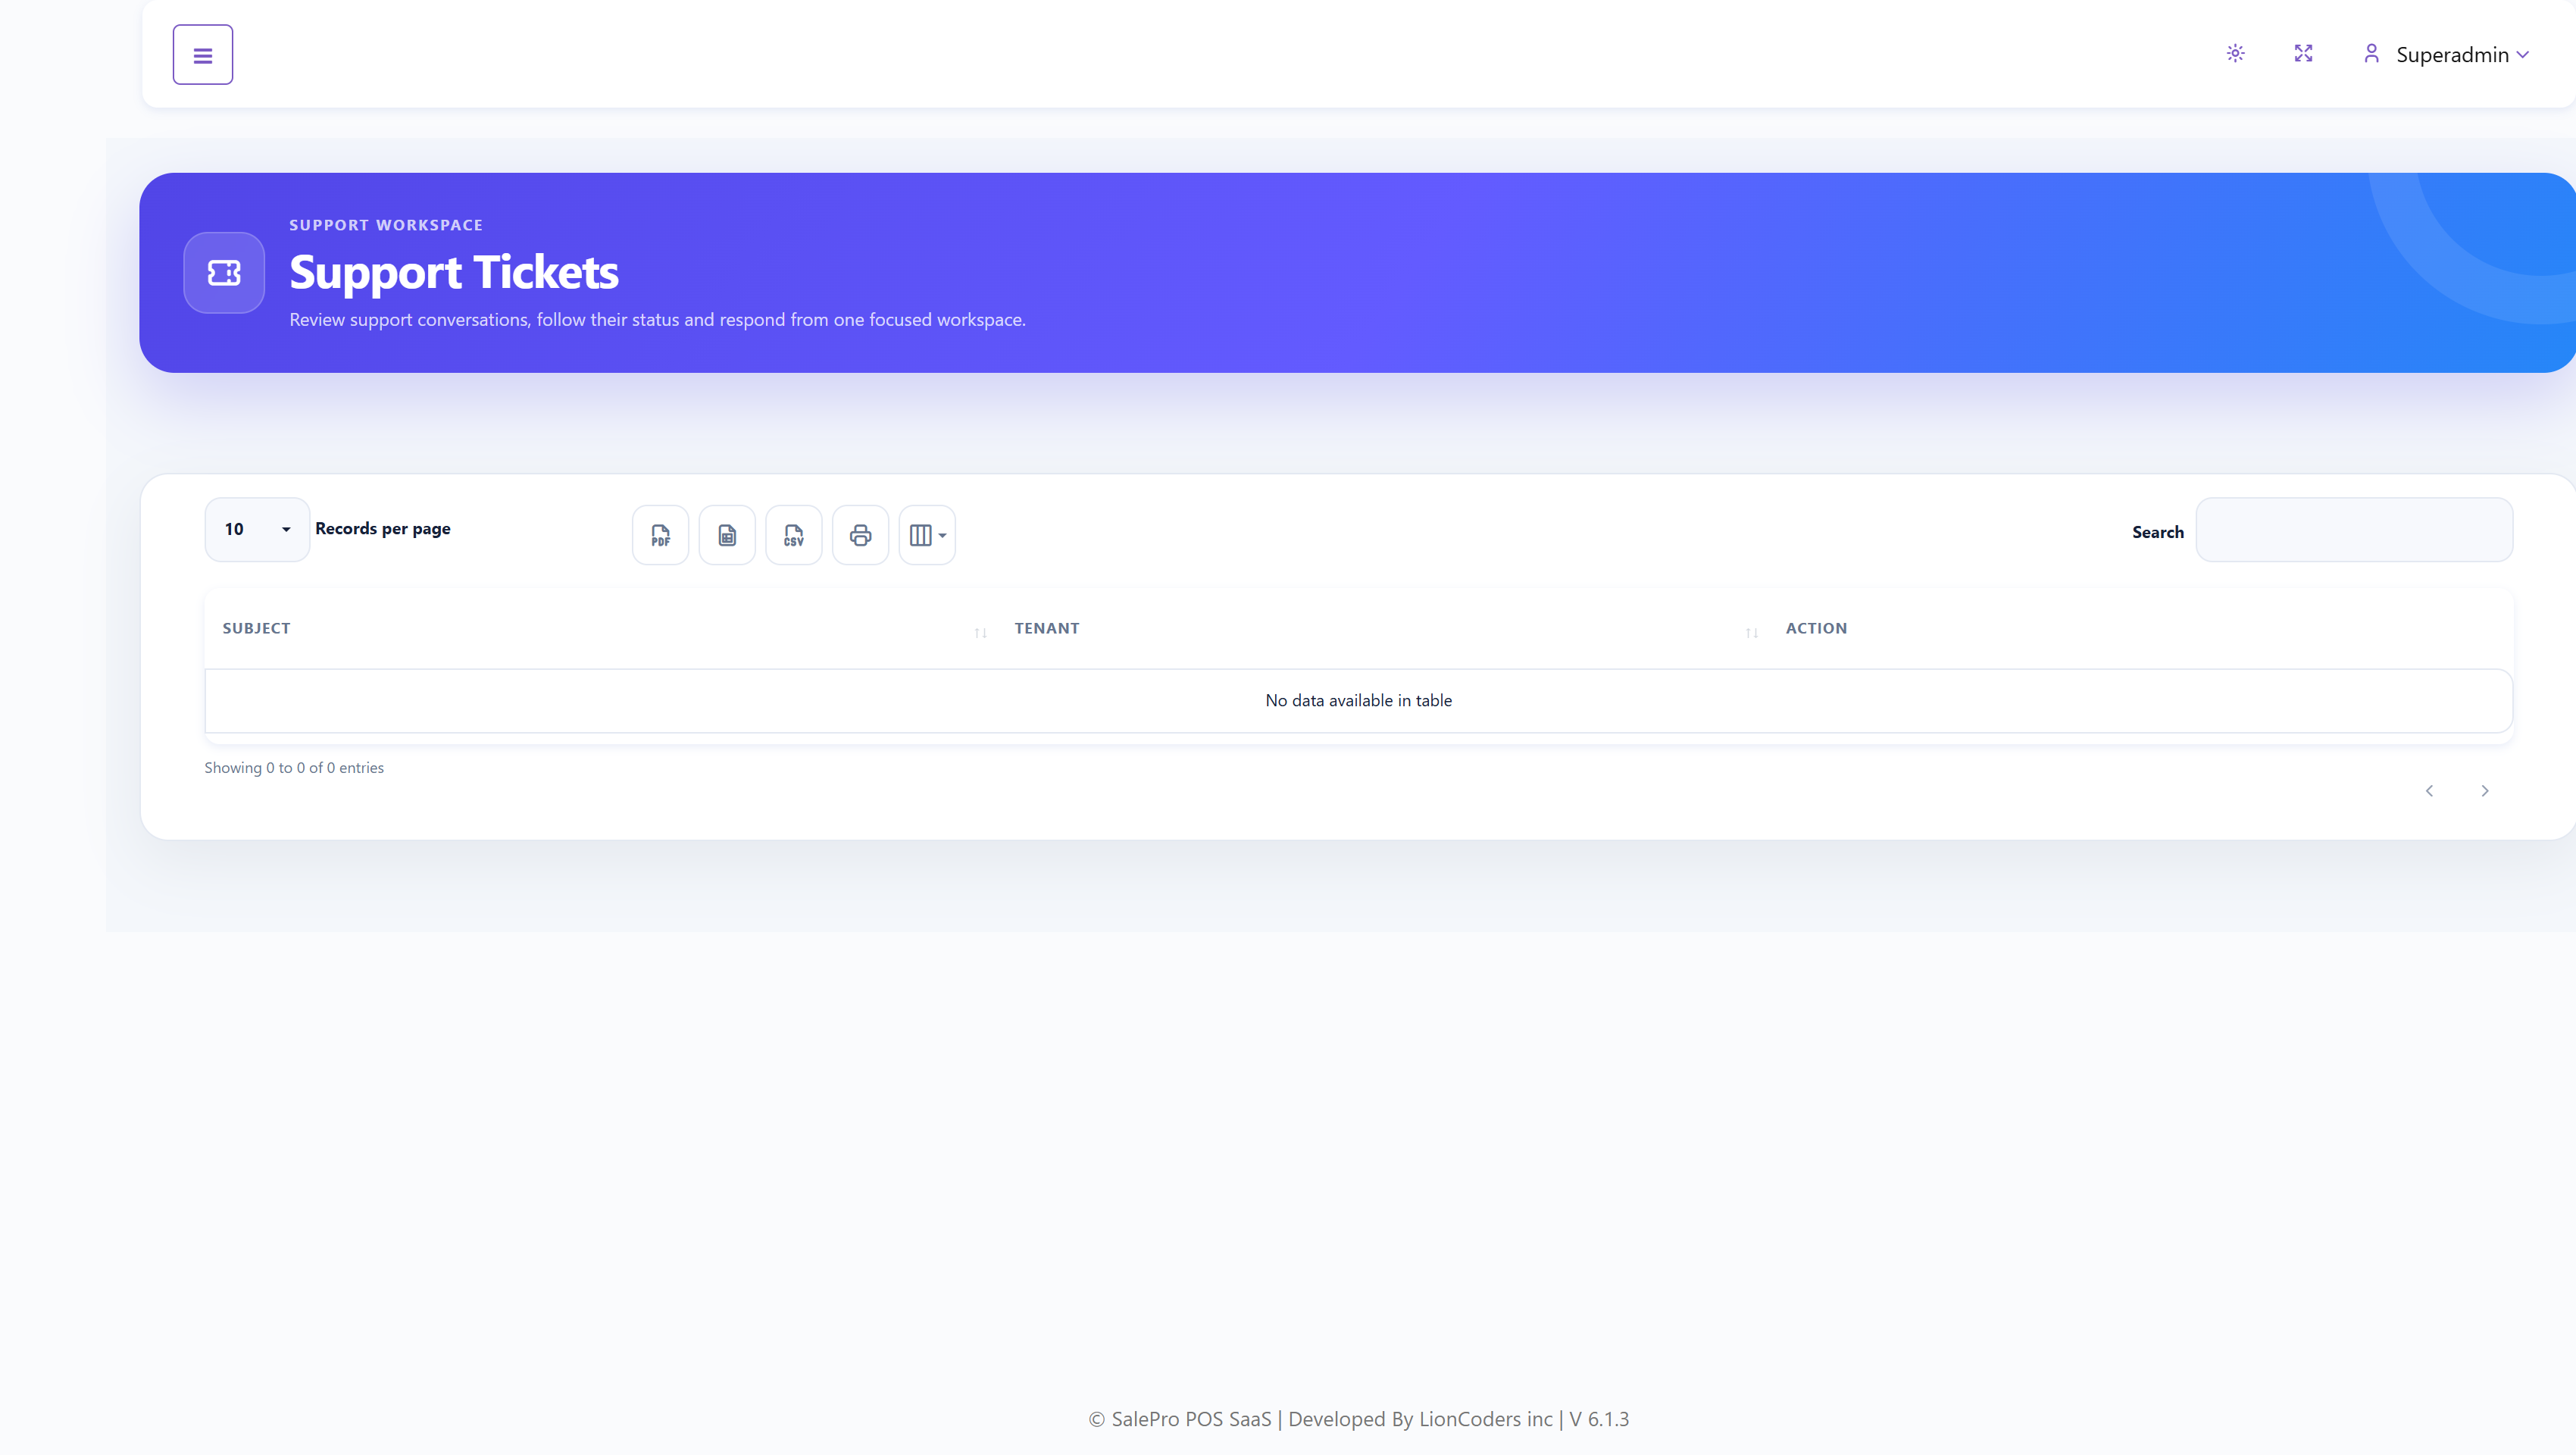
Review and reply#
- Find the ticket by subject or tenant and select View.
- Read the original message and the full chronological conversation.
- Enter a reply in the rich-text response box and select Submit.
- Return to the list and confirm that the reply is recorded in the conversation.
The list supports common export and column-visibility controls. Delete a ticket only when the conversation no longer needs to be retained; deletion cannot substitute for a formal support-retention policy.
If this sidebar item is absent, open Settings → General Setting and check whether Disable tenant support tickets is enabled.
Reading the conversation: identify the sender and time of each message before responding. Older versions used gray tenant messages and green Super Admin replies; colors can change with the theme. The tenant creates the original request, while Super Admin reviews and replies from this central workspace.
Affiliate Marketing#
Affiliate Marketing is the Super Admin workspace for partner approval, referral review, commission decisions, payouts, and program rules. The affiliate portal is a separate login area; the notes below explain what administrators need to verify when supporting partners.
Affiliates#
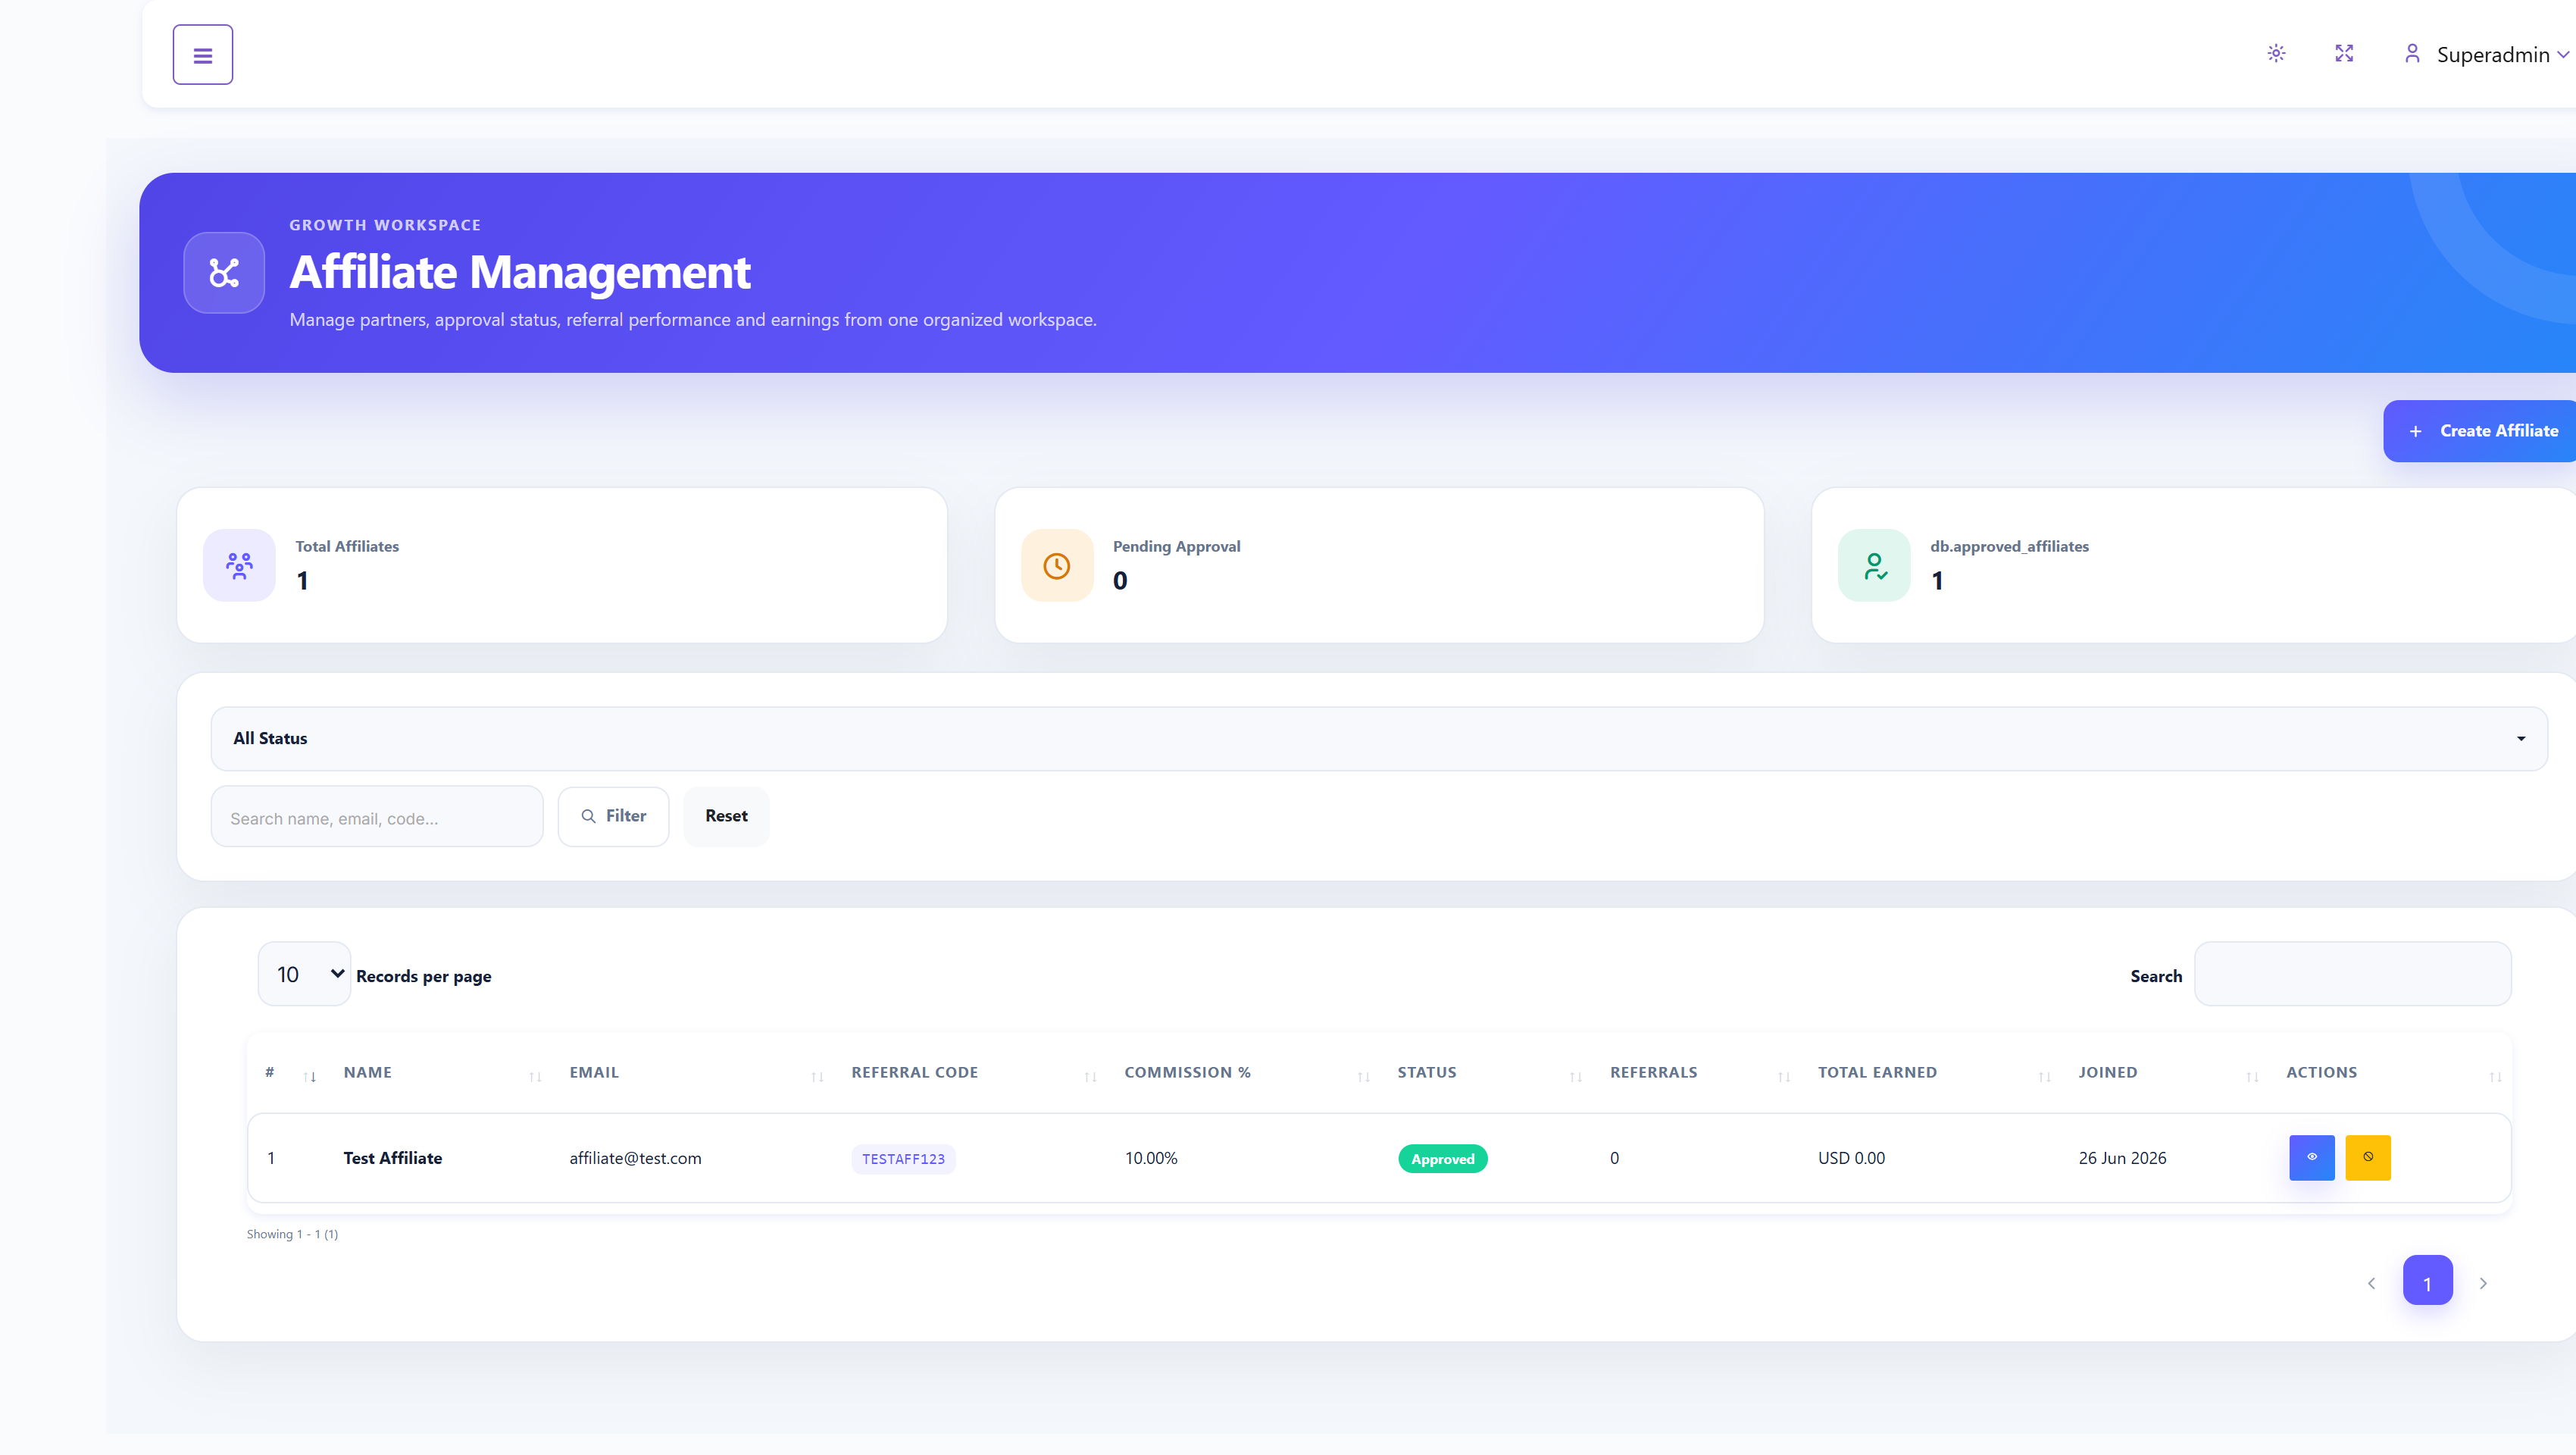
Use status and text filters to find a partner by name, email, or referral code. The list includes commission rate, account status, referral count, earnings, and join date. Open the partner record to inspect its referral link, referral history, conversions, commissions, and payouts.
Onboard and manage a partner#
- For an administrator-created account, select Create Affiliate, enter the name, email, password, optional phone and company, and commission percentage. Accounts created here are automatically approved; verify the partner before saving.
- Public applications from
/affiliate/registerstart as Pending. Review the application, then approve or reject it from the affiliate record. - Use Suspend to block an existing partner, or Reactivate when a rejected or suspended account should regain approved access. Add a reason where the form provides notes.
- Use the individual rate control to change future commission calculations for that partner. Changing the program default does not rewrite existing partners’ stored rates or previously generated commission records.
Account states: Pending means awaiting review; Approved permits affiliate access; Rejected and Suspended block affiliate portal login. Public registration is unavailable when the program is disabled. Confirm approval before directing a partner to /affiliate/login.
Referral links and partner support checks#
The referral URL uses /sign-up?ref=YOURCODE. Confirm that the complete code is present and belongs to the approved partner. The partner can find it on the affiliate Dashboard or Profile. The portal also provides Referrals, Commissions, Payouts, and Profile; these are not Super Admin sidebar pages.
When handling a support enquiry, confirm the partner’s account status, stored rate, full referral URL, and preferred payout method/details. Never request the partner’s password.
Understand referral attribution#
- Clicked: a valid referral link opens the signup page while the program is active and the affiliate is approved.
- The current implementation keeps the active referral in the browser session and a 30-day cookie. If a referral is already present, opening another affiliate link does not replace it. Browser clearing, cookie restrictions, or switching devices may affect attribution.
- Registered: signup associates that referral with the new tenant.
- Converted: a qualifying first paid subscription generates a commission and marks that referral as converted.
Referral counts represent recorded referral activity, not necessarily unique people. Review tenant IDs, timestamps, and payment records when investigating a disputed attribution.
Commissions#
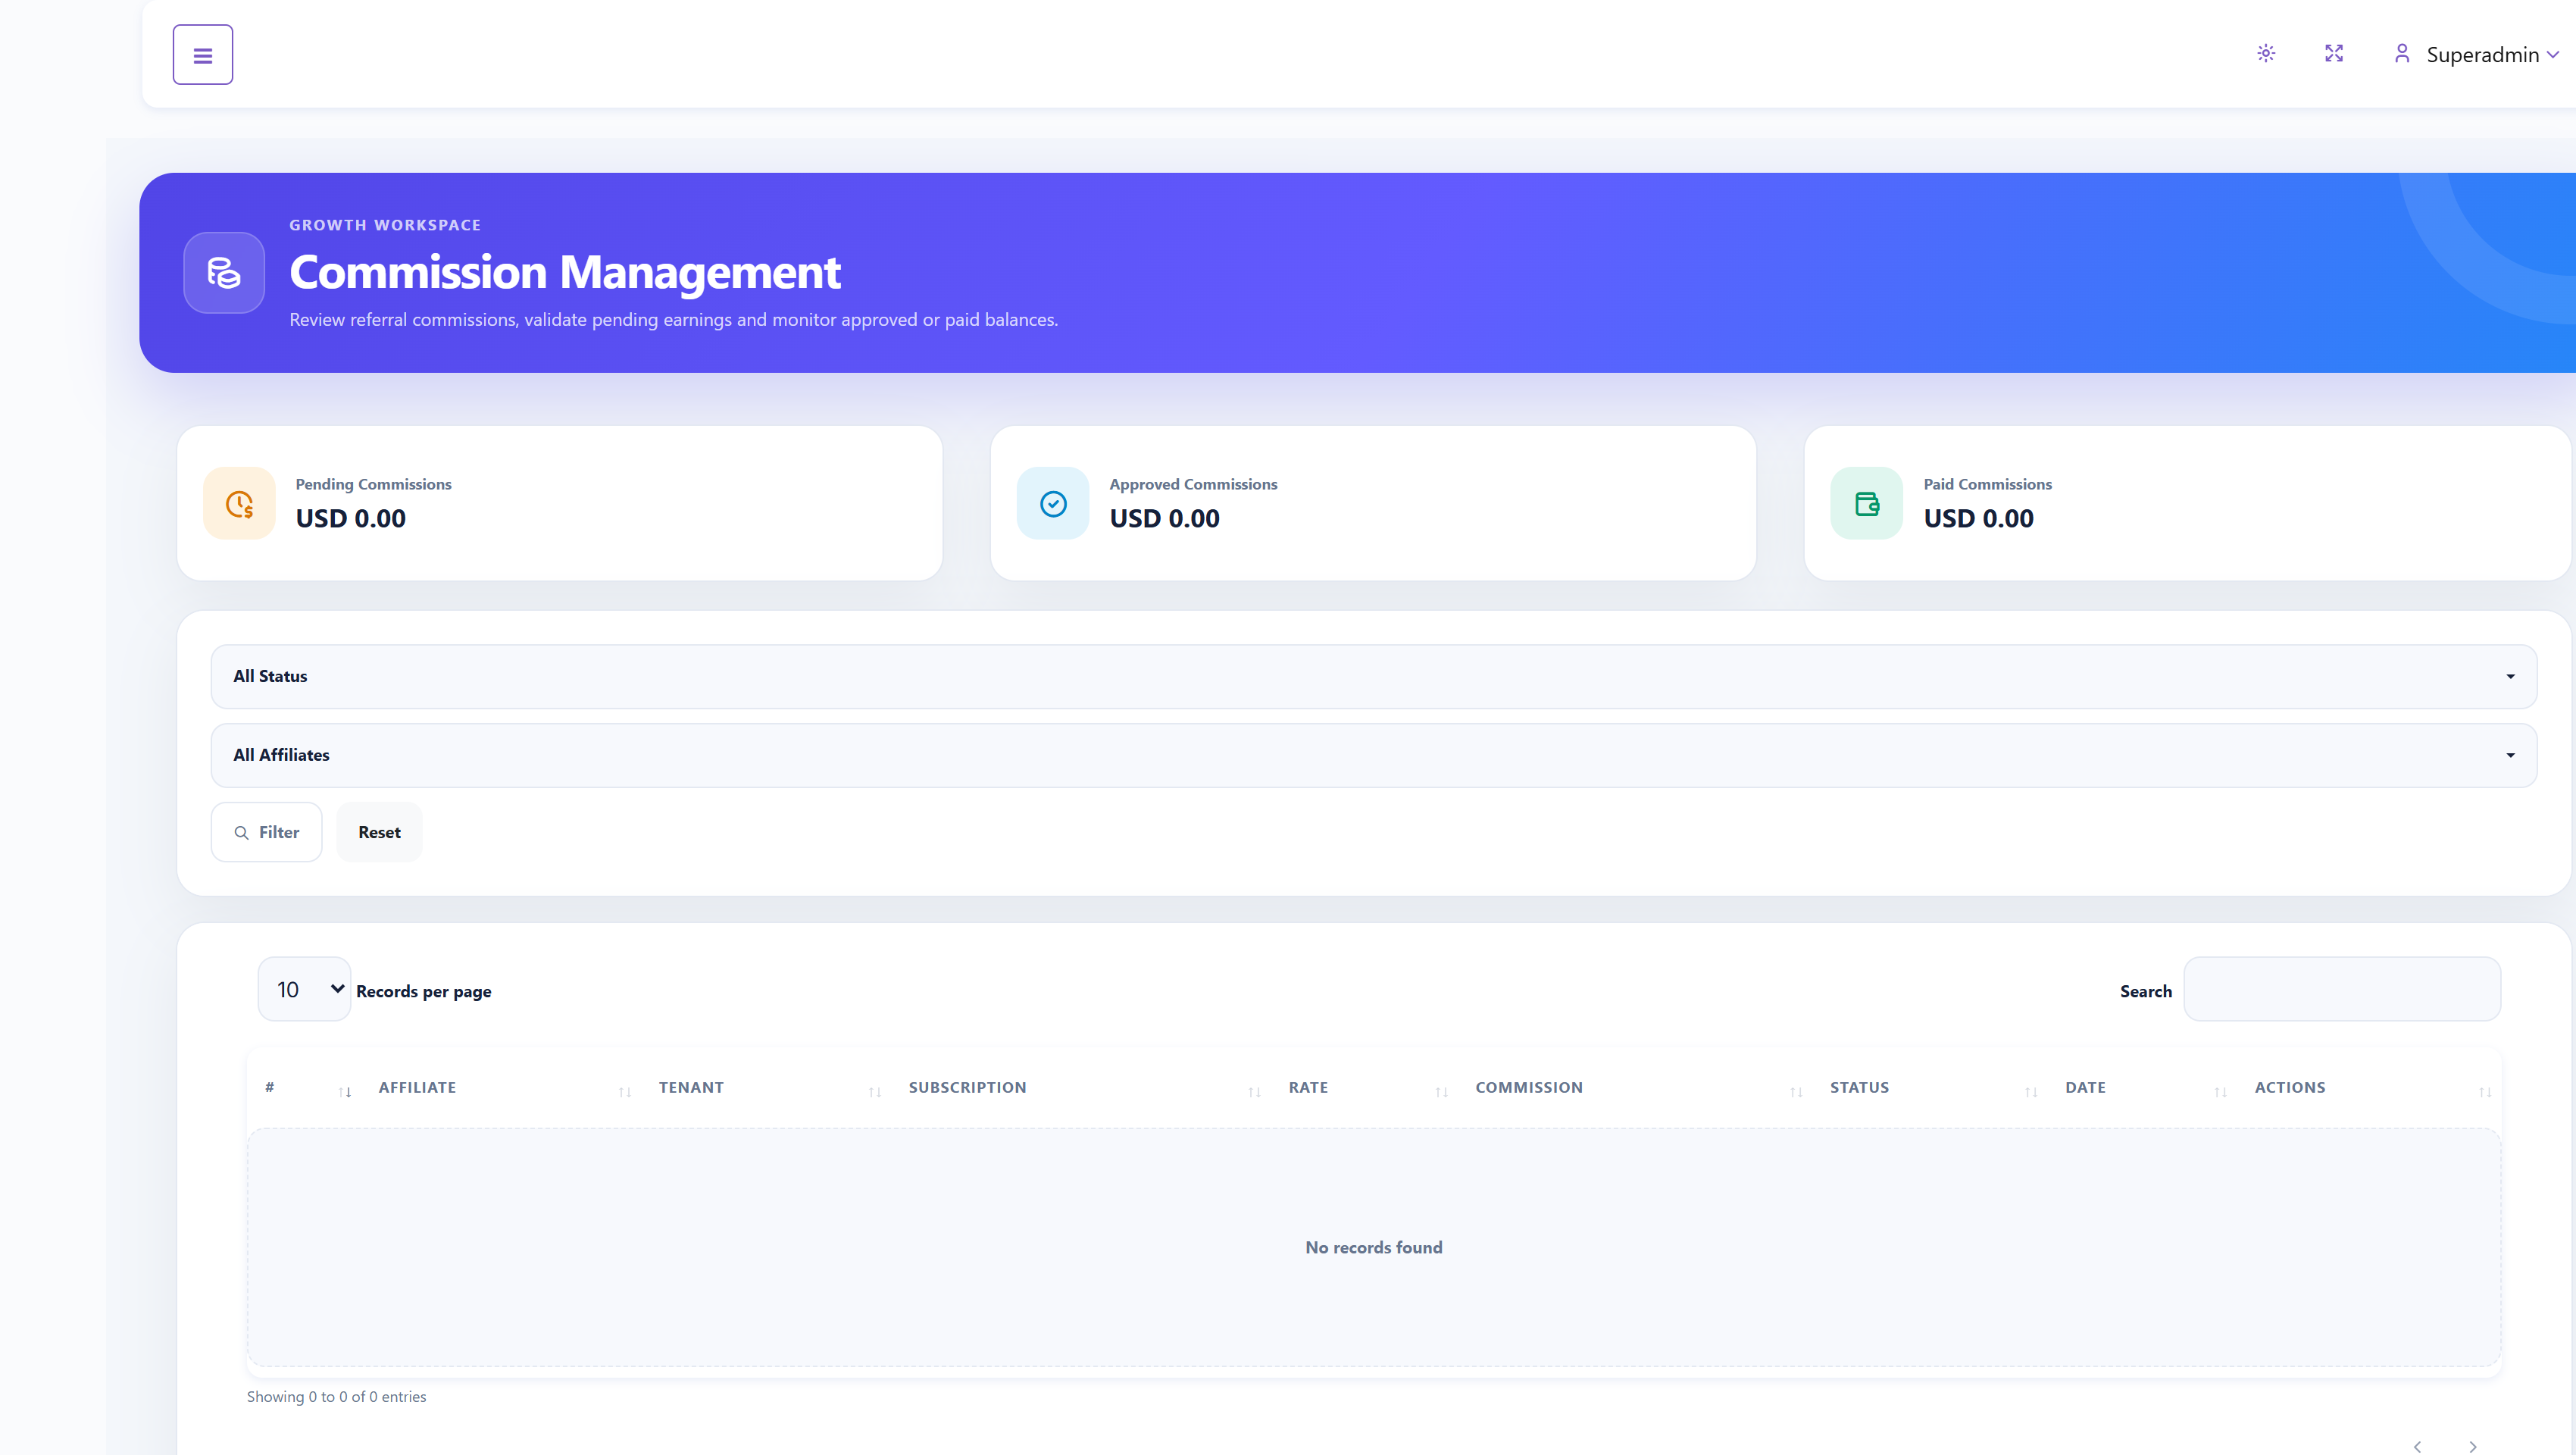
Filter by affiliate and status to review the tenant, subscription amount, rate, commission amount, date, and underlying referral/payment before making a decision.
Calculation and status meanings#
Commission = paid subscription amount × stored partner rate ÷ 100, rounded to two decimal places. For example, a 100.00 payment at 10% creates a 10.00 commission.
| Commission status | Meaning and Super Admin action |
|---|---|
| Pending | Generated and awaiting review. Verify the referral and successful payment. |
| Approved | Accepted by Super Admin and eligible for selection in a payout. |
| Paid | Included in a recorded payout. Reconcile with the external transfer. |
| Rejected | Not accepted. Record the reason where available and resolve any dispute before further changes. |
Approve only a valid pending commission. Reject invalid or duplicate claims after checking the records. Never use rejection as a substitute for a refund or for reversing an already completed payment.
When a commission is missing#
- Confirm that the signup followed a valid tracked referral and that it became associated with the intended tenant.
- Check that the affiliate was approved when the paid subscription was processed.
- Verify a positive recorded payment amount. Free trials, free plans, and zero-amount payments do not generate commissions.
- Check whether that referral already converted. The current implementation generates a commission for its first paid subscription, not subsequent renewals.
- Review the payment callback and application logs if a qualifying payment was recorded but the referral did not convert. Do not create a second payout while investigating.
Payouts#
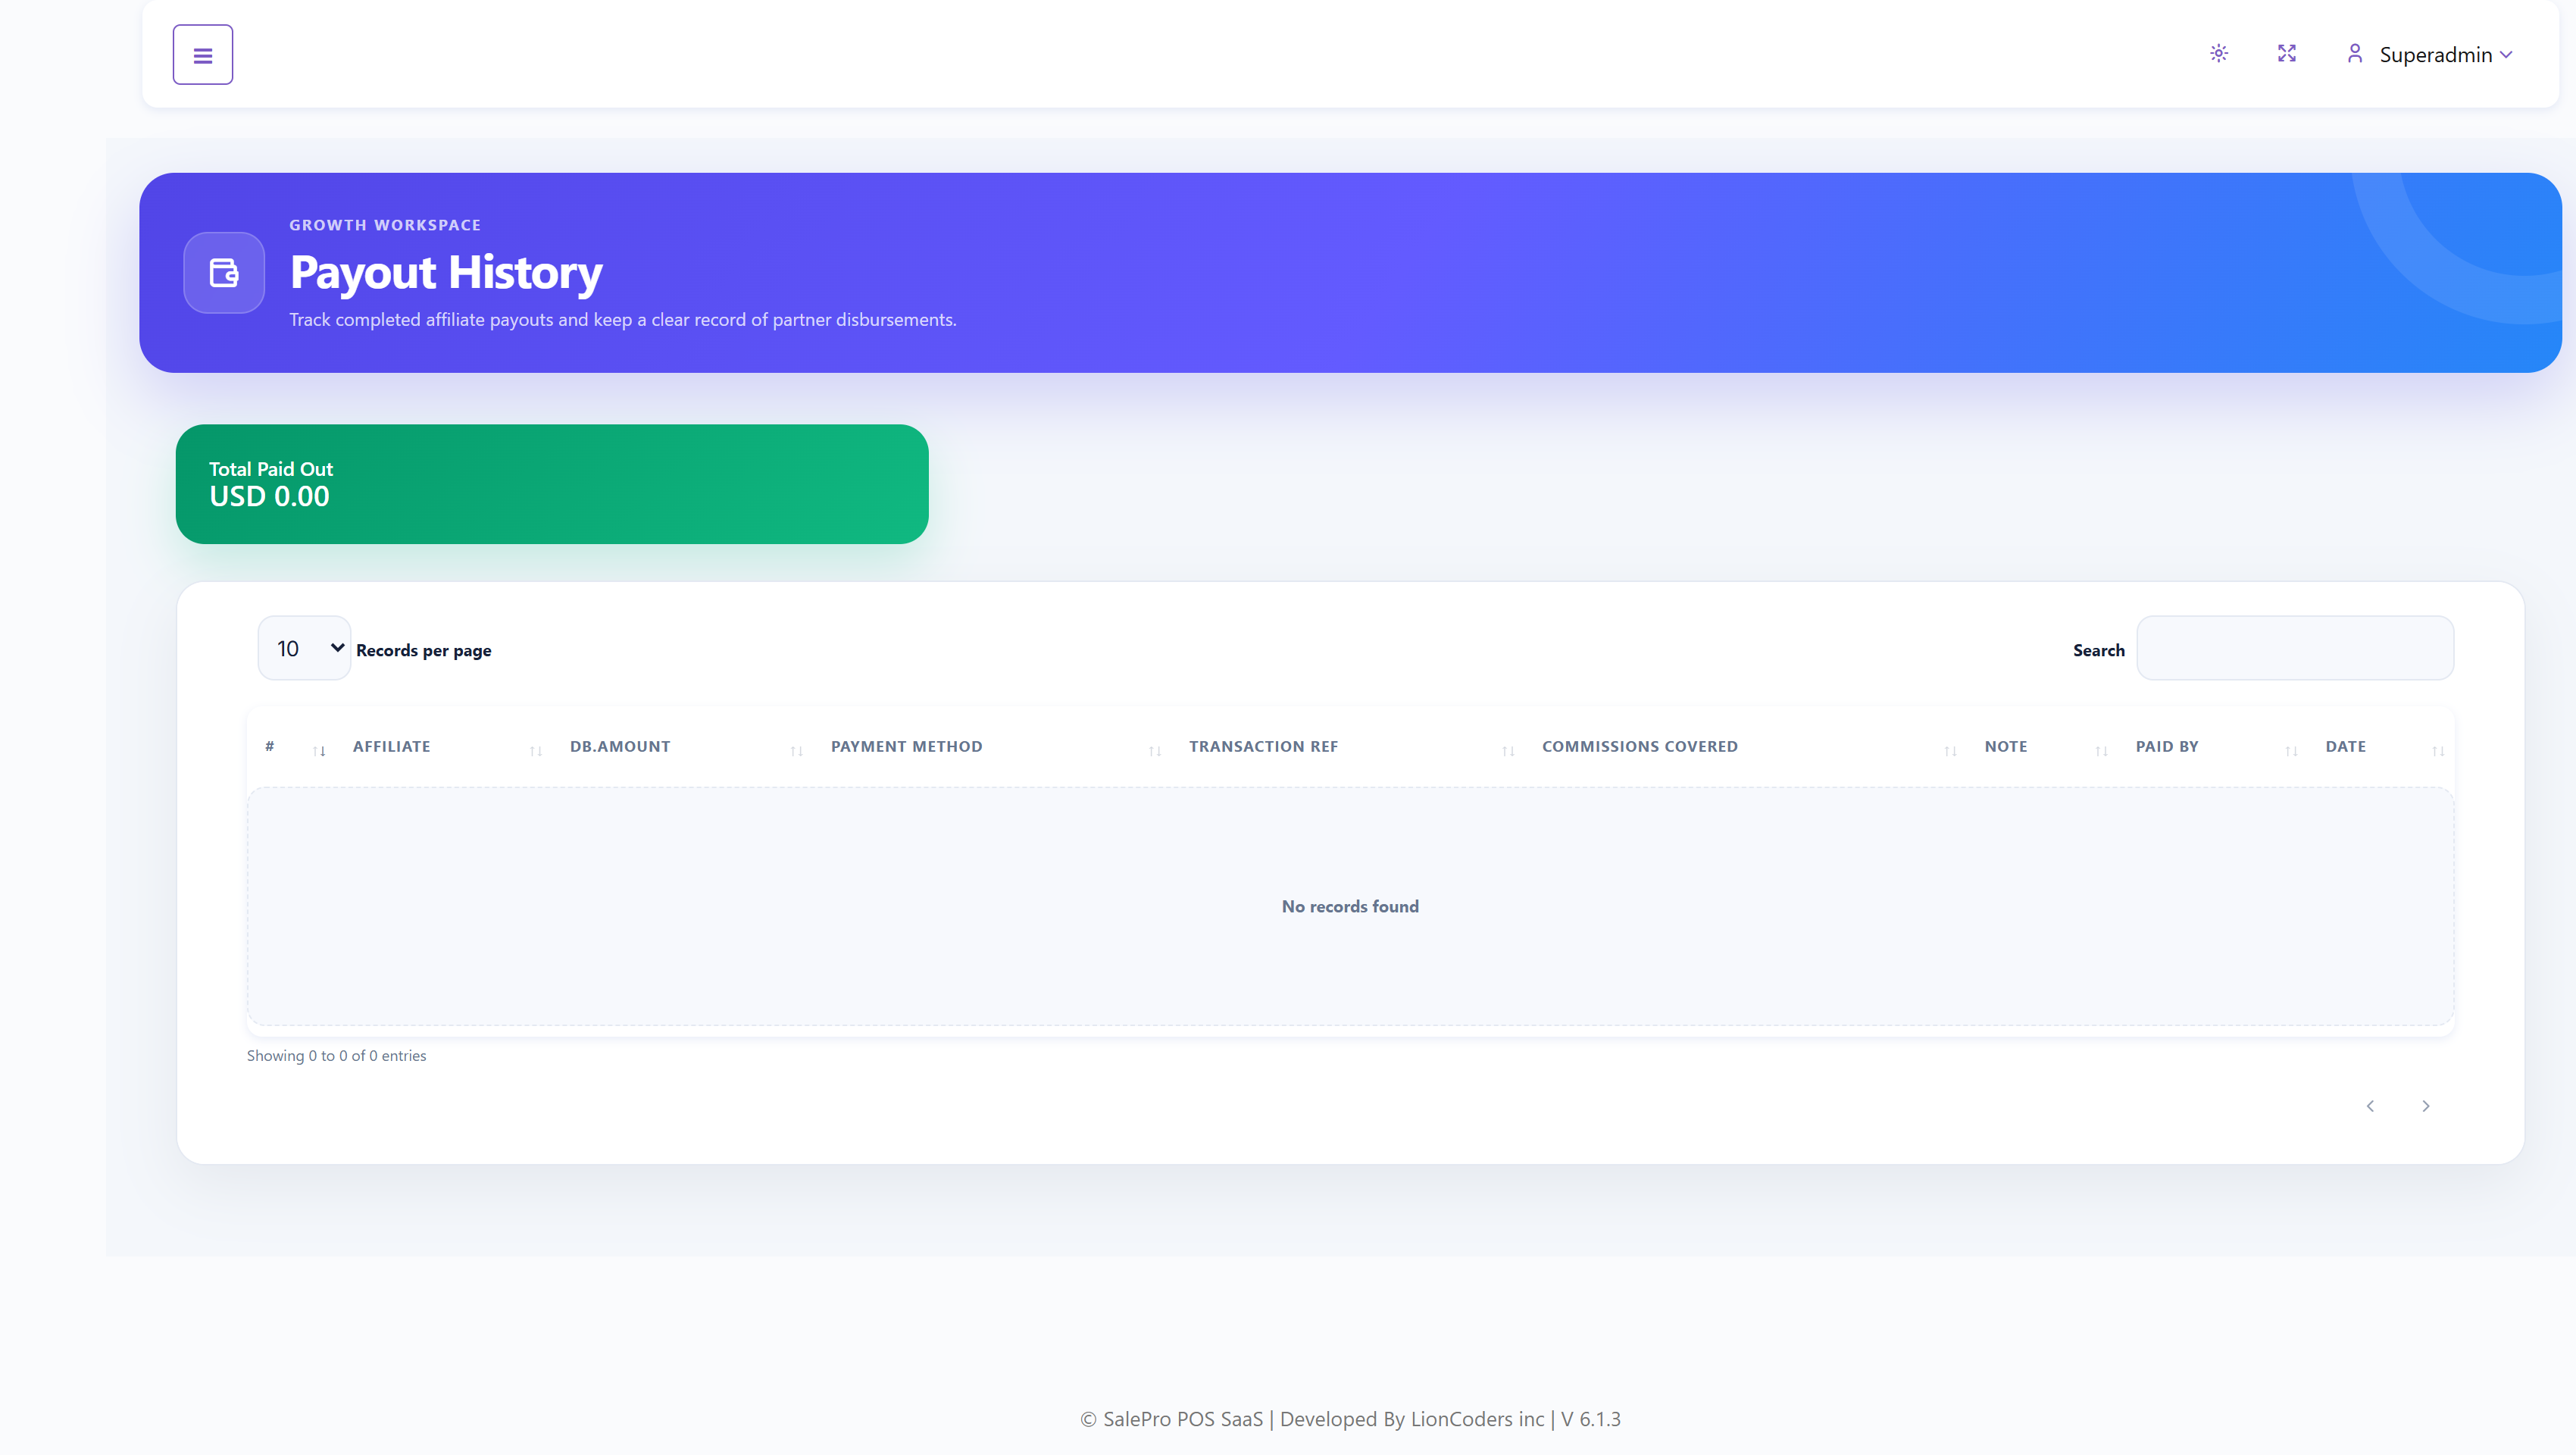
This historical ledger records the affiliate, amount, method, transaction reference, covered commissions, note, administrator, and date. It records disbursements; it is not a payment gateway.
Process an affiliate payout#
- Open the affiliate detail page. Confirm the payout destination with the partner, review approved unpaid commissions, and check the configured minimum payout policy.
- Open Process Payout and select only the approved commissions belonging to this affiliate that you intend to pay.
- Arrange and verify the external transfer through your approved payment process. The SaaS payout form does not send money itself.
- Enter the method, transaction reference, and relevant note. Check the amount against the selected commissions and the confirmed external transfer, then submit once.
- Confirm a new entry in Payouts and that the covered commissions now show Paid. If a response is unclear, check the ledger before retrying to avoid duplicate payment records.
Keep payout destinations and transaction evidence private. The current payout handler does not enforce the configured minimum amount, so Super Admin must verify the policy before processing.
Settings#
Configure the default commission percentage, minimum payout policy, and whether the affiliate program is active.
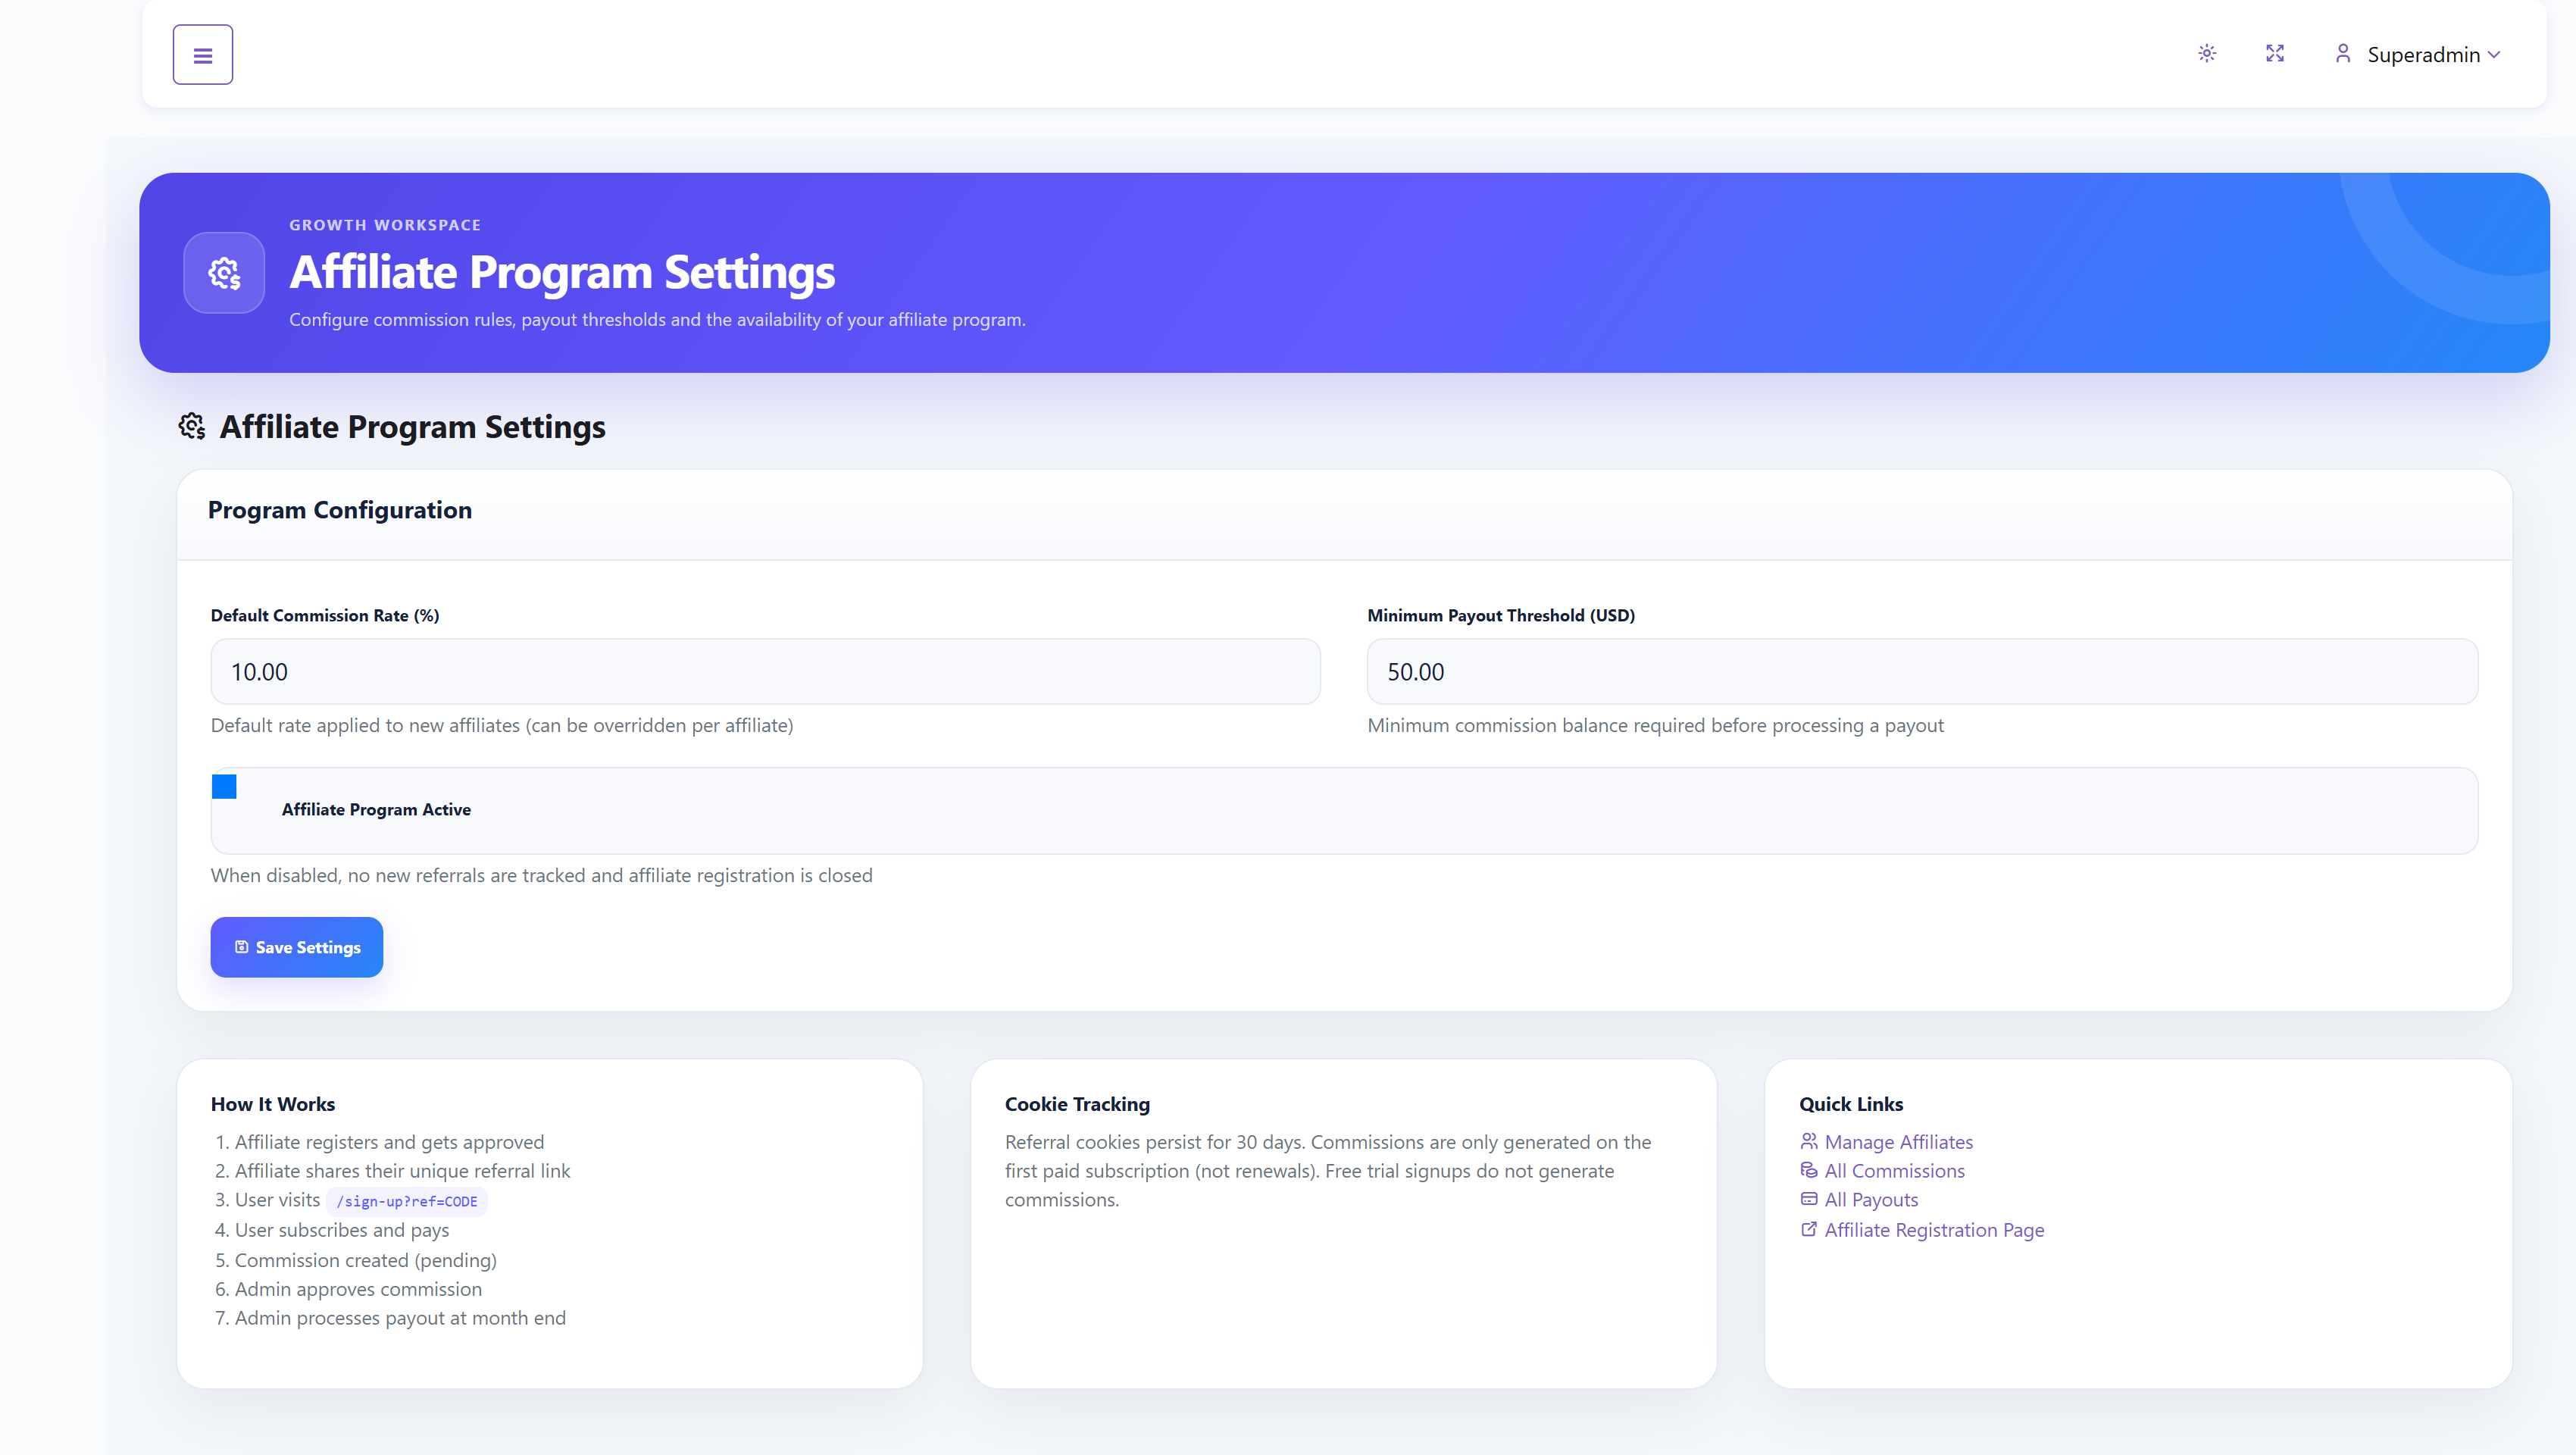
- Default commission: used for newly registered or created partners when no individual rate is supplied. Review existing partner rates separately.
- Minimum payout: the program’s payout threshold. Check it manually before disbursing approved balances.
- Program active: enables public applications and new referral tracking. Disabling it does not erase earlier referrals, commissions, or payouts; review existing obligations and recorded referrals separately.
Administration checklist: review applications, verify recorded referrals and qualifying payments, approve valid commissions, reconcile approved balances, check payout details and thresholds, record external payments once, and retain an audit trail of decisions.
Settings#
Settings controls platform-wide identity, billing integrations, discoverability, tracking, and outbound mail. Treat credentials and tracking code as sensitive configuration.
General Setting#
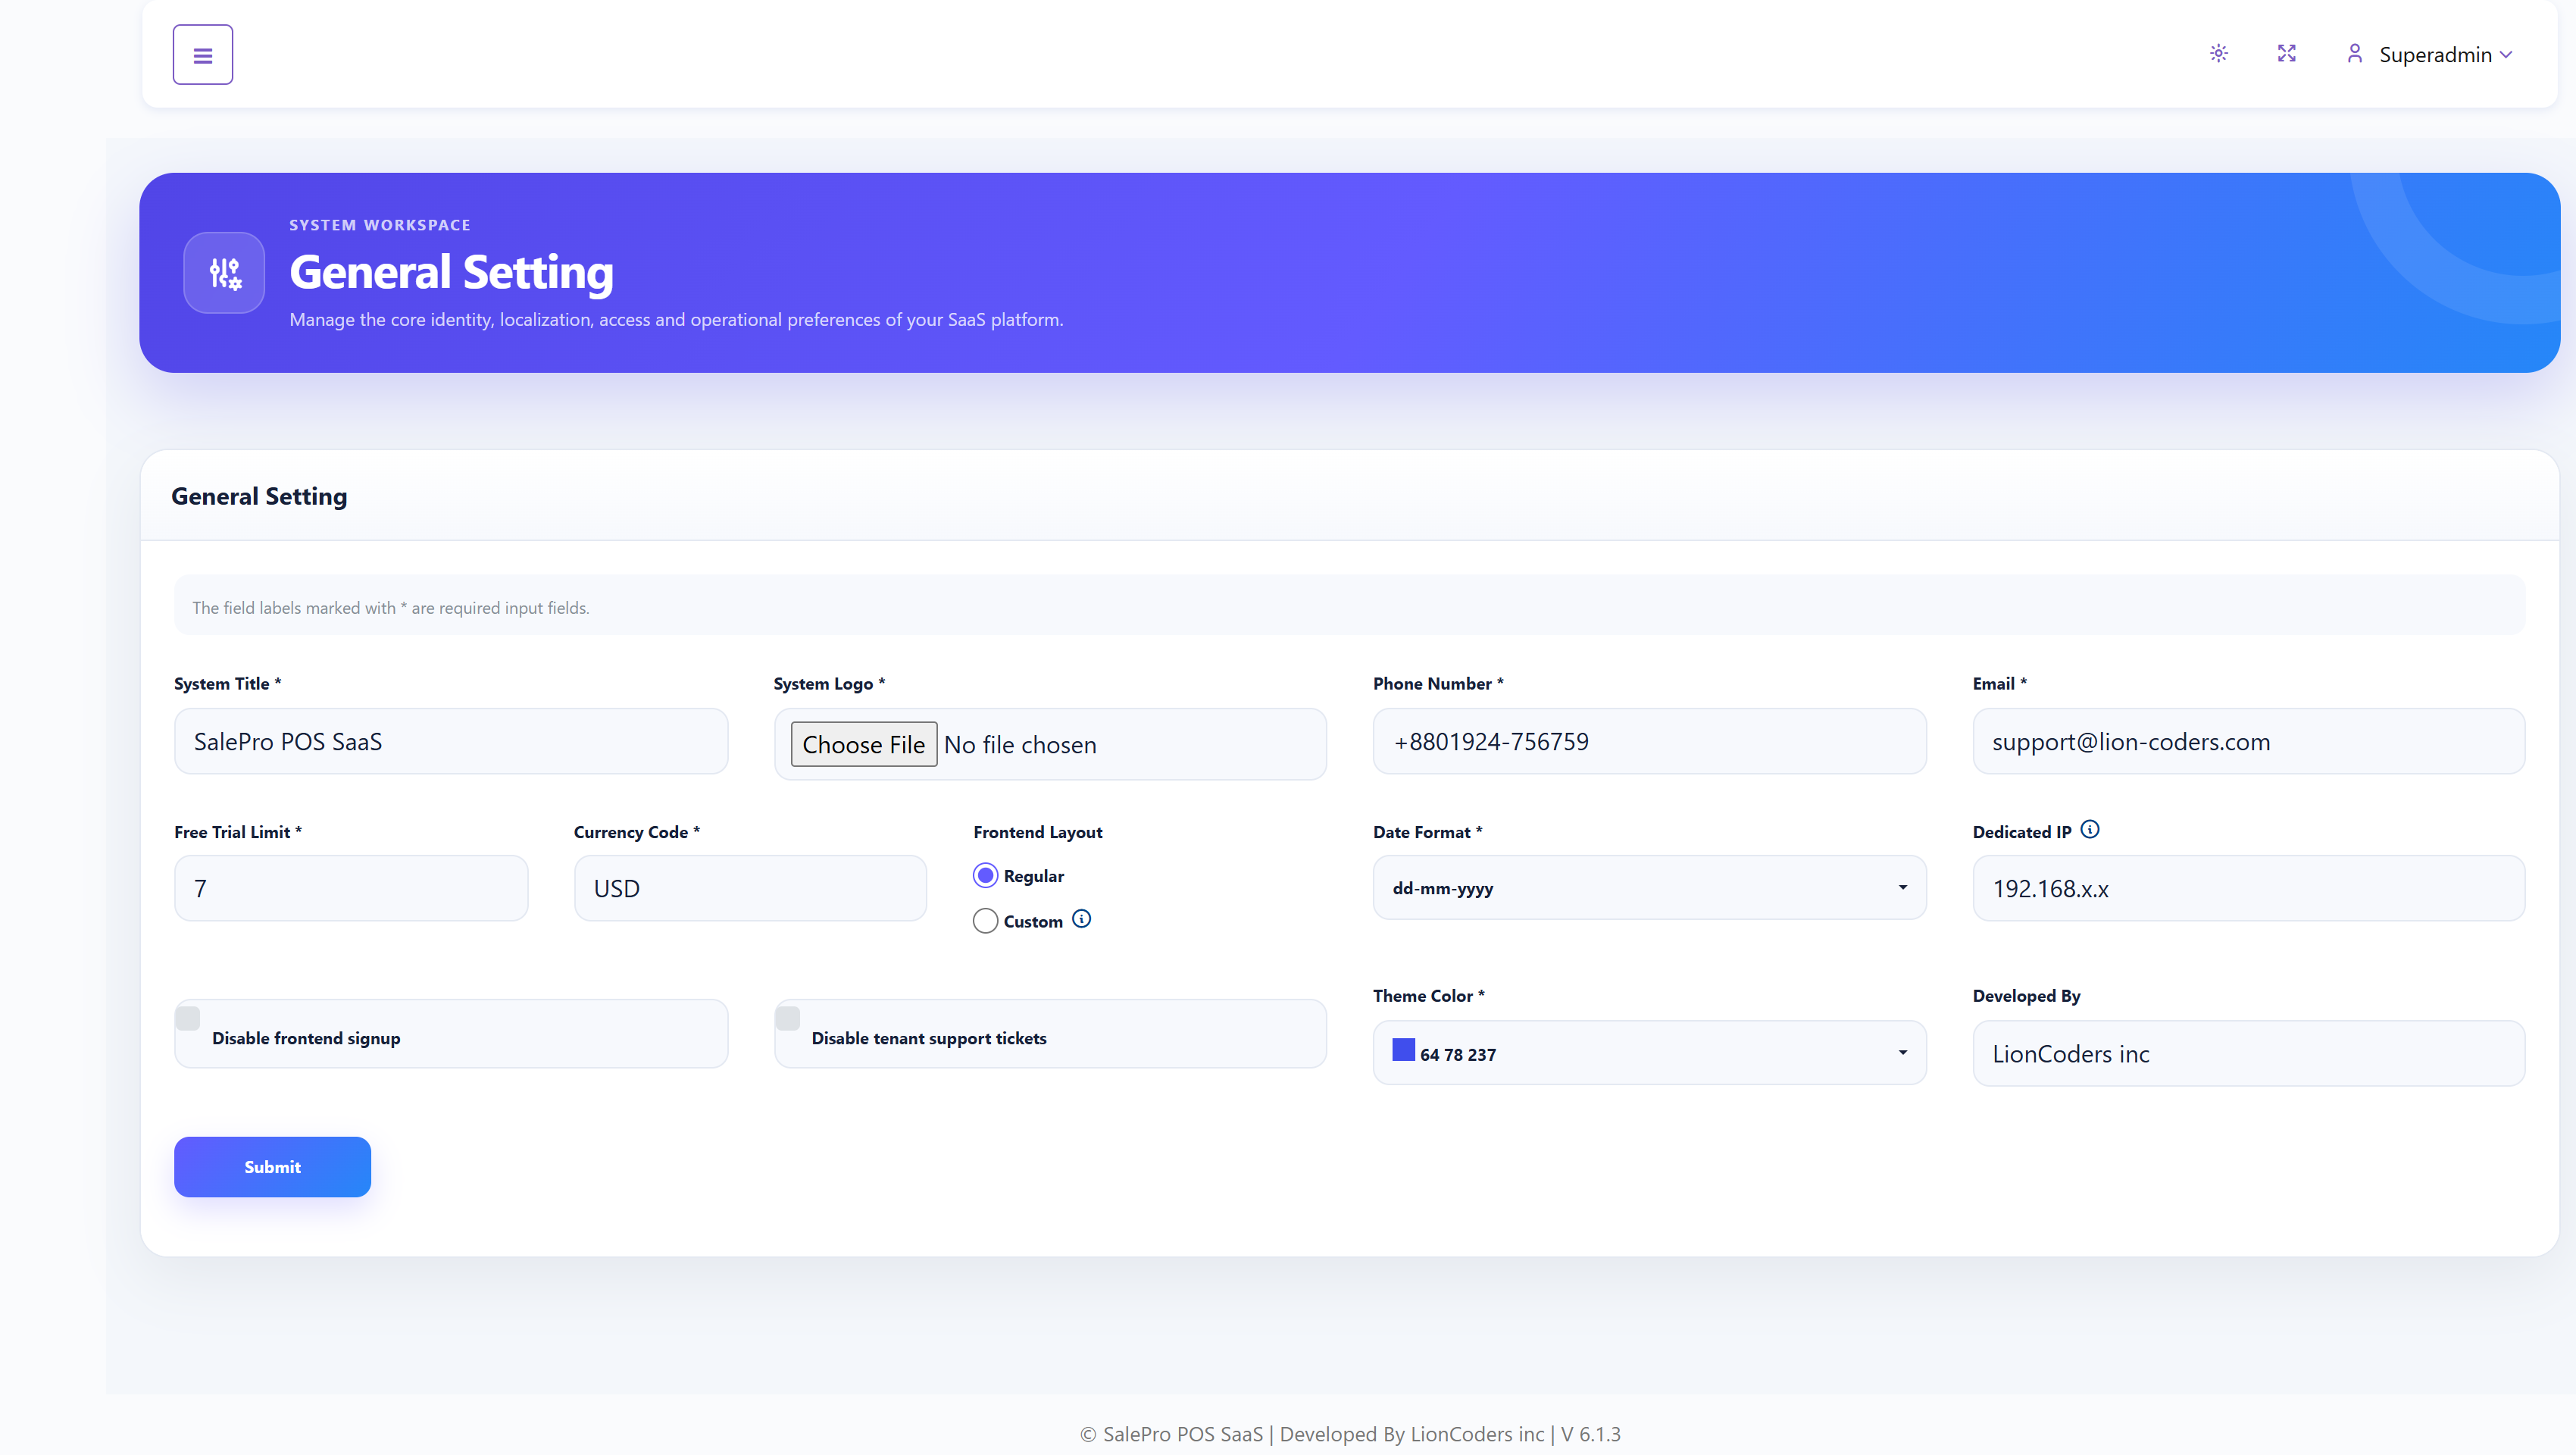
- System Title and Logo: platform name and primary brand image.
- Phone and Email: public or administrative contact details.
- Free Trial Limit: number of trial days offered where a package supports trial access.
- Currency Code: currency label used in pricing, revenue, and payment displays.
- Frontend Layout: Regular or Custom public-site presentation.
- Date Format: the display format used across Super Admin screens.
- Dedicated IP: optional infrastructure value used by the SaaS setup.
- Disable frontend signup: prevents new public tenant registration.
- Disable tenant support tickets: hides or disables the tenant support workflow and removes the Super Admin Support Tickets item.
- Theme Color and Developed By: shared presentation and footer attribution.
After saving, check the Dashboard, public Frontend, signup flow, date displays, and any affected sidebar item.
Payment Setting#
Payment Setting configures Manual Payment and supported online gateways, including PayPal, Stripe, Razorpay, Paystack, Paydunya, Pesapal, JazzCash, bKash, SSLCommerz, PayHere, Mollie, Xendit, M-Pesa, Monnify, and MTN MoMo.
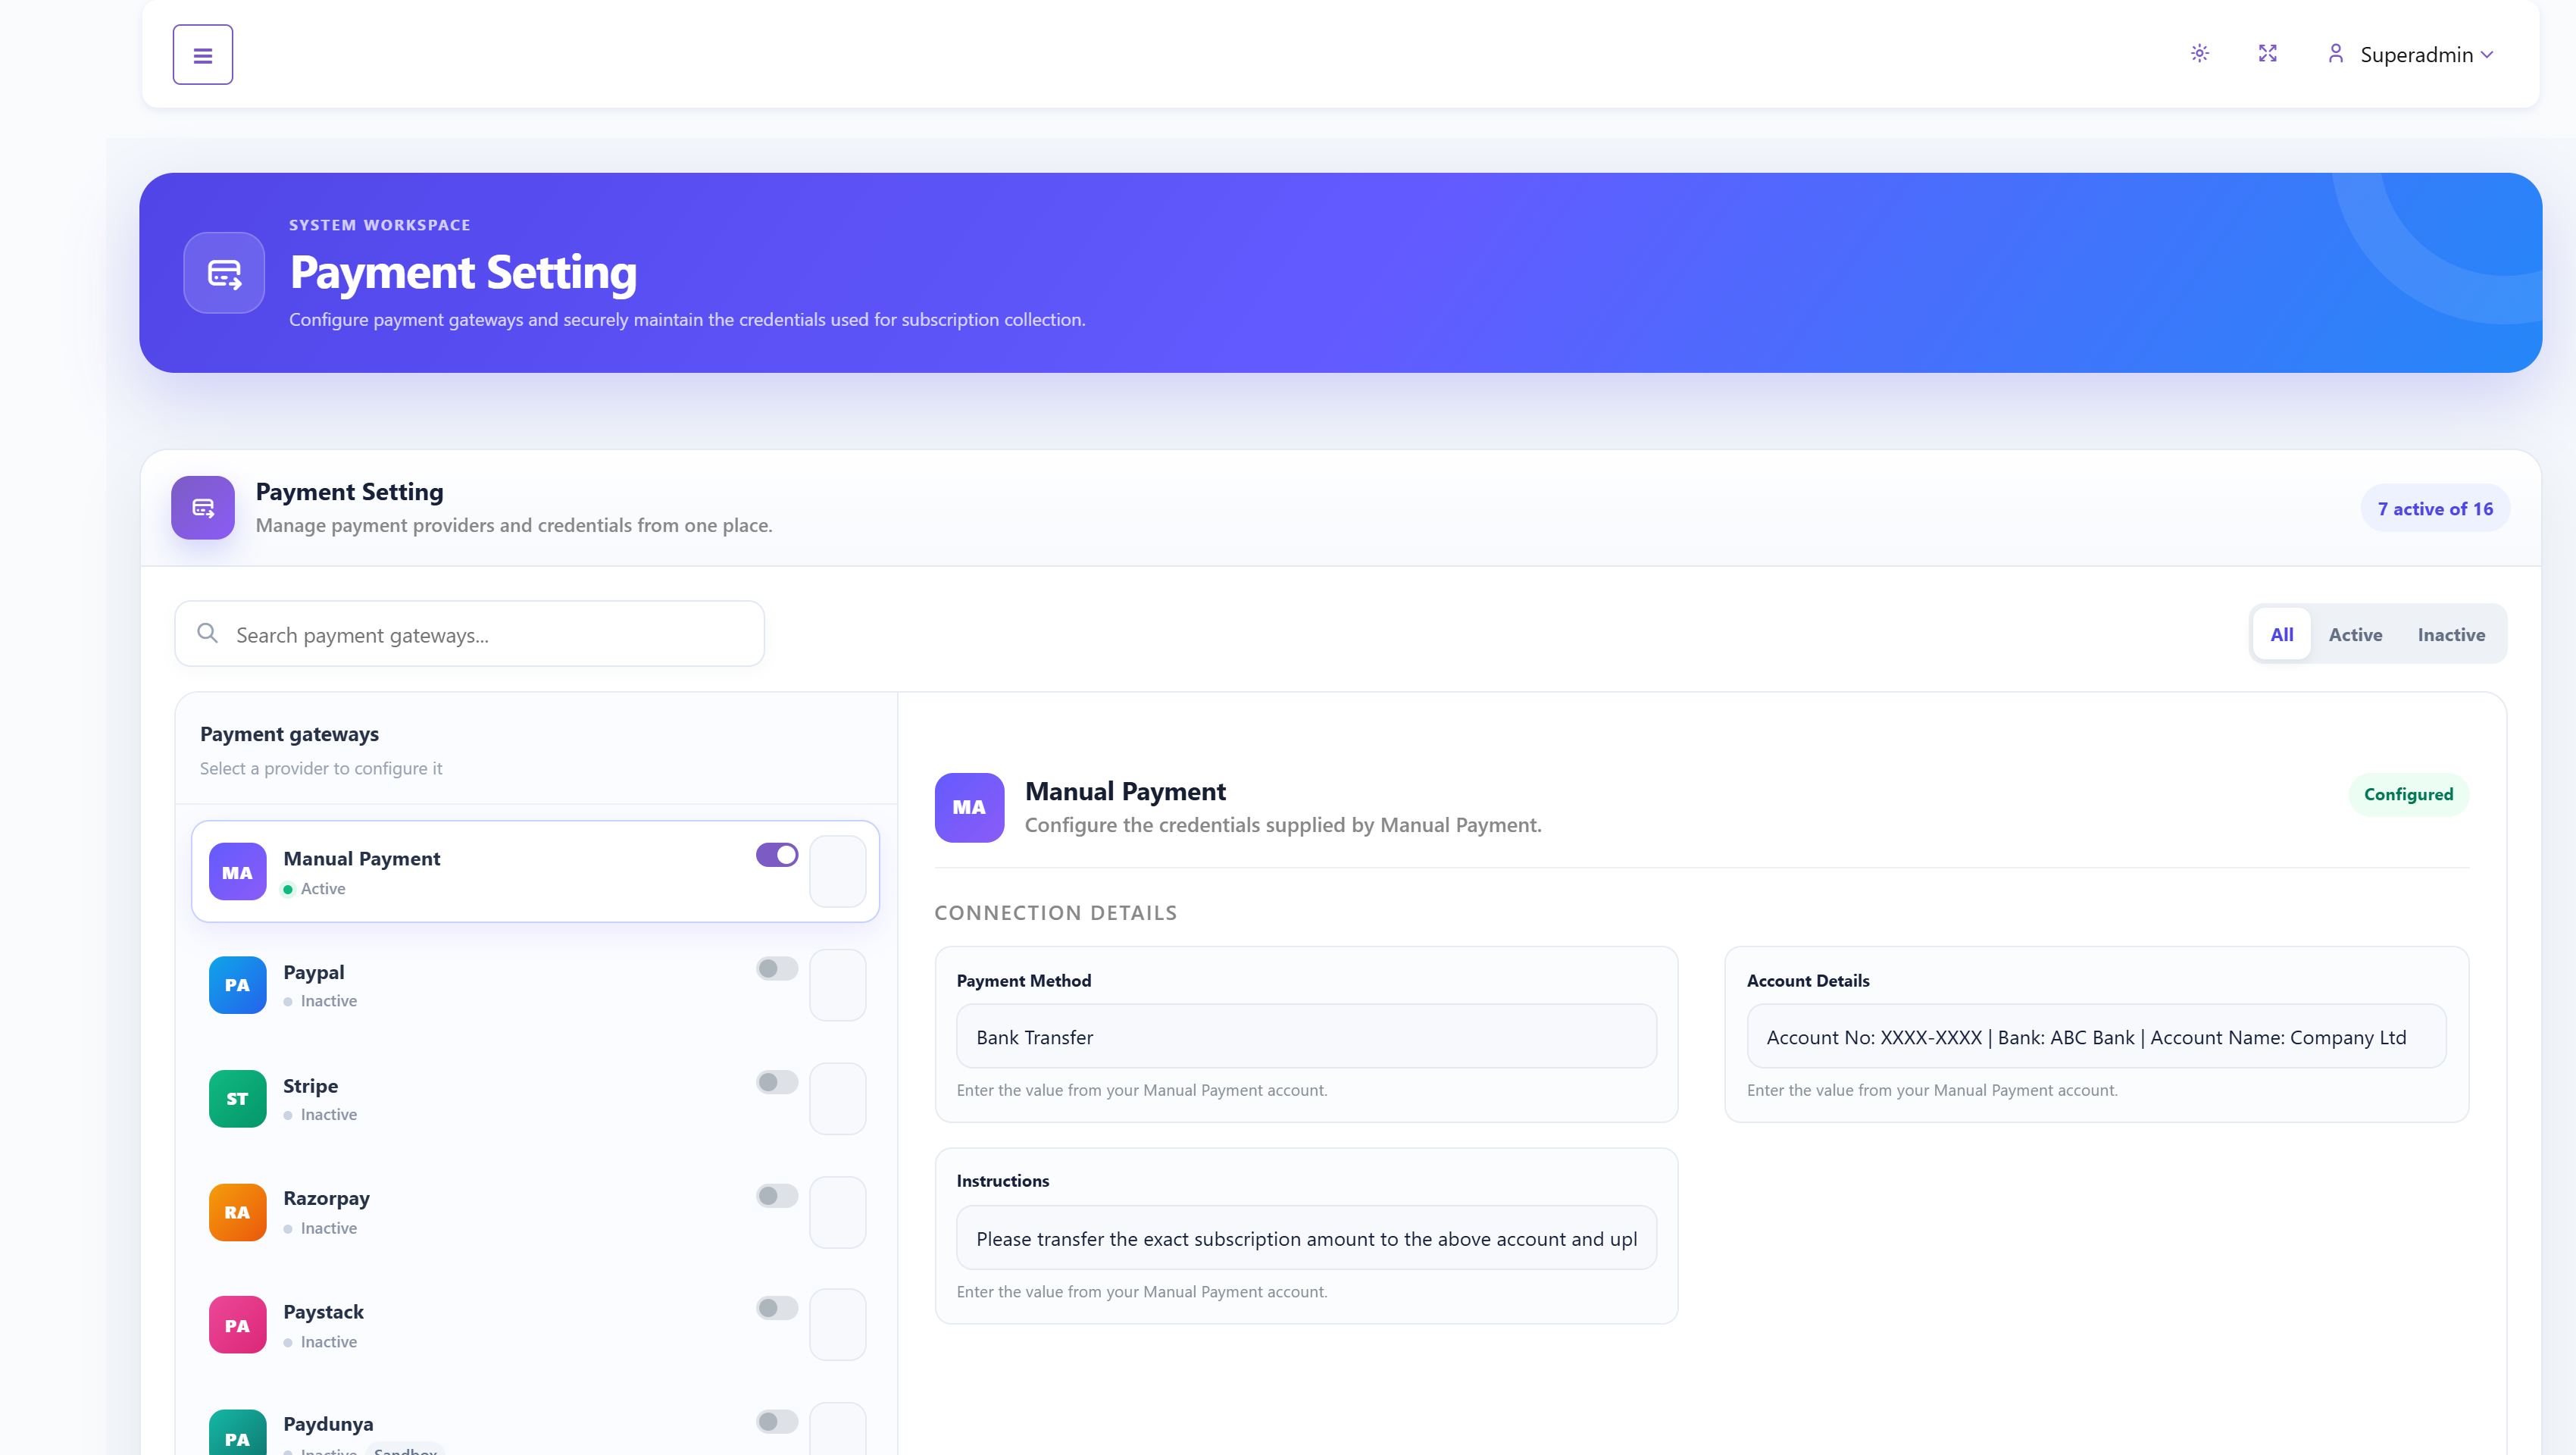
- Select a provider from the left-hand list.
- Choose Sandbox or Live mode where the provider supports it.
- Enter the provider-specific public and secret credentials, merchant identifiers, callback tokens, or manual-payment instructions.
- Enable the provider only when all required values and provider-side callback URLs are configured.
- Select Save changes.
Never include secret keys in screenshots or support messages. Use sandbox credentials for testing and rotate any credential that may have been exposed.
SEO Setting#
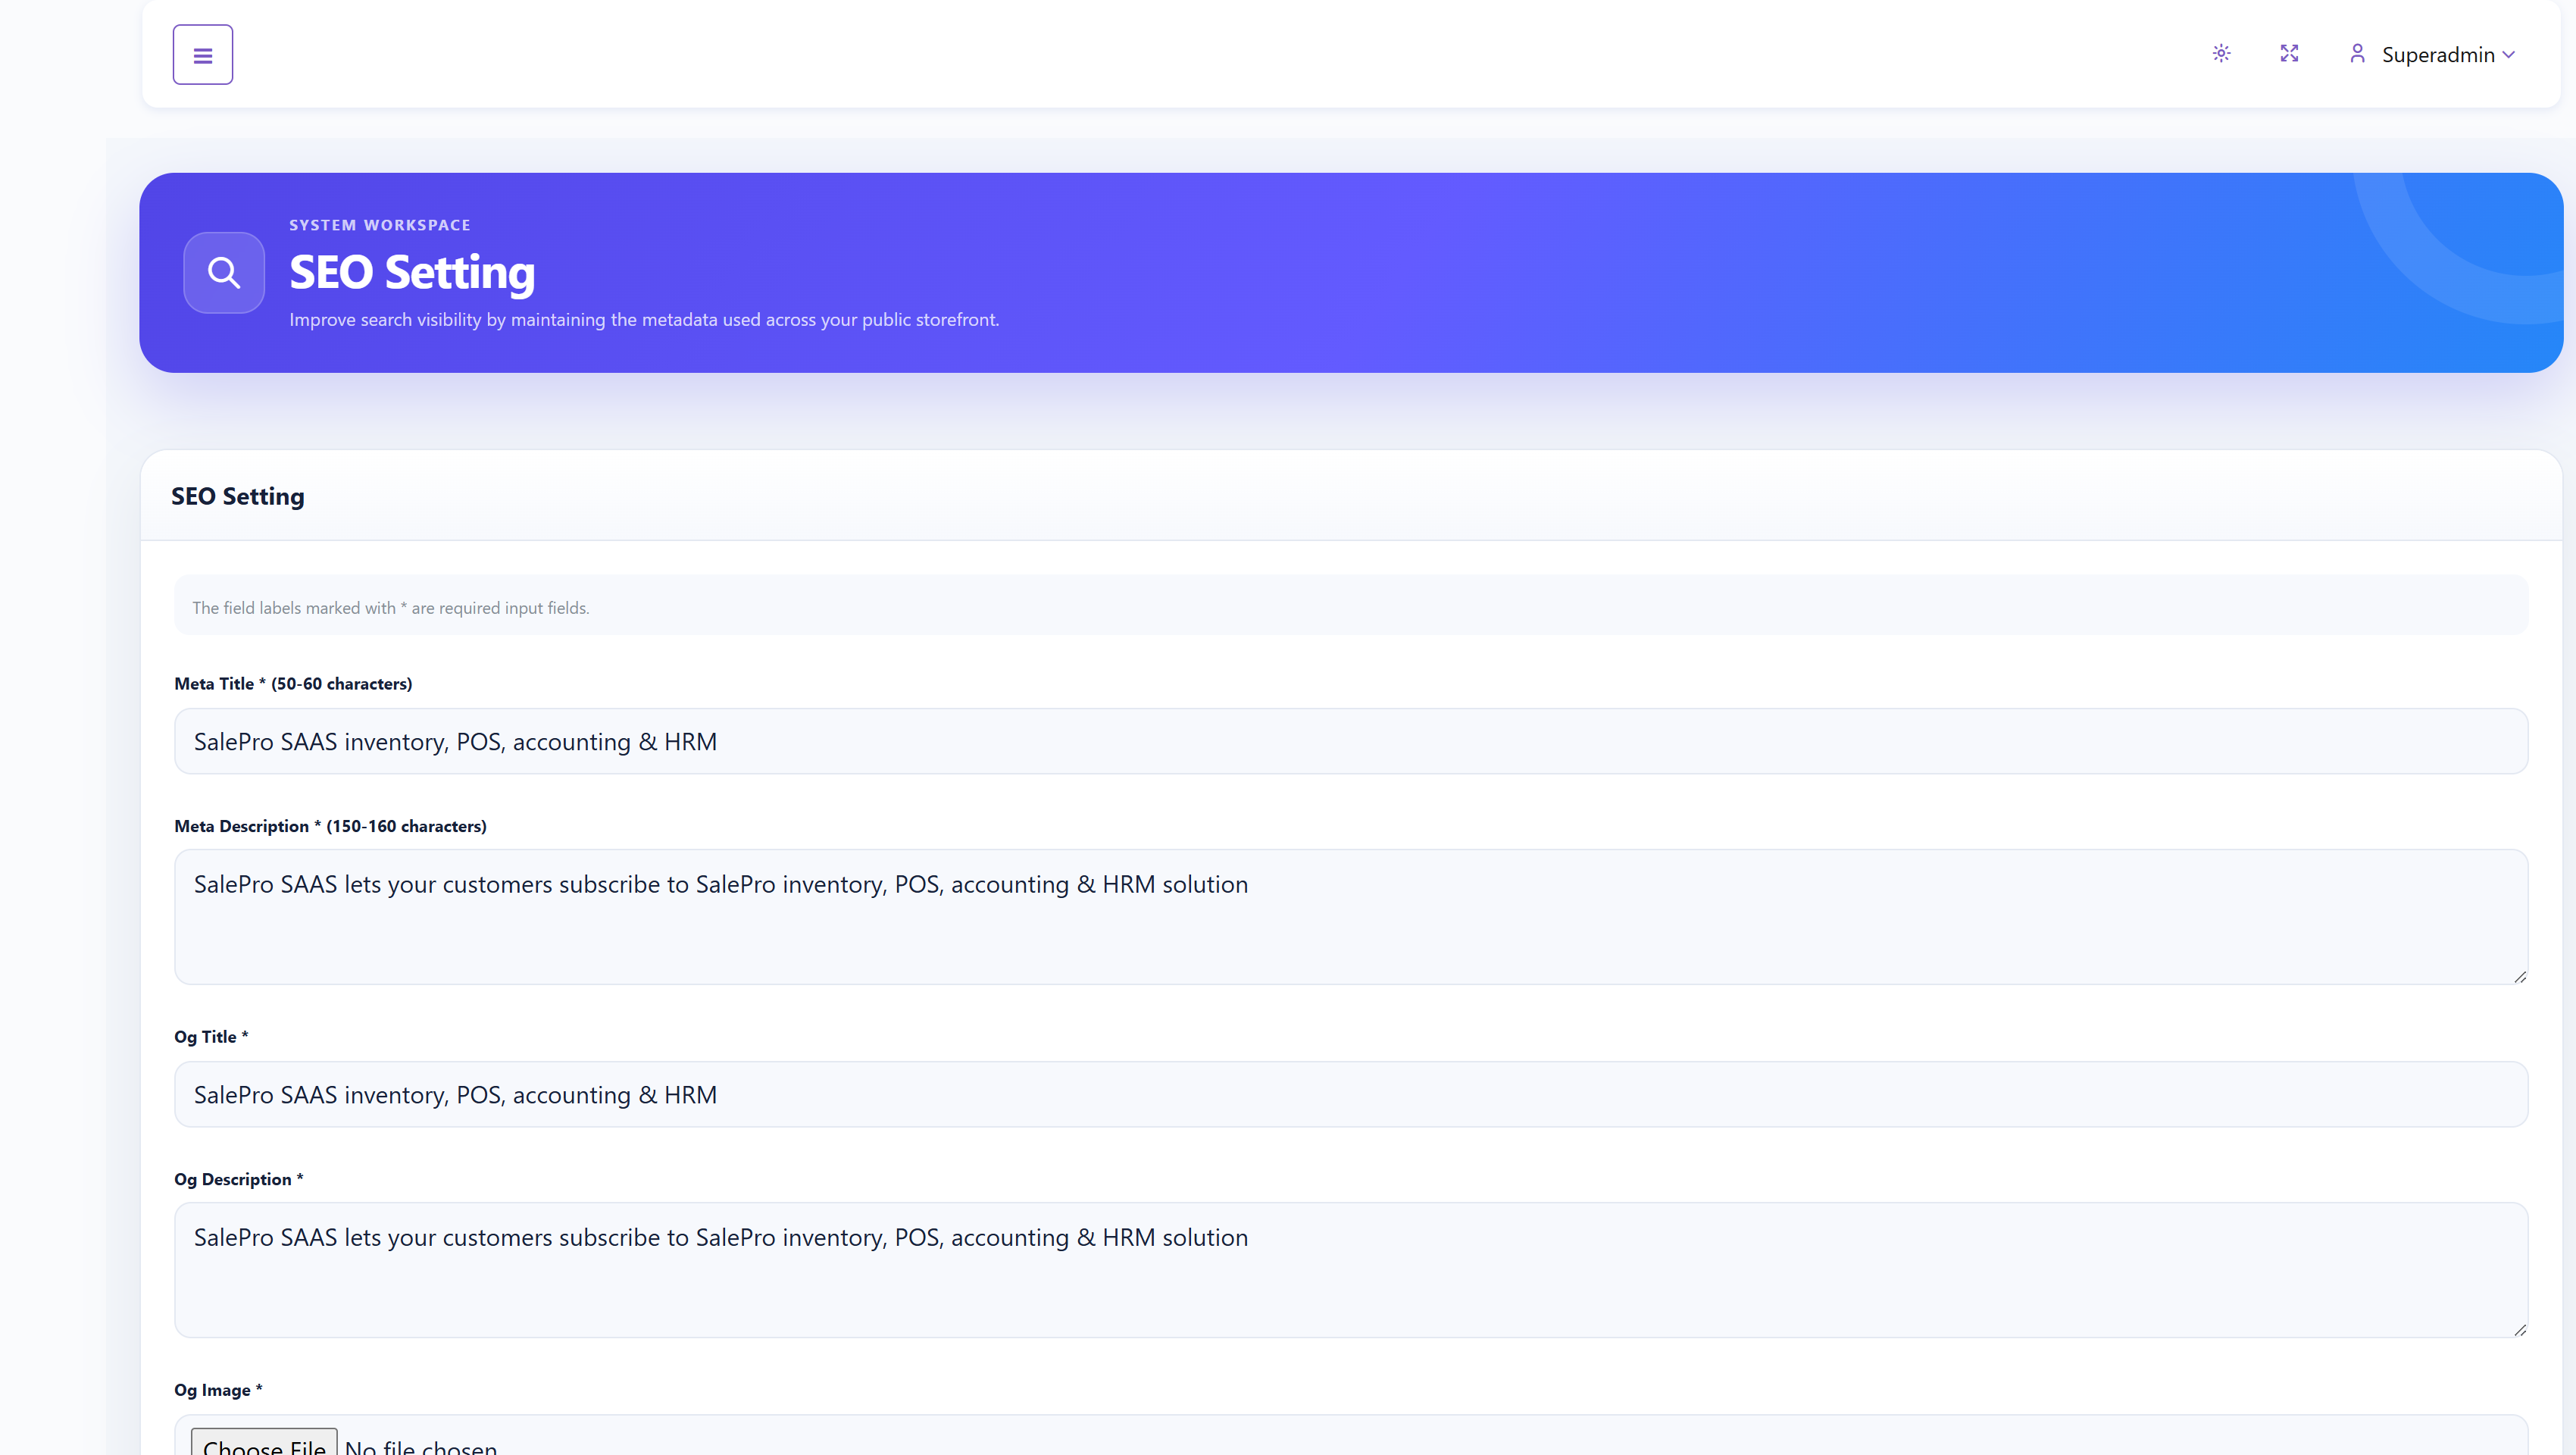
Enter a concise Meta Title, a descriptive Meta Description, Open Graph title and description, and an Open Graph image. The interface recommends approximately 50–60 characters for the title and 150–160 for the description. After saving, inspect the public page source or a trusted preview tool to confirm the metadata and image URL.
Analytics Setting#
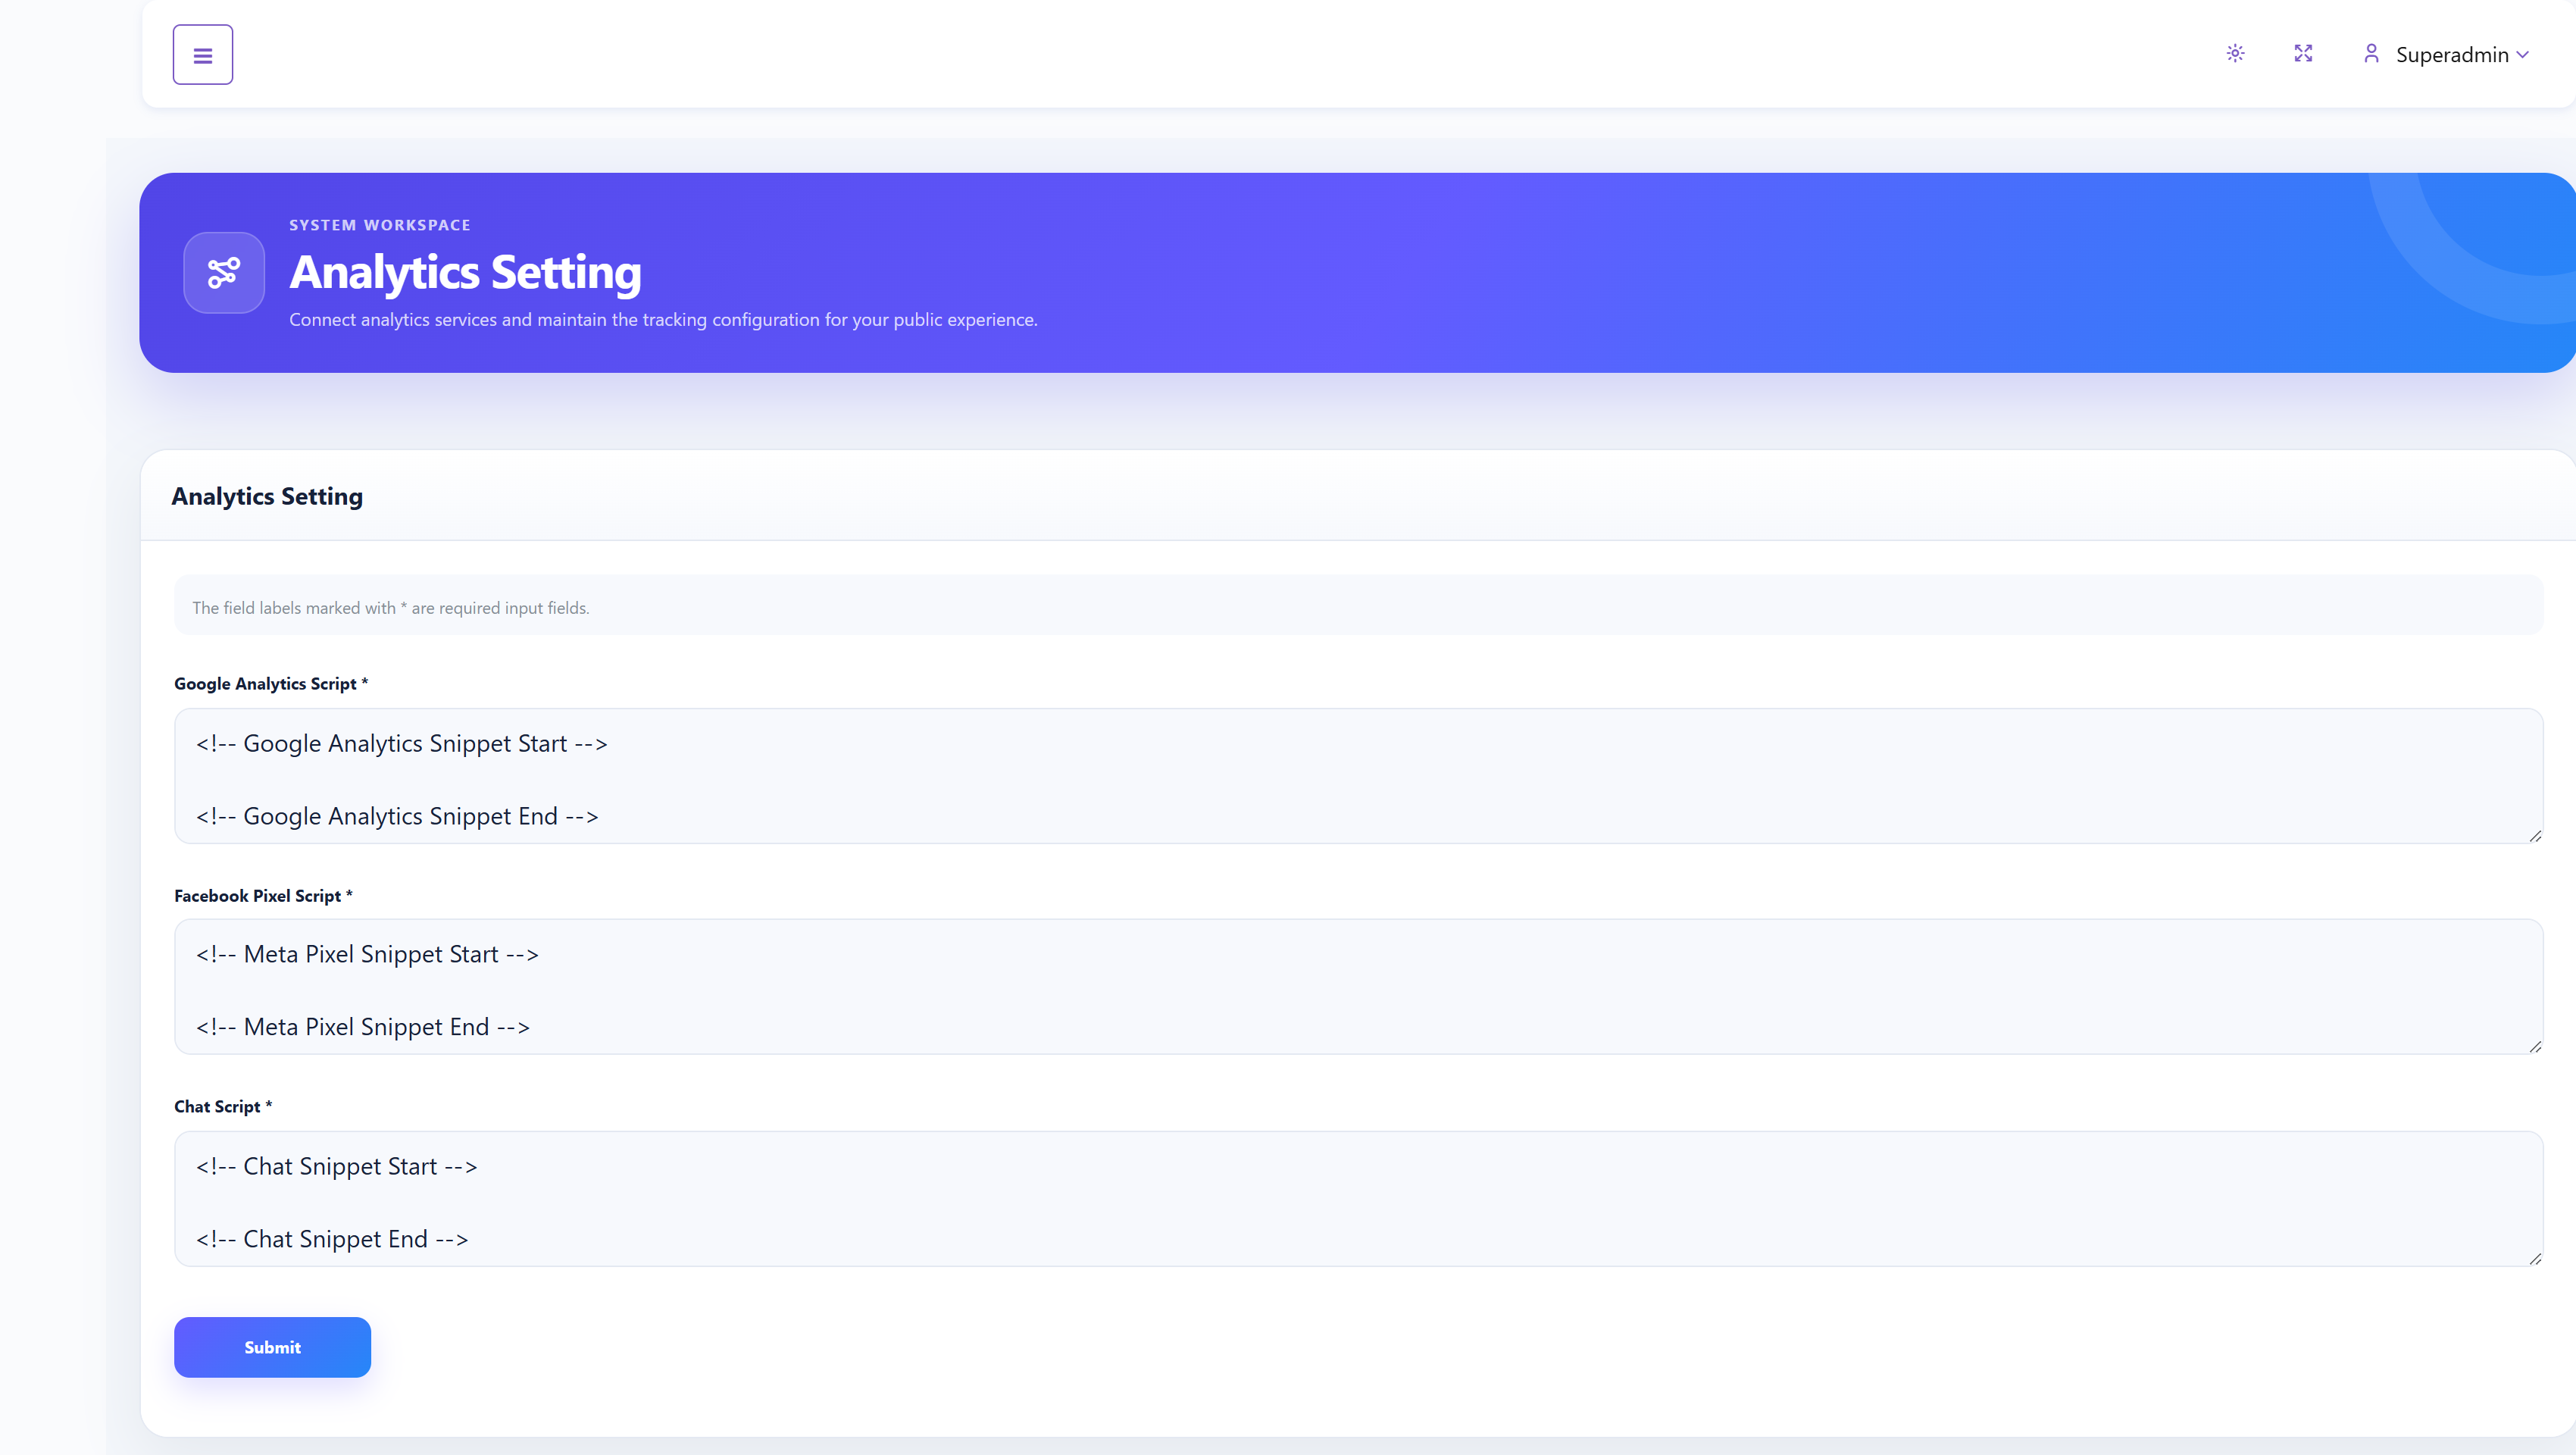
Paste only scripts obtained from the official analytics, advertising, or chat provider account. Validate the script in a staging environment, confirm any consent requirements that apply to your users, and avoid adding duplicate trackers through a tag manager and this page at the same time.
Mail Setting#
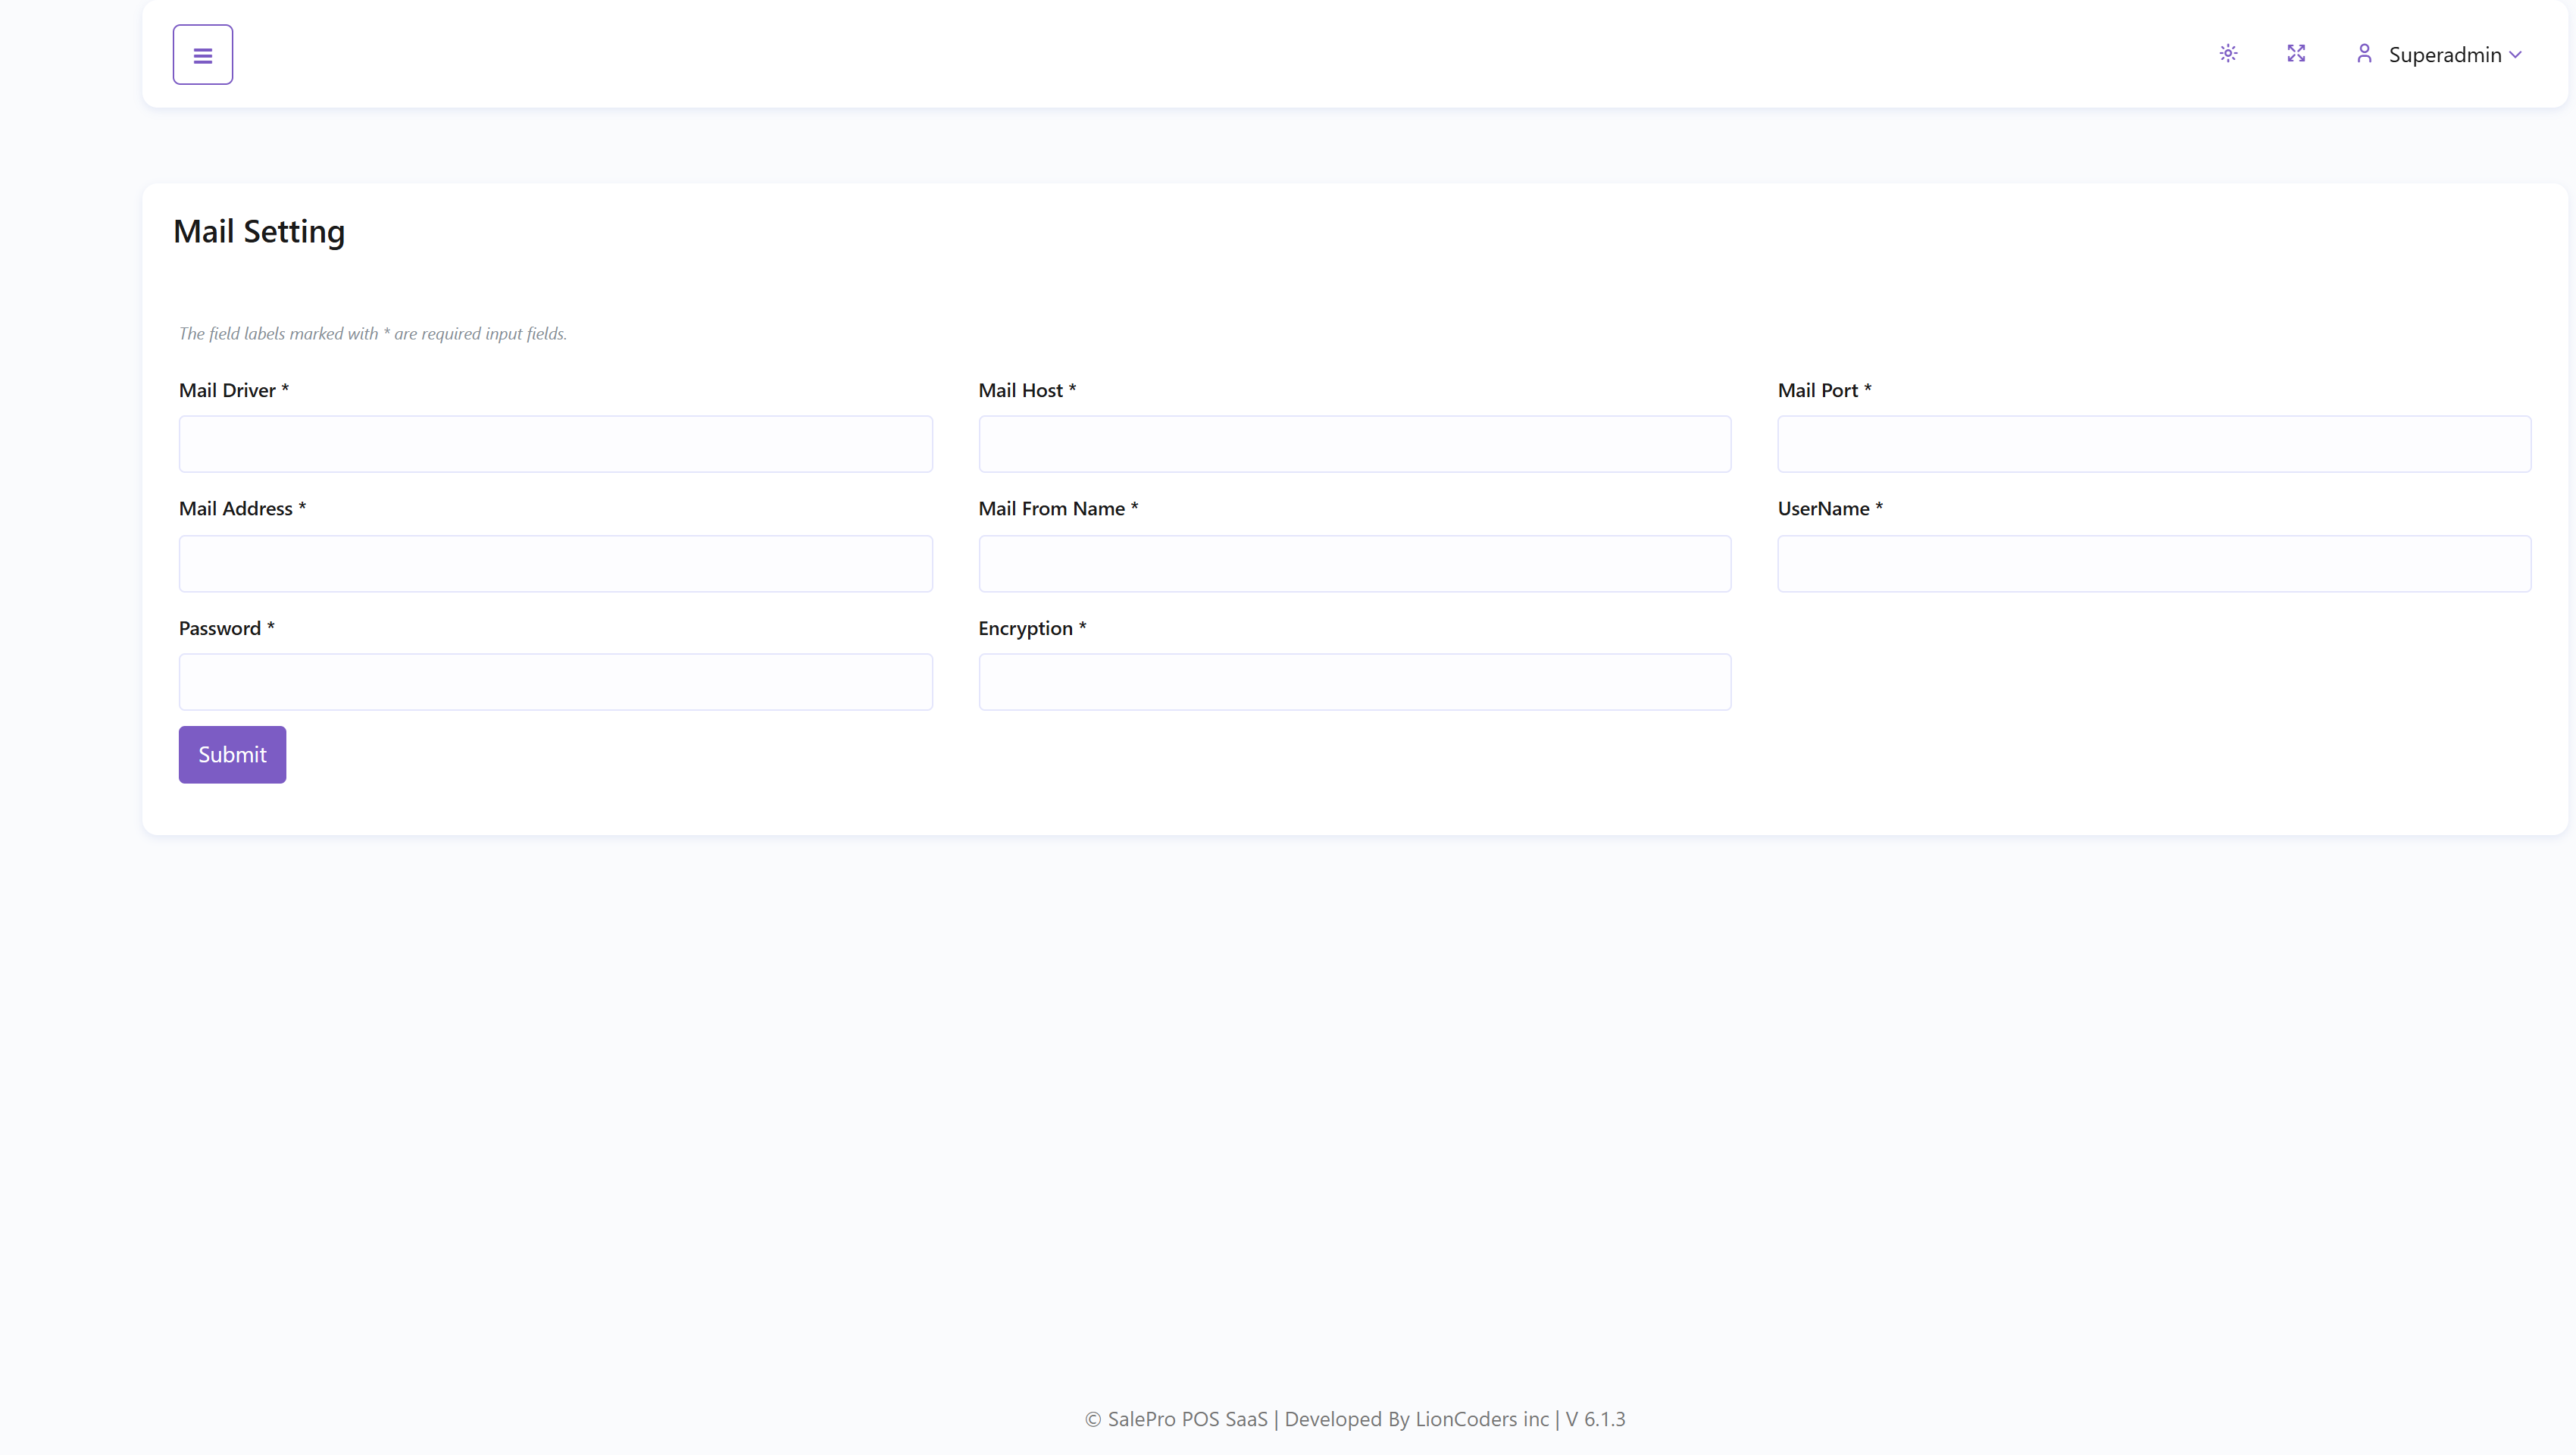
Enter the Mail Driver, Host, Port, From Address, From Name, Username, Password, and Encryption method. Use a dedicated transactional-mail account where possible. After saving, trigger a controlled platform email and check delivery, sender identity, TLS settings, and spam placement. Never publish the SMTP password.
App Theme Settings#
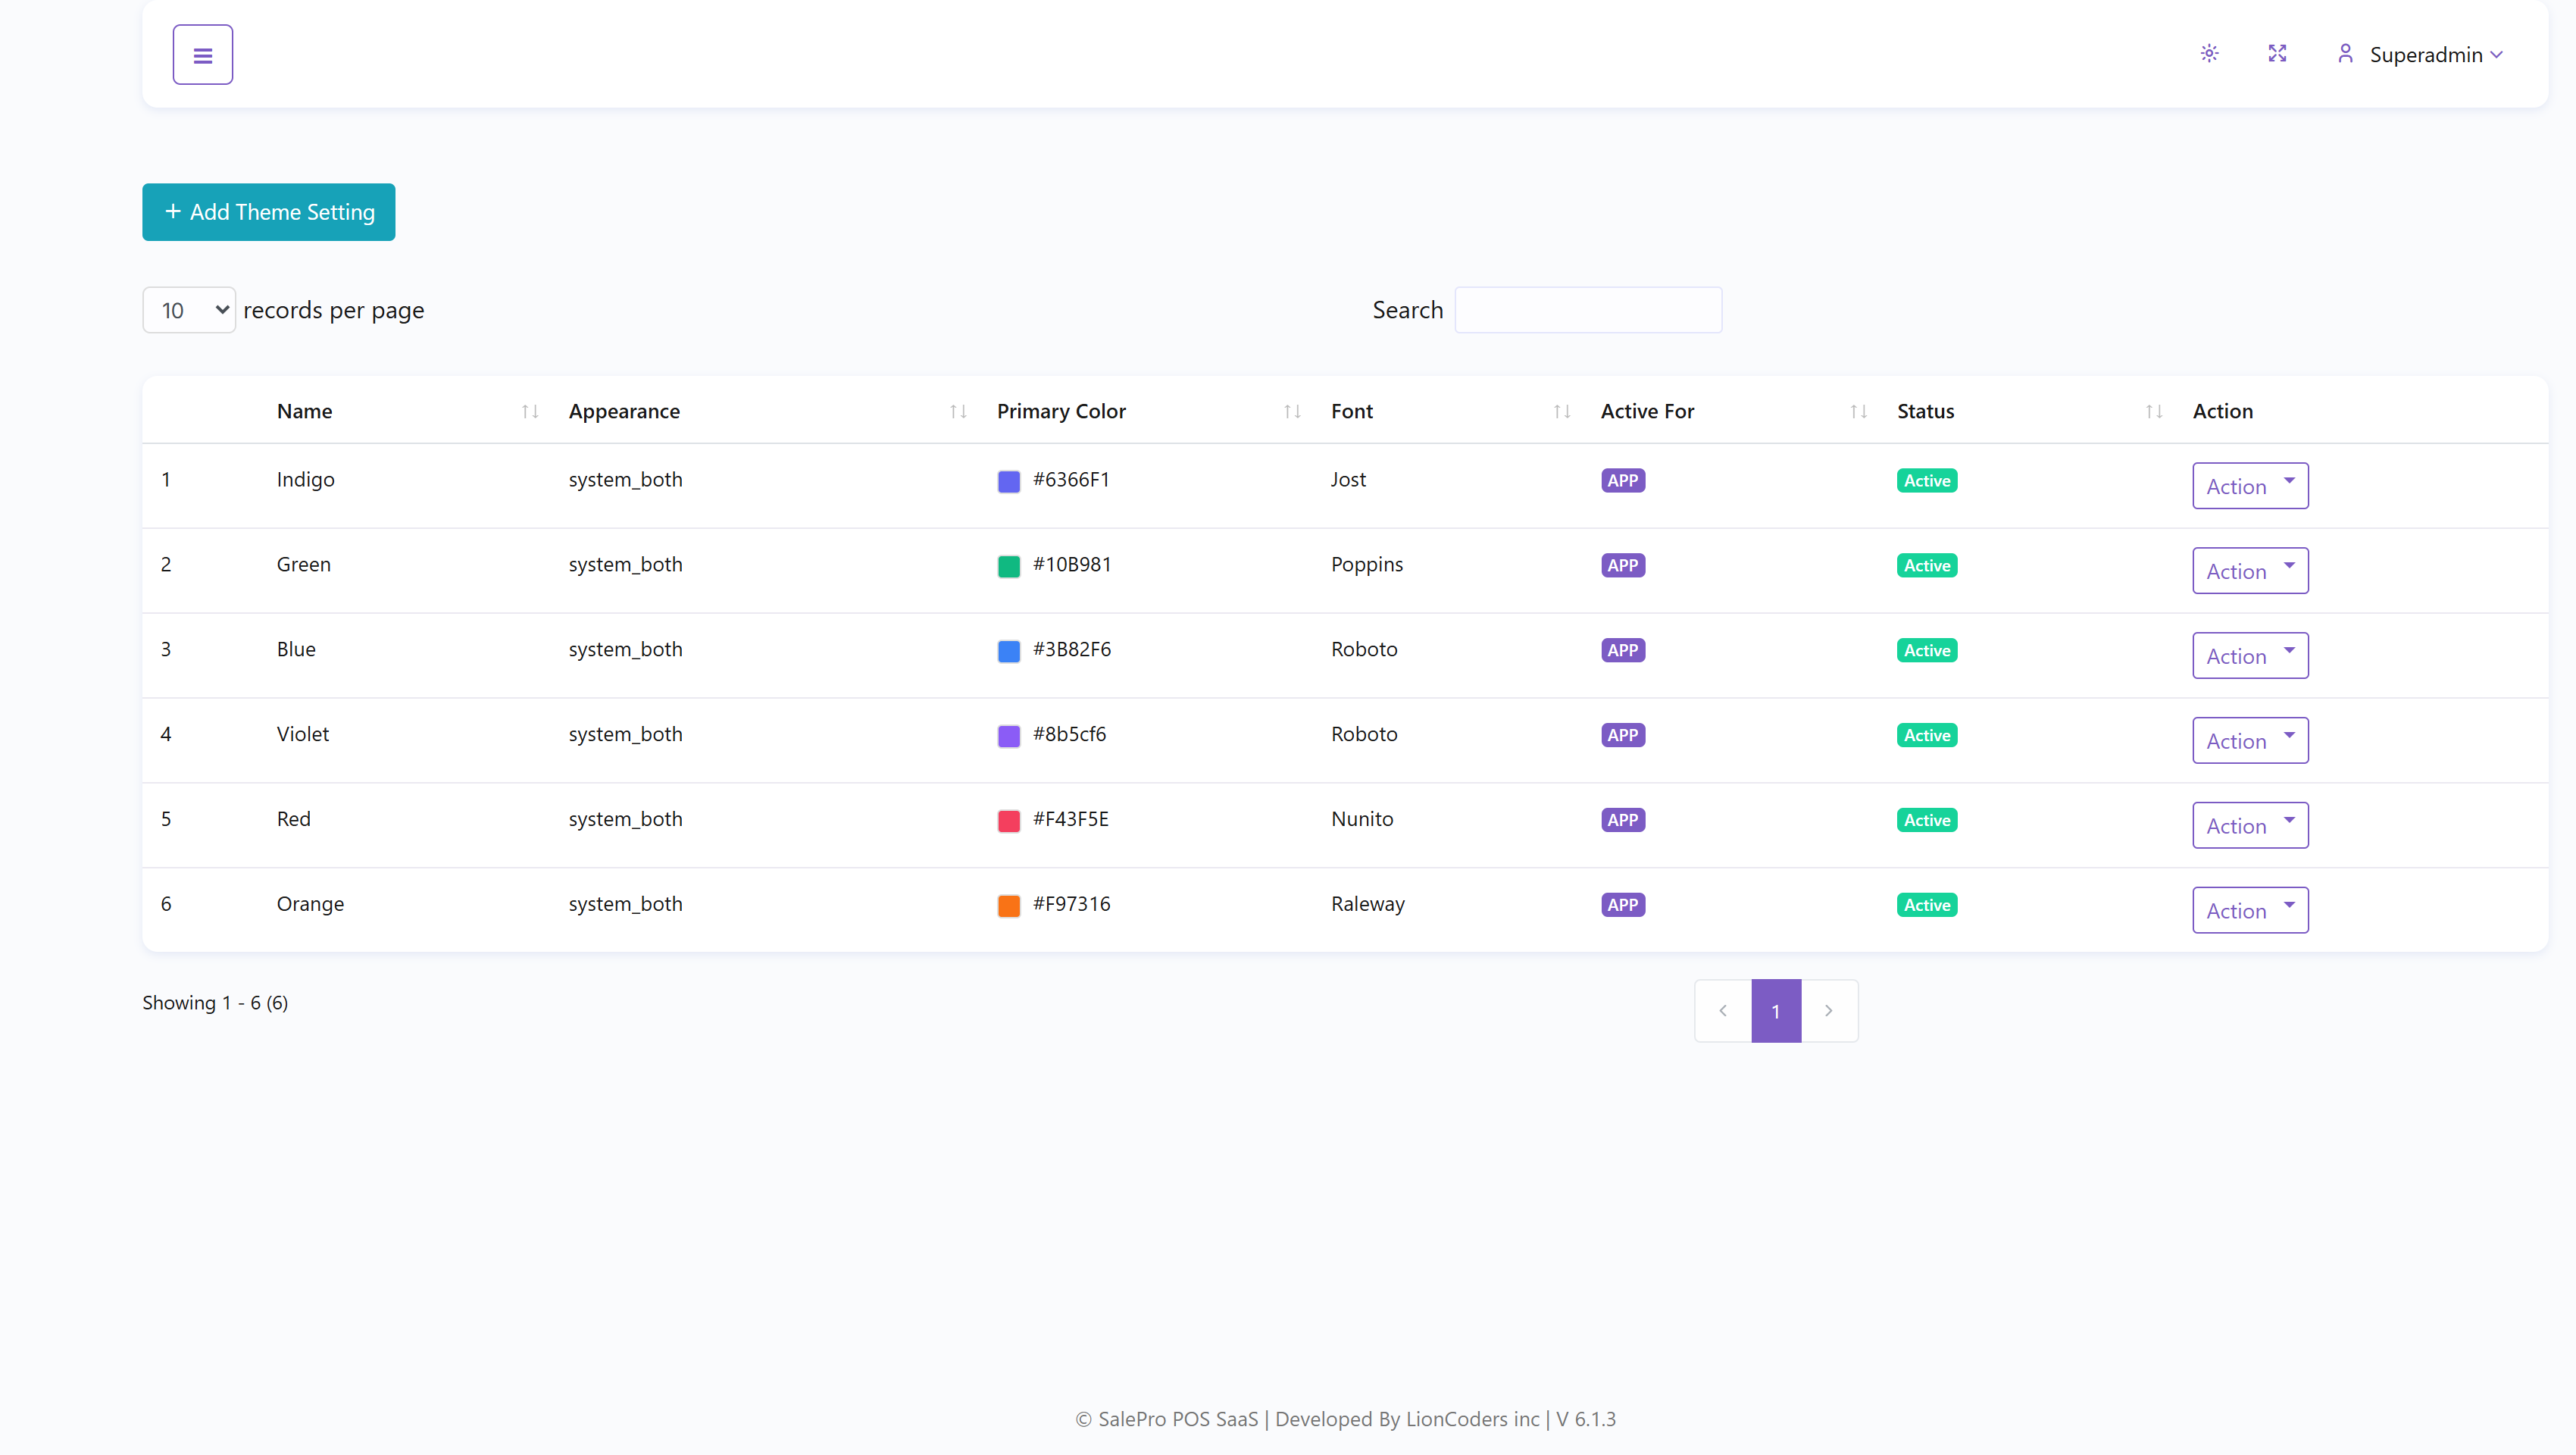
App Theme Settings manages reusable appearance presets. The list shows each preset’s name, appearance mode, primary color, font, targets, activation status, and actions.
Create or edit a theme preset#
Select Add Theme Setting or Action → Edit. The form provides a live preview and controls for theme name, light/dark appearance, Google font, icon pack, item size, border radius, input design, light/dark logos, primary color, button style and colors, sidebar style and colors, chart colors, authentication background, site background, dashboard background, app platform, active status, and initial targets.
Assign a theme#
Use Action → Active, select one or more targets—App, Dashboard, or Site—and save. A target should resolve to one intended active preset. Preview light and dark modes and verify login, dashboard, public site, buttons, charts, sidebar contrast, logos, and responsive layouts before rollout.
Delete a preset only when no active target depends on it.
Addons#
Addons lists optional SalePro SaaS extensions and whether each can be installed or updated.
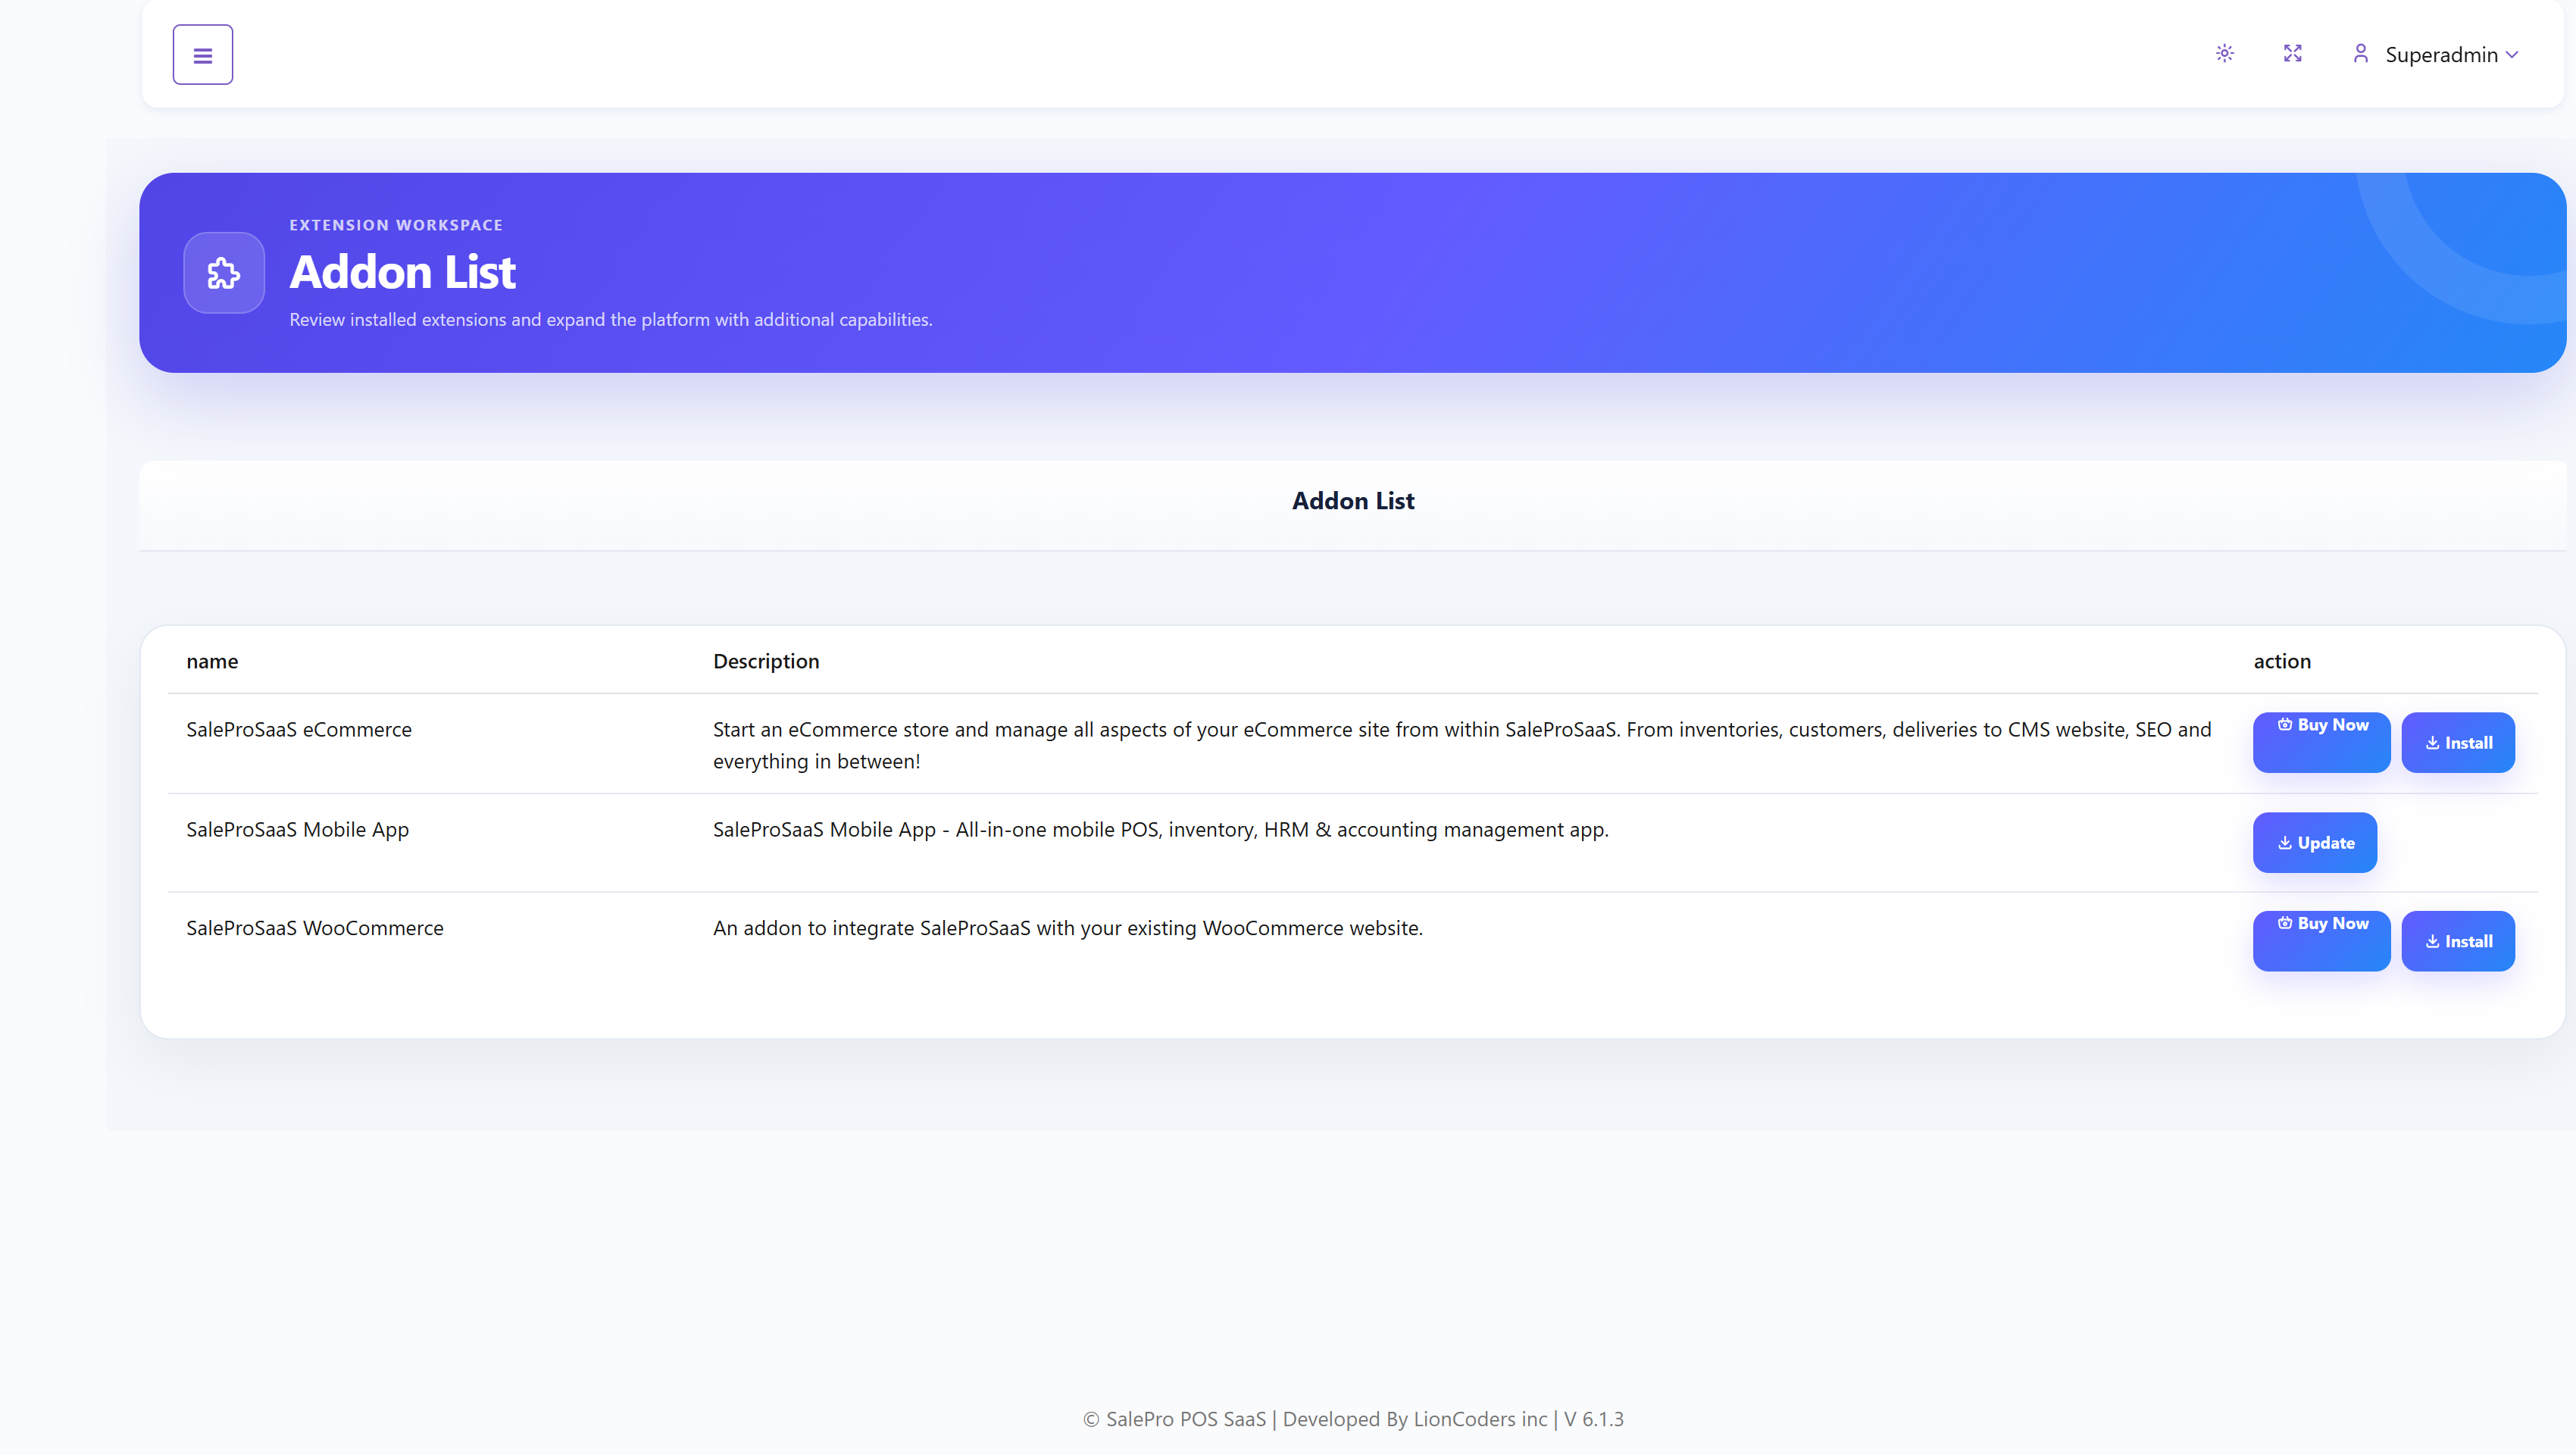
Buy Now opens the relevant external purchase page. Install or Update opens a form that requires a valid purchase code. Before installation, back up application files and all databases, confirm version compatibility, and schedule downtime if required. Afterward, run the extension’s setup steps, confirm permissions and package availability, and test both Super Admin and affected tenant workflows.
SaleProSaaS WooCommerce#
Use the official WooCommerce add-on product page to confirm licensing, compatibility, and installation requirements before using Install or Update.
SaleProSaaS eCommerce#
The official eCommerce add-on product page provides the extension details. Install and package-enable the add-on from Super Admin; storefront operations are outside this guide.
Recommended administration routine: review Dashboard and Support Tickets daily; check failed or unusual Payments and renewals regularly; back up before client database, package, theme, or add-on changes; test CMS and settings changes from Frontend; and keep an auditable record of tenant access, affiliate approvals, commission decisions, payouts, and platform configuration changes.
Server requirements#
Check the requirements for the build you are installing before purchasing hosting. This project requires PHP 8.3 or newer within the supported PHP 8.x dependency range; the earlier guide’s PHP 8.2 requirement is no longer sufficient.
- Use the root domain, such as
example.com, not a tenant subdomain or URL subfolder. The installer checks this before proceeding. - Provide a MySQL-compatible database setup and the ability to provision separate tenant databases. A VPS/dedicated account needs the provisioning privileges required by the deployment; cPanel, Plesk, and PlanetHoster use their corresponding hosting credentials/API integration.
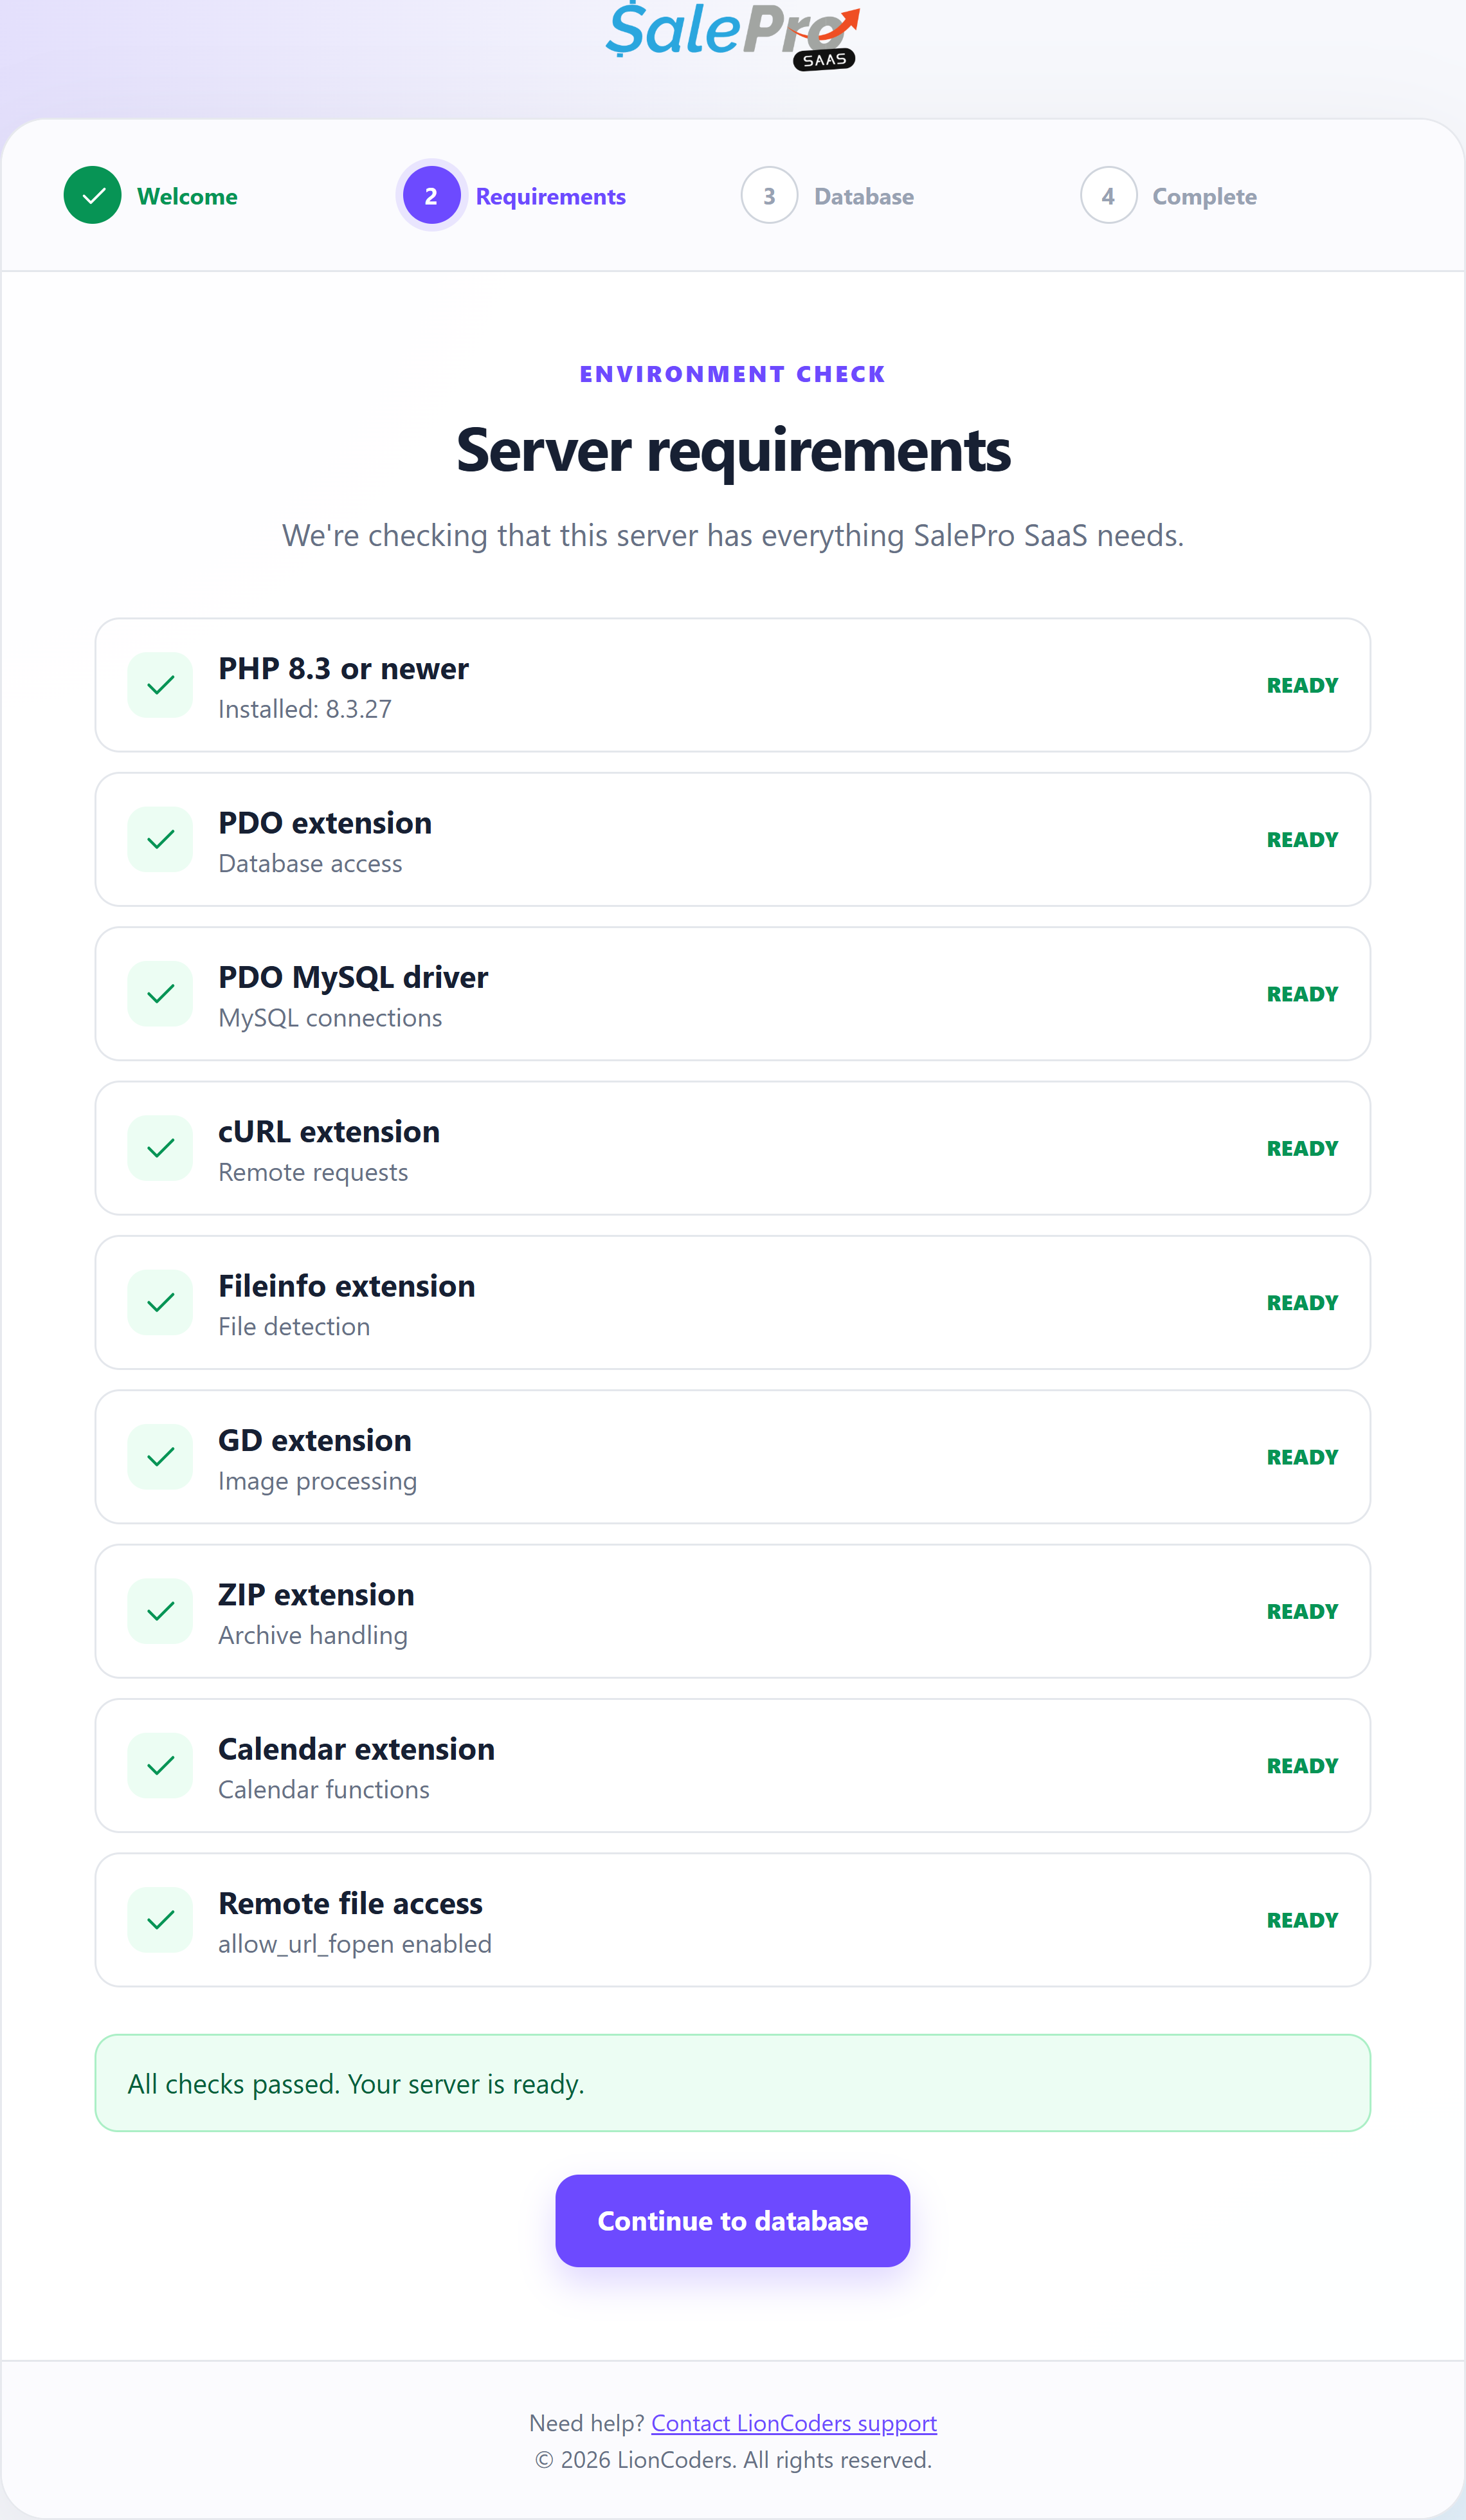
- The current installer checks PDO, PDO MySQL, cURL, Fileinfo, GD, ZIP, Calendar, and
allow_url_fopen. The PHP/Laravel dependency stack also needs its standard extensions, including Ctype, Mbstring, OpenSSL, Tokenizer, and XML. JSON support is built into supported PHP versions. - Wildcard DNS and hosting support are required for tenant subdomains, and HTTPS must cover both the central domain and tenant hostnames. Confirm certificate issuance and renewal with the provider; do not assume every shared-hosting plan handles wildcard certificates automatically.
- Keep the full distribution, including hidden files such as
.envand.htaccess. Give the application the permissions required for storage, cache, and installation without making private configuration publicly readable.
LionCoders support policy calls for a hosting control panel and appropriate database administration access; it excludes localhost and SSH-only setup support. Confirm current service eligibility through official support before requesting installation assistance.
Installation#
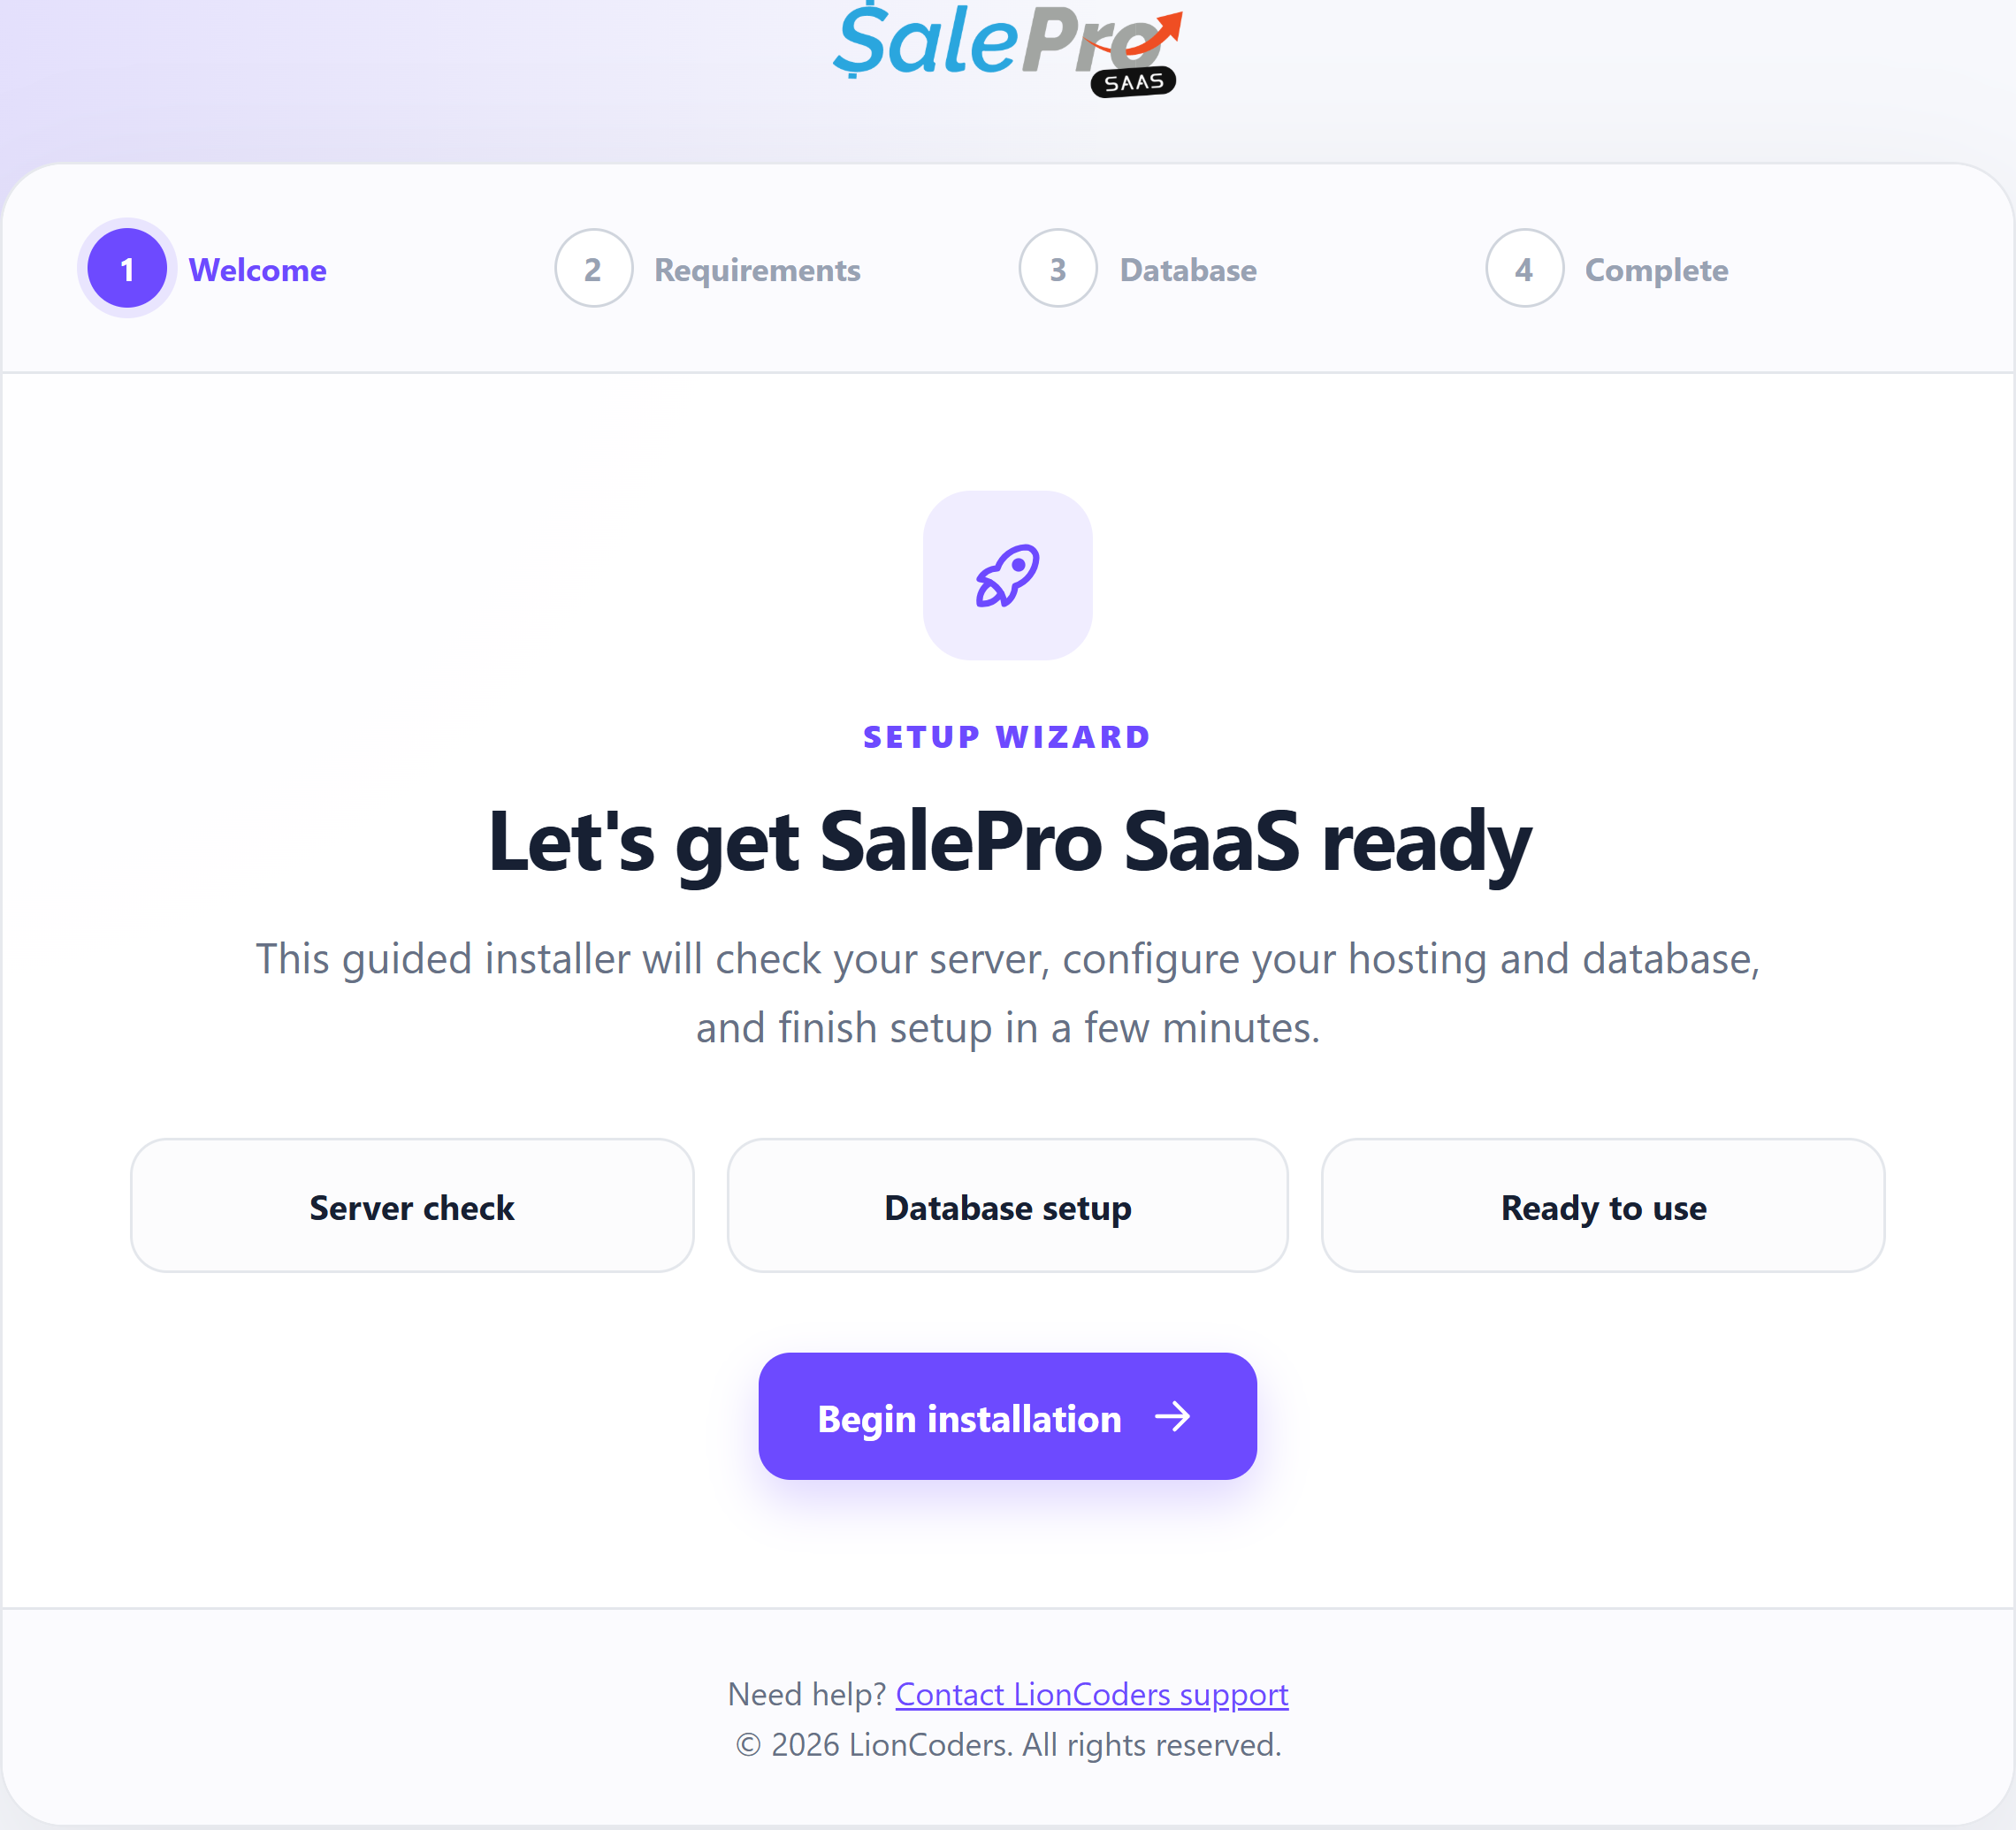
Step 1 — Welcome#
Open the application’s root URL and select Begin installation. If the root-domain check fails, correct the deployment location before continuing.
Step 2 — Server requirements#
Review each requirement. Resolve every Action needed result with your hosting administrator and refresh the page. When all checks pass, select Continue to database. The software’s actual checks are shown; do not bypass failed requirements.
Step 3 — Hosting and database configuration#
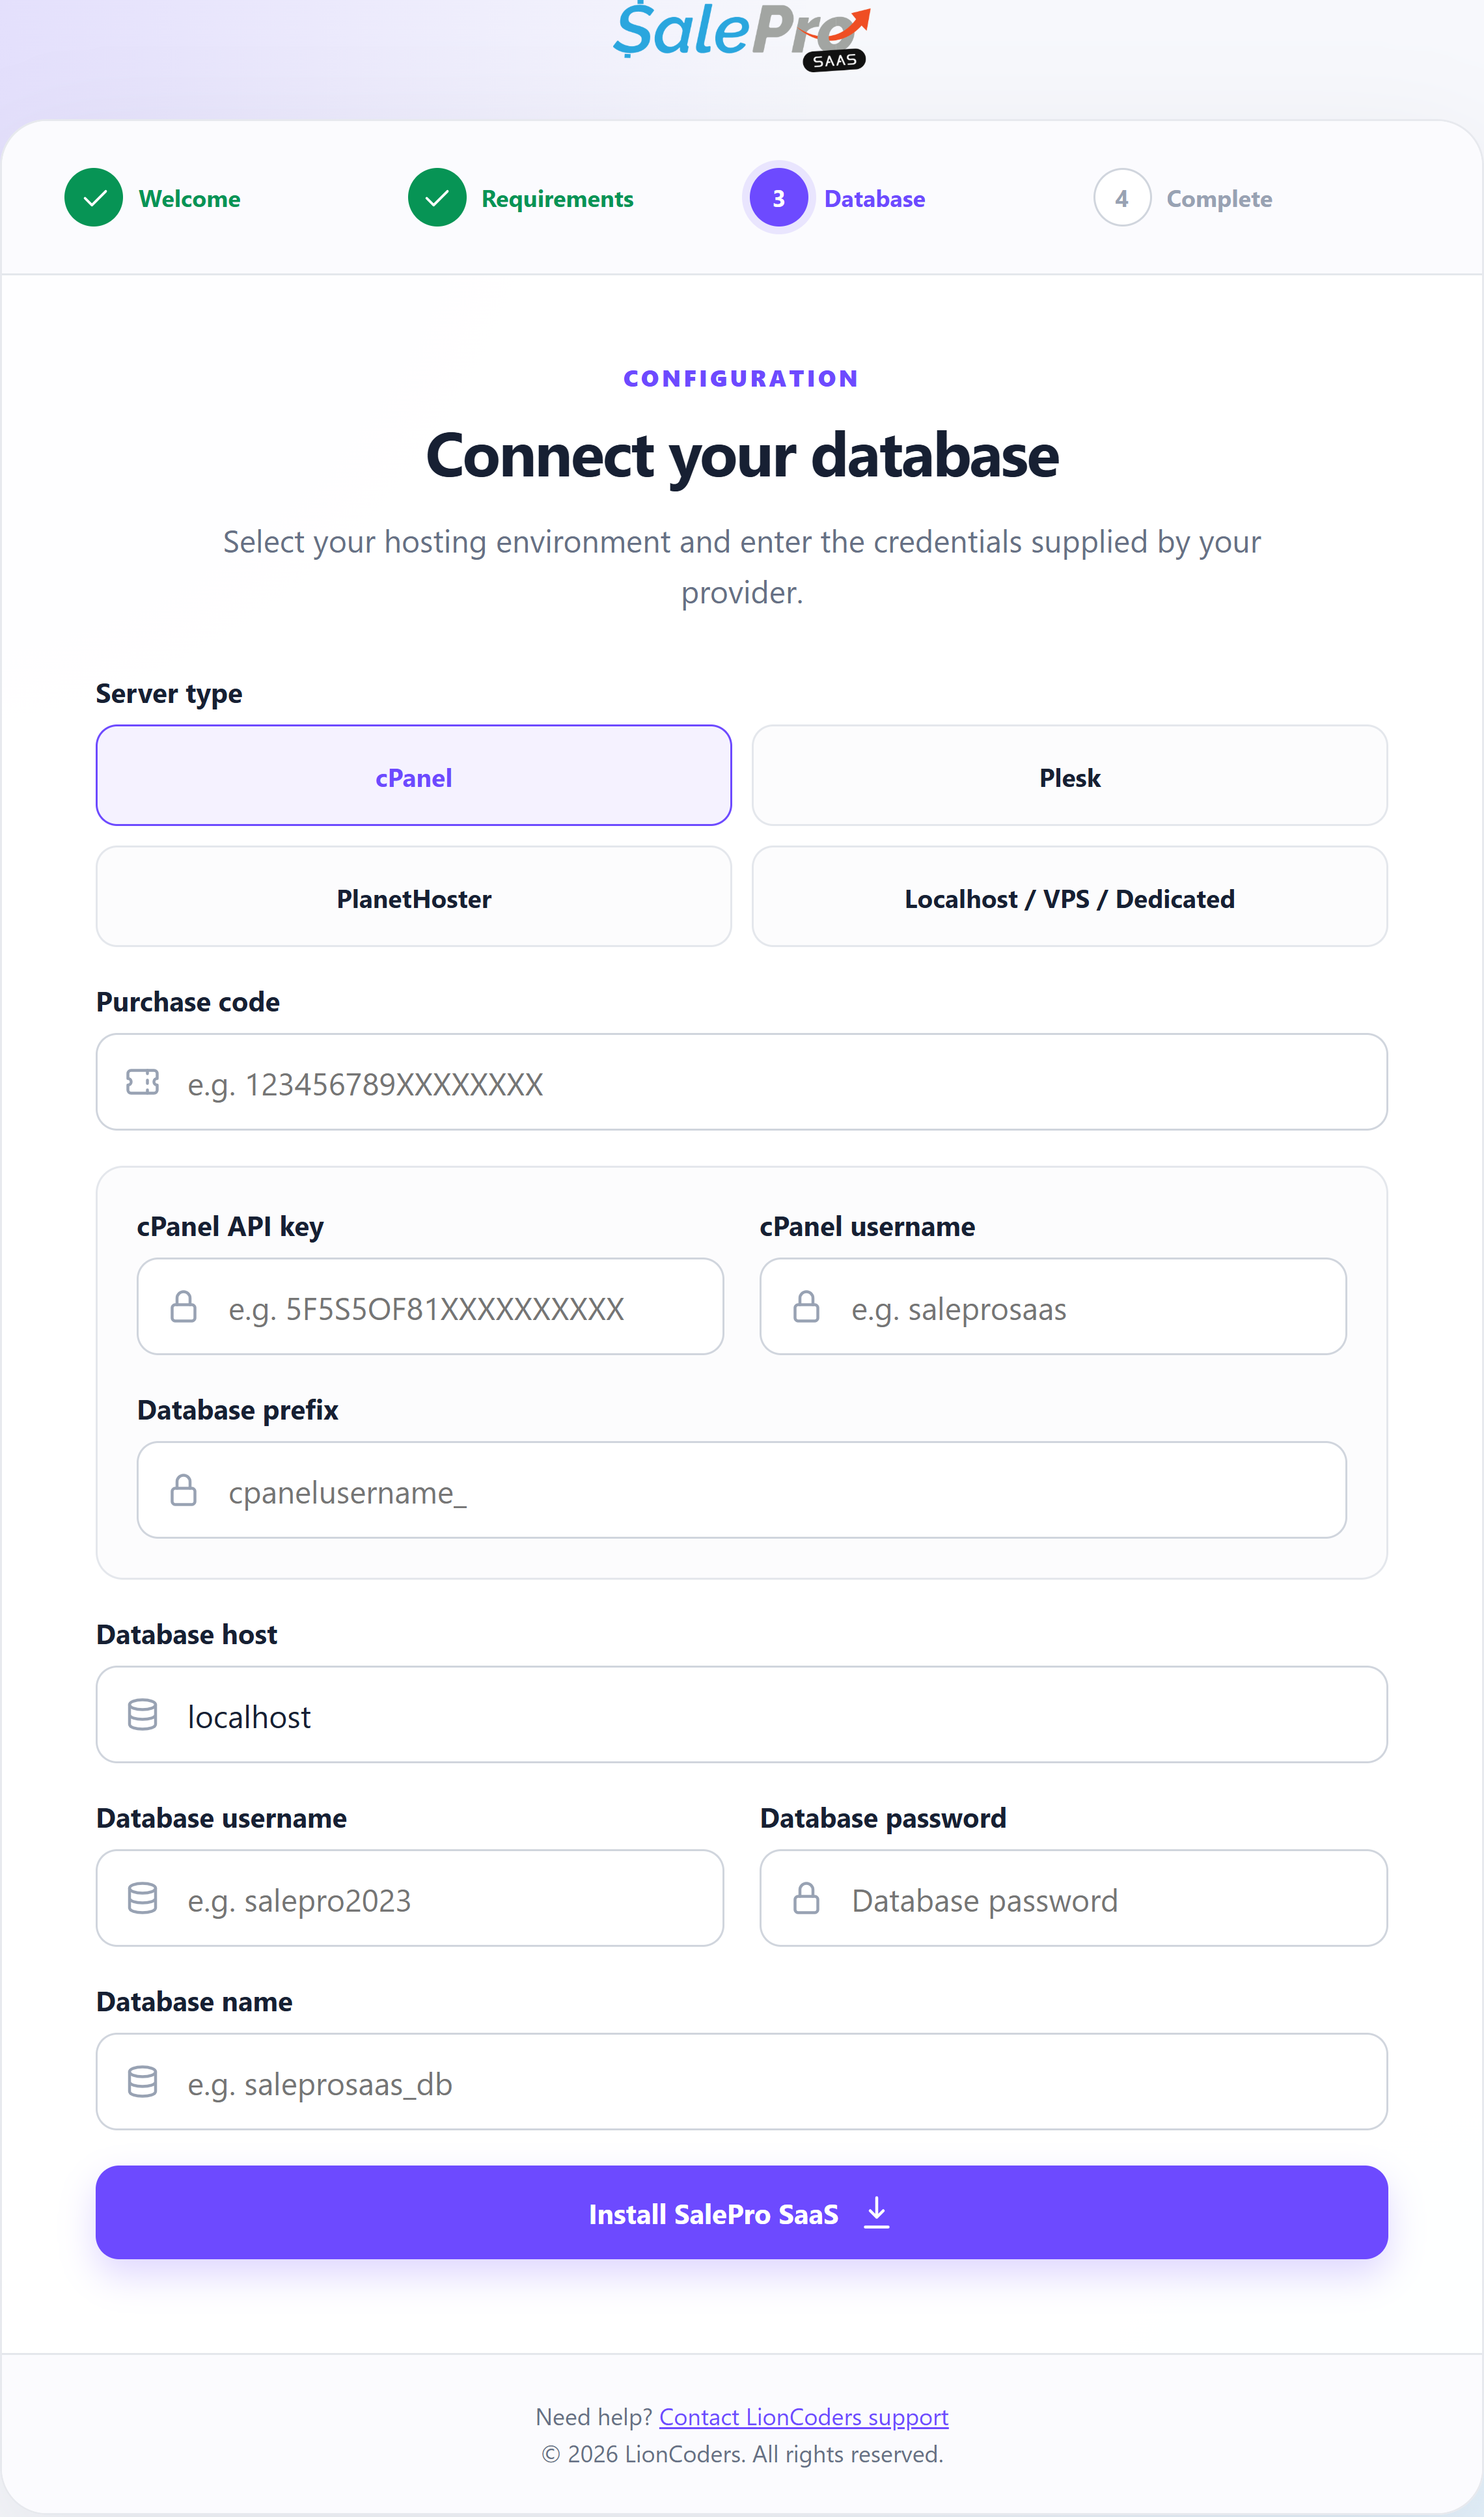
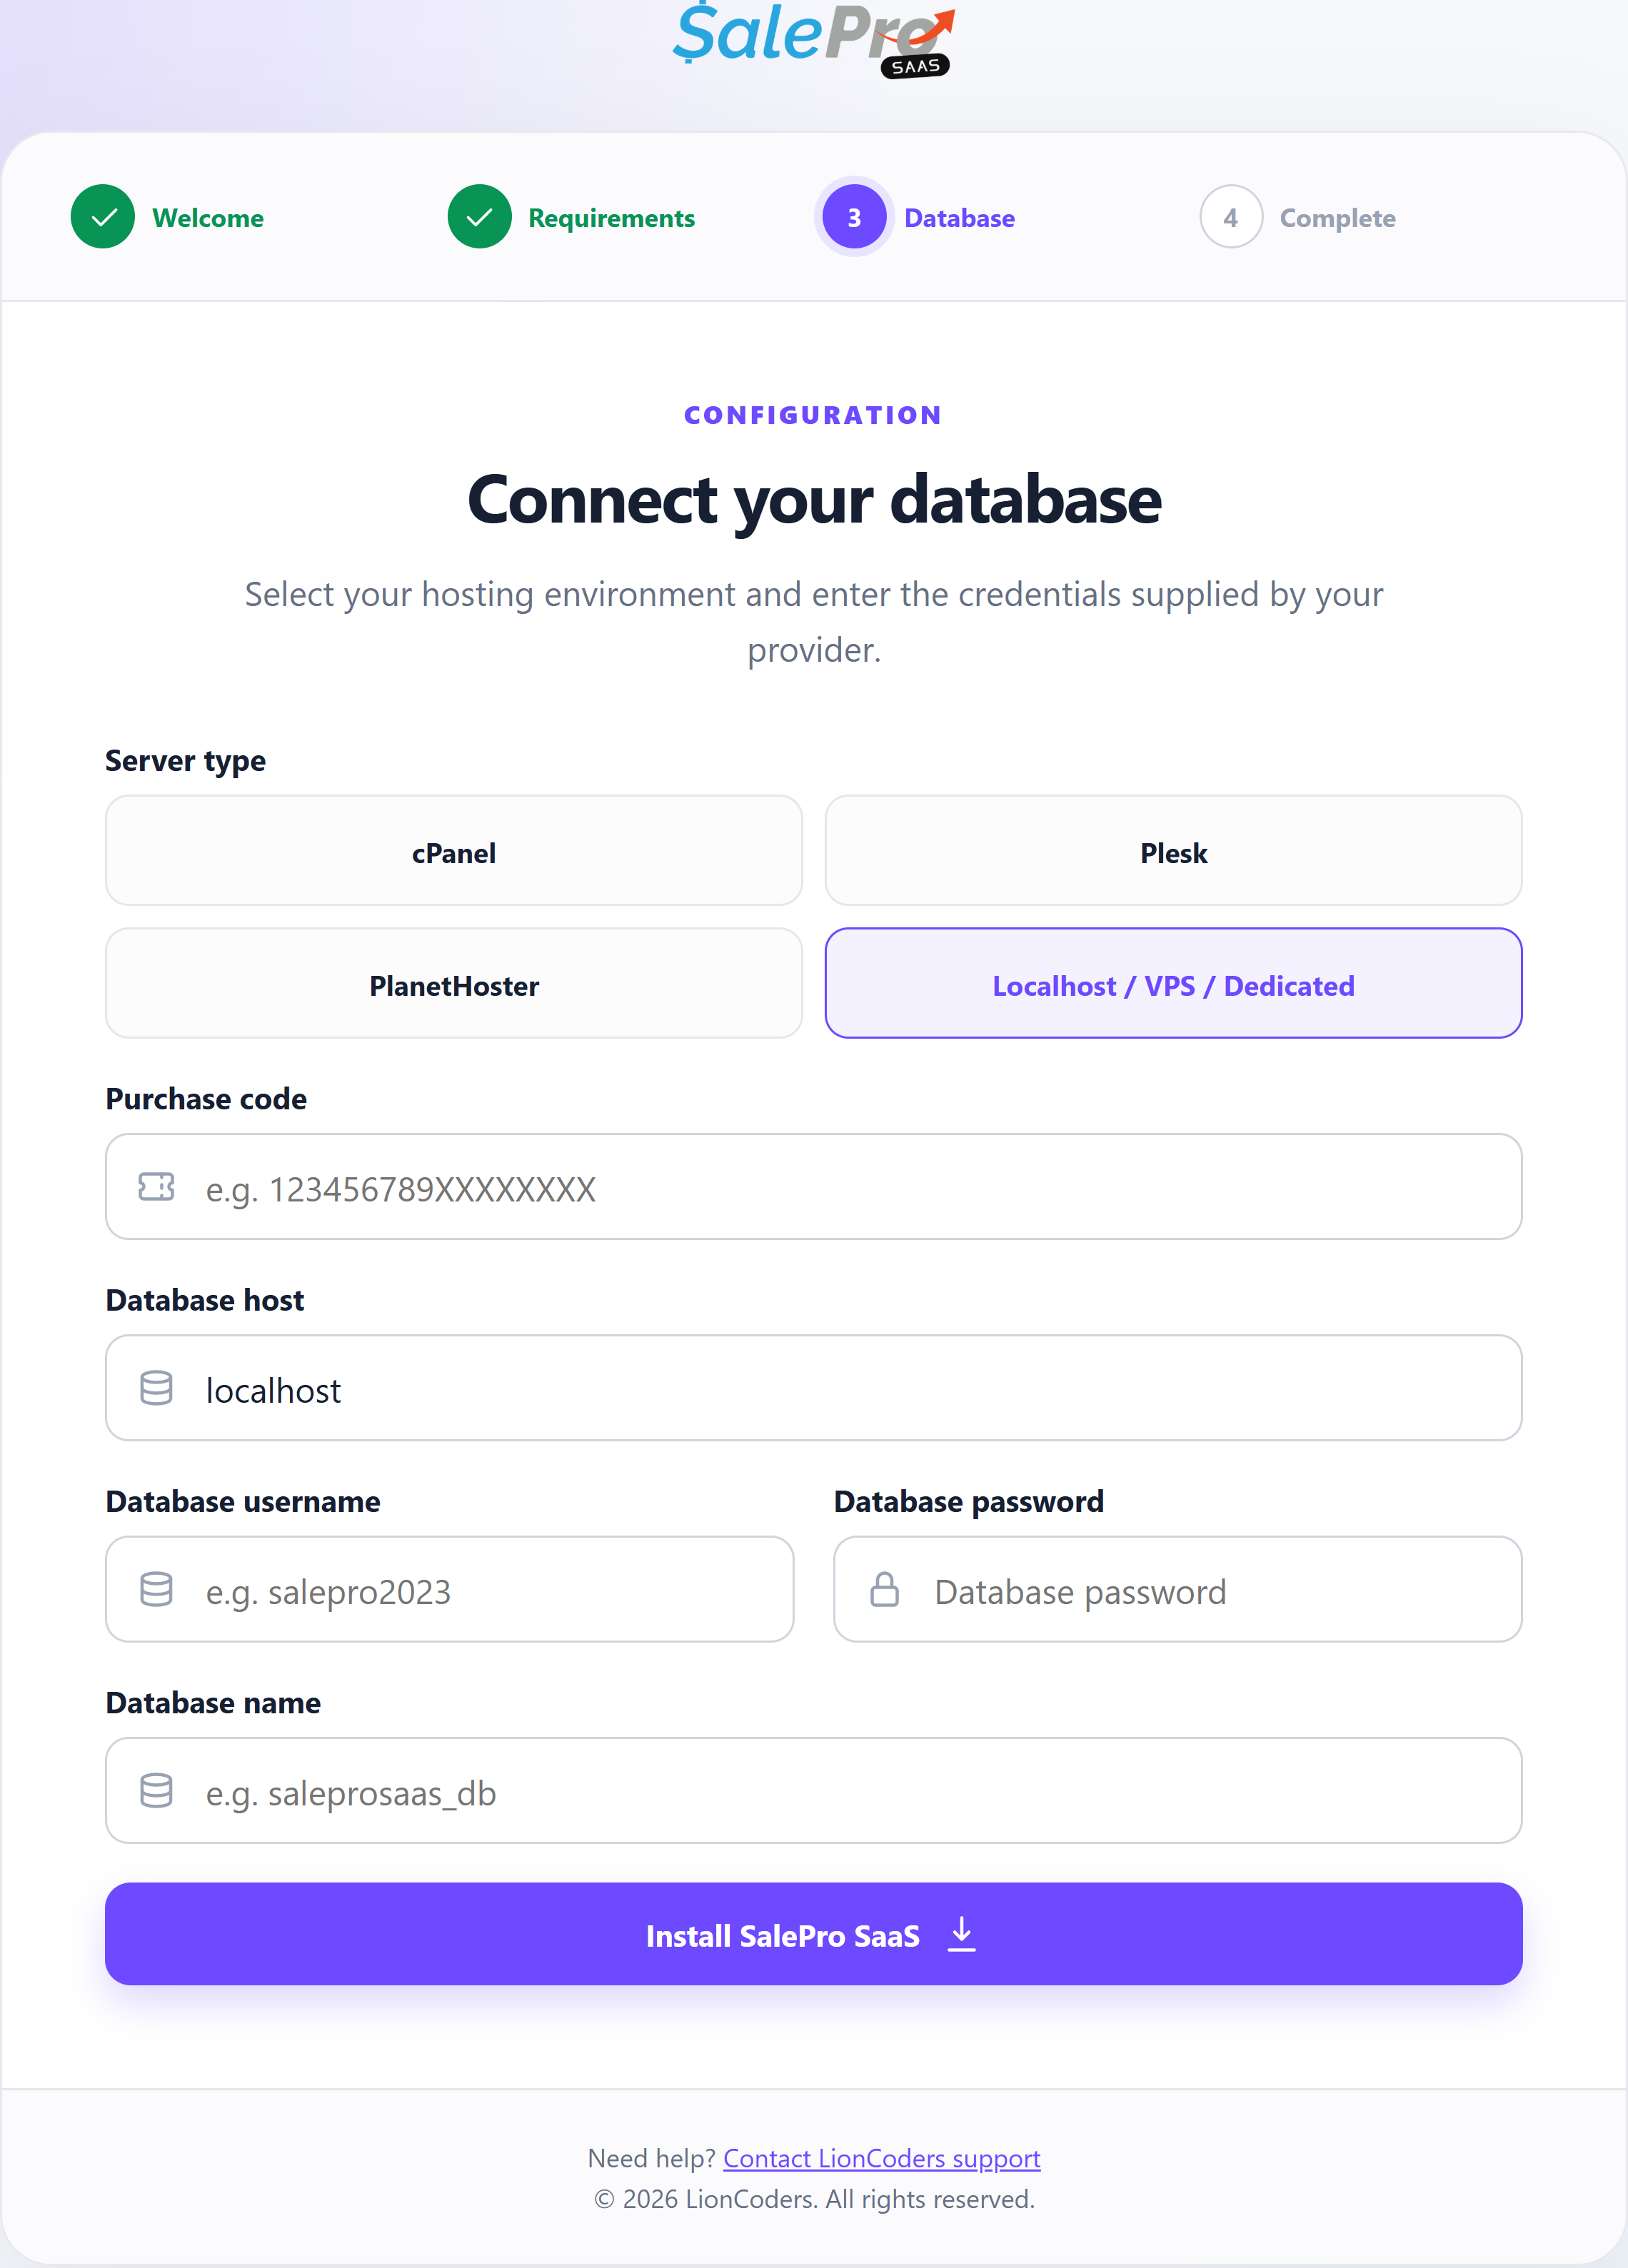
Select your server type and enter the purchase code and database credentials supplied for this installation. The common fields are Database host, Database username, Database password, and Database name. Use the intended empty landlord database, never an existing tenant or an unrelated application’s database. Database names and usernames must not contain spaces; the current form also rejects spaces, double quotes, and line breaks in the database password.
Complete the provider-specific fields described below. Then select Install SalePro SaaS once and wait for the result. If it fails, read the error and check the target database state before retrying. Do not share purchase codes, hosting tokens, or passwords in screenshots.
cPanel installation and API setup#
Upload the supplied SaaS distribution into the root-domain document root specified for the package; the earlier cPanel guide uses public_html, not a subdirectory. Include hidden files when extracting or moving the package. Do not merge it into a folder containing an unrelated live site.
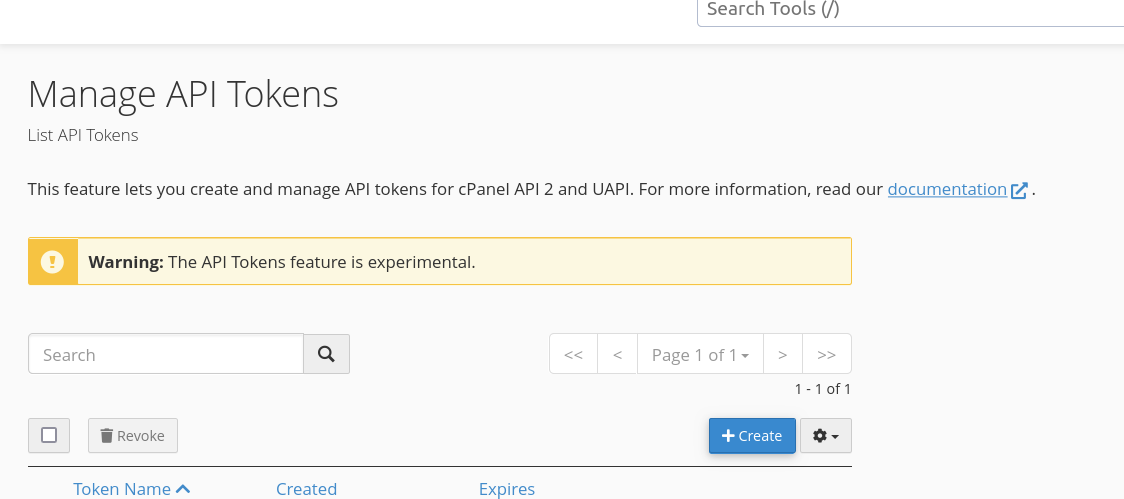
- In cPanel, open Security → Manage API Tokens and select Create.
- Give the token a recognizable name and choose an expiry appropriate to your maintenance process. Store it securely and plan its rotation.
- In the installer, select cPanel and enter the cPanel API key, cPanel username, and database prefix. Confirm the prefix with your host; the form suggests
cpanelusername_. - Complete the common purchase-code and database fields. Use credentials with the permissions needed to provision tenant databases.
If token management is missing, ask the hosting provider whether it is enabled. See cPanel’s API token documentation for current provider controls.
The original cPanel installation video is preserved below.
Wildcard subdomain, DNS, and SSL setup#
- In your domain’s DNS zone, configure a wildcard hostname such as
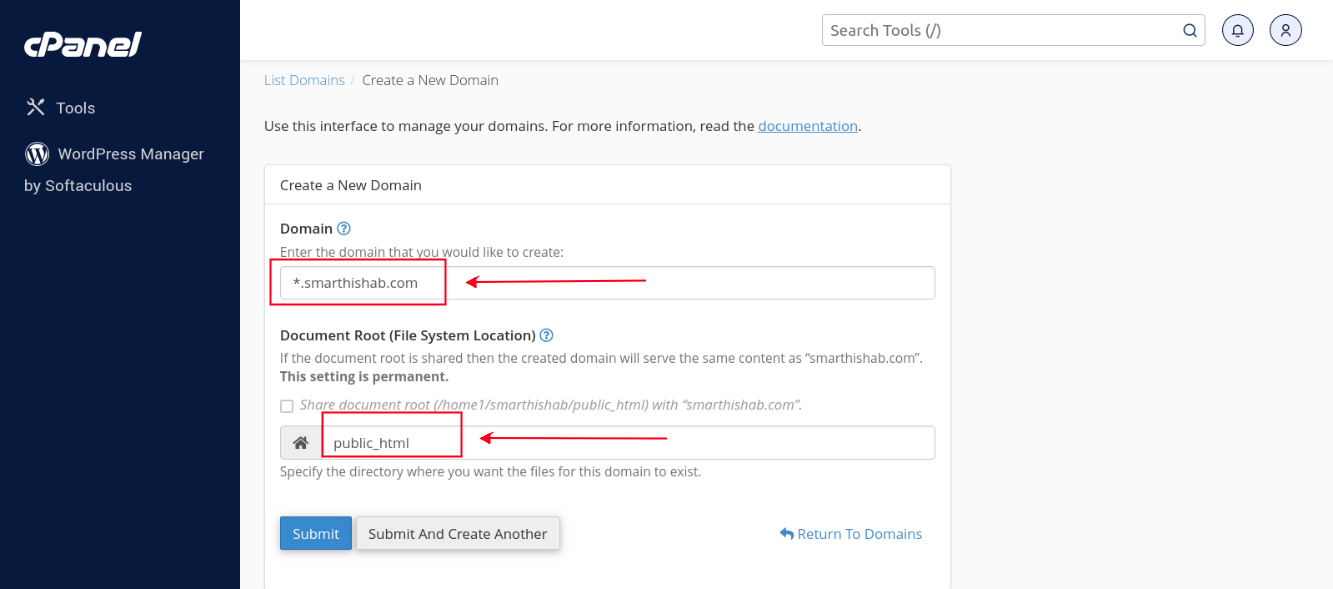
*.example.comto reach the SaaS server using the record type and destination supplied by your provider. - In the hosting panel, create or configure the wildcard domain so it uses the same application document root as the central domain. The earlier cPanel workflow uses Domains → Create A New Domain and
*.example.comwithpublic_html. - Provision valid HTTPS for the central and wildcard tenant names. DNS configuration and SSL issuance are separate steps.
- Verify that a newly created test tenant resolves to the correct application without a certificate warning. DNS alone does not create a tenant record.
VPS / dedicated installation#
In Step 3, select Localhost / VPS / Dedicated. Provide the purchase code and database host, username, password, and landlord database name. This mode does not show cPanel, Plesk, or PlanetHoster fields. Have your administrator configure tenant database provisioning, wildcard routing, HTTPS, and the application’s required write permissions before proceeding.
Plesk installation#
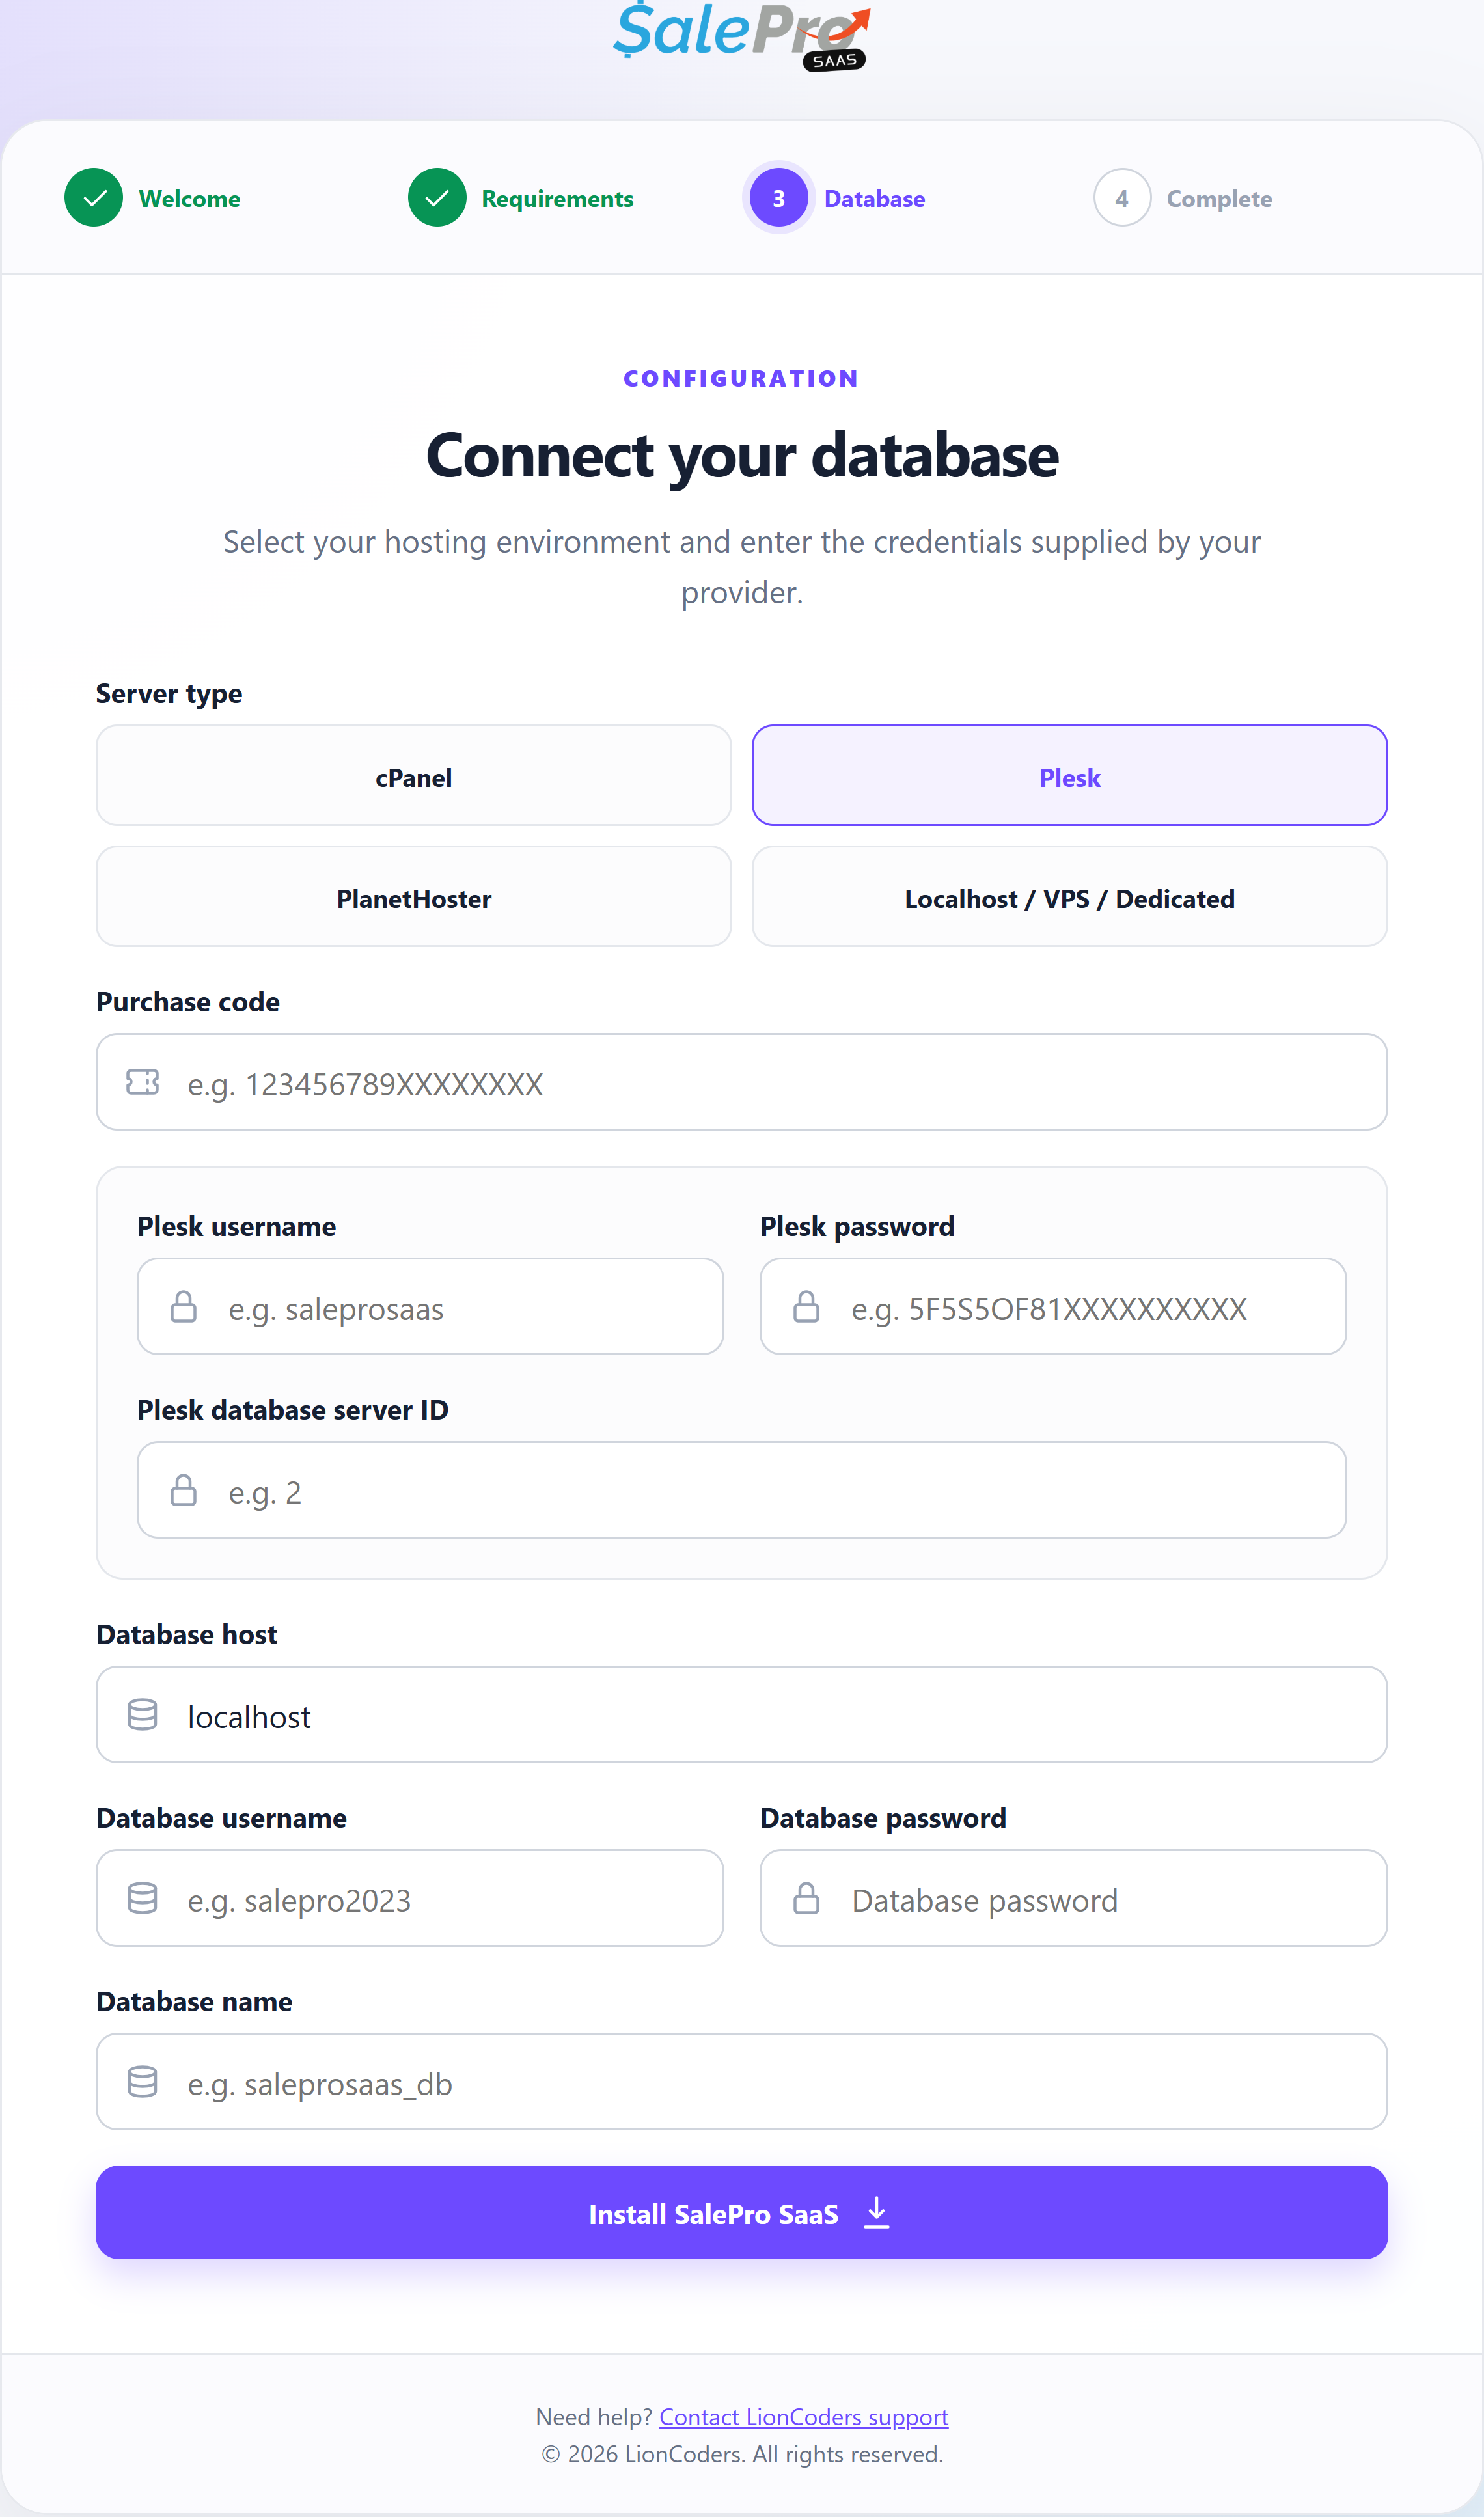
Select Plesk and enter the Plesk username, Plesk password, and numeric Plesk database server ID, followed by the common purchase-code and database fields. Confirm the database server ID and required API access with the hosting administrator. Map wildcard hostnames to the same application and confirm SSL issuance/renewal for the plan you purchased.
PlanetHoster installation#
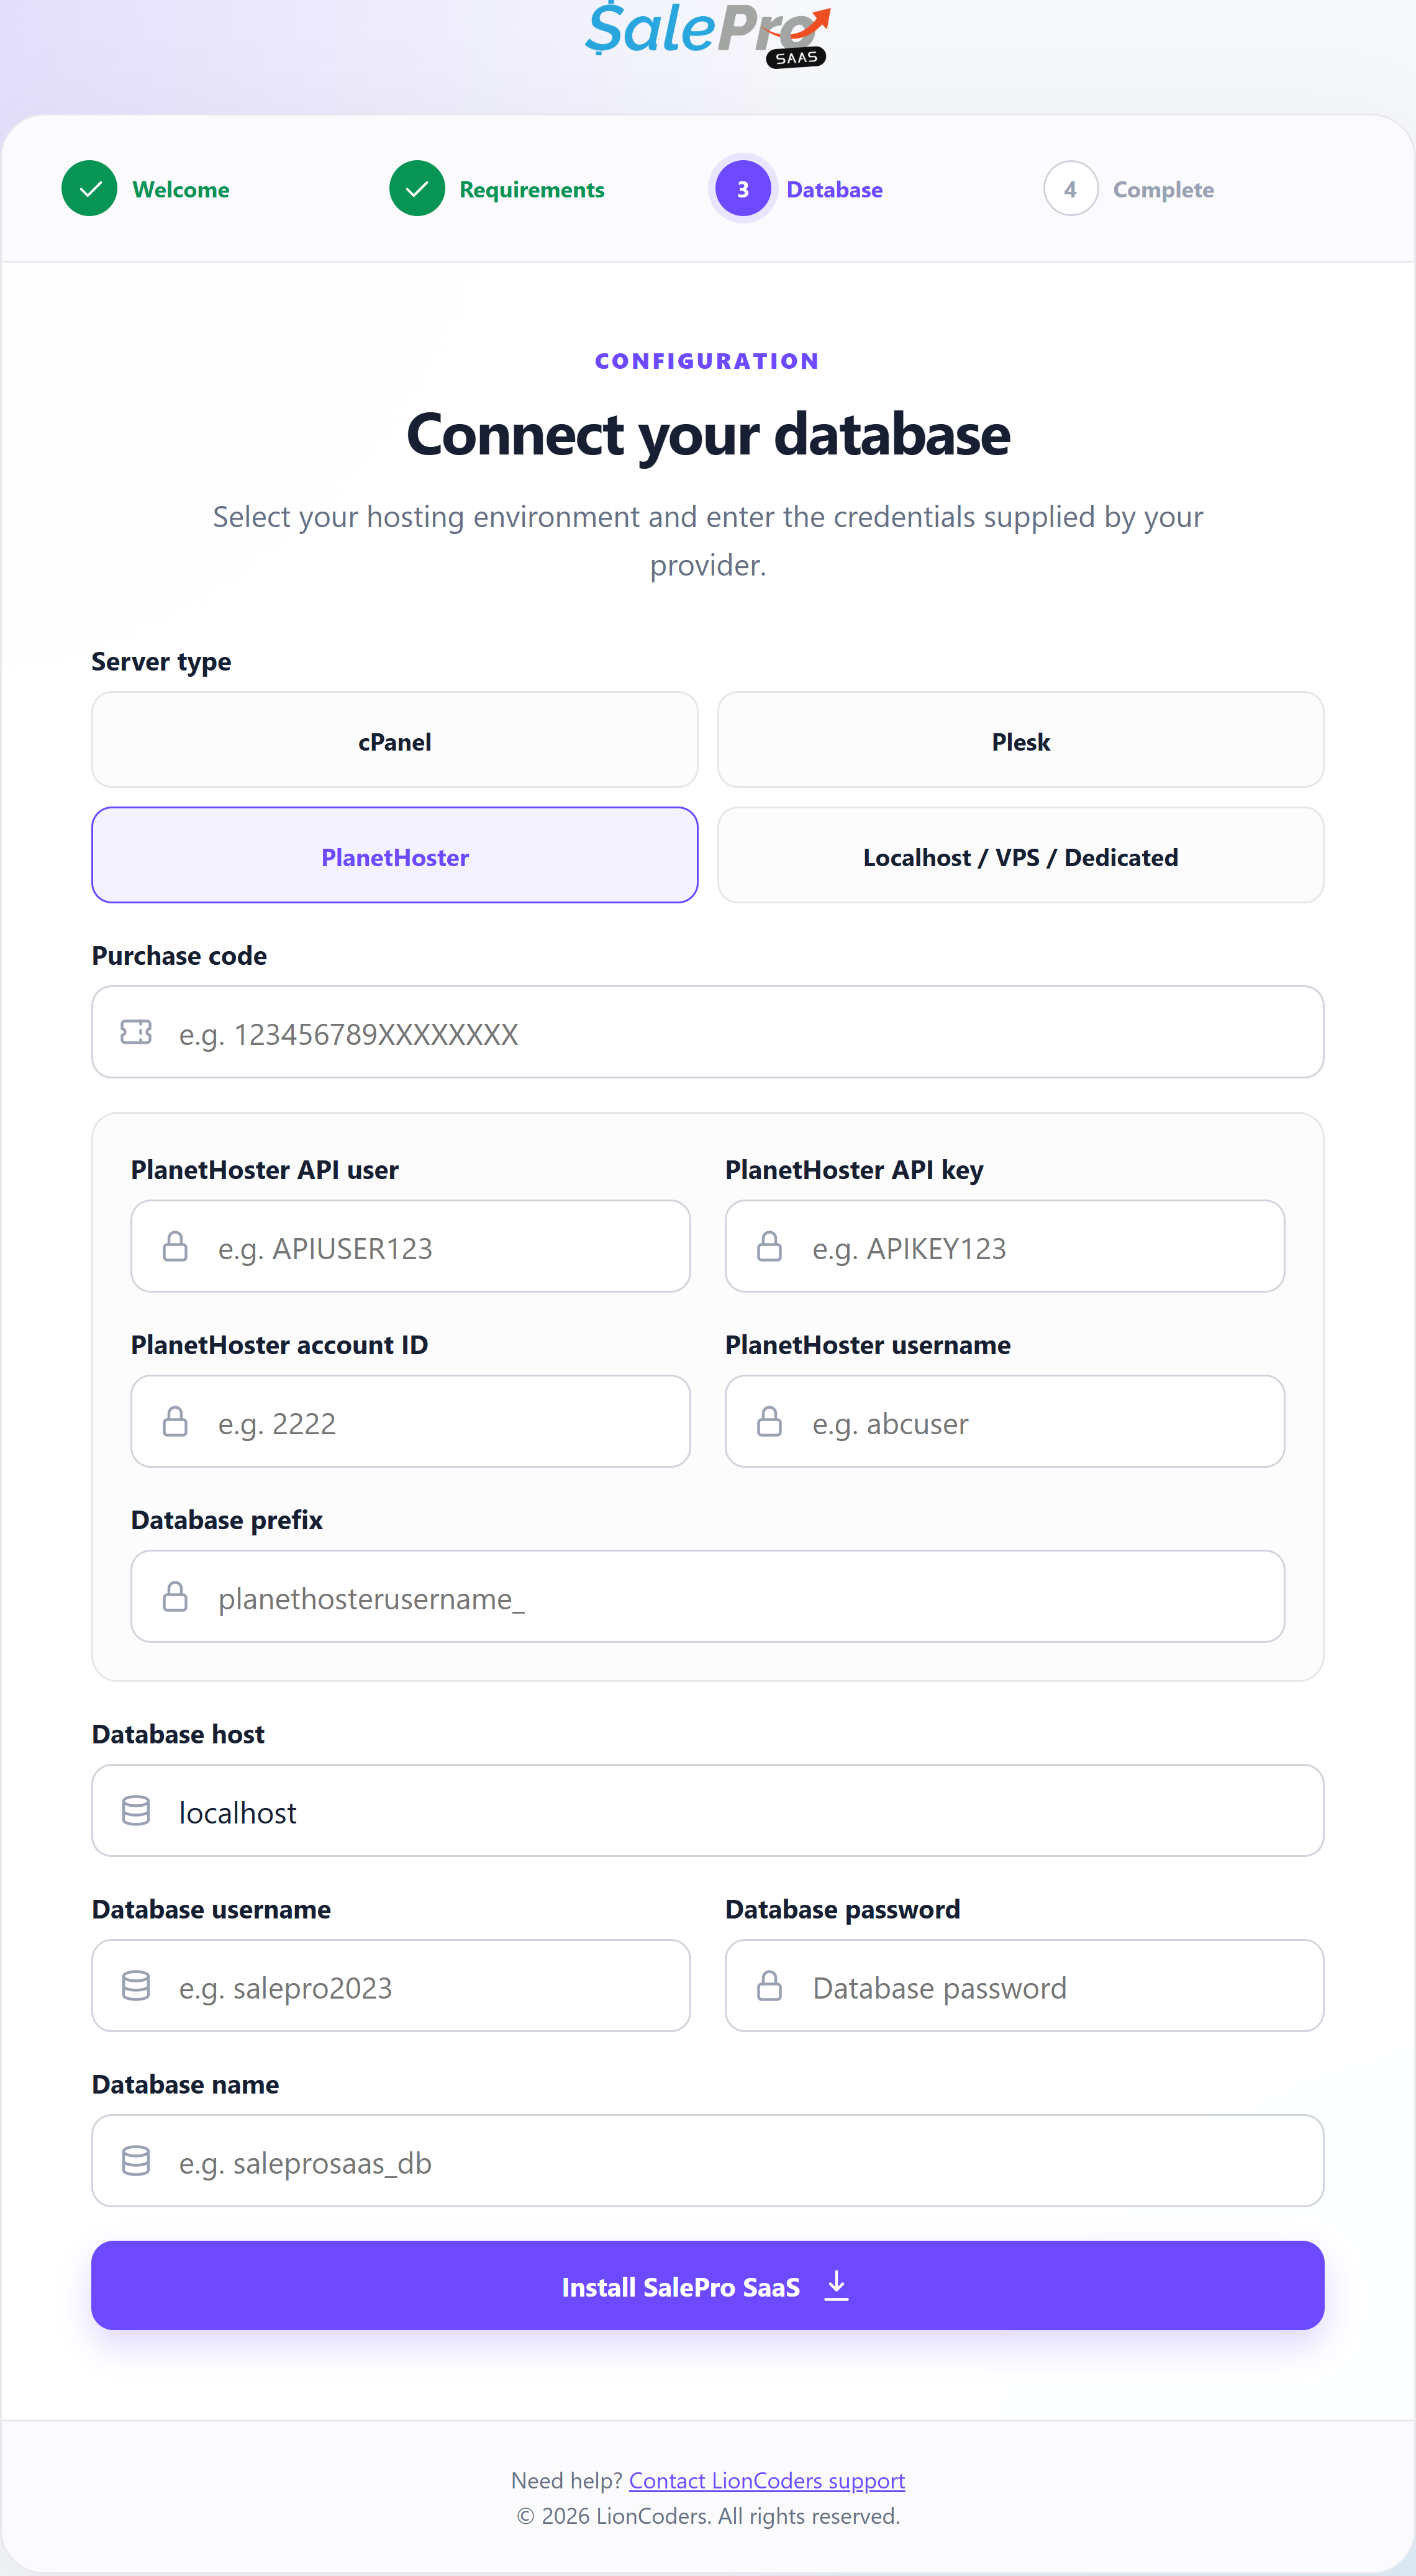
The current build also offers PlanetHoster. Supply the API user, API key, numeric account ID, PlanetHoster username, and database prefix, then the common purchase-code and database fields. Confirm all provider values and tenant database permissions with your hosting account administrator.
Step 4 — Complete and secure the installation#
After the installer reports success, use Open SaaS landing page or Open superadmin login. Sign in with the initial credentials shown and immediately change the password from your profile. Verify platform settings, tenant creation, HTTPS, mail delivery, and payment configuration before opening registration to customers.
Common errors and safe troubleshooting#
- Installer appears on an existing installation: check that the correct environment/configuration was deployed and that
CENTRAL_DOMAINandLANDLORD_DBhave their intended values. Do not run installation over existing data. - Requirement check fails: verify the PHP version and extensions used by the web server, not only by a command-line PHP installation.
- Database or API error: confirm the host, database name, credentials, prefix, provider identifiers, and provisioning permissions without posting the secrets publicly.
- Tenant URL or SSL error: check DNS, wildcard hosting, document-root mapping, and certificate coverage separately.
- Application error after setup: record the URL, time, action, and exact error; inspect the relevant application log, commonly under
storage/logs.
Keep APP_DEBUG=false on a public production site. If detailed debugging is needed, reproduce the issue on a restricted staging copy and enable debugging only there temporarily. Redact credentials, tokens, database connection details, and personal data from logs and screenshots before sharing them.
Video tutorials#
The original tutorial playlist is preserved below. It may include older interfaces or tenant-side material; use the installation and Super Admin portions relevant to this guide, and follow the current field names described above.
Vendor support and customization#
Contact LionCoders Support for software issues, installation assistance, or customization enquiries. The earlier documentation identifies this as the official support channel rather than WhatsApp or marketplace comments. Confirm current support eligibility and renew an expired support period where required.
Include the installed version, affected URL, reproduction steps, error time, and redacted evidence. Supply purchase information only through the private official channel. If access is necessary, agree on temporary scoped access and a secure delivery method, then revoke it when the work is complete. Never place hosting or Super Admin credentials in the public post.
Need a hand?
Our support team can help you continue.#
Tell us which step you are on and include a screenshot when possible.
Need a hand?
Our support team can help you continue.
Tell us which step you are on and include a screenshot when possible.