SalePro
Official Documentation
SalePro is an all-in-one business management software designed to simplify and automate day-to-day operations for retail, wholesale, pharmacy, electronics, and manufacturing businesses. It combines a powerful POS system with advanced inventory management, HRM, and full accounting features—making it a complete solution for modern businesses.
With a clean user interface, robust reporting tools, and reliable performance, SalePro helps businesses track stock accurately, manage sales, control expenses, handle employees, monitor finances, and make smarter decisions—all from one unified platform.
Whether you run a small shop or a multi-branch business, SalePro delivers the flexibility, scalability, and efficiency needed to manage everything seamlessly.
Support
We are happy to provide support for any issues within our software. We also provide customization. So if you have any features in mind or suggestions, please feel free to contact us at Support. Please note that we don’t provide support though any other means (example- WhatsApp, comments etc.). So, please refrain from commenting your queries on codecanyon or knocking us elsewhere.
Also, in case of any errors/bugs/issues on your installation, please contact us with your hosting details (url, username, password), software admin access (url, username, password) and purchase code. If your support period has expired, please renew support on codecanyon before contacting us for support.
Thank you and best wishes from LionCoders.
1.1 Server Requirements
Overview
This article explains the exact hardware and software specifications required to host and run SalePro successfully.
SalePro is a web-based business management application built on the Laravel PHP framework. Because it is self-hosted, it must be installed on a web server before you or your staff can log in and use it. Ensuring your server meets these requirements is the very first step in your deployment journey. If your server is missing a required component, the installation will fail or the software will experience critical errors during daily operations.
Prerequisites
Before evaluating your server requirements, you should have:
- A purchased domain name (e.g., yourbusiness.com).
- Access to a web hosting account (shared hosting, VPS, or dedicated server).
- Server must have admin panel to upload files and db, we will not do it using command line.
- Access to your hosting control panel (such as cPanel) to verify PHP settings.
Step-by-Step Instructions
Verifying your server meets the requirements is generally done through your hosting provider’s control panel.
- Log in to your Control Panel: Navigate to your hosting provider (e.g., Namecheap, HostGator, AWS) and log in to cPanel.
- Locate the PHP Selector: Search for a tool named “Select PHP Version”, “MultiPHP Manager”, or “PHP Configuration”.
- Verify the PHP Version: Ensure the active version is set to PHP 8.3.
- Enable Required Extensions: In the PHP Selector interface, switch to the “Extensions” tab. Check the boxes next to all required extensions listed in the “Software Requirements” section below.
- Save Changes: If a save button is present, click it. Most cPanel environments save extension toggles automatically.
Step:1
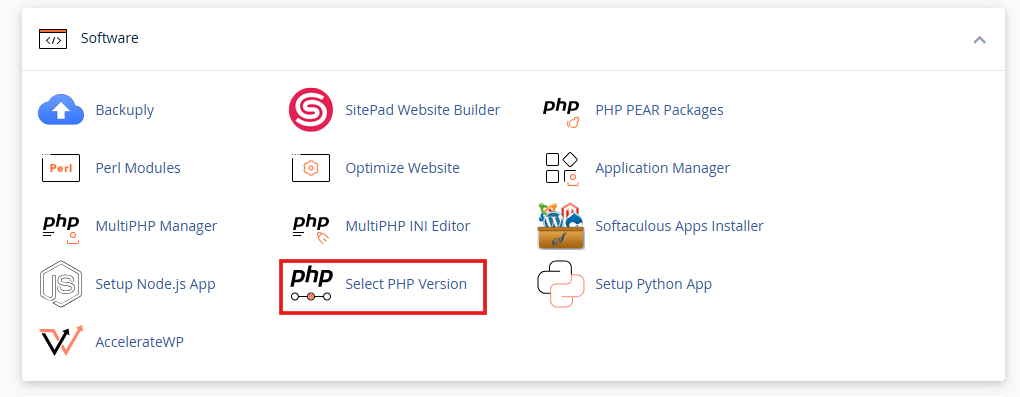
Step2:
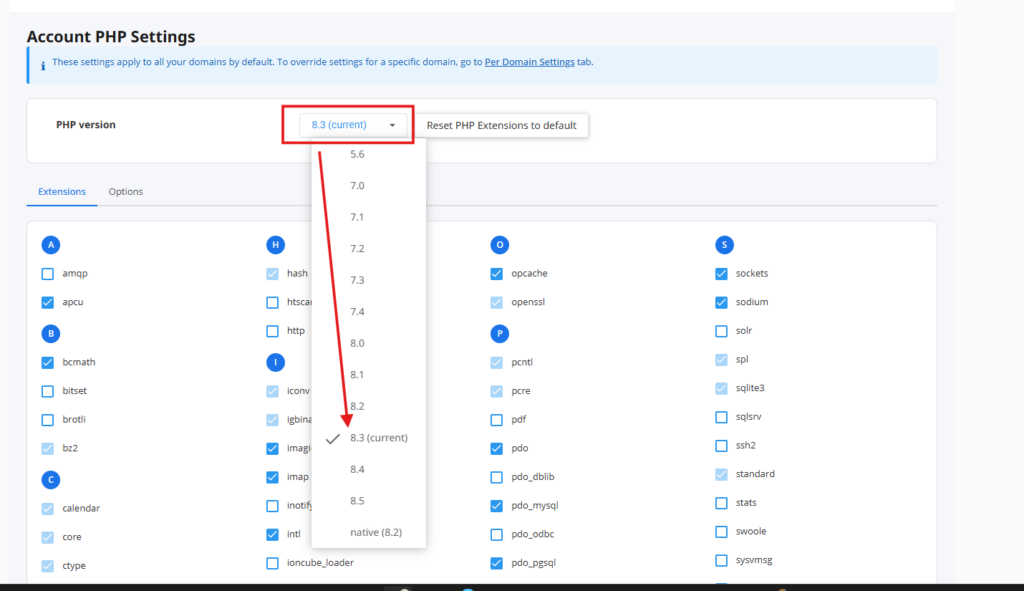
Screenshot: Select PHP 8.3 dropdown
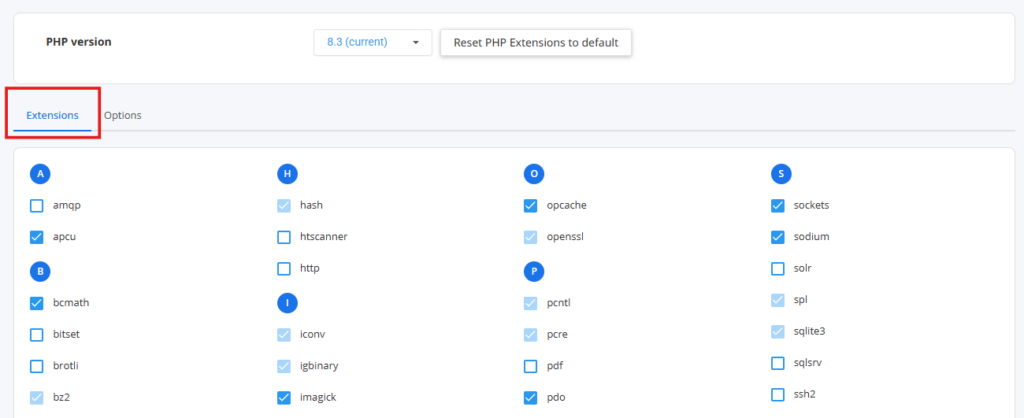
Screenshot: Cpanel Extension tab
Explanation of Specifications
Supported Web Servers
SalePro is compatible with any standard PHP-based web server that supports modern URL rewriting and routing. Popular supported options include: Apache, Nginx, LiteSpeed / OpenLiteSpeed.
WARNING: SalePro is not compatible with Microsoft IIS (ASP/.NET) web servers.
Software Requirements
Your server must have the following software installed and active:
- PHP: Version 8.3 (Strict requirement. Older or newer versions may cause syntax errors).
- MySQL: Version 5.7 or higher (Required for database management).
- Mod Rewrite: Must be enabled (Required for clean URLs and API routing).
Required PHP Extensions
The Laravel framework requires specific PHP extensions to handle tasks like security, file management, and string manipulation. Ensure the following are enabled:
- Required PHP Extensions The Laravel framework requires specific PHP extensions to handle tasks like security, file management, and string manipulation. Ensure the following are enabled:
- OpenSSL: Used for secure data encryption and HTTPS connections.
- PDO (PHP Data Objects): Used to securely connect to the MySQL database.
- Fileinfo: Used to determine the file type of uploaded images and documents.
- Mbstring: Required to properly process non-English characters and multi-byte text.
- Tokenizer: Used by the framework to read and compile the underlying code.
- Zip Archive: Required to extract the installation files and process software updates.
- GD (or Imagick): Required for image processing (e.g., uploading site logos, product images, and resizing).
- cURL: Required for making outbound API requests (e.g., SMS gateways, Payment gateways).
- XML: Required for parsing certain document types and server responses.
Business Workflow
Choosing the right server environment impacts your entire business:
Select Server → Verify PHP 8.3 & Extensions → Install SalePro → Daily Operations run smoothly without crashes.
Examples
- Small Retail Shop: A standard shared hosting plan with cPanel (using Apache) is usually sufficient to run SalePro for 1-5 concurrent users.
- Large Supermarket or Pharmacy: A VPS (Virtual Private Server) running Nginx is recommended to handle the higher transaction volume and simultaneous database queries from multiple POS registers.
Tips
- Check your limits: In your php.ini file, increase your memory_limit to at least 512M and your max_execution_time to 300. This ensures that large database imports (like during installation) do not time out.
Warnings
- Never attempt to bypass a missing PHP extension. If an extension is disabled, the software might appear to install correctly but will fail later when trying to execute a specific task (like uploading a product image).
Troubleshooting
Problem: You see a “500 Internal Server Error” during installation.
- Possible Cause: Mod Rewrite is not enabled on your server, or you are using LiteSpeed.
- Solution: Contact your hosting provider to enable Mod Rewrite, or switch to an Apache-based server.
Problem: You receive a “syntax error, unexpected token” message.
- Possible Cause: Your server is running an outdated version of PHP (e.g., PHP 7.4).
- Solution: Upgrade your PHP version to 8.3 in your cPanel.
Problem: The installation wizard says a folder is “Not Writable”.
- Possible Cause: The server file permissions are too restrictive.
- Solution: Change the permissions of the storage and bootstrap/cache directories to 775.
Related Articles
See also:
- 1.2 Installation Guide (Local & Online)
- 1.4 Updating the Software
- 2.4 Backup & Restore Management
1.2 Installation Guide (Local & Online)
Overview
This article provides step-by-step instructions on how to install SalePro. Because SalePro is a self-hosted PHP application, you must install it on a web server before anyone can access it.
You can choose to install SalePro on an online hosting provider (like cPanel) so it is accessible from anywhere in the world, or you can install it on your local computer (Localhost) using software like XAMPP or WAMP for testing or offline use.
This guide covers both methods and explains the installation wizard that sets up your database and creates your primary administrator account.
Prerequisites
Before beginning the installation, you must have:
- The downloaded SalePro installation .zip file.
- A server environment that fully complies with 1.1 Server Requirements (PHP 8.3, Apache/Nginx, required extensions).
- For Online Hosting: Access to your cPanel or hosting dashboard.
- For Localhost: XAMPP, WAMP, or Laragon installed and running on your computer.
Step-by-Step Instructions: Online Hosting (cPanel)
Installing on a live server is the most common deployment method.
Step 1: Create a Database
Before SalePro can install, it needs a database to store all your business information.
- Log in to your cPanel.
- Navigate to MySQL Databases or MySQL Database Wizard.
- Create a new database and note the Database Name.
- Create a new user with a strong password and note the Database Username and Database Password.
- Add the user to the database and ensure you grant All Privileges.
Step 1:
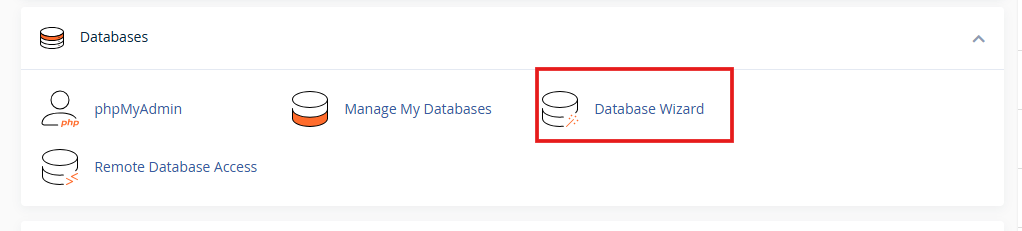
Step2:
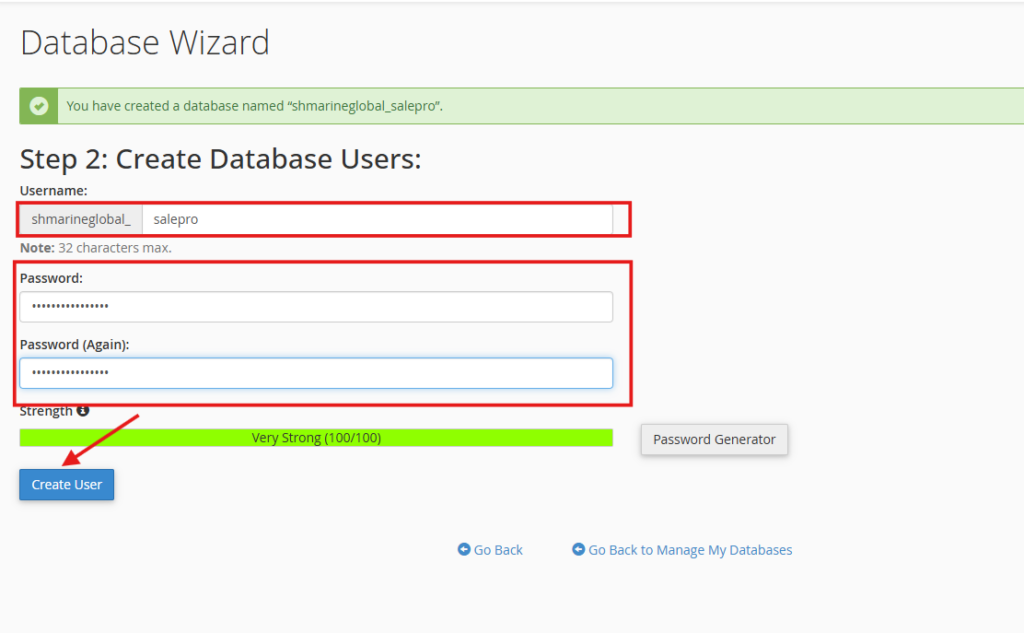
Step3:
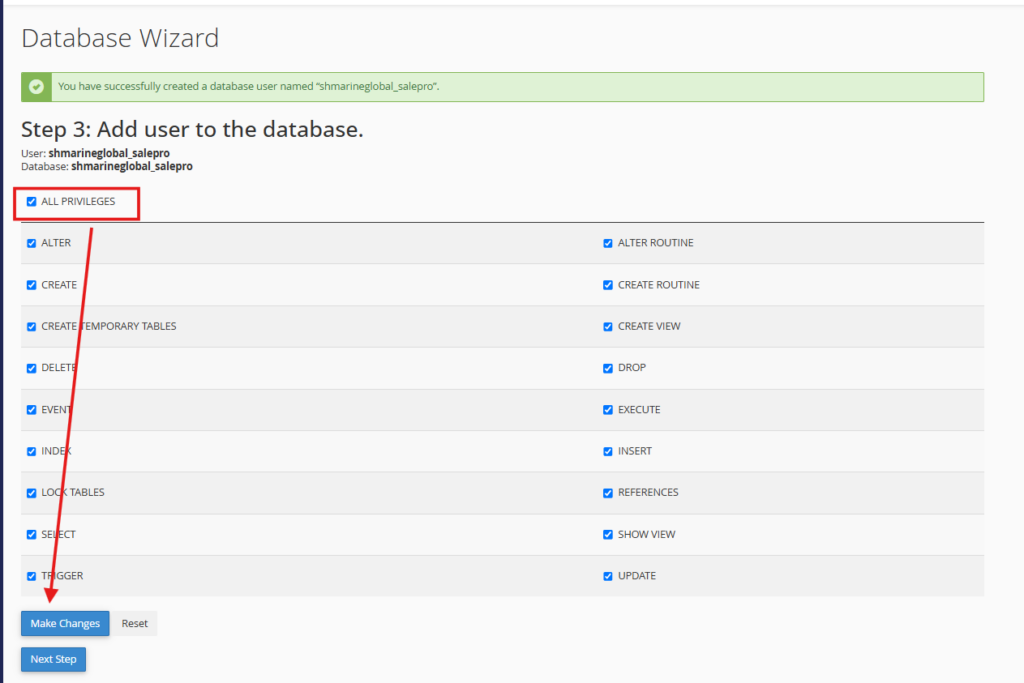
Step 2: Upload and Extract Files
- In cPanel, navigate to the File Manager.
- Open the public_html directory (or the specific folder where you want to install SalePro).
- Click Upload and select the SalePro .zip file from your computer.
- Once the upload reaches 100%, return to the File Manager, right-click the .zip file, and select Extract.
WARNING: Crucial Step for cPanel Users: By default, cPanel hides “dot files” (files that start with a period, like .env and .htaccess). If you extract the files into a subfolder and then move them to public_html, the hidden files will often be left behind. You must click “Settings” in the top right of your File Manager and check “Show Hidden Files” to ensure these critical files are moved to the correct directory. Without them, the installation will immediately fail.
Step 3: Run the Installation Wizard
- Open your web browser and navigate to your domain (e.g., https://yourbusiness.com).
- The SalePro Installation Wizard will automatically appear.
- Follow the on-screen prompts, which will verify your server requirements and ask for your database credentials.
Step-by-Step Instructions: Localhost (XAMPP / WAMP)
Installing locally is excellent for learning the software without needing to pay for web hosting.
Step 1: Prepare the Files
- Open your Localhost directory. (For XAMPP, this is C:\xampp\htdocs. For WAMP, this is C:\wamp\www).
- Create a new folder (e.g., salepro).
- Extract the contents of the SalePro .zip file directly into this folder.
Step 2: Create a Local Database
- Open your browser and go to http://localhost/phpmyadmin.
- Click the Databases tab.
- Enter a database name (e.g., salepro_db) and click Create.
Step 3: Run the Installation Wizard
- Open your browser and navigate to http://localhost/salepro (replacing salepro with the folder name you chose in Step 1).
- The SalePro Installation Wizard will appear. Follow the prompts.
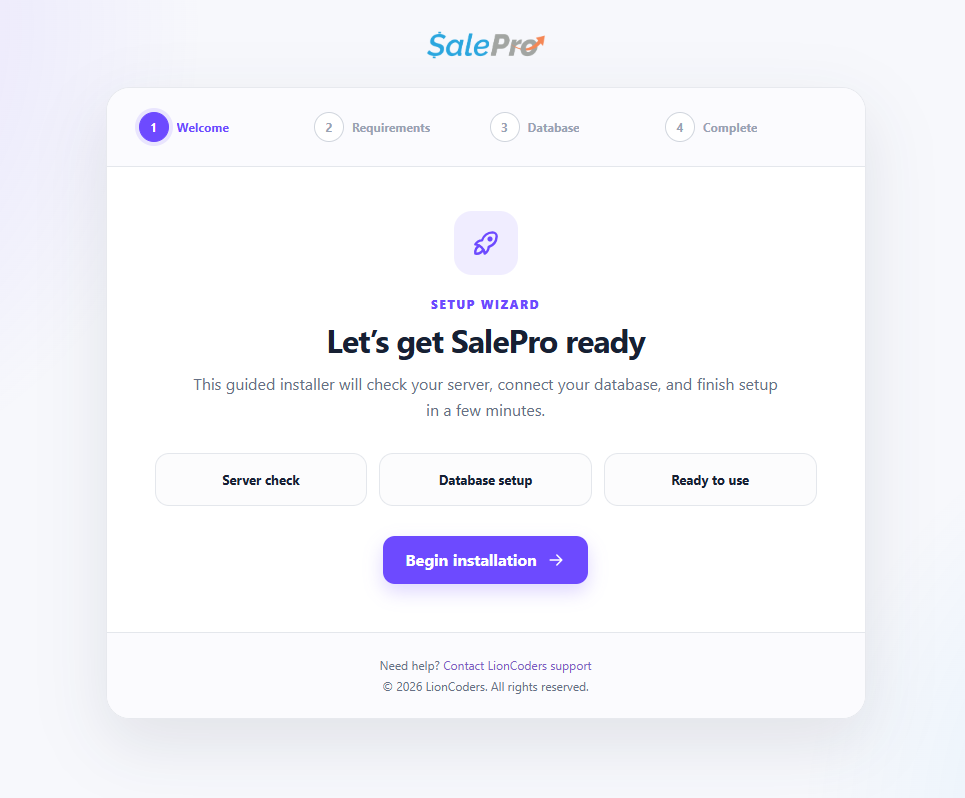
Screenshot: The first screen of the SalePro Installation Wizard
Explanation of Every Field (Installation Wizard)
When you reach the Database Setup screen in the wizard, you must fill out the following fields precisely:
- Database Host: The server address where your database lives. For 99% of hosts and all localhost setups, you must enter localhost or 127.0.0.1.
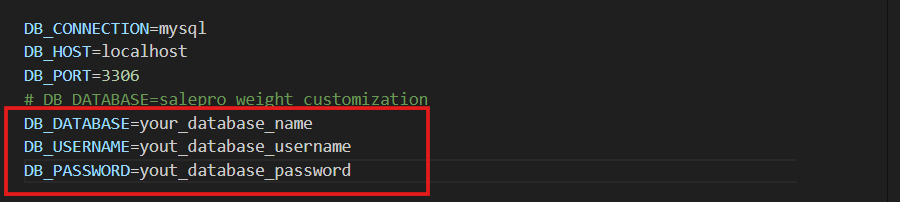
- Database Name: The exact name of the database you created in Step 1.
- Database Username: The user you assigned to the database. (On localhost via XAMPP, this is usually root).
- Database Password: The password for the database user. (On localhost via XAMPP, this is usually left completely blank).
On the final screen, you will create your primary user:
- Admin Username: The name you will use to log in.
- Admin Email: Your contact email. This is used for password resets and system notifications.
- Admin Password: A strong password to secure your entire business management system.
Business Workflow
The installation process fits into your business deployment like this:
Files Uploaded → Database Created → Wizard Executed ↓ The system automatically generates over 100 database tables. ↓ The system populates dummy data (sample products, sales, and customers) so you can test the software immediately. ↓ The Admin account is created, and you are redirected to the Login screen.
Examples
- Retail Chain: A retail chain installing SalePro on a cloud VPS will follow the Online Hosting steps, ensuring their database host is set securely and SSL certificates are installed prior to running the wizard.
- Solo Entrepreneur Testing: A small business owner might use XAMPP to install SalePro locally to test out the Point of Sale interface with their specific barcode scanner before purchasing a live domain.
Tips
- Use Google Chrome: For the best experience during installation and daily use, we highly recommend using Google Chrome.
- Secure your directory: Once installation is complete on a live server, ensure directory browsing is disabled in your cPanel to prevent unauthorized users from seeing your file structure.
Warnings
- Do not refresh the page during the final step of the installation wizard. The system is writing thousands of lines of data to your database, and interrupting it may cause a corrupted installation.
Troubleshooting
Problem: The installation wizard immediately shows a “500 Internal Server Error”.
- Possible Cause: The .htaccess file was not moved to the root directory, or your server is running LiteSpeed instead of Apache/Nginx.
- Solution: Enable “Show Hidden Files” in cPanel and ensure .htaccess is present. Switch to an Apache server.
Problem: “Maximum execution time exceeded” or a blank white screen during the final installation step.
- Possible Cause: Your server timed out while trying to import the database.
- Solution: Edit your server’s php.ini file and increase memory_limit to 512M and max_execution_time to 300.
Problem: “Database Connection Failed”.
- Possible Cause: The Database Name, Username, or Password you entered into the wizard does not perfectly match what you created in cPanel.
- Solution: Double-check your credentials. Ensure you assigned the user to the database with “All Privileges”.
Related Articles
See also:
- 1.1 Server Requirements
- 1.3 Changing Domain & Hosting (Migration)
- 1.5 Quick Start & First Login
- 2.1 System Settings & Localization
1.3 Changing Domain & Hosting (Migration)
Overview
This article explains how to migrate your existing SalePro installation to a new domain name or an entirely new hosting provider.
Businesses change domains for rebranding purposes or upgrade their hosting servers as their operations grow. Changing your domain or host requires moving your physical files and database, and then updating SalePro’s configuration file so it knows where it currently lives.
Prerequisites
Before beginning a migration, you must have:
- Full access to your old hosting control panel (cPanel, PHPMyAdmin).
- Full access to your new hosting control panel.
- A complete backup of your files and database (See 2.4 Backup & Restore Management).
Step-by-Step Instructions
Step 1: Export Your Database from the Old Host
- Log in to your old cPanel and open phpMyAdmin.
- Select your SalePro database from the left sidebar.
- Click the Export tab at the top.
- Leave the method as “Quick” and the format as “SQL”, then click Go. This will download a .sql file to your computer.
Step 2: Compress Your Files
- Open the File Manager in your old cPanel.
- Ensure “Show Hidden Files” is enabled in your File Manager settings.
- Select all files and folders in your SalePro installation directory (including .env and .htaccess).
- Right-click and select Compress. Choose the Zip format. Download this .zip file to your computer.
Step 3: Import to the New Host
- Log in to your new cPanel.
- Create a new database, database user, and assign the user to the database with all privileges (just like a fresh installation).
- Open phpMyAdmin on the new host, select the new database, click Import, and upload the .sql file you downloaded in Step 1.
- Open the File Manager on the new host, navigate to the new public directory, and upload the .zip file you created in Step 2.
- Extract the .zip file. (Again, ensure hidden files are extracted).
Step 4: Update the Configuration File (.env)
The new installation must be told how to connect to the new database and what its new URL is.
- In your new host’s File Manager, locate the .env file in the root of your SalePro directory.
- Right-click the .env file and select Edit.
- Update the configuration fields (explained below) and click Save Changes.
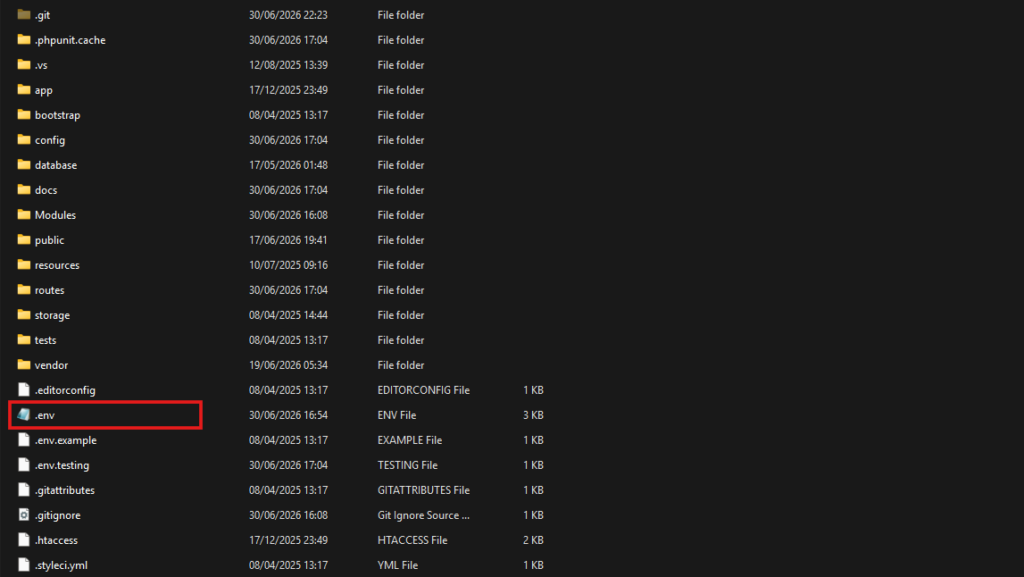
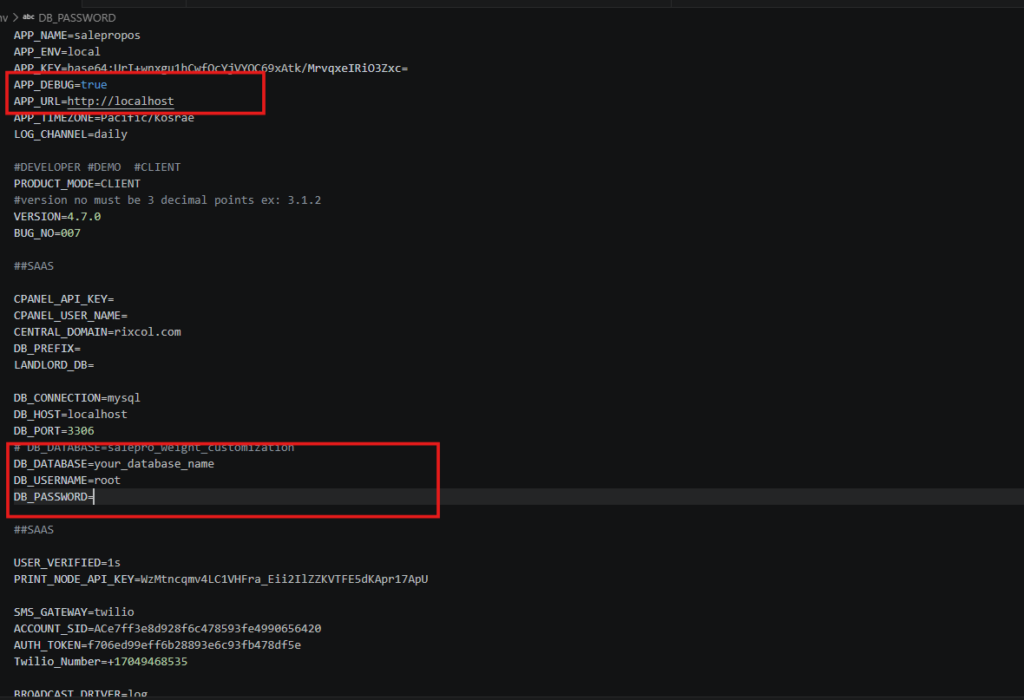
Screenshot: cPanel File Manager editing the .env file, highlighting the DB_ and APP_URL lines
Explanation of Every Field (The .env File)
When editing the .env file during a migration, you must update the following specific lines:
- APP_URL=: Update this to your new domain name (e.g., APP_URL=https://newdomain.com). Make sure to include https:// and do not put a trailing slash / at the end.
- DB_HOST=: Usually remains 127.0.0.1 or localhost, unless your host provides a remote database URL.
- DB_DATABASE=: The exact name of the new database you created on the new host.
- DB_USERNAME=: The exact username you created on the new host.
- DB_PASSWORD=: The exact password for the database user on the new host.
Business Workflow
The migration workflow ensures continuity: Old Server Online → Scheduled Downtime → Files & Database Transferred → Config Updated → New Server Online.
Examples
- Upgrading Servers: A business grows from processing 100 sales a day to 5,000 sales a day. Their shared hosting is crashing. They purchase a dedicated VPS. They follow these migration steps to move their data identically to the new, more powerful server without losing a single transaction.
Tips
- Clear the Cache: After migrating and editing the .env file, it is highly recommended to clear the system cache. You can usually do this by deleting the contents of the bootstrap/cache folder (do NOT delete the .gitignore file inside it).
Warnings
- Do Not Change Other .env Lines: Only change the APP_URL and DB_ lines. Changing the APP_KEY or other encryption keys will permanently break all encrypted data (like saved passwords) in your database.
Troubleshooting
Problem: The site loads but looks completely broken (no CSS/styling).
- Possible Cause: The APP_URL in the .env file is incorrect.
- Solution: Check the .env file and ensure the APP_URL exactly matches your new domain name, including https://.
Problem: “Database Connection Error” when visiting the new domain.
- Possible Cause: The DB_ credentials in the .env file do not match the new database you created.
- Solution: Double-check the spelling of the database name, user, and password in the .env file. Ensure the user has privileges.
Related Articles
See also:
- 1.2 Installation Guide (Local & Online)
- 2.4 Backup & Restore Management
1.4 Updating the Software
Overview
This article explains how to safely update your SalePro installation to the latest version.
Our development team frequently releases updates on CodeCanyon to introduce new features, improve performance, and patch security vulnerabilities. Keeping your software up to date ensures you have access to the latest tools to run your business and protects your data.
Prerequisites
Before attempting an update, you must:
- Verify that your support license is active on CodeCanyon.
- Take a complete backup of your files and database (See 2.4 Backup & Restore Management). Do not skip this step.
Step-by-Step Instructions
Updating the software involves replacing the core system files with the new ones provided by the developers.
Step 1: Download the Update
- Log in to your Envato/CodeCanyon account.
- Navigate to the Downloads section.
- Locate SalePro and click the Download button. Select Installable WordPress file only (or the equivalent main software file).
- Download the .zip file to your computer.
Step 2: Upload and Replace Files
- Log in to your hosting cPanel and open the File Manager.
- Navigate to your SalePro installation directory (e.g., public_html).
- Upload the newly downloaded .zip file into this directory.
- Right-click the .zip file and select Extract.
- When prompted, choose to Overwrite existing files.
Step 3: Run the Update Script (If Applicable)
Some major updates require database changes.
- Open your web browser.
- Navigate to your domain and append the update route (e.g., https://yourdomain.com/update).
- If an update script exists for this version, the page will guide you through running the database migrations. If you see a “404 Not Found” or are redirected to the dashboard, no database update is required for this specific version.
Business Workflow
Updates are a standard part of software maintenance: New Version Released → Full Backup Taken → Files Overwritten → Update Script Executed → Business Resumes on latest version.
Examples
- Security Patch: You receive an email that a critical security patch was released in version 4.1. You take a backup, download the 4.1 zip, upload it over your 4.0 files, and secure your system.
Tips
- Schedule Updates During Downtime: Always perform updates when your business is closed or experiencing low traffic to minimize disruption.
Warnings
WARNING: Custom Code Will Be Lost: If you or a developer have manually edited the core PHP or CSS files of SalePro (hardcoding changes), those changes will be permanently erased and replaced by the update files. This is why you must maintain a backup. If you need customizations, use the Custom CSS fields in settings or build an addon rather than editing core files.
Troubleshooting
Problem: After updating, the site crashes or shows a “500 Server Error”.
- Possible Cause: The update files were incomplete, or the server cached old files.
- Solution: Delete the contents of the bootstrap/cache folder (do NOT delete the .gitignore file). If the error persists, restore your system from the backup you took in the prerequisites and contact support.
Problem: Some features are missing or look distorted.
- Possible Cause: Your browser is caching the old Javascript or CSS files.
- Solution: Perform a “Hard Refresh” in your browser (Ctrl + F5 on Windows, Cmd + Shift + R on Mac) to clear the browser cache.
Related Articles
See also:
- 1.3 Changing Domain & Hosting (Migration)
- 2.4 Backup & Restore Management
1.5 Quick Start & First Login
Overview
This article guides you through your very first moments using SalePro immediately after completing the installation.
When you install SalePro, the developers have intentionally populated the database with “dummy data”—fake products, fake customers, and fake sales. This allows you to explore the software, generate reports, and see how the Point of Sale works without risking real business data. Once you are comfortable, you will empty the database and begin configuring the system for your actual business.
Prerequisites
- You have successfully installed SalePro on a local or live server.
- You remember the Admin Username and Admin Password you created during the installation wizard.
Step-by-Step Instructions
Step 1: Log In
- Navigate to your domain (e.g., https://yourbusiness.com). You will be greeted by the login screen.
- Enter the Admin Username and Admin Password you defined during installation.
- Click Login.
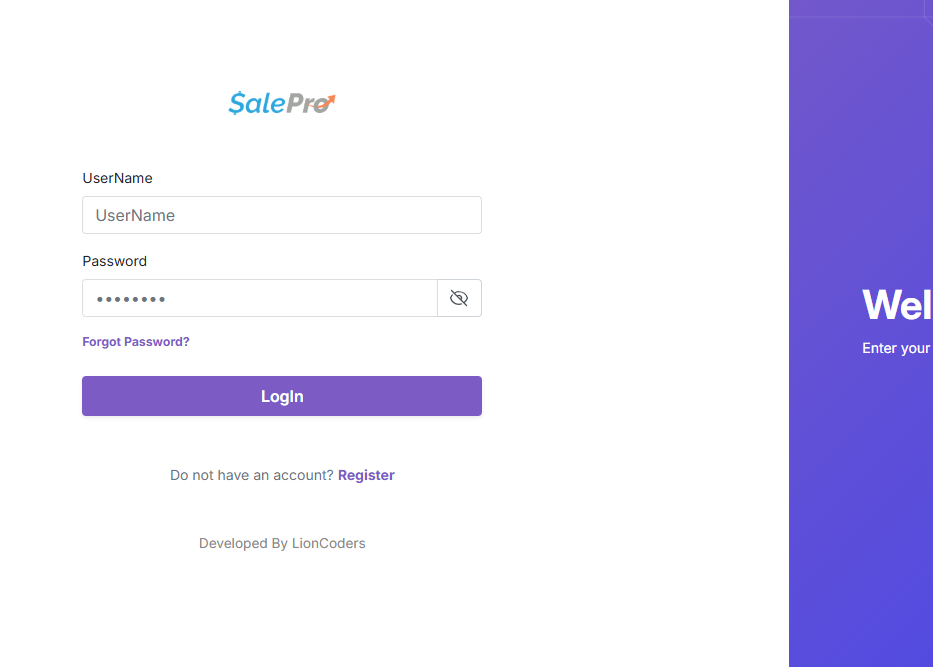
Screenshot: The SalePro Login Screen
Step 2: Explore the Dummy Data
- You will land on the Dashboard. Notice the charts and graphs are populated with fake revenue data.
- Use the left-hand navigation sidebar to explore.
- Click Product > Product List to see the sample inventory.
- Click Sale > POS to explore the cash register interface. Try ringing up a fake sale.
Step 3: Empty the Database
Once you are done exploring and are ready to input your real business data, you must wipe the system clean.
- Look at the top-right corner of the screen (the top navigation bar).
- Click on your Username (or profile picture).
- A dropdown menu will appear. Click Empty Database.
- A warning prompt will appear asking you to confirm. Click Yes.
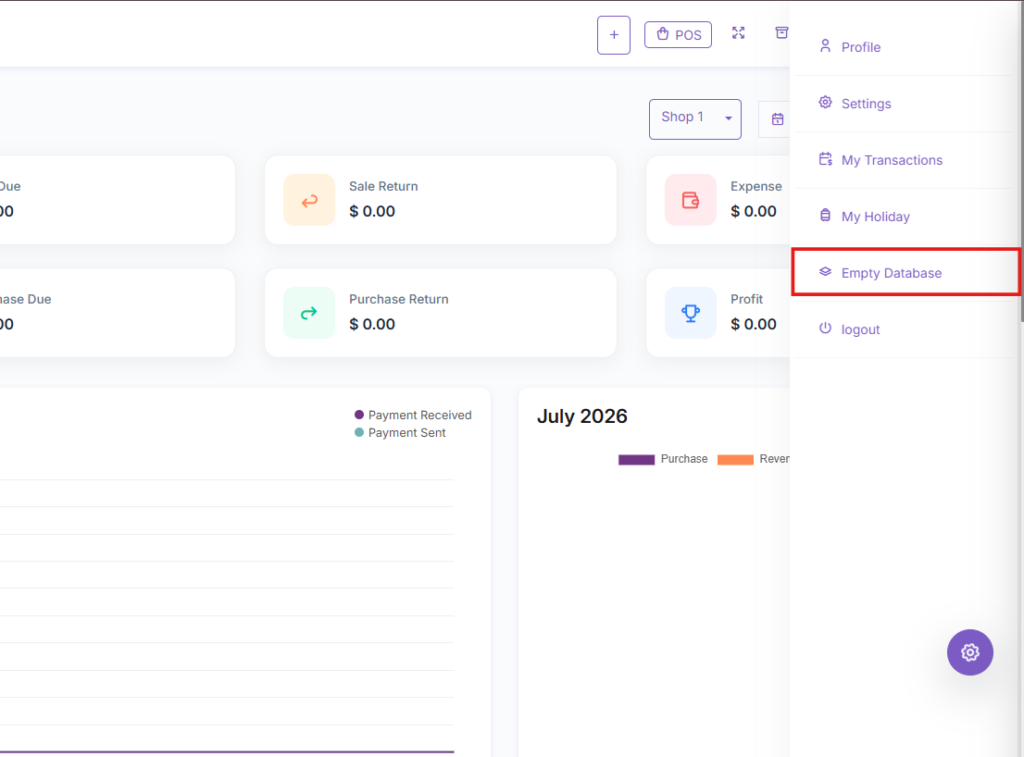
Screenshot: The top navigation dropdown menu highlighting the “Empty Database” button
Explanation of Every Field
(Not applicable for this workflow, as there are no form fields to fill out).
Business Workflow
The Quick Start workflow is the bridge between installation and real configuration: Install SalePro → Explore Dummy Data to learn the UI → Empty Database → Begin actual business configuration (Settings, Products, Users).
Examples
- Learning the Ropes: A new business owner logs in for the first time. They are afraid of “breaking” the system. The dummy data allows them to click buttons, process fake sales, and print fake receipts to learn how the software behaves safely. After 30 minutes of practice, they click “Empty Database” and start fresh.
Tips
- Do Not Skip Exploring: Take at least 15 minutes to play with the dummy data. Seeing how products look when they are fully configured makes it much easier to understand how to create your own products later.
Warnings
CAUTION: Emptying the database is irreversible. Clicking “Empty Database” deletes ALL sales, purchases, products, customers, and accounting entries. It leaves only the core structural settings and your Admin user account. Do NOT click this button after you have started entering real business data.
Troubleshooting
Problem: I clicked “Empty Database” but my products are still there.
- Possible Cause: The system failed to process the request, or your browser cached the page.
- Solution: Hard refresh your browser (Ctrl+F5). If they remain, you may have a database permission issue preventing the delete command from executing. Check your server logs.
Problem: I forgot my Admin password from the installation wizard.
- Possible Cause: Typo during setup.
- Solution: Click the “Forgot Password” link on the login screen. An email will be sent to the Admin Email address you provided during setup (Requires Mail Server to be configured first).
Related Articles
See also:
- 1.2 Installation Guide (Local & Online)
- 2.1 System Settings & Localization
- 6.2 The POS Interface
2.1 System Settings & Localization
Overview
This article guides you through configuring the core settings of SalePro.
Before you start adding products or ringing up customers, you must tell SalePro how your business operates. This includes setting your business name, configuring the timezone so sales are recorded accurately, and setting up the local currency formats. This module ensures the software is tailored to your specific geographical and operational needs.
Prerequisites
- You must be logged in as an Administrator.
- You should have completed the 1.5 Quick Start & First Login process (specifically, emptying the dummy database).
Step-by-Step Instructions
- From the left-hand sidebar, click on Setting to expand the configuration menu.
- Click on General Setting.
- You will see a form with multiple tabs (if applicable) or a long list of configuration fields.
- Fill in the fields carefully based on your business identity and geographical location.
- Once all fields are configured, scroll to the bottom of the page and click the Submit button.
Screenshot: The General Setting form highlighting the Timezone and Currency fields
Explanation of Every Field
The General Setting page contains several critical fields that dictate how the entire system behaves.
- Site Title: The name of your business. This will appear on the login screen, in the browser tab, and on various reports.
- Company Name: The legal name of your business (appears on invoices).
- VAT Registration Number: Your business Tax/VAT number (appears on invoices).
- Site Logo: Click to upload your company logo. This logo appears in the top-left corner of the dashboard and on customer invoices.
- Currency: Select your primary currency (e.g., USD, EUR, INR). If your currency is not listed, you must first create it (See 2.3 Tax & Currency Configuration).
- Currency Position: Choose whether the currency symbol appears before the amount ($100) or after the amount (100$).
- Timezone: Select your local timezone. This is absolutely critical; if set incorrectly, your sales, reports, and automated cron jobs will execute at the wrong times.
- Date Format: Choose how dates should be displayed across the system (e.g., dd-mm-yyyy, mm/dd/yyyy). Choose the format most familiar to your staff.
- Staff Default Warehouse: (Settings > Pos settings ) If a cashier logs in, which warehouse should they be assigned to by default? This speeds up the login and sales process for employees.
- Staff Default Biller: (Settings > Pos settings ) The default billing entity assigned to sales processed by staff.
Business Workflow
Configuring these settings is a one-time foundational step: Install Software → Empty Database → Configure System Settings → Add Products → Begin Selling.
Examples
- European Boutique: A clothing store in Paris configures the Currency to EUR, the Currency Position to Right, the Timezone to Europe/Paris, and the Date Format to dd-mm-yyyy. All invoices printed will now reflect proper European formatting automatically.
Tips
- Optimize Pagination: If you have a very slow internet connection, set your Pagination to 10. If you have a fast connection and a large monitor, set it to 50 so you can see more data at once without clicking “Next”.
Warnings
WARNING: Do not change the Timezone after you start selling. Changing the timezone halfway through a fiscal year can cause your daily and monthly financial reports to shift, leading to discrepancies in your accounting. Set it once during setup and leave it.
Troubleshooting
Problem: I uploaded my logo, but the old one is still showing.
- Possible Cause: Your web browser has cached the old image.
- Solution: Perform a hard refresh (Ctrl + F5).
Problem: My local currency is not in the dropdown list!
- Possible Cause: The currency hasn’t been created in the database yet.
- Solution: Navigate to Setting > Currency and add your specific currency symbol and code. Then return to General Settings.
Related Articles
See also:
- 1.5 Quick Start & First Login
- 2.3 Tax & Currency Configuration
- 3.2 Managing Users & Employees
2.2 Mail, SMS, and WhatsApp Configuration
Overview
This article explains how to connect SalePro to external communication gateways.
Modern businesses rely on automated communication. By configuring these settings, SalePro can automatically email PDF invoices to customers, send password reset links to staff, or send SMS/WhatsApp notifications regarding delivery statuses and promotions. Without configuring these gateways, SalePro cannot send any external messages.
Prerequisites
- You must have an active email account (e.g., Gmail, Outlook, or a custom domain email via cPanel).
- If configuring SMS, you must have an active account with an SMS gateway provider (e.g., Twilio, Clickatell, Nexmo).
- If configuring WhatsApp, you must have an active business WhatsApp API integration.
Step-by-Step Instructions
Part 1: Configuring the Mail Server
- From the left sidebar, go to Setting > Mail Setting.
- You will be presented with the SMTP configuration form.
- Obtain your SMTP credentials from your email provider (see the Examples section for Gmail).
- Fill out the fields exactly as provided by your host.
- Click Submit.
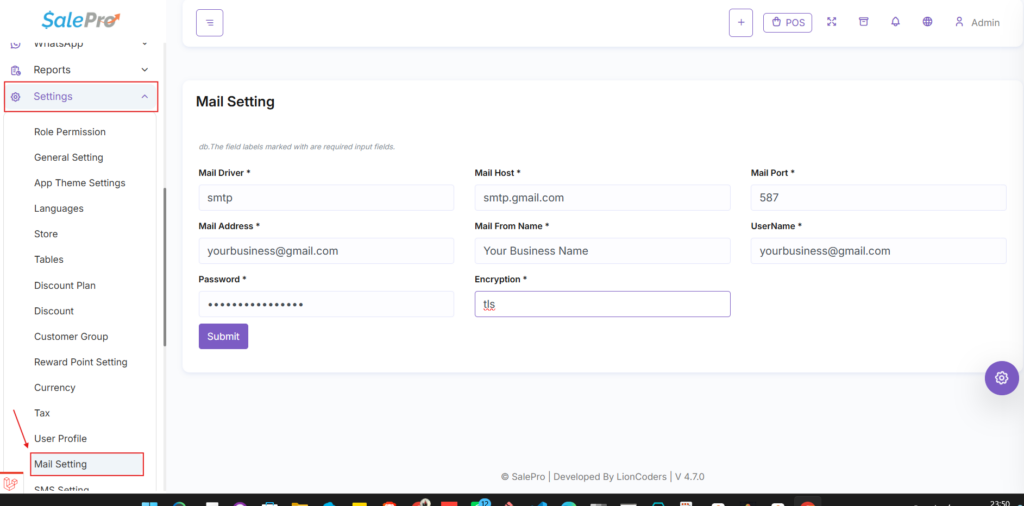
Screenshot: Mail Setting form filled out with sample SMTP details
Mail Setting Fields
- Mail Driver: The protocol used to send emails. Select SMTP (Simple Mail Transfer Protocol), which is the industry standard.
- Mail Host: The server address of your email provider (e.g., smtp.gmail.com).
- Mail Port: The port used for the connection. Usually 587 for TLS or 465 for SSL.
- Mail Address: The email address the system will use to log in (e.g., billing@yourbusiness.com).
- Mail From Name: The name that will appear in the customer’s inbox (e.g., Your Business Name).
- Username: Usually identical to your Mail Address.
- Password: The password for your email account. (Note: For Gmail and Office365, this must be an “App-Specific Password”, not your normal login password).
- Encryption: The security method used. Select TLS or SSL matching your port.
Part 2: Configuring the SMS Gateway
- From the left sidebar, go to Setting > SMS Setting.
- Select your SMS Gateway provider from the dropdown menu (e.g., Twilio).
- The form will update to ask for specific API keys based on your chosen provider.
- Log in to your SMS provider’s dashboard, copy the required API Keys/Tokens, and paste them into SalePro.
- Click Submit.
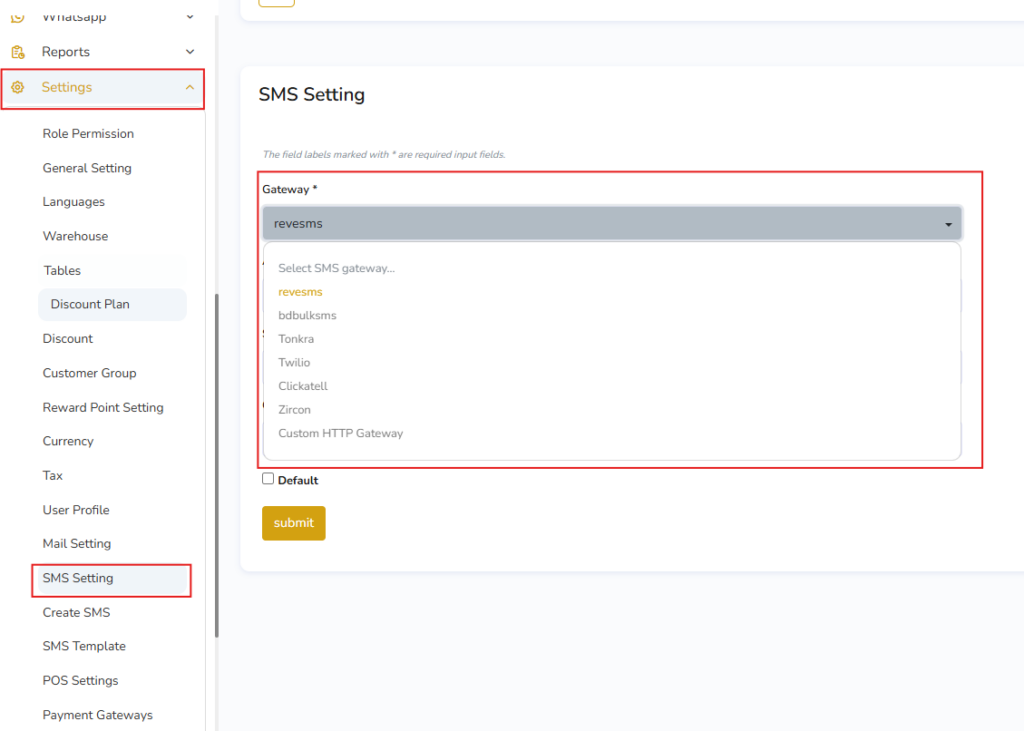
SMS Setting Fields (Example: Twilio)
- Gateway: The provider you are using.
- Account SID: Your unique Twilio account identifier.
- Auth Token: Your secret Twilio authentication token.
- Twilio Number: The phone number you purchased on Twilio that will send the texts.
Part 3: Configuring WhatsApp
- From the left sidebar, navigate to the WhatsApp menu and click on Settings. (Whatsapp > Whatsapp settings)
- You will be prompted to enter your WhatsApp Cloud API credentials.
- Fill in the Phone Number ID, Business Account ID, and Permanent Access Token obtained from your Meta Developer dashboard.
- Click Submit to connect your WhatsApp Business account.
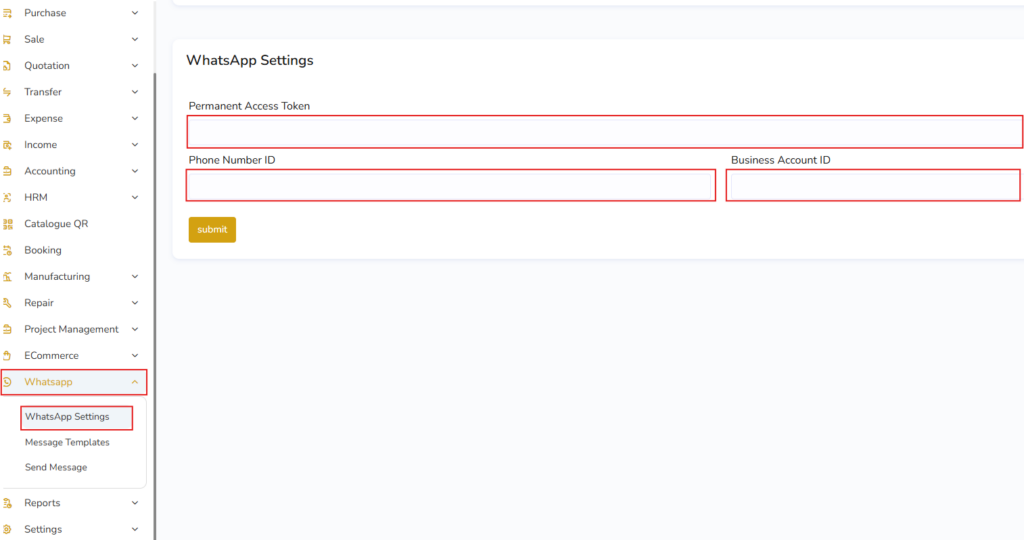
Whatsapp Setting Fields
- Phone Number ID: The unique identifier for the phone number connected to your Meta app.
- Business Account ID: The WhatsApp Business Account ID found in your Meta Developer portal.
- Permanent Access Token: A non-expiring token generated from the Meta Business Settings to allow continuous API access.
Business Workflow
Once configured, this operates entirely in the background: Staff clicks “Email Invoice” on a Sale → SalePro connects to SMTP server → Email provider delivers the PDF to the customer’s inbox.
Examples
Example Configuration for Gmail (Google Workspace):
- Mail Driver:SMTP
- Mail Host:smtp.gmail.com
- Mail Port:587
- Mail Address:yourbusiness@gmail.com
- Mail From Name:Your Business Name
- Username:yourbusiness@gmail.com
- Password:your_16_digit_app_password
- Encryption:TLS
Tips
- Test Immediately: After configuring your Mail Settings, log out of SalePro, click “Forgot Password” on the login screen, and enter your admin email. If you receive the reset link, your mail server is configured perfectly.
Warnings
WARNING: Gmail Users: Google no longer allows basic username/password logins for external apps. You MUST enable 2-Factor Authentication on your Google account and generate an “App Password” to paste into the SalePro Password field.
Troubleshooting
Problem: Customers aren’t receiving emails, and the system shows an error when I try to send an invoice.
- Possible Cause: Incorrect SMTP port or encryption combination, or your host is blocking outbound SMTP ports.
- Solution: Verify that Port 587 uses TLS, and Port 465 uses SSL. If you are on a VPS, check your firewall (like CSF) to ensure outbound connections on port 587/465 are permitted.
Problem: SMS messages are failing to send.
- Possible Cause: Insufficient funds in your SMS provider account, or the destination number is in an unsupported international format.
- Solution: Check your Twilio/Nexmo balance. Ensure customer phone numbers include the country code.
Related Articles
See also:
- 6.3 Standard Sales & Quotations (Sending emails)
2.3 Tax & Currency Configuration
Overview
This article explains how to configure the financial foundations of SalePro: Taxes and Currencies.
Taxes and currencies are vital components of any transaction. SalePro allows you to create unlimited custom tax rates (like VAT, GST, or State Sales Tax) and unlimited currencies. By setting these up before adding products, you can easily assign appropriate tax rules and pricing formats to your inventory, ensuring your sales receipts are legally compliant and correctly formatted for your region.
Prerequisites
- You must be logged in as an Administrator.
Step-by-Step Instructions
Part 1: Adding a Currency
- From the left sidebar, navigate to Setting > Currency.
- Click the Add Currency button at the top of the page.
- Fill out the currency details (explained below).
- Click Submit to save the currency.
- Note: Once created, you must go to Setting > General Setting to set this new currency as your system default (See 2.1 System Settings).
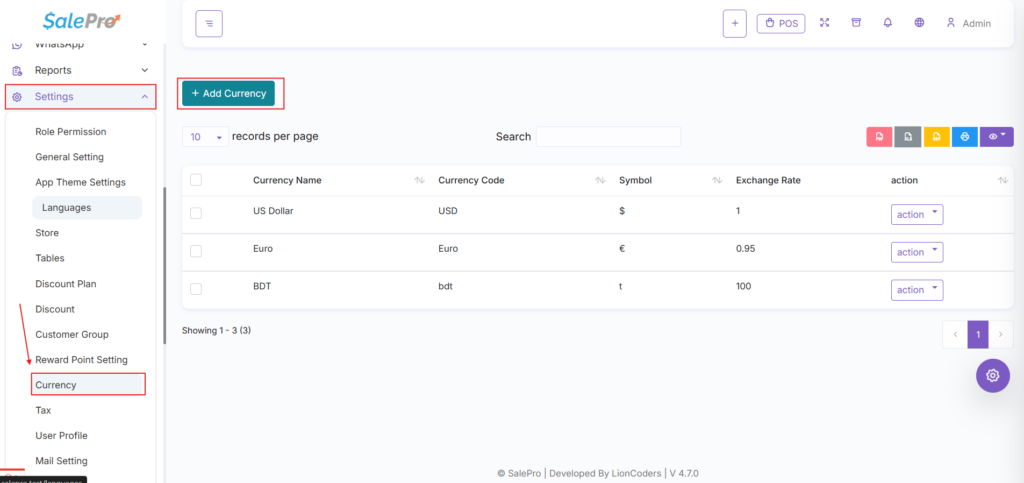
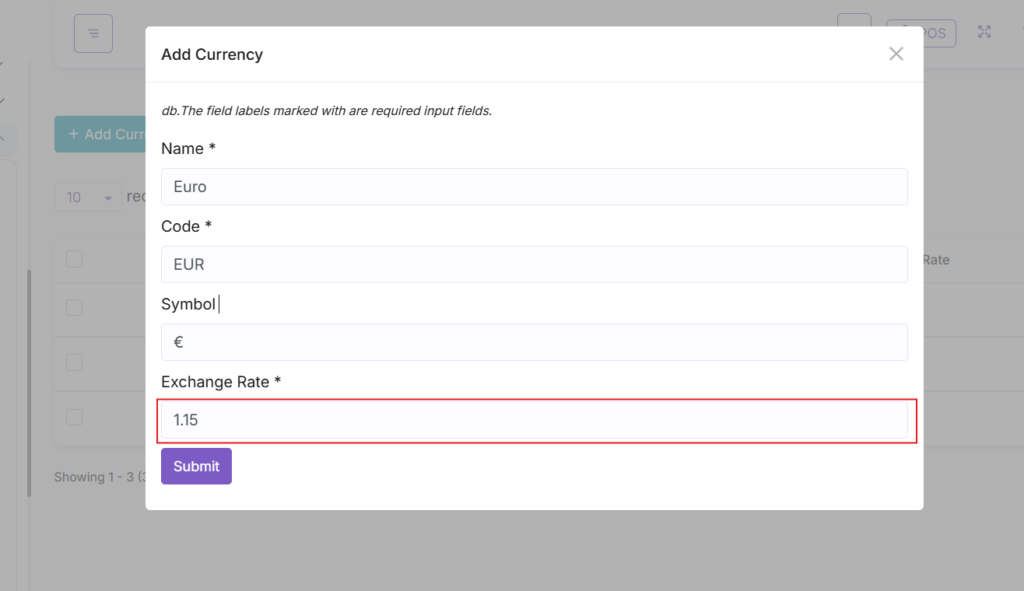
Screenshot: Add Currency modal showing Name, Code, and Exchange Rate fields
Part 2: Adding a Tax Rate
- From the left sidebar, navigate to Setting > Tax.
- Click the Add Tax button.
- Fill out the tax details (explained below).
- Click Submit to save the tax rate.
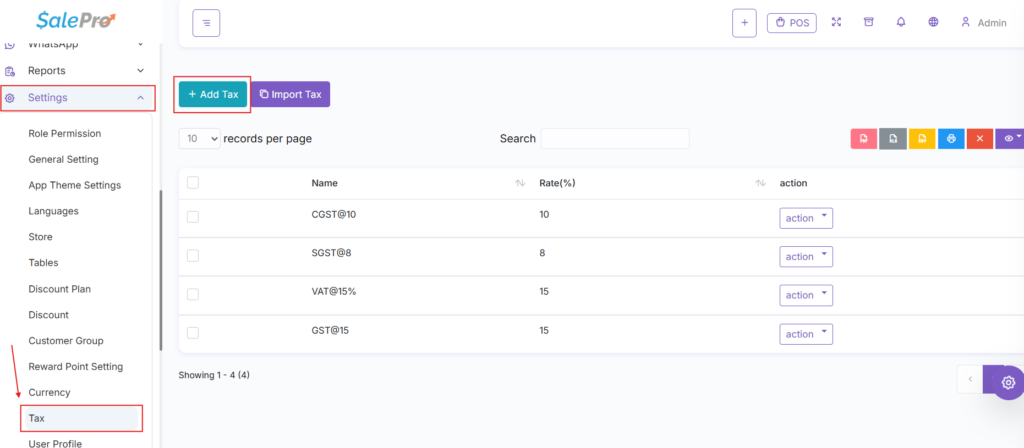
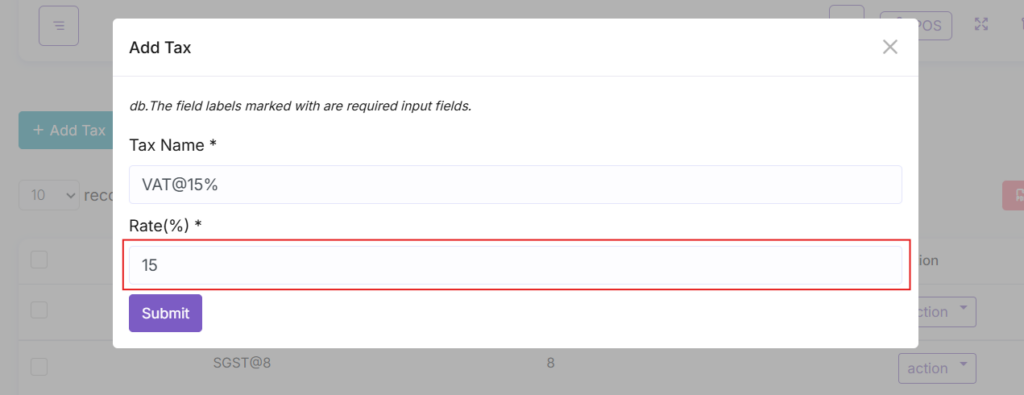
Screenshot: Add Tax modal highlighting the Rate percentage field
Explanation of Every Field
Currency Fields
- Currency Name: The full name of the currency (e.g., US Dollar, Euro, Indian Rupee).
- Currency Code: The standard 3-letter ISO code (e.g., USD, EUR, INR).
- Symbol: The visual symbol of the currency (e.g., $, €, ₹).
- Exchange Rate: If this is your primary base currency, set this to 1. If this is a secondary currency, set the exchange rate relative to your base currency (e.g., 1.15). This is used for multi-currency reporting.
Tax Fields
- Tax Name: The recognizable name of the tax (e.g., VAT 20%, State Sales Tax). This name will appear on customer receipts.
- Tax Rate (%): The numerical percentage of the tax (e.g., 20, 5.5). Do not include the % symbol in the field, just the number.
Business Workflow
Setup dictates operations: Create Tax Rate → Assign Tax Rate to a Product → Product is Sold → Tax is automatically calculated and added to the Grand Total → Tax Reports are updated for your accountant.
Examples
- Multi-Tax Regions: A store in Canada creates multiple tax rates: “GST 5%”, “PST 7%”, and “HST 13%”. When they create a new product, they select the appropriate tax rate from the dropdown so the POS calculates it automatically.
- Tax-Free Goods: A grocery store creates a “Zero Tax 0%” rate and assigns it to essential food items, while assigning “VAT 20%” to luxury goods.
Tips
- Use Descriptive Names: Name your taxes clearly (e.g., “VAT 20%” instead of just “VAT”). If the government changes the tax rate next year, you can create a new “VAT 21%” tax rather than overriding historical data.
Warnings
WARNING: Do not delete taxes that have been used. If you delete a tax rate that was applied to past sales, those historical invoices may fail to render correctly. If a tax is no longer used, simply stop assigning it to new products.
Troubleshooting
Problem: I created a currency, but it’s not showing up on my dashboard or sales screen.
- Possible Cause: You created the currency but didn’t set it as the active default.
- Solution: Go to Setting > General Setting and select your new currency from the Currency dropdown menu.
Problem: Tax isn’t being calculated on the POS screen.
- Possible Cause: The product does not have a tax rate assigned, or the POS “Order Tax” is set to 0.
- Solution: Edit the product in Product > Product List and ensure a tax rate is selected.
Related Articles
See also:
- 2.1 System Settings & Localization
- 4.3 Creating & Managing Products
- 6.2 The POS Interface
2.4 Backup & Restore Management
Overview
This article explains how to safeguard your business data by taking backups and restoring them when necessary.
Your database contains every product, sale, customer, and financial record your business generates. Hardware fails, servers crash, and human errors happen. SalePro includes a built-in database backup utility that allows you to download a complete copy of your database with a single click. Taking regular backups is the single most important administrative task you can perform.
Prerequisites
- You must be logged in as an Administrator.
- Note: This built-in tool backs up the MySQL database, not your physical files (like uploaded images). To backup files, you must use your hosting provider’s tools (e.g., cPanel).
Step-by-Step Instructions
Taking a Database Backup
- From the left sidebar, navigate to Setting > Backup Database.
- Click the Backup Database button.
- The system will process the database and generate a .sql file.
- A new row will appear in the backup list. Click the Download button (downward arrow icon) to save the file to your local computer.
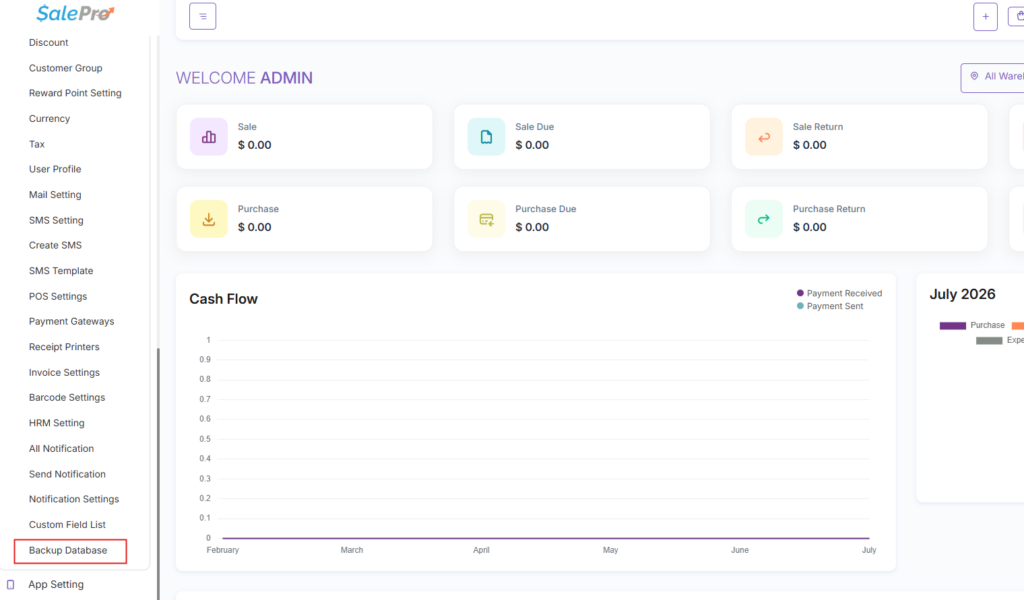
Screenshot: The Backup management screen highlighting the ‘Generate Backup’ button
Restoring a Database Backup
The built-in interface allows you to restore backups that are currently listed on the server.
- From the left sidebar, navigate to Setting > Backup Database.
- Locate the backup you wish to restore in the list.
- Click the Restore button (circular arrow icon) on that row.
- Confirm the action. The system will overwrite your current database with the backup data.
CAUTION: If you need to restore a backup that you downloaded to your computer but deleted from the server, you must use phpMyAdmin in your cPanel to import the .sql file directly. SalePro cannot “upload” an external backup file through the web interface for security reasons.
Explanation of Every Field
The Backup list displays the following information:
- File Name: The automatically generated name of the backup (usually contains the date and time).
- File Size: The size of the database backup in MB or KB.
- Created At: The exact date and time the backup was generated.
- Action: Buttons to Download, Restore, or Delete the backup file from the server.
Business Workflow
Standard security workflow: End of Week → Admin logs in → Clicks Generate Backup → Downloads file to local hard drive → Business data is safe from server failure.
Examples
- Ransomware Protection: A business manager sets a calendar reminder every Friday at 5 PM to generate and download a backup. When their web host suffers a catastrophic failure a month later, they spin up a new server and import their latest .sql backup, losing only a few hours of data instead of years of transactions.
Tips
- Store Backups Off-Site: Generating a backup leaves a copy on the server. If the server dies, that backup dies with it. ALWAYS click the Download button and save the backup to an external hard drive, Google Drive, or Dropbox.
Warnings
WARNING: Restoring is Irreversible. When you click “Restore”, the system completely drops the current database and replaces it with the backup. Any sales, products, or changes made after the backup was generated will be permanently destroyed.
Troubleshooting
Problem: Clicking “Generate Backup” results in a timeout or white screen.
- Possible Cause: Your database has grown too large (e.g., millions of rows) and PHP ran out of memory or execution time trying to compress it.
- Solution: Increase memory_limit and max_execution_time in your php.ini. For massive databases, use cPanel’s built-in Backup Wizard or SSH (mysqldump) instead of the web interface.
Problem: I restored a backup, but my product images are missing!
- Possible Cause: This tool only backs up the database (text data). It does not back up the physical image files stored in the public/images directory.
- Solution: You must restore your public folder from a cPanel file backup.
Related Articles
See also:
- 1.3 Changing Domain & Hosting (Migration)
- 1.4 Updating the Software
2.5 Hardware Configuration (Printers & Displays)
Overview
This article guides you through setting up essential retail hardware: Receipt Printers and the Customer Display Screen.
SalePro integrates with standard POS hardware. Configuring thermal printers ensures that your cashiers can print professional, customized receipts instantly after a sale. Setting up the Customer Display Screen allows shoppers to see a real-time, itemized breakdown of their purchase as it is being rung up, building trust and modernizing your checkout counter.
Prerequisites
- A physical POS thermal printer (58mm or 80mm) connected to your network or computer.
- For the Customer Display, a secondary monitor connected to your checkout computer and configured as an “Extended Display” in your operating system.
Step-by-Step Instructions
Part 1: Configuring ESC/POS Thermal Printers
SalePro supports direct communication with ESC/POS compatible networks and local printers.
- From the left sidebar, navigate to Setting > Receipt Printer.
- Click Add Printer.
- Fill in the printer details (explained below).
- Click Submit.
- Once the printer is added, navigate to Setting > Invoice Setting and set this printer as your default.
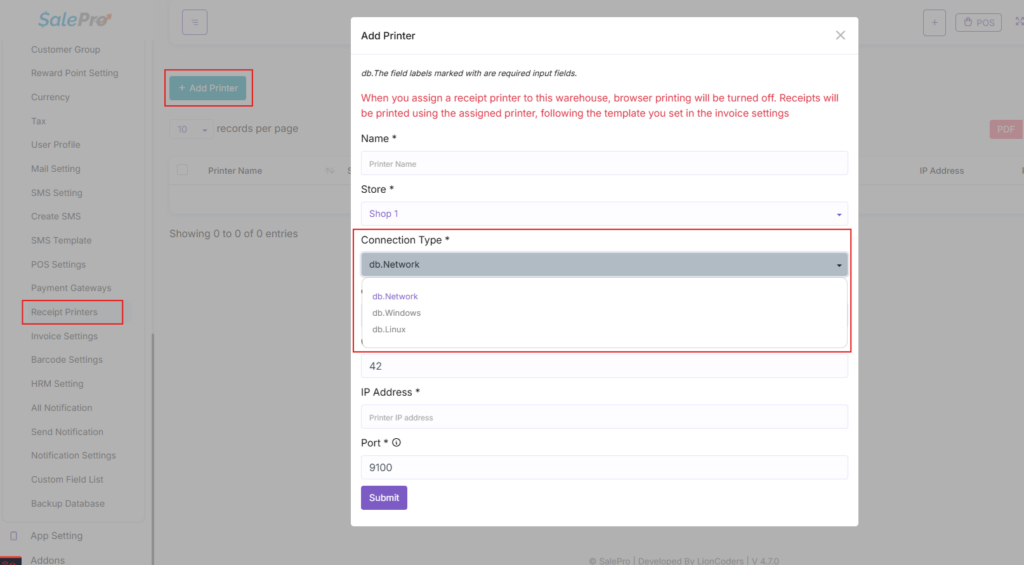
Screenshot: Add Printer modal highlighting the Connection Type dropdown
Part 2: Browser-Based Printing (Alternative Method)
If you do not want to configure network paths, you can use standard browser printing.
- Install your printer drivers on your Windows/Mac computer and ensure it prints a test page.
- In SalePro, do not configure the Receipt Printer menu.
- When you complete a sale in the POS, the browser’s standard Print Dialog (Ctrl+P / Cmd+P) will appear.
- Select your thermal printer from the browser’s list, set the paper size to 80mm/58mm, set margins to “None”, and click Print.
Part 3: Using the Customer Display Screen
- Connect a second monitor to your computer and set it to “Extend” in your Display Settings (not “Duplicate”).
- Log into SalePro and open the POS interface.
- In the top navigation bar of the POS screen, click the Monitor Icon (Customer Display).
- A new browser tab will open displaying the customer-facing interface.
- Drag this new browser tab onto your secondary monitor and make it full screen (F11).
- As you scan items on your primary monitor, the secondary monitor will update automatically.
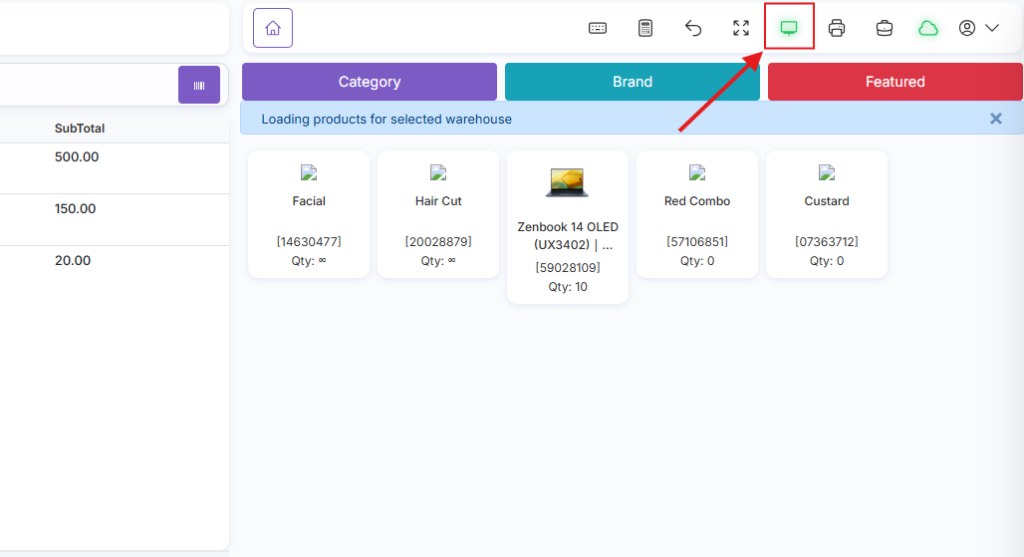
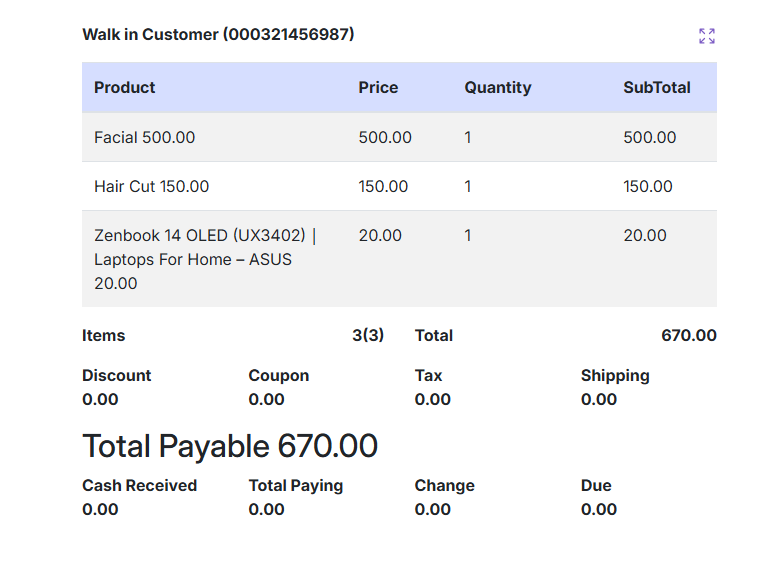
Screenshot: POS Screen highlighting the Monitor Icon in the top navigation bar][Screenshot: Example of the Customer Display Screen showing scanned items and a total
Explanation of Every Field
When adding a printer in Setting > Receipt Printer, you must configure:
- Printer Name: A friendly name (e.g., Register 1 Printer).
- Connection Type: How the printer communicates.
- Network: For printers connected via Ethernet/Wi-Fi. You must provide the IP Address.
- Windows: For USB printers on a Windows PC. You must share the printer in Windows and provide the SMB path (e.g., smb://computer_name/printer_name).
- Linux: For USB printers on a Linux machine. Provide the device path (e.g., /dev/usb/lp1).
- IP Address: Required only if Connection Type is Network. (e.g., 192.168.1.100).
- Port: The network port for the printer. Usually 9100.
- Path: Required only for Windows/Linux connections.
Business Workflow
Cashier clicks “Pay” on POS → System records sale → System sends print command directly to the IP address of the printer → Receipt prints instantly without a browser dialog box.
Examples
- Supermarket Checkout: A supermarket has 5 registers. They buy 5 Network Thermal Printers. In SalePro, they create 5 printers (IP 192.168.1.101 to .105). Each cashier logs in, and the admin has set their specific default printer in their profile, ensuring receipts print at their physical location.
Tips
- Browser Printing is Easier: If you are not an IT professional and struggle with IP addresses or SMB paths, we highly recommend using the Browser-Based Printing method. It works with 100% of USB printers instantly.
- Customize the Invoice: Navigate to Setting > Invoice Setting to add a custom footer message, terms and conditions, or promotional text to the bottom of all printed receipts.
Warnings
WARNING: Windows SMB Paths: If using the Windows connection type, your computer must have password-protected sharing turned OFF, and the printer must be explicitly shared in Windows Control Panel. This is a common point of failure.
Troubleshooting
Problem: Network printer is not printing, but the system says “Sale Completed”.
- Possible Cause: The printer’s IP address has changed because it was assigned via DHCP instead of Static IP.
- Solution: Print a configuration page from your physical printer to check its current IP address. Update the IP in SalePro, and configure your router to assign a Static IP to the printer.
Problem: The Customer Display Screen is not updating when I scan items.
- Possible Cause: The display screen tab was closed and reopened, losing its connection to the active POS session.
- Solution: Close the Customer Display tab, return to the POS tab, refresh the page, and click the Monitor Icon to launch a fresh, connected display tab.
Related Articles
See also:
- 6.2 The POS Interface
- 2.1 System Settings & Localization
3.1 Understanding User Roles & Permissions
Overview
This article explains how to secure your business by controlling what your staff can and cannot do within SalePro.
A “Role” is a collection of permissions. Instead of assigning individual permissions to every single employee, you create a Role (like “Cashier” or “Store Manager”) and assign all necessary permissions to that Role. When you hire a new cashier, you simply assign them the “Cashier” role, and they automatically inherit the correct access level. This ensures cashiers cannot view your profit margins, delete sales, or access the accounting module.
Prerequisites
- You must be logged in as an Administrator.
Step-by-Step Instructions
Creating a New Role
- From the left sidebar, navigate to Settings > Role Permission.
- Click the Add Role button at the top of the page.
- Enter a descriptive name for the role (e.g., Sales Associate).
- Click Submit to save the role.
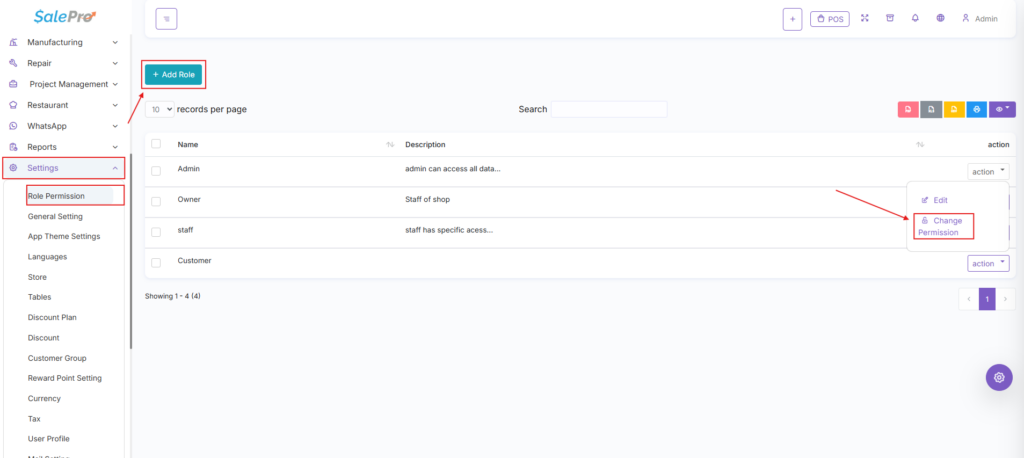
Editing Permissions for a Role
- In the Settings > Role permission list, locate the role you want to modify.
- Click the Action button on that row and select Change Permission from the dropdown menu .
- Check or uncheck the necessary permissions.
- Click Submit. Note: Changes take effect the next time users with that role log in.
- You will be redirected to the group permission page containing a matrix of checkbox representing every single action possible in salePro.
- Check the boxes for the specific permission you want this role to have. And leave the others unchecked.
- Click submit to save the permissions.
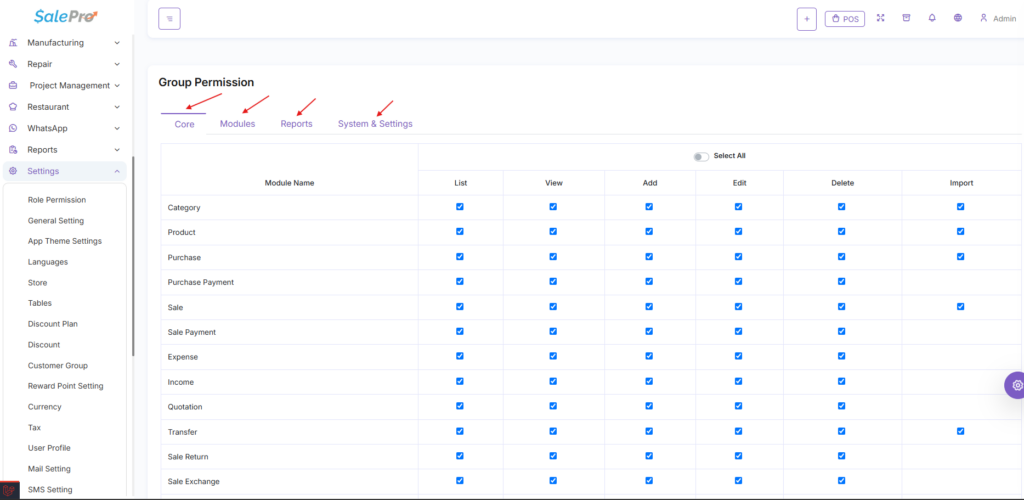
Screenshot: The Add Role modal showing the Name field and the permission checkboxes
Editing Role (details(name/Description)
- From the left sidebar, navigate to Settings > Role Permission.
- Click the Action button on the row and select Edit.
- Update the role’s name or description needed.
- Click Submit to save the change..
Explanation of Key Permissions
The permission matrix is massive, broken down by module. Here are the most critical categories to understand:
- Products:
- View / Add / Edit / Delete: Controls who can manage your inventory catalog. Cashiers generally should only have View access.
- Purchases:
- Controls who can add inbound stock and see supplier costs. Usually restricted to Managers or Purchasing Agents.
- Sales:
- Add: Allows the user to create a sale (critical for cashiers).
- Edit / Delete:Highly Sensitive. Restrict this to managers only to prevent employee theft (e.g., an employee selling an item, taking the cash, and deleting the digital record).
- POS:
- Access POS: Grants access to the cash register interface.
- Reports:
- Controls who can see the financial health of the business. Typically restricted to Owners and Accountants.
Business Workflow
Role management is foundational HR: Owner creates “Cashier” Role with limited permissions → Hires John → Creates User Account for John and assigns him the “Cashier” role → John logs in and cannot see the “Accounting” or “Reports” tabs on his sidebar.
Examples
- The “Technician” Role: A repair shop creates a role named “Technician”. They grant this role permission to view the Repair Addon and Update Job Status, but they explicitly uncheck “Edit Product Price” and “Delete Sale”. This allows the technician to do their job without accessing the cash register.
- The “Accountant” Role: An external bookkeeper is hired. They are given a role that only has access to the Accounting module and Reports, but no access to the POS or adding products.
Tips
- Start Restrictive: It is always better to give an employee too few permissions and have them ask for more, rather than giving them too many permissions and risking a data breach or theft.
Warnings
WARNING: Never edit the Default Admin Role. The system requires at least one role to have full access. If you accidentally uncheck permissions for the Admin role and apply it to yourself, you may lock yourself out of the settings entirely, requiring a direct database intervention to fix.
Troubleshooting
Problem: An employee says they can’t see the “Add Product” button.
- Possible Cause: Their assigned role does not have the “Products – Add” permission checked.
- Solution: Navigate to Settings > Role Permission, edit their role, check the correct permission, and have the employee log out and log back in.
Problem: A cashier was able to delete a sale!
- Possible Cause: The Cashier role accidentally has “Sales – Delete” enabled.
- Solution: Immediately edit the Cashier role and remove the delete permission.
Related Articles
See also:
- 3.2 Managing Users & Employees
- 3.3 Payroll, Attendance & Holidays
3.2 Managing Users & Employees
Overview
This article explains how to create accounts for the people who work in your business.
In SalePro, there is a distinction between an Employee and a User:
- Employee: A profile used purely for HR purposes (tracking attendance, managing payroll, department assignment). An employee cannot log into the software.
- User: An account with login credentials (username and password) that can actively use SalePro. A User is almost always linked to an Employee profile.
You must create your staff in the system so that every sale, repair, or inventory adjustment is tracked to the specific person who performed it.
Prerequisites
- You must have configured your Roles (See 3.1 Understanding User Roles & Permissions).
- Optional: Configure Departments in HRM > Department.
Step-by-Step Instructions
Step 1: Create an Employee Profile
Before a person can log in, you should create their HR profile.
- Navigate to HRM > Employee.
- Click Add Employee.
- Fill in their personal details (Name, Email, Phone Number, Address).
- Assign them to a Department (e.g., Sales Floor, Management).
- Click Submit.
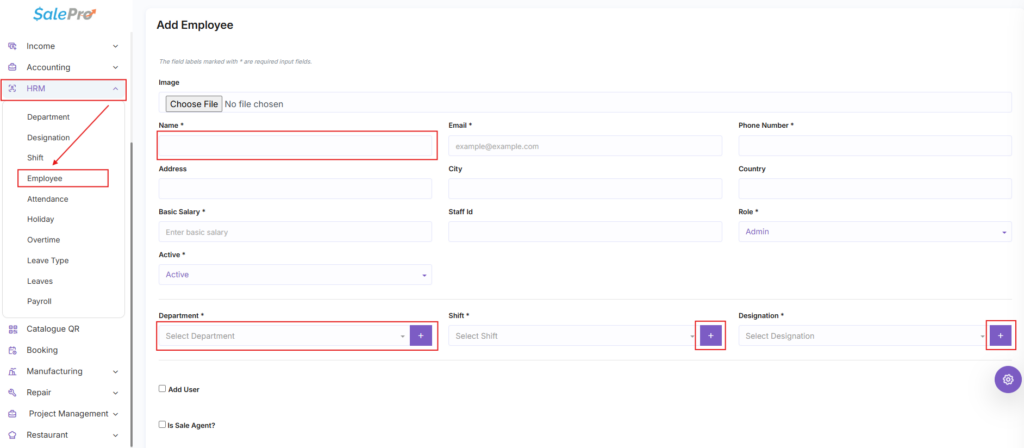
Screenshot: Add Employee form highlighting the Name and Department fields
Step 2: Create a User Account
Now, give that employee the ability to log in.
- Navigate to People > User List.
- Click Add User.
- Fill out the User credentials (explained below).
- Click Submit.
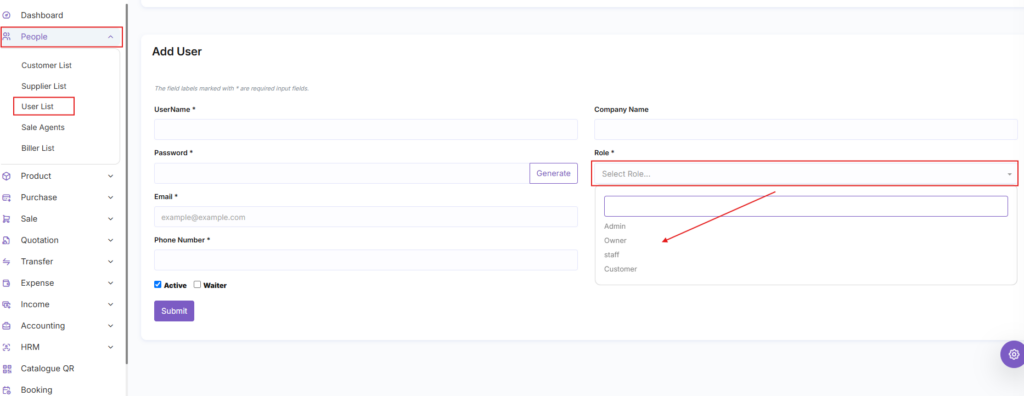
Screenshot: Add User form highlighting the Role and Password fields
Explanation of Every Field (Add User Form)
- Username: The unique name the person will type into the login screen (e.g., johnsmith or cashier1).
- Password: The password they will use to log in. (You can provide them a temporary one and ask them to change it later).
- Email: The email address associated with the account (used for password resets).
- Phone Number: The user’s contact number.
- Role:CRITICAL FIELD. Select the permission level for this user (e.g., Cashier, Manager). This determines what they can see and do.
- Biller: If your business has multiple billing entities, select the default biller for this user.
- Warehouse: Select the default warehouse this user works at. When they log in and open the POS, this warehouse will be pre-selected automatically.
- Is Active: Check this box to allow the user to log in. Uncheck it to disable their account.
Business Workflow
New Hire Process: HR creates Employee Profile → HR creates User Account linked to a Role → Employee is given credentials → Employee logs in and processes sales under their name.
Examples
- Cashier Shift Turnover: A retail store has three cashiers. They create three User accounts: alice, bob, and charlie. When Alice starts her shift, she logs in as alice. Every sale she makes is stamped with her user ID. At the end of the day, the manager generates a sales report specifically filtered by Alice to balance her cash drawer.
Tips
- Never Share Logins: Never have a generic cashier login that multiple people use. If money goes missing or a product is deleted, you will have no way of knowing who did it. Always create individual accounts.
- Link Employee to User: When creating a User, make sure the name and email match the Employee profile you created so HR reports sync smoothly.
Warnings
WARNING: Do not delete Users if they quit. If an employee leaves your company, go to People > User list, edit their account, and uncheck the Is Active box. Do NOT delete the user. Deleting a user will orphan all the historical sales and records associated with them, which can break historical reports.
Troubleshooting
Problem: An employee forgot their password.
- Possible Cause: Normal human error.
- Solution: An Admin can go to People > User List, click Edit on that user, type a new password in the Password field, and click Submit. Alternatively, the user can click “Forgot Password” on the login screen if the Mail Server is configured.
Problem: A user logs in but sees sales from the wrong store location.
- Possible Cause: Their default warehouse is set incorrectly.
- Solution: Edit their User profile and change the Warehouse dropdown to their correct physical location.
Related Articles
See also:
- 3.1 Understanding User Roles & Permissions
- 3.3 Payroll, Attendance & Holidays
3.3 Payroll, Attendance & Holidays
Overview
This article covers the Human Resources tools within SalePro that help you track when your employees work and how much they are paid.
By logging daily attendance and scheduling official company holidays, you create a digital paper trail for your workforce. The Payroll module then allows you to record salary payments, deduct absences, and properly account for employee expenses, seamlessly tying your HR data into your financial reporting.
Prerequisites
- You must have configured your Employees (See 3.2 Managing Users & Employees).
- (Optional) You must have set up bank or cash accounts in the Accounting module if you wish to track the payroll expense dynamically.
Step-by-Step Instructions
Part 1: Tracking Attendance
- From the left sidebar, navigate to HRM > Attendance.
- Click Add Attendance.
- Select an Employee from the dropdown menu.
- Select the Date.
- Enter the Check-In time and Check-Out time.
- Add any relevant notes and click Submit.
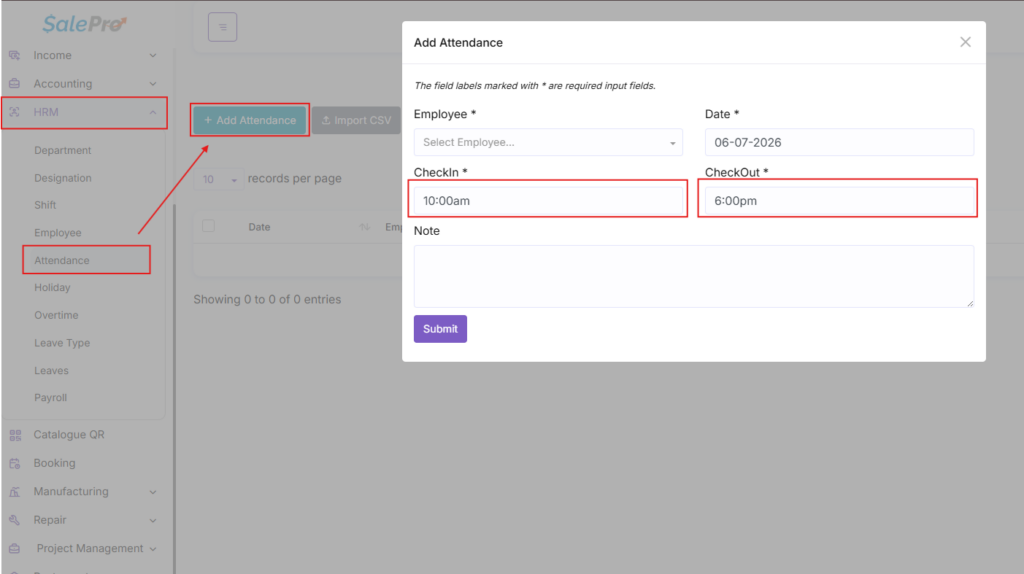
Screenshot: Add Attendance modal highlighting Check-In and Check-Out fields
Part 2: Creating Holidays
- Navigate to HRM > Holiday.
- Click Add Holiday.
- Select the start and end dates of the holiday.
- Add a description (e.g., New Year’s Day, Company Retreat).
- Click Submit. Note: Employees logging in during a holiday will see a notification, and attendance is not expected.
Part 3: Processing Payroll
- Navigate to HRM > Payroll.
- Click Add Payroll.
- Select the Employee you are paying.
- Fill in the financial fields (explained below).
- Click Submit.
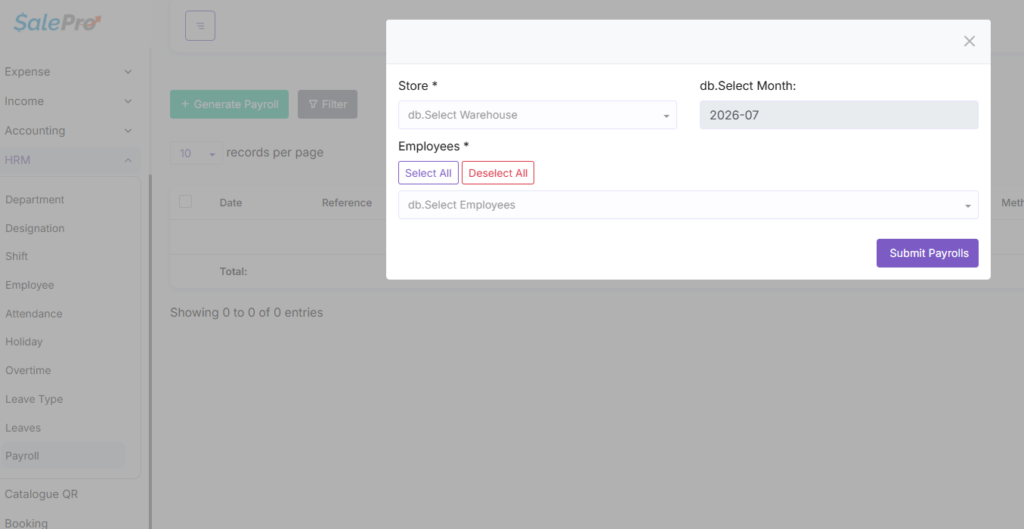
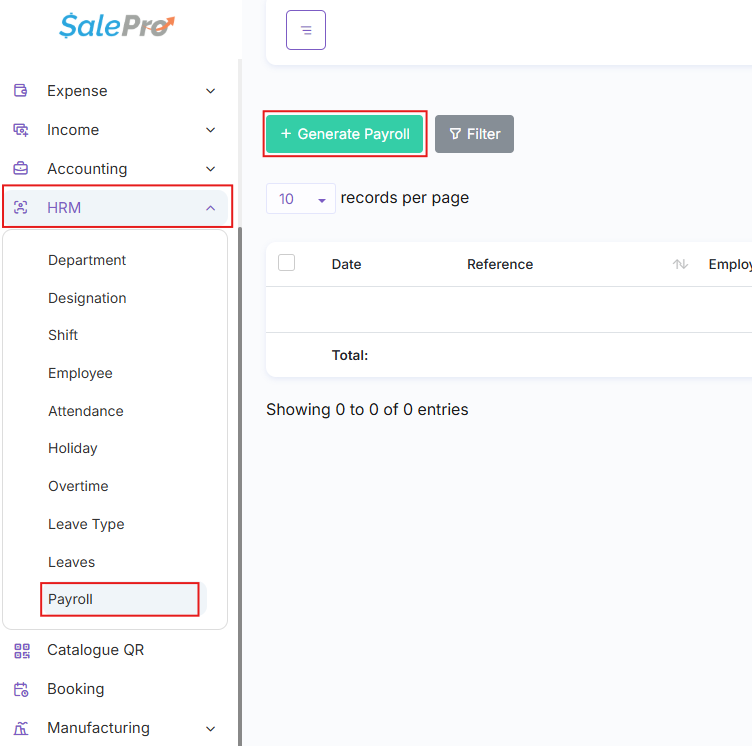
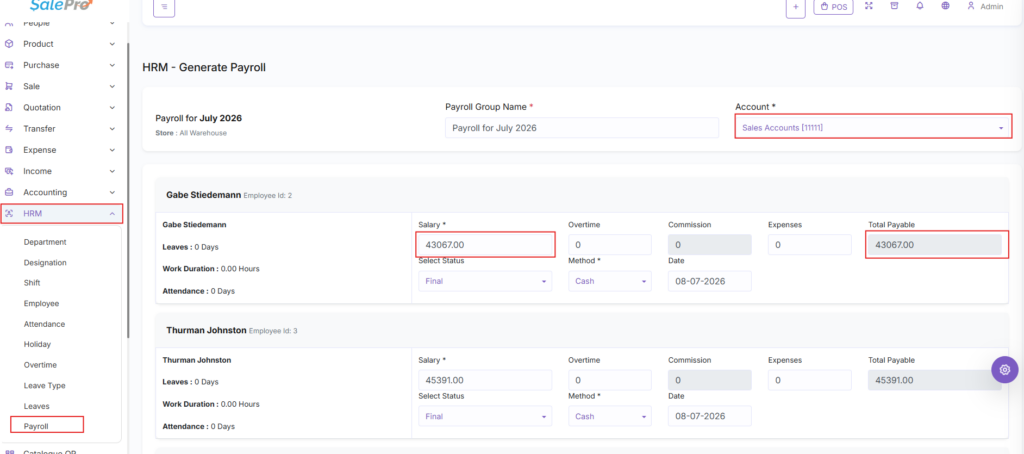
Screenshot: Add Payroll form showing Salary, Deductions, and Net Amount
Explanation of Every Field (Add Payroll)
When generating payroll, you must fill out the following financial fields accurately:
- Month: The specific month for which the payroll is being processed.
- Employee: The person receiving the salary.
- Account: The financial account the money is being drawn from (e.g., Main Bank Account, Cash Register).
- Amount: The base salary or hourly total earned by the employee.
- Paying Method: How the employee is receiving the money (e.g., Cash, Cheque, Bank Transfer).
- Note: Any relevant details regarding the payment.
Business Workflow
End of Month Processing: Manager reviews Attendance Logs → Manager opens Payroll module → Manager calculates pay based on attendance → Submits Payroll entry → System records an Expense and decreases the Bank Account balance automatically.
Examples
- Retail Store: A cashier works 40 hours a week. The store manager records their attendance daily. At the end of the month, the manager generates a $2,000 payroll entry, selecting “Bank Transfer” as the method. This action automatically updates the company’s financial ledger, logging the $2,000 as a Payroll Expense.
Tips
- Daily Discipline: If you intend to use the Attendance module, make it a strict rule that managers check staff in and out immediately. Attempting to backdate attendance for 10 employees at the end of the month leads to inaccurate payrolls.
Warnings
WARNING: Payroll Cannot Be Edited: Once a payroll entry is submitted, it is permanently locked into the accounting ledger. If you make a mistake, you must delete the entire payroll record and create a new one to ensure the double-entry accounting remains balanced.
Troubleshooting
Problem: An employee is missing from the Payroll dropdown menu.
- Possible Cause: The person was created as a “User” but not as an “Employee”.
- Solution: Navigate to HRM > Employee and ensure their profile exists there. Payroll is tied to the Employee profile, not the User login.
Related Articles
See also:
- 3.2 Managing Users & Employees
- 8.1 Income & Expense Tracking
4.1 Multi-Warehouse Management
Overview
This article explains how to create and manage physical and logical storage locations within SalePro.
A “Warehouse” in SalePro represents any physical location where inventory is stored. It doesn’t have to be a massive distribution center; a warehouse can be a retail storefront, a stockroom, or a delivery van. By creating multiple warehouses, you can track exactly how much stock is at each location, prevent cashiers at Store A from selling inventory located at Store B, and generate location-specific profit reports.
Prerequisites
- You must be logged in as an Administrator.
Step-by-Step Instructions
Step 1: Add a Warehouse
- From the left sidebar, navigate to Setting > Warehouse.
- Click the Add Warehouse button at the top of the screen.
- Fill in the location details (explained below).
- Click Submit.
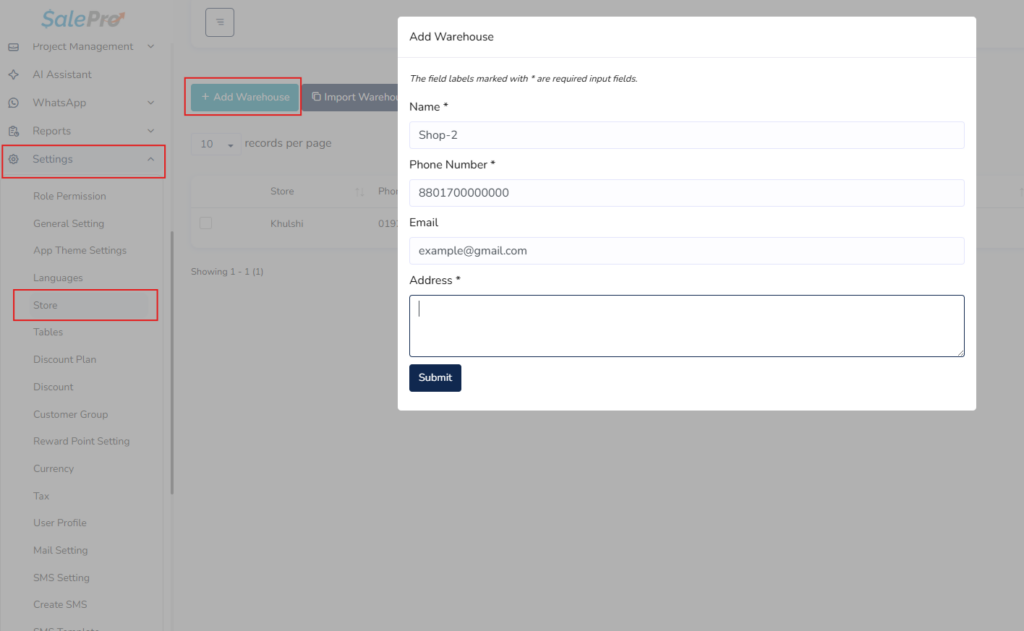
Screenshot: Add Warehouse modal showing Name, Phone, and Address fields
Step 2: Edit or Delete a Warehouse
- In the Warehouse list, find the location you want to modify.
- Click the dropdown arrow in the Action column.
- Select Edit to change its details, or Delete to remove it.
Explanation of Every Field (Add Warehouse)
- Name: A descriptive title for the location (e.g., Main Storefront, Downtown Outlet, Mobile Repair Van).
- Phone: The contact number for this specific location. This is often printed on invoices generated at this warehouse.
- Email: The contact email for this location.
- Address: The physical street address. This is printed on invoices and packing slips.
Business Workflow
Warehouse configuration is a foundational step: Create Warehouses → Add Products → Perform a Purchase and assign the incoming stock to a specific Warehouse → Assign Cashiers to their respective Default Warehouses.
Examples
- The Retail Chain: A business has three locations: A main distribution warehouse, a North-side retail store, and a South-side retail store. They create three warehouses in SalePro. When they order 100 laptops from a supplier, they assign them to the main distribution warehouse. Later, they use the Stock Transfer feature to move 50 laptops to the North store and 50 to the South store.
- The Service Business: A plumbing company keeps stock in their main office, but also has three vans on the road. They create a warehouse for “Van 1”, “Van 2”, and “Van 3”. When a plumber uses a part at a customer’s house, they ring up the sale on their tablet, and the stock is correctly deducted from their specific van’s inventory.
Tips
- Use Warehouses for “Damaged Goods”: Consider creating a warehouse named “Quarantine” or “Damaged”. When items arrive broken, you can transfer them to this logical warehouse. This removes them from your active sales inventory without deleting the financial value of the goods until they are returned to the supplier.
Warnings
WARNING: Do not delete a warehouse that contains active stock. If you delete a warehouse, all inventory counts associated with that location will be permanently orphaned or destroyed. If a location closes, use the Stock Transfer module to move all items to your main warehouse before deleting the old location.
Troubleshooting
Problem: A cashier cannot find a product when ringing up a sale.
- Possible Cause: The product exists, but there is 0 stock in the cashier’s assigned warehouse.
- Solution: Check the cashier’s default warehouse in their User profile. Then, go to the Product List and verify that the specific warehouse has inventory for that item.
Related Articles
See also:
- 4.7 Stock Adjustments, Counts & Transfers
- 3.2 Managing Users & Employees (Assigning default warehouses)
4.2 Understanding Product Types
Overview
Before you start adding inventory to SalePro, you must understand how the system categorizes products.
SalePro supports four distinct product types. Choosing the correct type is critical because it fundamentally alters how the software treats the item. For example, some items require physical stock tracking, while others do not. Some items are composed of other items. Selecting the wrong product type will break your inventory counts and accounting.
The Four Product Types
1. Standard Product
This is a physical, tangible item that you buy, store on a shelf, and sell to a customer.
- Stock Tracking: Yes. The system strictly tracks how many you have. You cannot sell it if you don’t have stock (unless overselling is explicitly enabled).
- Cost Tracking: Yes. The system calculates your profit margins based on the physical cost of the item.
- Example: A smartphone, a t-shirt, a bottle of water.
2. Digital Product
This is a non-physical item, usually a file that is emailed or downloaded by the customer upon purchase.
- Stock Tracking: No. Because it is a digital file, inventory is infinite. The system will never ask you how many you have in the warehouse.
- Cost Tracking: Optional.
- Delivery: You can attach a file (like a PDF or ZIP) to the product setup. When the invoice is emailed to the customer, the file link is included.
- Example: An eBook, a software license key, a digital gift card.
3. Combo Product
A Combo product is a single item that is actually made up of two or more Standard products bundled together.
- Stock Tracking: Indirect. You do not purchase or stock a “Combo”. Instead, its availability is entirely dependent on the stock levels of its constituent ingredients. If you run out of an ingredient, you cannot sell the Combo.
- Cost Tracking: Automatically calculated based on the combined cost of the ingredients.
- Example: A “Burger Meal” (Composed of 1 Burger, 1 Fries, 1 Soda). A “PC Gamer Bundle” (Composed of 1 Keyboard, 1 Mouse, 1 Headset).
4. Service
A service is labor or an intangible action performed for a customer.
- Stock Tracking: No. Services do not consume warehouse space.
- Cost Tracking: Optional (representing labor costs).
- Integration: Service products are heavily utilized in the Repair Addon and general invoicing.
- Example: “Screen Repair Labor”, “1 Hour Consultation”, “Delivery Fee”.
Business Workflow
Understanding product types informs your catalog creation: Determine what you are selling → Select the corresponding Product Type → The Add Product form dynamically changes to hide or show irrelevant fields (e.g., hiding “Alert Quantity” for Services).
Tips
- Use Combos for Promotions: If you have excess stock of two slow-moving standard items, create a Combo product that bundles them together at a slight discount. You don’t need to manually adjust the stock of the individual items; selling the Combo deducts them automatically.
Warnings
WARNING: Product Types Cannot Be Changed. Once a product is saved, you cannot change its type (e.g., converting a Standard product into a Service). If you make a mistake, you must delete the product and create it again.
Troubleshooting
Problem: I created a product but it doesn’t ask me for my inventory count.
- Possible Cause: You accidentally selected “Service” or “Digital” as the product type.
- Solution: Delete the product and recreate it, ensuring “Standard” is selected from the options at the very top of the form.
Related Articles
See also:
- 4.3 Creating & Managing Products
- 4.4 Product Variants, Combos & Digital Goods
4.3 Creating & Managing Products
Overview
This article provides step-by-step instructions on how to add standard inventory items into SalePro.
Your product catalog is the heart of the system. Creating a product defines its name, barcode, price, cost, and taxation rules. Once a product is created in the database, it can be purchased from suppliers, transferred between warehouses, and sold to customers.
Prerequisites
Before you create your first product, you must have configured the foundational elements it requires:
- Categories: (Created via Product > Category)
- Brands: (Created via Product > Brand)
- Units: Base and Sale units (Created via Setting > Unit)
- Taxes: (See 2.3 Tax & Currency Configuration)
Step-by-Step Instructions
- From the left sidebar, navigate to Product > Add Product.
- Leave the “Product Type” option set to Standard.
- Work your way down the form, filling in the general information (Name, Code, Category).
- Fill in the pricing information (Cost, Price, Tax).
- (Optional) Check the boxes for advanced tracking (Variants, Batches, IMEI) if needed.
- Click Submit at the bottom of the page.
IMPORTANT: Creating a product does NOT add physical stock to your warehouse. It simply creates the digital record. Your stock count will remain at 0 until you process a Purchase or a Stock Adjustment.
Screenshot: The top half of the Add Product form showing Name, Code, and Category
Explanation of Every Field
The Add Product form is extensive. Here is a breakdown of every field:
- Product Name: The name of the item as it will appear on receipts and the POS screen.
- Product Code: A unique alphanumeric identifier (SKU). You can type one manually, or click the Generate button to have the system create a random code.
- Barcode Symbology: The format of the barcode. Leave it as Code 128 (the global standard) unless you are using specialized hardware that requires EAN-13 or UPC-A.
- Brand: The manufacturer of the item.
- Category: The organizational group the item belongs to.
- Product Unit: The base unit of measurement (e.g., Piece, Kilogram).
- Sale Unit: The unit the customer buys (Usually identical to the Product Unit).
- Purchase Unit: The unit you buy from the supplier (Usually identical, but see Tips below).
- Product Cost: How much you pay your supplier for one base unit.
- Product Price: How much you charge your customer for one base unit (before tax).
- Daily Sale Objective: A target number for reports.
- Alert Quantity: When the physical stock falls below this number, the product will appear on the Quantity Alert report (and trigger auto-purchasing if configured).
- Product Tax: The tax rate applied to this specific item.
- Tax Method:
- Exclusive: The tax is added on top of the Product Price (e.g., $10 Price + 10% Tax = $11 Final).
- Inclusive: The tax is already inside the Product Price (e.g., $10 Price. The system reverse-calculates that $0.91 was tax and $9.09 was the true price).
- Featured: If checked, this product’s image will appear prominently as a quick-click button on the POS screen.
- Product Image: Upload a photo. (Max 3 images).
- Product Details: A text description for e-commerce integrations or internal notes.
Business Workflow
Product Creation Workflow: Admin configures Categories/Taxes → Admin fills out Add Product form → Product is saved to Database with 0 stock → Admin creates a Purchase order from a Supplier → Stock increases → Cashier can now sell the product.
Examples
- Retail Clothing Store: An admin creates a product named “Basic White T-Shirt”. They generate a random Product Code. They set the Cost to $5 and the Price to $15. They set the Alert Quantity to 10 so they know when to reorder.
Tips
- Using Different Purchase/Sale Units: If you buy water in boxes but sell it in bottles, you can create a base unit of “Bottle” and a purchase unit of “Box” (where 1 Box = 24 Bottles). When you purchase 1 Box, SalePro automatically adds 24 Bottles to your inventory.
- Use the Featured Checkbox: For your top 20 best-selling items, check the “Featured” box and upload a clear image. Cashiers can tap the image on the POS touch screen instead of scanning a barcode, massively speeding up checkout times.
Warnings
WARNING: Product Codes Must Be Unique. Never attempt to reuse a product code for a different item. If you have an existing product and try to create a new one with the same code, the system will reject it.
Troubleshooting
Problem: I can’t select a “Product Unit”. The dropdown is empty.
- Possible Cause: You have not created any units in the system settings.
- Solution: Navigate to Setting > Unit and create your base units (e.g., Piece, Meter, Kg) before trying to add a product.
Problem: I want to sell a t-shirt that comes in Small, Medium, and Large. Do I create three products?
- Solution: No. You should use the “Variants” feature. See 4.4 Product Variants, Combos & Digital Goods.
Related Articles
See also:
- 4.2 Understanding Product Types
- 4.4 Product Variants, Combos & Digital Goods
- 5.2 Creating & Importing Purchases
4.4 Product Variants, Combos & Digital Goods
Overview
This article explains how to create advanced products: Variants (items with multiple sizes/colors), Combos (bundles of existing items), and Digital Goods (files).
While a standard product (like a single can of soda) is simple to create, many businesses require complex inventory. A clothing store sells one shirt in 5 sizes and 3 colors. A fast-food restaurant sells a “Meal Deal” made of a burger, fries, and a drink. SalePro handles these complexities cleanly through specialized product types and toggles, preventing you from cluttering your database with hundreds of individual listings.
Prerequisites
- You must know how to create a basic product (See 4.3 Creating & Managing Products).
- For Combos: The individual ingredients (the burger, the fries) must already exist as Standard products in your database.
Step-by-Step Instructions
Part 1: Creating Product Variants
Use this for items that share the same base name but have different attributes (Size, Color, Material).
- Navigate to Product > Add Product.
- Fill out the general product information (Name, Code, Price).
- Scroll down and check the box labeled This product has variants.
- Two new fields will appear: Option and Value.
- In the Option field, type the attribute name (e.g., Size).
- In the Value field, type the choices, pressing Enter after each (e.g., Small, Medium, Large).
- Click the + button to add another option (e.g., Option: Color, Values: Red, Blue).
- The system will automatically generate a matrix of all possible combinations (e.g., Small-Red, Small-Blue).
- (Optional) You can assign a specific Item Code or Additional Price to each specific variant in the generated matrix.
- Click Submit.
Screenshot: The Variant matrix generated by typing Size and Color options
Part 2: Creating a Combo Product
Use this to bundle existing items together.
- Navigate to Product > Add Product.
- At the very top, change the Product Type selection from Standard to Combo.
- Notice that the Cost field disappears (cost is calculated from the ingredients).
- Scroll down to the Add Product search bar.
- Search for and select the existing standard products that make up this combo.
- Adjust the Quantity of each item in the combo (e.g., 1 Burger, 2 Fries).
- Enter the final selling Product Price for the bundle.
- Click Submit.
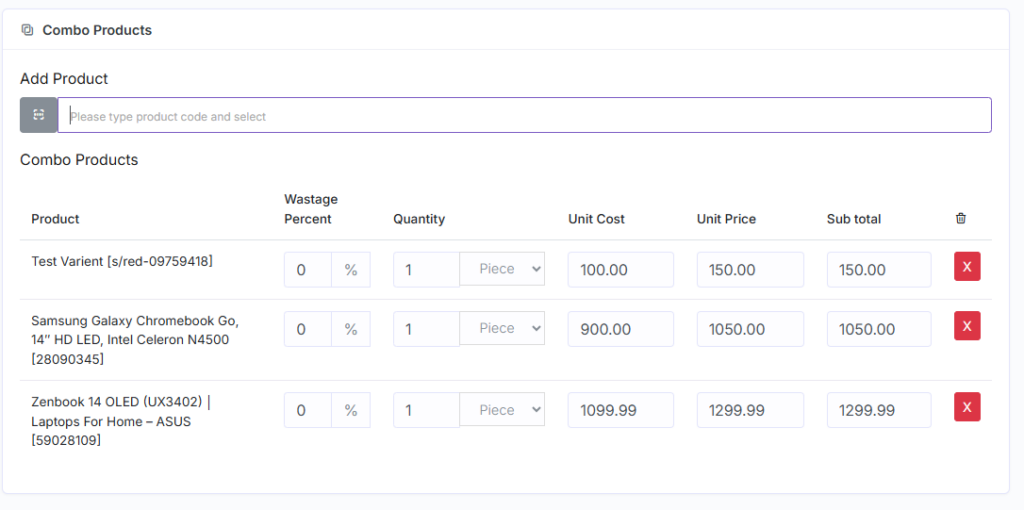
Screenshot: The Combo ingredient selection table
Part 3: Creating a Digital Product
Use this for non-physical items.
- Navigate to Product > Add Product.
- Change the Product Type to Digital.
- Notice that all unit and alert quantity fields disappear (digital items have infinite stock).
- Scroll down to the Attach File field.
- Upload the file (PDF, ZIP, etc.) that the customer is purchasing.
- Click Submit.
Explanation of Key Fields
- Variant Item Code: When variants are generated, SalePro automatically creates a unique sub-code for each one (e.g., if the main code is 1001, the variant might be 1001-S-R). You can overwrite this if your manufacturer provides specific barcodes for each size.
- Variant Additional Price: If the XXL size costs $5 more than the base price, type 5 in this field. The POS will automatically add $5 when the XXL is selected.
- Combo Price: The price of a combo does not have to equal the sum of its parts. You can set the price lower to offer a “bundle discount”.
Business Workflow
- Variants: Cashier scans barcode → System identifies the specific Size/Color variant → Deducts exactly 1 unit of that specific variant from warehouse stock.
- Combos: Cashier selects “Meal Deal” → System checks if all ingredients are in stock → System records 1 Meal Deal sold → System automatically deducts 1 Burger and 1 Fries from the warehouse.
Examples
- Fashion Retailer (Variants): Sells a “Summer Dress”. Instead of creating 15 different products, they create one product with Option 1: Size (S, M, L, XL, XXL) and Option 2: Color (Red, Blue, Green).
- Electronics Store (Combo): Wants to clear out old mouse pads. They create a Combo named “Gamer Starter Pack” containing 1 Keyboard, 1 Mouse, and 1 Mouse Pad.
Tips
- Use Variants to keep the POS clean: On the POS screen, a variant product shows up as a single button. When tapped, a popup asks the cashier to select the specific size/color. This is much faster than scrolling through 15 different buttons.
Warnings
WARNING: Variant Generation Limits: Do not create excessive options (e.g., 5 options with 10 values each). This will generate thousands of combinations and may crash your browser or database. Keep variants limited to 2 or 3 options per product.
Troubleshooting
Problem: I can’t add an item to my Combo product.
- Possible Cause: The item you are searching for does not exist, or it is a Service/Digital product.
- Solution: Combos can only be built using Standard products.
Related Articles
See also:
- 4.2 Understanding Product Types
- 4.3 Creating & Managing Products
4.5 Batches, Expiry & IMEI Tracking
Overview
This article explains how to use SalePro’s advanced inventory tracking features for specialized industries.
Standard inventory only tracks how many items you have. However, pharmacies and grocery stores need to know when items expire. Electronics stores need to track the exact serial number of every phone sold for warranty purposes. SalePro handles this through Batch Tracking and IMEI Tracking toggles located on the Add Product screen.
Prerequisites
- You must know how to create a basic Standard product (See 4.3 Creating & Managing Products).
Step-by-Step Instructions
Part 1: Enabling Batch & Expiry Tracking
Use this for food, medicine, or cosmetics.
- Navigate to Product > Add Product.
- Fill out the general product information.
- Scroll down and check the box labeled This product has a batch and expired date.
- Click Submit.
NOTE: Checking this box does not ask you for an expiry date immediately. Expiry dates are tied to the physical stock, not the product definition. You will enter the actual Batch Number and Expiry Date when you Purchase the item from a supplier or do a Stock Adjustment.
Part 2: Enabling IMEI / Serial Number Tracking
Use this for phones, laptops, and serialized electronics.
- Navigate to Product > Add Product.
- Fill out the general product information.
- Scroll down and check the box labeled This product has IMEI or Serial numbers.
- Click Submit.
NOTE: Similar to batches, you do not enter the serial numbers here. You will scan or type the exact serial numbers when you receive the goods via a Purchase.
Screenshot: The bottom of the Add Product form highlighting the Batch and IMEI checkboxes
Explanation of the Workflow
Because these features fundamentally alter how inventory is handled, the workflow is different from standard items.
The Batch Workflow
- Purchasing: When you create a Purchase for a batch-enabled product, a new field appears asking for the “Batch No” and “Expired Date”.
- Selling (POS): When a cashier adds the item to the POS, a dropdown menu appears. The cashier MUST select which specific batch they are handing to the customer. (SalePro will automatically suggest the batch closest to expiring to enforce First-In-First-Out).
- Reporting: You can run the “Product Expiry Report” to see exactly which batches across all warehouses are expiring in the next 30, 60, or 90 days.
The IMEI Workflow
- Purchasing: When purchasing an IMEI-enabled product, a large text box appears. If you buy 10 phones, you must scan or type exactly 10 distinct IMEI numbers, separated by commas.
- Selling (POS): When the cashier scans the main product barcode, a popup demands an IMEI. The cashier scans the specific serial number on the box. SalePro verifies that this exact serial number is currently in the warehouse. If it is, the item is added to the cart, and the serial number is printed on the receipt for warranty tracking.
- Returns/Exchanges: If a customer returns a phone, the system verifies the IMEI against the original receipt to prevent warranty fraud.
Examples
- Pharmacy (Batches): A pharmacy buys 500 bottles of Aspirin. They arrive in two boxes. Box A has a batch number of ASP-001 expiring in 2026. Box B is ASP-002 expiring in 2027. They record both batches during the Purchase. The POS forces cashiers to sell from ASP-001 first.
- Mobile Repair Shop (IMEI): A shop buys 5 identical iPhones. They scan the 5 serial numbers into the Purchase. A customer buys one. The specific serial number is removed from the active inventory list and permanently tied to that customer’s sales invoice.
Tips
- Use a Barcode Scanner for IMEIs: Never type 15-digit IMEI numbers by hand during a Purchase. It is highly prone to human error, which will cause the POS to reject the item when a cashier tries to sell it. Always use a USB or Bluetooth barcode scanner.
Warnings
WARNING: Cannot toggle retroactively: If you have already purchased and sold a product, you cannot suddenly turn on IMEI tracking for it. The database architecture for that product is already set as a standard item. You must create a new product to begin tracking it via IMEI.
Troubleshooting
Problem: The POS won’t let the cashier sell a phone; it says “IMEI not found”.
- Possible Cause: The cashier scanned a serial number that was typed incorrectly during the Purchase phase.
- Solution: The manager must go to the Product List, view the stock details, find the typo in the IMEI list, and correct it, or perform a stock adjustment.
Problem: A batch expired. How do I get rid of it?
- Solution: Go to Product > Quantity Adjustment. Select the product, select the expired batch from the dropdown, and process an adjustment of “Subtraction”. This removes it from inventory and logs a financial loss.
Related Articles
See also:
- 4.3 Creating & Managing Products
- 5.2 Creating & Importing Purchases
- 7.2 The Product Exchange Workflow
4.6 Barcodes, Labels & Weight Scales
Overview
This article covers how to physically label your inventory for quick scanning and how to integrate barcode-printing weight scales for businesses that sell items by weight (like delis and supermarkets).
While many products arrive from the manufacturer with a UPC/EAN barcode already printed on the box, items you produce yourself (or bulk items you break down) need custom labels. SalePro includes a built-in barcode generator. Additionally, SalePro natively supports “Price Embedded” and “Weight Embedded” barcodes generated by deli scales, allowing cashiers to scan a bag of apples and instantly ring up the correct weight and price.
Prerequisites
- Products must already be created in the system.
- A standard printer or a dedicated label printer (e.g., Dymo, Zebra).
- For Weight Scales: A scale that prints 13-digit EAN-13 barcodes.
Step-by-Step Instructions
Part 1: Printing Standard Barcodes
- Navigate to Product > Print Barcode.
- In the search bar, type the name or code of the product you want to label and select it.
- The product will appear in a table below. Adjust the Quantity field to match the number of labels you want to print (e.g., 50).
- You can search and add multiple different products to this table at once.
- Choose your paper size (e.g., A4, or specific Label Roll sizes).
- Check or uncheck the details you want printed on the label (Name, Price, Promotional Text).
- Click Submit. A PDF of the barcodes will be generated for printing.
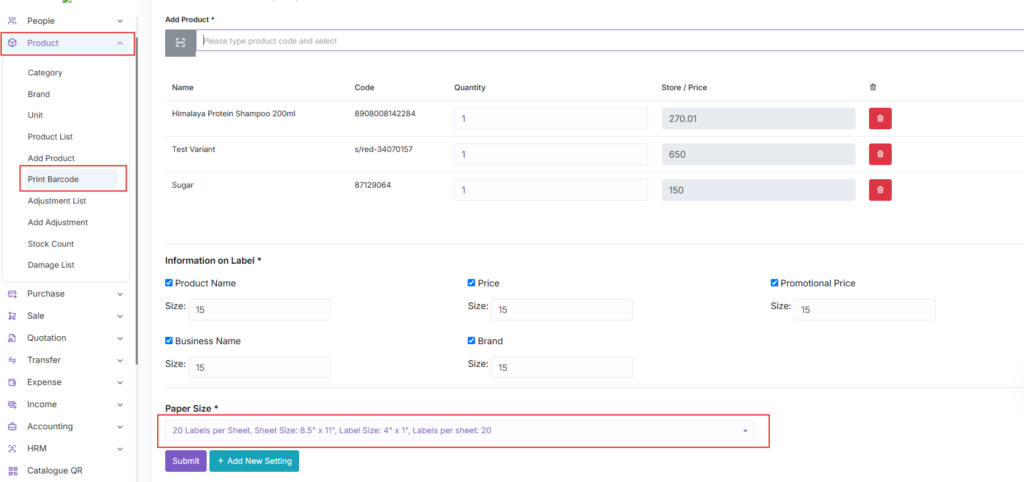
Screenshot: The Print Barcode screen showing the product selection table and paper size options
Tips Weight Scale Barcodes: When you enable the “Embedded Barcode” option for a product, SalePro automatically expects a 13-digit EAN-13 barcode from your scale. It reads the first 7 digits to identify the product and uses the next 5 digits as the weight (in grams) to calculate the final price. You do not need to configure this in General Settings.
Business Workflow
Labeling Workflow
Receive 100 unlabelled generic shirts → Search “Generic Shirt” in Print Barcode menu → Set quantity to 100 → Print 100 stickers → Stick them on the shirts → Ready for the POS.
Scale Workflow
Customer takes apples to the deli scale → Scale weighs 1.5kg and prints a barcode sticker → Customer brings sticker to checkout → Cashier scans sticker → SalePro reads the first 5 digits to identify “Apples” and the next 5 digits to identify “1.5kg” → Automatically calculates the final price on the POS.
Examples
- The Boutique: A boutique creates custom jewelry. They generate random 8-digit Product Codes in SalePro. They use the Print Barcode feature to print tiny price tags using a dedicated label printer, attaching them to the necklaces before putting them in the display case.
- The Supermarket: The meat counter weighs a steak and prints a barcode (2012345005508). The cashier scans it. SalePro sees 20 (scale prefix), identifies product 12345 (Ribeye), reads the price 00550 ($5.50), and adds it to the cart instantly without the cashier needing to weigh it again at the register.
Tips
- Save Paper: If you are printing on standard A4 paper, wait until you have a full page of items to print (usually 40+ labels) rather than printing one or two labels at a time and wasting the sheet.
Warnings
WARNING: Scale Prefix Matching: For the deli scale integration to work, the product’s “Product Code” in SalePro MUST exactly match the 5-digit item code programmed into your physical deli scale. If they do not match, the POS will say “Product Not Found” when scanned.
Troubleshooting
Problem: The printed barcodes are scanning incorrectly or not scanning at all.
- Possible Cause: The printer scaled the PDF (e.g., “Fit to Page” was checked in the printer dialog), warping the barcode lines.
- Solution: When the browser print dialog opens, ensure “Scale” is set to “Default” or “100%”, not “Fit to Printable Area”.
Problem: The POS scans the scale barcode as a standard product and says “Not Found”.
- Possible Cause: The barcode symbology on the product is set to Code 128, or the General Settings are not configured for embedded barcodes.
- Solution: Ensure the product’s barcode symbology is set to EAN-13, and the General Setting for Weight/Price Embedded is enabled.
Related Articles
See also:
- 4.3 Creating & Managing Products
- 6.2 The POS Interface
4.7 Stock Adjustments, Counts & Transfers
Overview
This article covers how to manually modify your inventory numbers without processing a sale or a purchase, and how to move inventory between different locations.
In the real world, inventory gets lost, stolen, or broken. When this happens, your digital stock count will be higher than your physical stock count. The Quantity Adjustment tool allows you to correct this discrepancy. Similarly, the Stock Transfer tool allows you to legally move inventory from Warehouse A to Warehouse B, keeping your location-specific reports perfectly accurate.
Prerequisites
- You must have multiple warehouses configured to perform a transfer (See 4.1 Multi-Warehouse Management).
- Products must exist in the system.
Step-by-Step Instructions
Part 1: Quantity Adjustments (Fixing Discrepancies)
- Navigate to Product > Quantity Adjustment.
- Click Add Adjustment.
- Select the Warehouse where the discrepancy exists.
- Search for the product in the search bar.
- In the table below, change the Action dropdown to either Subtraction (item is lost/broken) or Addition (found extra items).
- Enter the Quantity to adjust.
- Enter a Note explaining why (e.g., “Broken during shelf stocking”).
- Click Submit.
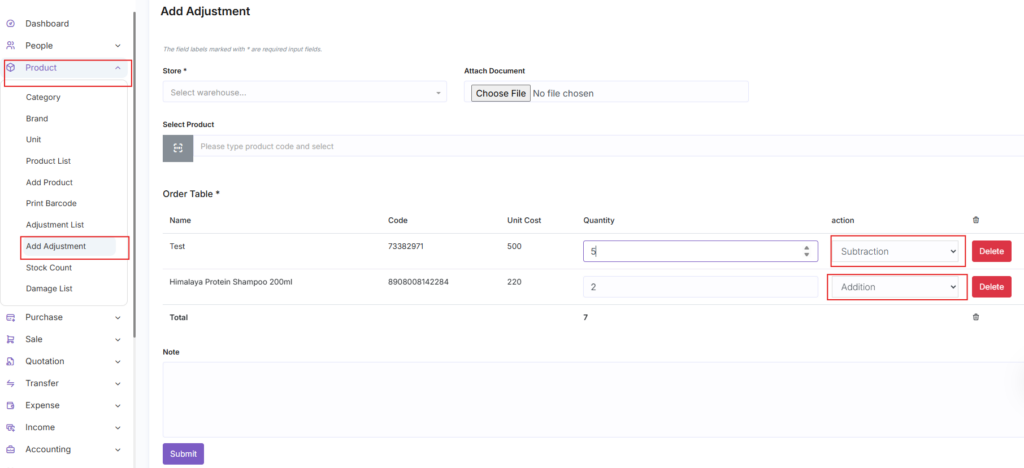
Screenshot: Add Adjustment screen highlighting the Action dropdown and Quantity field
Part 2: Stock Transfers (Moving Items)
- Navigate to Transfer > Add Transfer.
- Select the From Warehouse (Where the stock is currently).
- Select the To Warehouse (Where the stock is going).
- Search for the products being moved and select them.
- In the table, enter the Quantity of each item being loaded onto the truck.
- Select the Status (usually Pending or Sent).
- Enter the Shipping Cost (if you pay a 3rd party to move it).
- Click Submit.
Part 3: Completing a Transfer
- When the truck arrives at the destination, the receiving manager logs in.
- They navigate to Transfer > Transfer List.
- They find the pending transfer and click Edit.
- They change the Status to Completed and click Submit. The stock is now officially added to the new warehouse.
Explanation of Key Fields
- Adjustment Action (Subtraction/Addition): Subtraction lowers the stock count and logs a financial loss. Addition increases the stock count and logs a financial gain.
- Transfer Status:
- Draft/Pending: The transfer is planned but stock hasn’t left the building.
- In Transit: The stock has been deducted from Warehouse A, but is currently in a truck and has not yet been added to Warehouse B. (It is temporarily out of the system).
- Completed: The stock arrives and is officially added to Warehouse B.
Business Workflow
- Stock Count Workflow: Once a month, the manager closes the store and counts every item. They compare the physical count to the SalePro “Stock Chart” report. For every discrepancy, they perform a Quantity Adjustment to realign the database with reality.
- Hub-and-Spoke Workflow: The main warehouse receives a shipment of 1,000 shirts. The manager creates three Transfers (300 to Store A, 300 to Store B, 300 to Store C). The store managers receive the physical boxes, count them, and mark the transfers as “Completed” in the system.
Examples
- The Broken Bottle: A customer accidentally drops a bottle of wine in the aisle. The cashier cleans it up, goes to Quantity Adjustment, selects Subtraction for 1 unit, and writes “Customer dropped item”. The inventory is now correct, and the accountant can see exactly why there is a financial loss for that day.
Tips
- Never use Adjustments instead of Purchases: Do not use the “Addition” adjustment to log incoming stock from a supplier. You must use the Purchase module for that, otherwise, your Accounts Payable (money owed to suppliers) will not be tracked.
Warnings
WARNING: Stock Must Exist to Transfer: You cannot transfer 50 items if the ‘From Warehouse’ only has 40 items in stock. The system will throw an error. Ensure your starting warehouse is fully stocked (via a Purchase) before attempting to transfer goods out of it.
Troubleshooting
Problem: A transfer is marked “Completed”, but the destination warehouse still shows 0 stock.
- Possible Cause: The system experienced a database timeout during the status change, or the transfer was accidentally edited back to “In Transit”.
- Solution: Edit the transfer, ensure the status is Completed. If it still fails, you may need to delete the transfer and manually adjust the quantities at both locations.
Related Articles
See also:
- 4.1 Multi-Warehouse Management
- 5.2 Creating & Importing Purchases
5.1 Managing Suppliers & Billers
Overview
This article explains how to set up the entities that supply your business with goods (Suppliers) and the internal entities that issue invoices to your customers (Billers).
Before you can purchase stock, you must tell SalePro who you are buying it from. Suppliers (also known as Vendors) are the external companies that provide your inventory. Billers, on the other hand, represent your own company’s invoicing profiles. If your business operates under multiple LLCs or tax IDs, you can create multiple Billers so that customer receipts display the correct legal entity information depending on who processes the sale.
Prerequisites
- None. This is a foundational step.
Step-by-Step Instructions
Part 1: Adding a Supplier
- From the left sidebar, navigate to People > Supplier List.
- Click the Add Supplier button.
- Fill out the supplier’s contact and corporate information.
- (Optional) Enter their VAT Number or Tax ID if required for your local accounting laws.
- Click Submit.
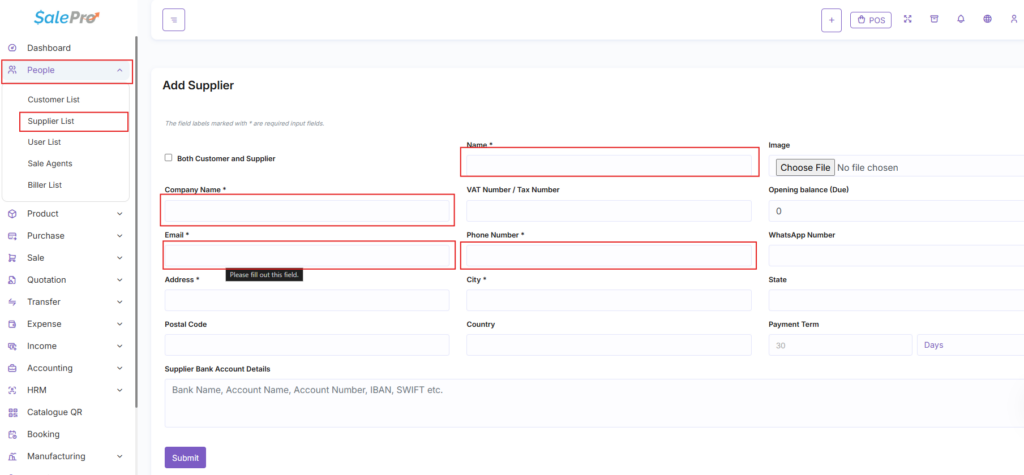
Screenshot: Add Supplier highlighting the Company Name, Email, and Phone fields
Part 2: Adding a Biller
- Navigate to People > Biller.
- Click the Add Biller button.
- Fill out the biller’s information (This is usually your own company’s information).
- Upload a specific Logo for this Biller (if different from the main system logo).
- Click Submit.
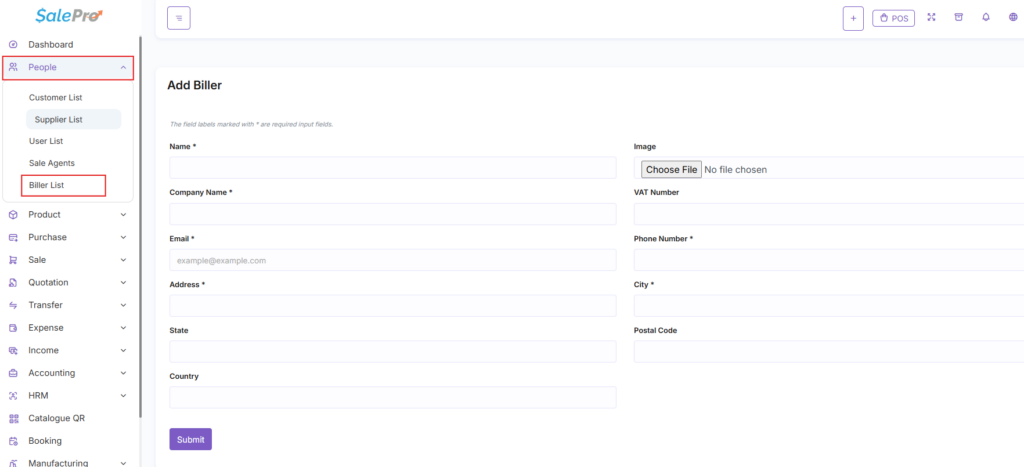
Screenshot: Add Biller highlighting the VAT Number and Logo upload fields
Explanation of Every Field
Supplier Fields
- Name: The primary contact person at the supplier (e.g., Jane Doe).
- Company Name: The legal name of the supplying business (e.g., Acme Electronics Wholesale).
- VAT Number: The supplier’s tax identification number.
- Email / Phone / Address: Contact details used for automated purchase orders (See 5.3 Automated Purchasing).
Biller Fields
- Name / Company Name: Your company’s legal name.
- VAT Number: Your company’s tax ID. This will be printed on invoices issued by this biller, which is a legal requirement in many countries (e.g., the EU, UAE).
- Invoice Logo: An optional override. If a cashier assigned to this Biller prints an invoice, this logo will be used instead of the default Site Logo in General Settings.
Business Workflow
Supplier Workflow
Create Supplier → Go to Purchases → Create a Purchase Order and select the Supplier from the dropdown → The system tracks how much money you owe this specific Supplier (Accounts Payable).
Biller Workflow
Create Biller → Go to People > Users → Assign the Biller as the “Default Biller” for specific cashiers. When those cashiers process a sale, the invoice is legally stamped with Biller’s details.
Examples
- The Multi-Brand Company: A single SalePro installation manages two storefronts: “Tech Gadgets” and “Home Appliances”. They are legally two different companies. The admin creates two Billers, each with a different VAT number and Logo. Cashiers at store A are assigned the Tech Gadgets biller. Cashiers at store B are assigned the Home Appliances biller. The invoices automatically reflect the correct branding and tax ID.
Tips
- Importing Suppliers: If you are migrating from another software and have 500 suppliers, do not add them manually. Go to People > Supplier, click the Import Supplier button, download the sample CSV file, paste your data into it, and upload it for instant creation.
Warnings
WARNING: Do not delete a Supplier with unpaid purchases. If you have outstanding debt (Due amount) attached to a Purchase from a specific supplier, deleting that supplier profile will orphan the financial records and corrupt your Accounts Payable reports.
Troubleshooting
Problem: I can’t find my supplier when trying to create a purchase.
- Possible Cause: The supplier was not saved correctly, or was accidentally created as a “Customer”.
- Solution: Navigate to People > Supplier and verify they exist in the list.
Related Articles
See also:
- 5.2 Creating & Importing Purchases
- 3.2 Managing Users & Employees (Assigning default billers)
5.2 Creating & Importing Purchases
Overview
This article explains the most critical inventory action in SalePro: The Purchase Order.
Creating a Purchase is how you get physical stock into your warehouses. You are telling the system: “I bought these items from this supplier, and they are now sitting in this warehouse.” A purchase action does two things simultaneously: it increases your physical inventory counts, and it logs a financial expense (or debt, if unpaid) in your accounting ledger.
Prerequisites
- You must have at least one Warehouse (See 4.1 Multi-Warehouse Management).
- You must have at least one Supplier (See 5.1 Managing Suppliers & Billers).
- You must have Products created (See 4.3 Creating & Managing Products).
Step-by-Step Instructions
Creating a Manual Purchase
- From the left sidebar, navigate to Purchase > Add Purchase.
- Select the Warehouse where the goods are being delivered.
- Select the Supplier you are buying from.
- Set the Purchase Status (e.g., Received or Pending).
- Use the search bar to find and add the products you are buying.
- In the table below, adjust the Quantity and verify the Unit Cost for each item.
- Scroll to the bottom and select the Payment Status (e.g., Paid or Due).
- Click Submit.
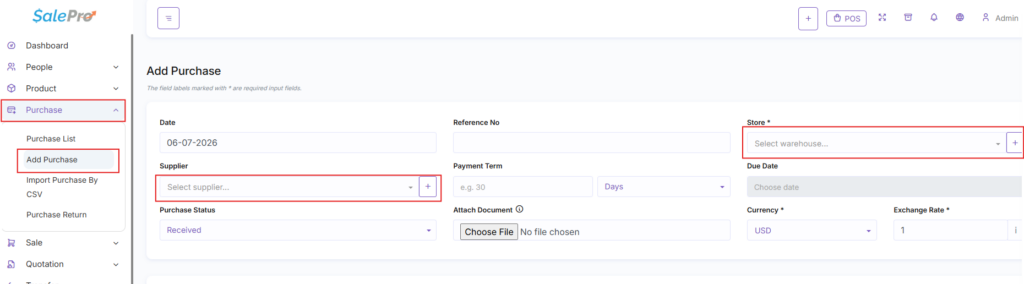
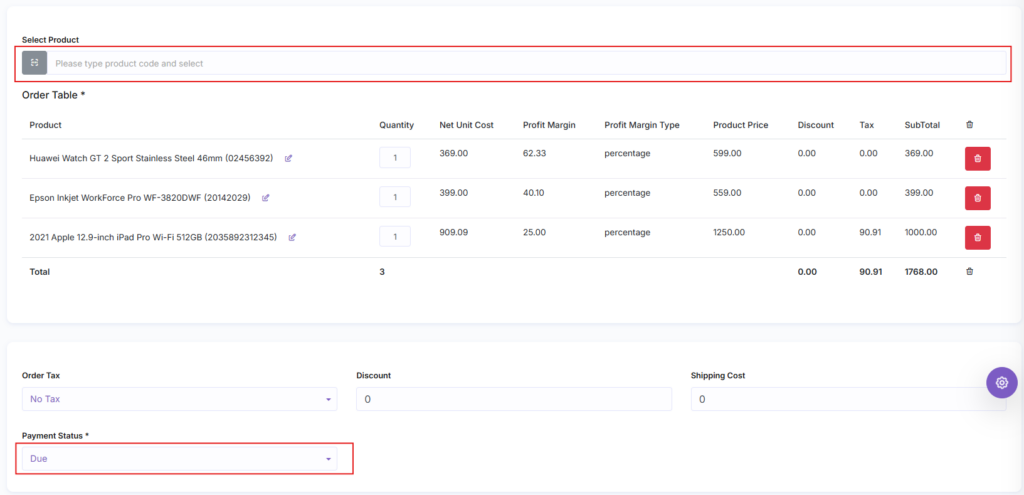
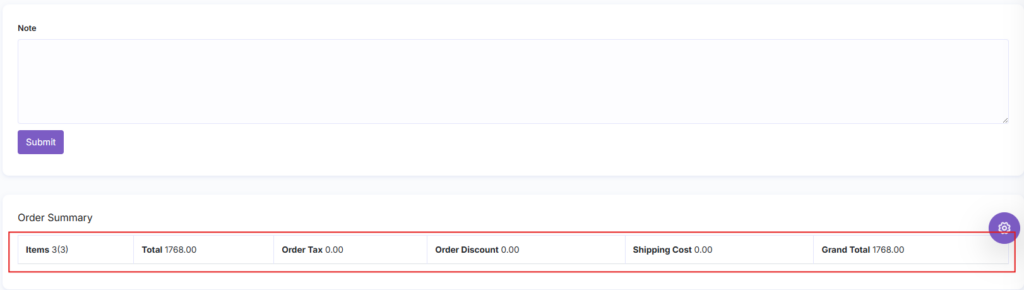
Screenshot: Add Purchase screen showing the Warehouse dropdown, Search bar, and Product Table
Importing a Purchase via CSV
If you are buying hundreds of items, adding them manually is tedious. You can import the purchase from a spreadsheet.
- Navigate to Purchase > Import Purchase By CSV.
- Select the Warehouse, Supplier, and Status as usual.
- Click Download Sample File.
- Open the CSV in Excel. Fill in the Product Codes, Quantities, and Costs. Save the file.
- Upload the CSV into SalePro and click Submit.
Explanation of Every Field (Add Purchase)
- Purchase Status:
- Received: The items have physically arrived. Stock is immediately added to the warehouse.
- Pending: The order has been sent, but items have not arrived. Stock is NOT added.
- Ordered: Similar to pending, used for internal tracking.
- Product Table:
- Quantity: How many Base Units (or Purchase Units) you are buying.
- Net Unit Cost: The cost of the item before tax. You can edit this on the fly if the supplier changed their prices.
- Tax / Discount: Any specific taxes or discounts applied by the supplier.
- Order Tax / Discount: Taxes or discounts applied to the entire invoice, not just individual items.
- Shipping Cost: The amount you paid for freight/delivery. This is added to the grand total.
- Payment Status:
- Paid: You paid the supplier in full today. You must select the Paying Method (Cash/Bank) to deduct the funds from your accounts.
- Due: You received the goods on credit and will pay later. This creates an Accounts Payable record.
- Partial: You paid a deposit today and owe the rest later.
Business Workflow
Standard Re-stocking Workflow: Manager notices low stock → Manager creates Purchase with status “Ordered” → Supplier delivers boxes a week later → Manager edits the Purchase and changes status to “Received” → Stock increases instantly → Manager changes Payment Status to “Paid” once the accounting department sends a check.
Examples
- Batch/Expiry Purchasing: A pharmacy buys 100 bottles of medicine. When they add the medicine to the Purchase table, SalePro forces a popup asking for the Batch Number and Expiry Date. The manager enters “BATCH99” and “12-31-2025”. Now, those specific 100 bottles are permanently tracked under that expiration date.
Tips
- Dynamic Cost Updates: If you buy a shirt that normally costs $5, but today the supplier charges $6, change the Net Unit Cost in the Purchase table to $6. SalePro will automatically update the product’s master cost in the database, ensuring your future profit margins are calculated accurately based on the new price.
Warnings
WARNING: Do not delete a “Received” purchase to fix a mistake. If you delete a purchase, the system will instantly subtract all those items from your warehouse. If you already sold some of those items, your stock count will go into negative numbers. Always Edit a purchase to fix quantity mistakes, do not delete it.
Troubleshooting
Problem: I created a purchase, but the items are not showing up in the POS.
- Possible Cause: The Purchase Status is set to “Pending” or “Ordered”.
- Solution: Edit the purchase and change the status to “Received”. The system only adds physical stock when goods are marked as received.
Problem: CSV Import fails with an error.
- Possible Cause: The Product Codes in your CSV do not exactly match the Product Codes in SalePro.
- Solution: Double-check your spreadsheet. The codes must be an exact, case-sensitive match.
Related Articles
See also:
- 4.1 Multi-Warehouse Management
- 4.3 Creating & Managing Products
- 8.1 Income & Expense Tracking
5.3 Automated Purchasing (Cron)
Overview
This article explains how to set up SalePro to automatically generate purchase orders when your inventory runs low.
Manually checking stock levels every day is inefficient. SalePro features a Cron Job (an automated background task) that checks your inventory against the “Alert Quantity” you defined when creating your products. If a product drops below the alert threshold, the system automatically emails the assigned Supplier a restock request.
Prerequisites
- Mail Settings must be fully configured and working (See 2.2 Mail, SMS, and WhatsApp Configuration).
- Products must have an “Alert Quantity” greater than 0 (See 4.3 Creating & Managing Products).
- You must have access to your hosting cPanel to set up the Cron Job.
Step-by-Step Instructions
To automate purchasing, you must tell your physical web server to run a specific SalePro script on a regular schedule (e.g., once a day).
Step 1: Configure the Server (cPanel)
- Log in to your hosting cPanel.
- Scroll down to the Advanced section and click Cron Jobs.
- Under “Add New Cron Job”, select a schedule from the “Common Settings” dropdown (e.g., Once Per Day).
- In the Command field, paste the URL you copied from SalePro.
- Click Add New Cron Job.
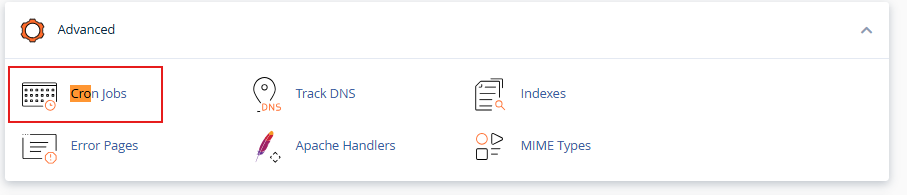
Screenshot: cPanel Cron Jobs interface showing “Once Per Day” and the pasted command
Explanation of the Workflow
Once configured, the automation works invisibly in the background:
- Midnight Trigger: At 12:00 AM, the cPanel Cron Job executes the SalePro URL.
- Database Scan: SalePro scans every warehouse for products where the current Stock is less than the Alert Quantity.
- Supplier Grouping: It groups the low-stock items by their assigned Suppliers.
- Email Dispatch: SalePro connects to your SMTP server and sends a formatted email to each Supplier containing a list of the required items.
- System Record: SalePro creates a new Purchase record in Purchase > Purchase List with the status set to Ordered.
Examples
- The Hands-Off Grocery Store: A store sells hundreds of bottles of milk a week. The Alert Quantity is set to 50. On Tuesday, a cashier sells the 51st bottle, dropping the stock to 49. On Wednesday at 1:00 AM, the Cron Job runs. It sees the milk is low, emails the dairy supplier ordering more, and logs a Pending Purchase in the system. The manager wakes up, does nothing, and the milk arrives on Thursday.
Tips
- Don’t Run Too Often: Set your Cron Job to run once a day (preferably overnight). If you set it to run every 5 minutes, you risk sending your suppliers hundreds of duplicate emails before they have a chance to deliver the goods and clear the alert status.
Warnings
WARNING: Check your Suppliers’ Emails: This feature only works if every product is explicitly tied to a Supplier, and that Supplier profile has a valid email address. If the system cannot find an email address, the automation will fail silently.
Troubleshooting
Problem: Stock is below the Alert Quantity, but no automated purchase was created.
- Possible Cause: The Cron Job in cPanel is not configured correctly, or your Mail Settings in SalePro are broken.
- Solution: Test your Mail Settings manually. If they work, manually copy the Cron Job URL from SalePro and paste it directly into your web browser’s address bar. Press enter. If the screen goes white and a Purchase is generated, the script works, meaning your cPanel Cron Job schedule is set up incorrectly.
Related Articles
See also:
- 2.2 Mail, SMS, and WhatsApp Configuration
- 4.3 Creating & Managing Products
- 5.2 Creating & Importing Purchases
6.1 Customer Management & Groups
Overview
This article explains how to build a client database and organize your buyers into specific pricing tiers.
Knowing who your customers are is vital for marketing, loyalty programs, and Accounts Receivable (tracking who owes you money). While a quick retail transaction might be assigned to a generic “Walk-in Customer”, regular clients and B2B partners should have dedicated profiles. By categorizing customers into “Customer Groups” (like VIP or Wholesale), you can automate pricing—for example, automatically giving all Wholesale customers a 15% discount at checkout.
Prerequisites
- None. You can create customers at any time.
Step-by-Step Instructions
Part 1: Creating a Customer Group
Before creating a customer, it is highly recommended to define your groups.
- Navigate to Setting > Customer Group.
- Click Add Customer Group.
- Enter the Name (e.g., Wholesale, VIP Member, Employee).
- Enter the Percentage (e.g., 10 for a 10% discount, or 0 for no discount).
- Click Submit.
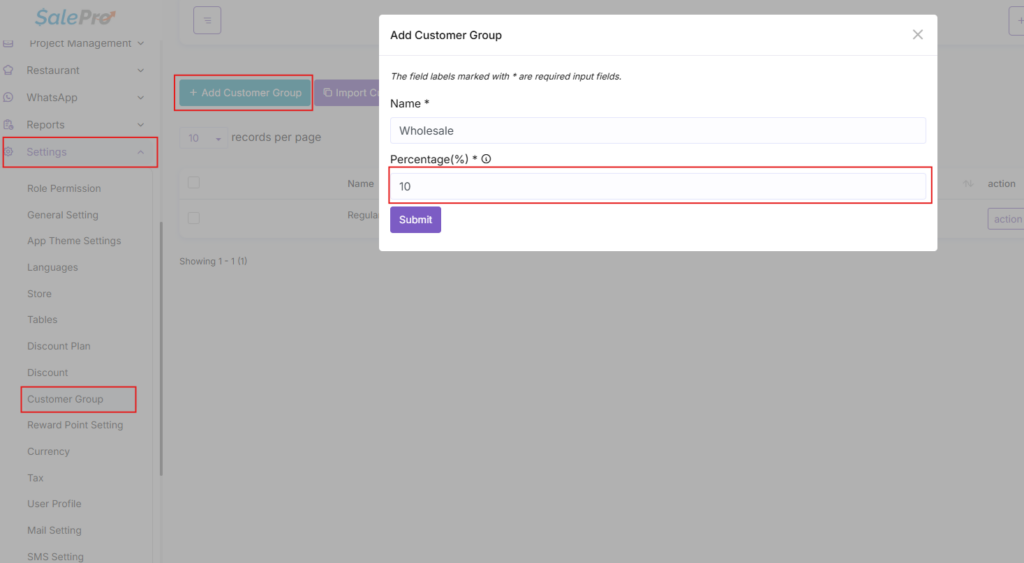
Screenshot: Add Customer group….
Part 2: Creating a Customer Profile
- Navigate to People > Customer List.
- Click Add Customer.
- Select the Customer Group they belong to.
- Fill out their contact details (Name, Company, Email, Phone, Address).
- (Optional) Enter their Tax Number if you do B2B invoicing.
- Click Submit.
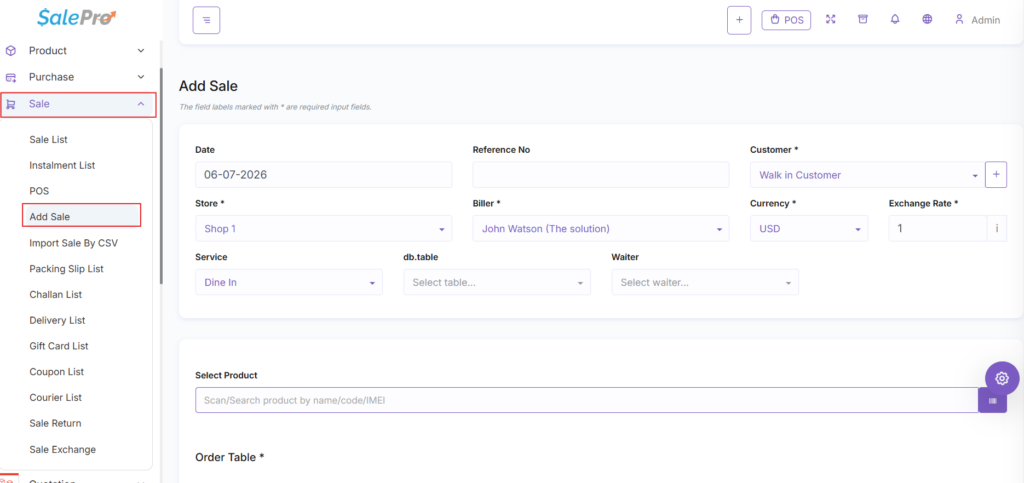
Screenshot: Add Customer page.
Explanation of Every Field
- Customer Group: The pricing tier the customer belongs to. (If you select a group with a 10% discount, all their future purchases will automatically be discounted by 10%).
- Name: The person’s full name.
- Company Name: The business name (if this is a B2B client).
- Tax Number: The customer’s VAT or Tax ID. If provided, this is legally required to print on B2B invoices in many jurisdictions.
- Email / Phone / Address: Used for sending digital invoices, SMS notifications, and delivery routing.
Business Workflow
Retail Workflow
Customer buys an item at the POS → Cashier asks for their phone number → Cashier quickly creates the customer profile directly from the POS screen → Sale is finalized → Customer is now in the database for future marketing.
Wholesale Workflow
A local restaurant agrees to buy produce from you weekly → Admin creates a “Restaurant” Customer Group with a 20% discount → Admin creates a Customer Profile for “Joe’s Diner” in that group → When you ring up Joe’s Diner, the system automatically cuts the price by 20%.
Examples
- The “Friends & Family” Discount: A store owner creates a Customer Group named Friends & Family with a 25% discount. They add their relatives to this group. When their cousin comes in to buy a TV, the cashier selects the cousin’s name on the POS, and the 25% discount is applied automatically without the cashier needing manual override permission.
Tips
- Importing Customers: If you have an existing mailing list or database, navigate to People > Customer and click Import Customer by CSV to bulk-upload thousands of clients instantly.
- Deposit / Advance Payments: You can add money to a customer’s account in advance. Go to the Customer List, click the “Action” dropdown next to a name, and select “Add Deposit”. They can use this balance to pay for future sales.
Warnings
WARNING: Deleting Customers: Do not delete a customer if they have historical sales attached to them. Doing so will break the links in your sales database. If a customer asks to be removed, edit their profile and change their name to “Redacted” to maintain database integrity while honoring privacy.
Troubleshooting
Problem: A wholesale customer complained they didn’t get their discount.
- Possible Cause: The cashier forgot to select the customer’s name at the POS and rang them up as the default “Walk-in Customer”.
- Solution: To fix it retroactively, you must edit the specific sale, change the customer attached to it, and process a partial refund. Instruct cashiers to always select the customer before taking payment.
Related Articles
See also:
- 6.2 The POS Interface
- 9.1 Reward Points System
6.2 The POS Interface
Overview
This article provides a comprehensive tour of the Point of Sale (POS) screen.
The POS is the most important screen in SalePro. It is the cash register interface used by your frontline staff to process retail transactions quickly. It is specifically designed to be touch-screen friendly, relying on large visual buttons, barcode scanning, and intuitive payment workflows.
Prerequisites
- You must have Products in stock (See 5.2 Creating & Importing Purchases).
- A barcode scanner (Optional, but highly recommended).
Step-by-Step Instructions: Processing a Sale
- From the left sidebar, click on Sale > POS. (The screen will expand to full-screen mode).
- Select the Customer: In the top left, the customer defaults to “Walk-in Customer”. Click the dropdown to search for a specific customer if needed.
- Add Items:
- Method A (Scanner): Scan the barcode of the product. It will instantly appear in the cart.
- Method B (Touch/Mouse): Click on a Category or Brand on the right side of the screen, then click the image of the product to add it to the cart.
- Adjust Cart: Change the quantity using the + and – buttons in the cart.
- Take Payment: Click the large Cash, Credit Card, or Multiple Pay button at the bottom.
- The receipt will print automatically (if configured), and the screen will clear for the next customer.
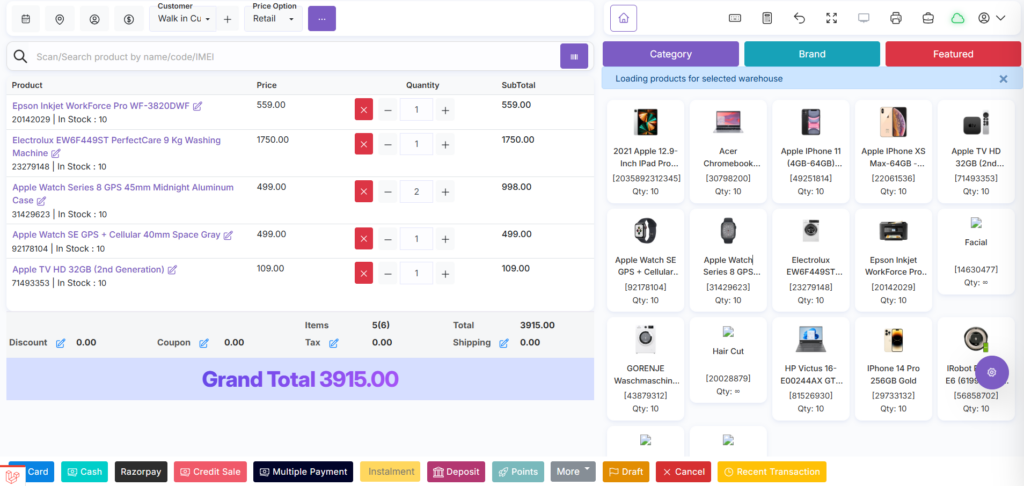
Screenshot: The entire POS interface, highlighting the Cart (Left) and the Product Grid (Right)
Explanation of Key Interface Areas
The Top Navigation Bar
- Warehouse Dropdown: If the user has permission, they can switch which warehouse they are selling from.
- Biller Dropdown: Select which legal entity is issuing this receipt.
- Monitor Icon: Launches the Customer Display Screen (See 2.5 Hardware Configuration).
- Calculator Icon: Opens an on-screen calculator.
- Full Screen Icon: Expands the browser window.
The Left Side (The Cart)
- Customer Selection: Choose who is buying. You can also click the + icon here to quickly create a new customer without leaving the POS.
- Product Search Bar: A fallback if you don’t have a scanner. Type the name or code here.
- The Cart Table: Lists the items being purchased. Click the Edit (pencil) icon on an item to override its price or apply a specific item discount (Requires manager permission).
- Order Tax / Order Discount: Buttons to apply a global tax or global discount to the entire cart.
The Right Side (The Product Grid)
- Category / Brand Filters: Click these buttons to filter the images displayed below.
- Product Buttons: The visual tiles representing your items. Only products marked as “Featured” or products belonging to the selected category will appear here.
The Bottom (Payments)
- Draft: Saves the cart to the database without taking payment (Useful if the customer forgot their wallet and needs to step outside).
- Cash / Credit Card: Fast-checkout buttons that assume the customer is paying the exact grand total using that method.
- Multiple Pay: Opens a detailed modal where you can split the payment (e.g., $10 Cash, $15 Card) or calculate exact change.
Business Workflow
Cashier logs in → Opens POS → Scans 5 items → Customer hands them a $50 bill → Cashier clicks “Multiple Pay”, types $50 into the Cash field → System calculates change → Cashier clicks Submit → Cash drawer pops open, receipt prints, stock is deducted.
Examples
- The Split Payment: A customer’s total is $100. They want to pay $30 in cash and the rest on their Visa. The cashier clicks Multiple Pay, enters $30 in the Cash row, clicks “Add Payment Row”, selects Credit Card, and enters $70. The system accepts the split transaction and balances the daily accounting ledger perfectly.
Tips
- Keyboard Shortcuts: The POS is optimized for speed. Click the Keyboard icon on the top navigation bar to view all available quick-keys for focusing the search bar, applying discounts, or fast checkout.
Warnings
WARNING: Selling Below Zero: By default, if an item is out of stock, the POS will throw an error and prevent the sale. If you wish to allow “Negative Inventory” (overselling), an Admin must enable it in Setting > General Setting.
Troubleshooting
Problem: The cashier scans a barcode, but the screen says “Product Not Found”.
- Possible Cause: The item is completely out of stock at this specific warehouse, or the barcode on the physical item doesn’t match the database.
- Solution: Go to Product > Product List and verify the stock level and the barcode.
Problem: Clicking the Credit Card button does nothing.
- Possible Cause: You have not configured a payment gateway like Stripe, or your Stripe API keys are invalid.
- Solution: See 6.5 Payments, Gateways, and Installments for setup instructions, or use the “Multiple Pay” button and select an offline terminal method.
Related Articles
See also:
- 6.1 Customer Management & Groups
- 6.5 Payments, Gateways, and Installments
- 2.5 Hardware Configuration (Printers & Displays)
6.3 Standard Sales & Quotations
Overview
This article explains how to process sales and generate estimates using the backend interface, which is designed for B2B operations rather than fast-paced retail checkouts.
While the POS (Point of Sale) is built for speed and touchscreens, the Add Sale interface is built for detail. It is used when a salesperson is sitting at a desk, taking an order over the phone, issuing an invoice with 30-day payment terms, or sending a formal price quote (Quotation) to a corporate client.
Prerequisites
- Customers should be set up in the database.
- Products must be in stock (Unless creating a Quotation, which does not require stock).
Step-by-Step Instructions
Part 1: Creating a Standard Sale (B2B Invoice)
- From the left sidebar, navigate to Sale > Add Sale.
- Select the Customer, Warehouse, and Biller.
- Use the search bar to add products to the order table.
- Adjust quantities, and (if you have permission) adjust the Net Unit Price for this specific client.
- Set the Sale Status (e.g., Completed, Pending).
- Set the Payment Status (e.g., Paid, Due). If they are paying later on “Net 30” terms, leave it as Due.
- Click Submit.
Screenshot: Add Sale interface highlighting the Sale Status and Payment Status dropdowns
Part 2: Creating a Quotation (Estimate)
A Quotation is a formal offer. It does NOT deduct stock, and it does NOT record revenue.
- Navigate to Quotation > Add Quotation.
- Fill out the form exactly like a Standard Sale (Customer, Products).
- Select the Quotation Status (e.g., Pending, Sent).
- Click Submit.
- From the Quotation List, click the dropdown under “Action” and select Email to send a PDF copy to the client.
Part 3: Converting a Quotation to a Sale
If the client accepts your quote, you must convert it into an actual sale to deduct stock and record the revenue.
- Navigate to Quotation > Quotation List.
- Find the accepted quote. Click the dropdown under “Action”.
- Select Create Sale.
- The system will transport all data from the quote into the Add Sale form.
- Review the details, set the Payment Status, and click Submit.
Explanation of Key Fields (Add Sale)
- Sale Status:
- Completed: The goods have been handed to the customer. Stock is deducted immediately.
- Pending: The order is confirmed, but goods have not been given yet. Stock is NOT deducted.
- Payment Status:
- Paid: You received the money.
- Due: The customer owes you money (Creates Accounts Receivable).
- Partial: The customer paid a deposit.
- Order Discount / Order Tax: Adjustments applied to the grand total.
- Shipping Cost: Fees added to the invoice for delivery.
Business Workflow
B2B Workflow
Client calls asking for bulk pricing → Sales rep creates a Quotation → Quotes is emailed to client → Client calls back 2 days later to accept → Rep clicks Create Sale from the quote → Status is set to “Completed”, Payment is set to “Due” → Warehouse ships the goods → 30 days later, client sends a check → Rep edits the sale and changes payment to “Paid”.
Examples
- The Custom Invoice: A construction company needs 50 bags of cement. The sales manager uses “Add Sale”. Because this is a massive order, the manager manually overrides the price of the cement from $10 to $8 directly in the product table. They add a Shipping Cost of $50, generate the invoice, and email the PDF directly from the Sale List.
Tips
- Save for Later: If you are halfway through typing a massive 50-item B2B order and the client says they need to call you back, set the Sale Status to “Pending”. It saves your work securely without deducting stock or finalizing the revenue.
Warnings
WARNING: Pending Sales and Inventory: A “Pending” sale does not reserve or deduct inventory. If you have 5 laptops in stock, and you create a Pending sale for 5 laptops, a cashier on the POS can still sell those 5 laptops to a walk-in customer. Only “Completed” sales protect your inventory counts.
Troubleshooting
Problem: I can’t email the Quotation to the customer; it gives an error.
- Possible Cause: The customer’s profile doesn’t have an email address, or your system Mail Settings are not configured.
- Solution: Verify the customer email in People > Customer, and ensure SMTP is configured in Setting > Mail Setting.
Related Articles
See also:
- 6.4 Deliveries, Challans & Packing Slips
- 8.1 Income & Expense Tracking
6.4 Deliveries, Challans & Packing Slips
Overview
This article explains how to manage the physical dispatch of goods after a sale is completed.
In a retail store, the customer takes the item immediately. In e-commerce, furniture sales, or B2B supply, the goods must be delivered. SalePro includes a Delivery module that allows you to generate Packing Slips (Delivery Challans) for your drivers, track the status of shipments, and log exactly who signed for the package.
Prerequisites
- A sale must already exist in the system (either from the POS or the Add Sale menu).
- The sale must have a status of “Completed” (Meaning the goods are legally the customer’s and are ready to be moved).
Step-by-Step Instructions
Step 1: Create a Delivery Order
- From the left sidebar, navigate to Sale > Sale List.
- Locate the sale that requires delivery.
- Click the dropdown arrow in the Action column.
- Select Add Delivery.
- A modal window will appear. The system automatically pulls the customer’s address from their profile.
- Fill in the delivery details.
- Change the Status to Packing or Delivering.
- Select the Courier Name.
- Click Submit.
Screenshot: The Add Delivery modal showing Address, Driver, and Status fields
Step 2: Print the Packing Slip (Challan)
- Navigate to Sale > Delivery List. (This is your master dispatch list).
- Locate the delivery you just created.
- Click anywhere on the delivery row (except the Action column) to open the Delivery Details window. Click the Print button at the top left of the window.
- A PDF will generate. This document lists the items to be delivered but hides all prices. Print this and give it to your driver.
Step 3: Mark as Delivered
- When the driver returns and confirms the package was dropped off, navigate back to Sale > Delivery List.
- Click Edit on that specific delivery.
- Change the Status to Delivered.
- (Optional) Type the name of the person who signed for the package in the “Received By” field. (Use the “Delivered By” field for the driver’s name).
- Click Submit.
Explanation of Every Field (Add/Edit Delivery)
- Delivery Reference: An auto-generated tracking number for internal use.
- Sale Reference: A link back to the original financial invoice.
- Customer / Address: Where the goods are going.
- Delivered By: The name of your staff member or the 3rd party courier (e.g., FedEx, Driver John).
- Status:
- Packing: Warehouse staff is currently boxing the items.
- Delivering: The box is on the truck.
- Delivered: The package has reached the customer.
- File Attachment: Use this to upload a scanned copy of the physical paper receipt containing the customer’s signature.
Business Workflow
Customer buys a Fridge on POS → Cashier asks for address and finalizes sale → Warehouse manager sees the sale in Sale List, clicks Add Delivery, sets status to “Packing” → Prints Packing Slip → Driver takes fridge and slip → Customer signs slip → Driver returns paper → Manager edits Delivery, uploads photo of signature, sets status to “Delivered”.
Examples
- Third-Party Logistics: A business sells online. They pack 50 boxes a day. They create 50 Deliveries in SalePro, setting “Delivered By” to DHL and typing the DHL Tracking Number into the Notes field. This allows customer service to easily find the tracking number if a customer calls asking where their package is.
Tips
- Use the Attachment Feature: In dispute resolution (e.g., a customer claims they never received a $5,000 piece of equipment), having a digital scan of their signature attached directly to the SalePro Delivery record is invaluable.
Warnings
WARNING: Deliveries Do Not Affect Stock: Creating a delivery does NOT subtract stock from your warehouse. The stock was already subtracted the moment the Sale was marked “Completed”. The Delivery module is purely a logistical tracking tool.
Troubleshooting
Problem: I can’t find the “Add Delivery” button for my sale.
- Possible Cause: The sale status is set to “Draft” or “Pending”.
- Solution: Deliveries can only be generated for “Completed” sales. Edit the sale and change the status.
Related Articles
See also:
- 6.3 Standard Sales & Quotations
- 6.2 The POS Interface
6.5 Payments, Gateways, and Installments
Overview
This article explains how to process customer payments, integrate online payment gateways (like Stripe or PayPal), and manage partial payments or installments.
SalePro’s accounting engine relies on accurate payment tracking. A sale can be finalized without receiving money (creating Accounts Receivable). When the customer eventually pays, you must record that payment accurately. Furthermore, SalePro allows you to connect digital payment gateways, enabling cashiers to charge credit cards directly through the software, or enabling customers to pay their invoices online via a secure link.
Prerequisites
- To use online gateways: You must have an active merchant account with Stripe, PayPal, or Razorpay, and have access to your API Keys.
- A Sale must exist in the system.
Step-by-Step Instructions
Part 1: Configuring a Payment Gateway (Stripe)
- Navigate to Setting > Payment Gateway.
- Select the Stripe tab.
- Enter your Stripe Publishable Key and Stripe Secret Key (obtained from your Stripe Developer Dashboard).
- Enter your Currency Code.
- Click Save.
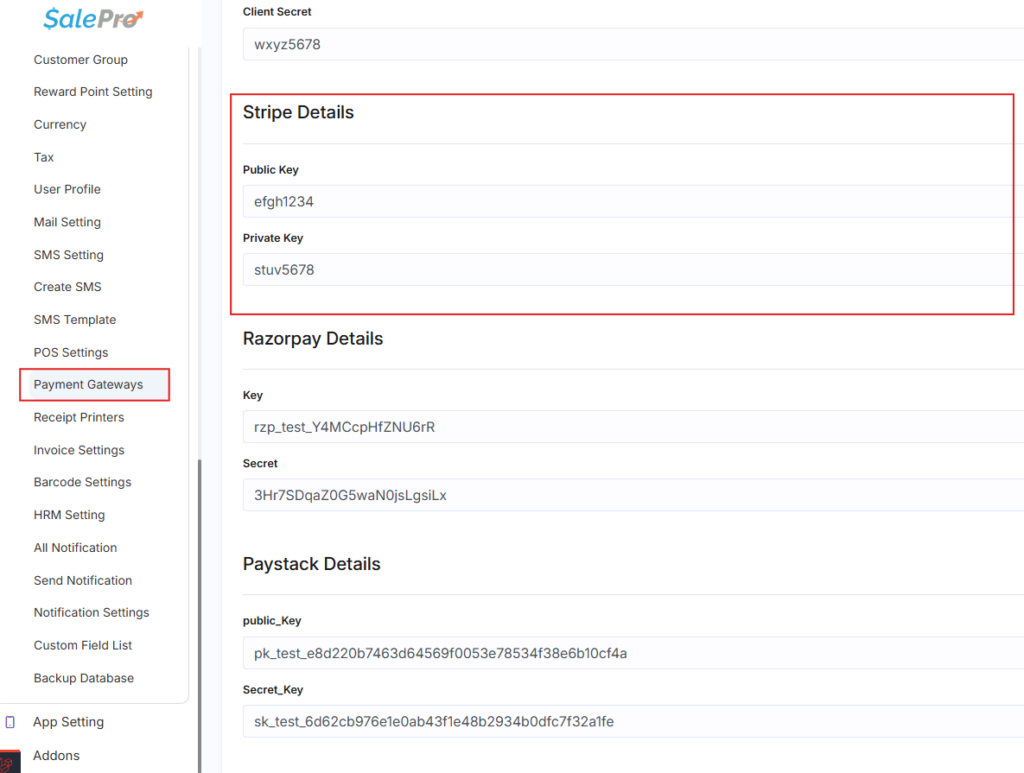
Screenshot: Payment Gateway settings showing the Stripe API key fields
Part 2: Taking a Payment via Gateway (POS)
- On the POS screen, add items to the cart.
- Click the Credit Card button (or select Stripe from the Multiple Pay modal).
- A secure popup will appear.
- Type or swipe the customer’s credit card details into the popup.
- Click Submit. SalePro communicates with Stripe; if approved, the sale is completed instantly.
Part 3: Recording Manual/Installment Payments
If a customer bought items on credit (Sale Status = Completed, Payment Status = Due), they owe you money. When they bring you cash a week later:
- Navigate to Sale > Sale List.
- Find the sale marked as “Due”.
- Click the dropdown in the Action column and select Add Payment.
- Enter the Amount they are paying today.
- Select the Paying Method (e.g., Cash, Bank Transfer).
- Select the internal Account to deposit the money into (e.g., Cash Drawer 1).
- Click Submit.
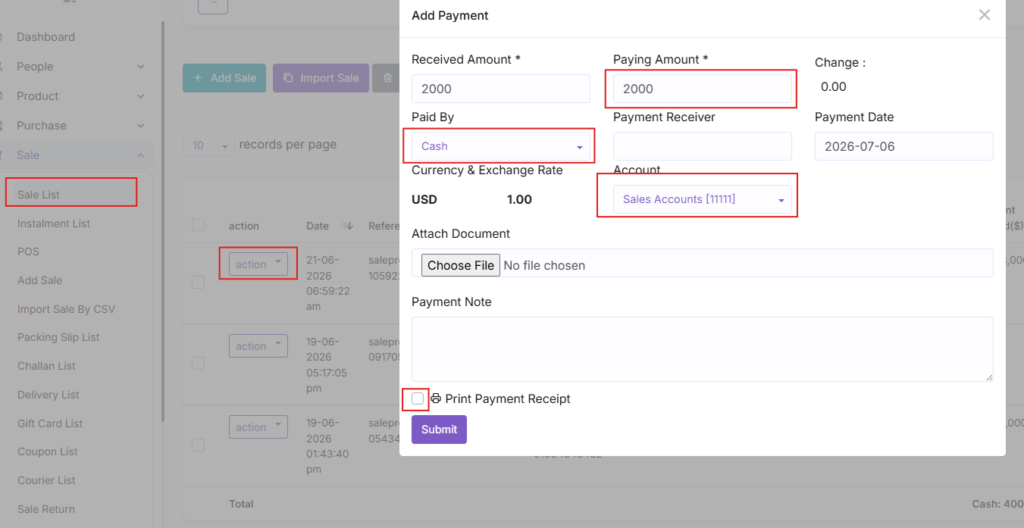
Screenshot: Add Payment modal showing Amount, Paying Method, and Account dropdowns
Explanation of Every Field (Add Payment)
- Received Amount: How much physical money the cashier was handed.
- Paying Amount: How much is being applied to the invoice. (Usually identical to Received Amount. But if a customer hands you a $100 bill to pay a $90 debt, Received = 100, Paying = 90, and Change = 10).
- Paying Method:
- Cash/Cheque/Bank Transfer: Manual tracking methods.
- Stripe/PayPal: Triggers the digital gateway API to actually charge a card.
- Deposit: Deducts the payment from the Customer’s pre-paid advance balance.
- Account: Which of your company’s bank/cash accounts is receiving the funds (critical for the Accounting module).
Business Workflow
The Installment Workflow
Customer buys a $1,000 laptop on a 4-month payment plan → Cashier creates sale via POS, clicks “Draft” or “Multiple Pay” and sets payment to $0 → Sale is marked “Due” for $1,000 → Month 1: Customer brings $250. The cashier goes to the Sale List, clicks Add Payment, enters $250. Status automatically changes to “Partial”. Debt is now $750. → Month 4: Customer pays final $250. System automatically flips status to “Paid”.
Examples
- B2B Online Payment: You email a PDF Quotation/Invoice to a client for $5,000. Because you configured PayPal in the settings, the email includes a secure link. The client clicks the link, enters their PayPal credentials, and pays. SalePro receives the ping from PayPal and automatically marks the invoice as “Paid” without you lifting a finger.
Tips
- Viewing Payment History: To see all installments made on a single invoice, go to the Sale List, click the Action dropdown, and select View Payment. A table will show every date and amount paid toward that specific debt.
Warnings
WARNING: Gateway Test Modes: When setting up Stripe or PayPal, ensure you are using your “Live” API keys, not your “Test/Sandbox” keys, before ringing up actual customers. Using test keys will result in receipts printing, but real money will not be transferred to your bank.
Troubleshooting
Problem: The Stripe popup throws a “Token Error” or “Invalid API Key”.
- Possible Cause: A typo in your API keys in the settings, or your Stripe account is restricted/unverified.
- Solution: Copy the keys from Stripe again. Ensure there are no empty spaces before or after the keys in the SalePro settings.
Problem: The customer paid by Cheque, but the money isn’t in the Accounting report.
- Possible Cause: You forgot to select the correct “Account” when adding the payment.
- Solution: Go to Sale > Sale List, click Action > View Payment, edit the payment, and ensure it is assigned to your “Main Bank Account” rather than a hidden cash drawer.
Related Articles
See also:
- 6.2 The POS Interface
- 8.1 Income & Expense Tracking
7.1 Managing Standard Returns
Overview
This article explains how to process a refund when a customer brings an item back to your store.
A return is the exact opposite of a sale. When you process a return, SalePro performs two actions simultaneously: it puts the physical item back into your warehouse inventory, and it records a financial deduction (a refund) in your accounting ledger. Proper use of the Return module ensures your stock counts remain accurate without manual intervention.
Prerequisites
- The customer must provide their original receipt (or you must know the Sale Reference number).
- The cashier must have the “Add Return” permission enabled in their Role.
Step-by-Step Instructions
Processing a Return
- From the left sidebar, navigate to Sale > Sale Return and click the Add Return button. Or, from the Sale List, click the Action button for the relevant sale and select Add Return to process it directly.
- Ensure the Quantity matches what the customer is handing back to you.
- (Optional) If the item is completely broken and going in the trash, you must still process the Return normally, and then perform a “Quantity Adjustment” (Subtraction) to remove it from stock.
- At the bottom of the screen, select the Paying Method you used to give the customer their money back (e.g., Cash or Bank).
- Click Submit.
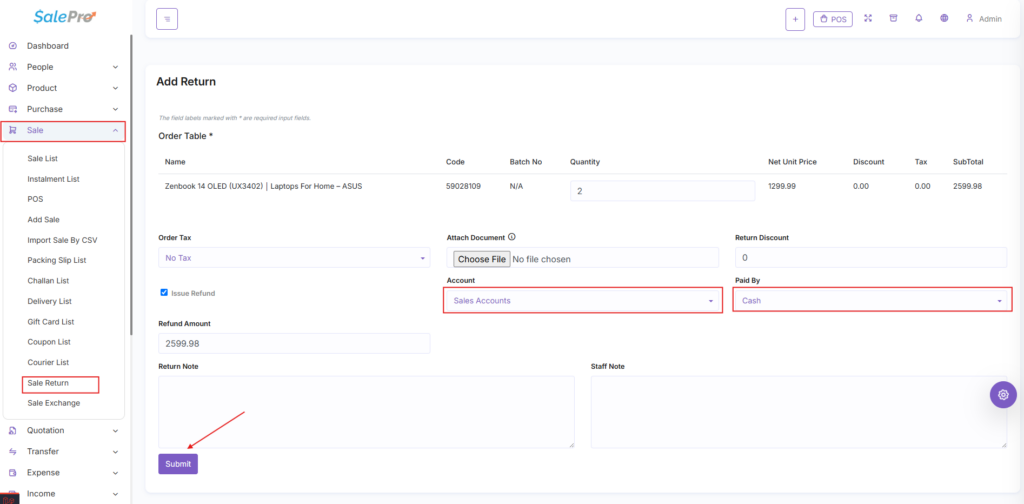
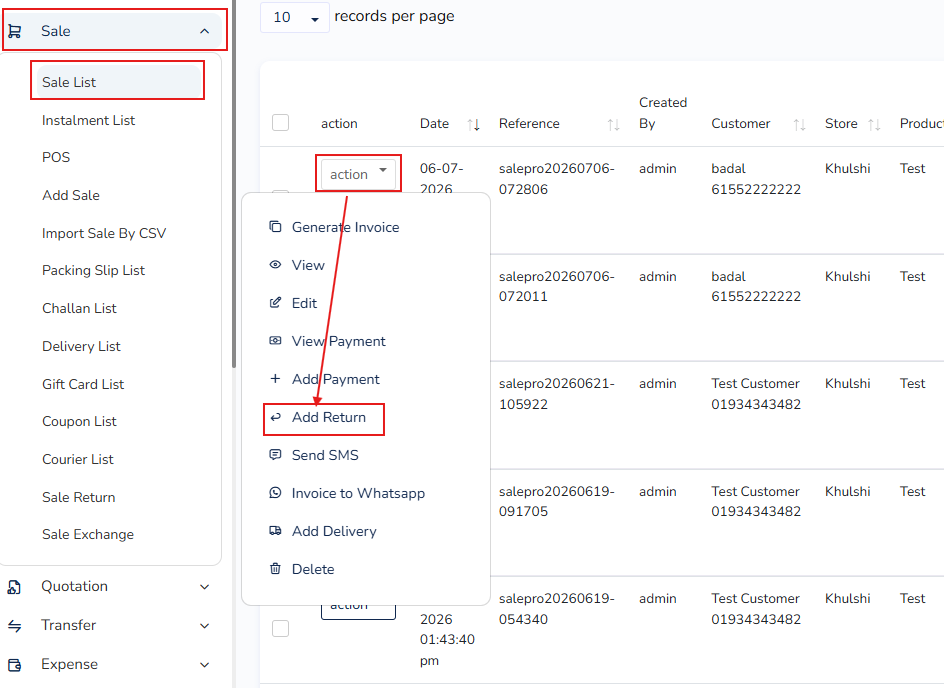
Screenshot: Add Return form highlighting the Product Search and Paying Method fields
Explanation of Key Fields
- Return Note: A text box where the cashier should briefly explain why the item was returned (e.g., “Defective zipper”, “Customer changed mind”). This is useful for managers reviewing return rates.
- Staff Note: A private note only visible to administrators.
- Order Tax / Order Discount: If the original sale had a global discount, you must manually apply that same discount percentage to the return, otherwise, you will refund the customer more money than they actually paid.
Business Workflow
Customer brings back a shirt → Cashier verifies original receipt → Cashier creates a Return in SalePro → System adds +1 Shirt back to inventory → System deducts $20 from the daily cash total → Cashier opens the physical drawer and hands the customer a $20 bill.
Examples
- The Partial Return: A customer bought 3 shirts. They want to return 1. The cashier navigates to Add Return, adds the specific shirt to the table, sets the quantity to 1, and processes the refund for just that single item. The original invoice remains marked as “Paid” for the other 2 shirts.
Tips
- Use the Sale List to Return Faster: Instead of going to Return > Add Return, you can go to Sale > Sale List. Find the specific invoice, click the Action dropdown, and select Add Return. This automatically fills in the Customer, Biller, and Warehouse for you.
Warnings
WARNING: Check Original Payment Method: If the customer originally paid by Credit Card, SalePro will only record the accounting of the refund. You must still log into your Stripe/PayPal terminal or swipe their card on your physical terminal to actually transmit the money back to their bank account.
Troubleshooting
Problem: I processed a return, but the money in my cash drawer doesn’t match the end-of-day report.
- Possible Cause: The cashier selected “Bank Transfer” or “Credit Card” as the Paying Method on the Return form, but handed the customer physical Cash.
- Solution: Edit the return and change the Paying Method to Cash to balance the drawer.
Related Articles
See also:
- 7.2 The Product Exchange Workflow
- 4.7 Stock Adjustments, Counts & Transfers
7.2 The Product Exchange Workflow
Overview
This article explains the correct procedure for processing a product exchange in SalePro.
An exchange occurs when a customer returns one or more previously purchased items and takes one or more new items instead. During this process, the system calculates the returned products and the new products together, then automatically determines the exchange value, new products total, grand total, and whether the customer needs to pay additional money or receive a refund.
In this workflow, exchanges can be processed in two ways:
- Exchange with a Sale Reference Number — If the exchange is related to a specific previous sale, you can enter the sale reference number to load that sale and process the exchange from it.
- Exchange without a Reference Number — If there is no sale reference number, you can manually select the customer, store/warehouse, returned products, and new products to complete the exchange.
Prerequisites
Before starting an exchange, it is recommended to have one of the following:
- The Sale Reference Number, if the exchange is related to a previous sale
- Or the customer information and the product details involved in the exchange
- The barcode, product name, code, or IMEI of the returned and new products
Step-by-Step Instructions
Go to the Sale Exchange page — From the left sidebar, navigate to Sale > Sale Exchange.
An “Add Sale Exchange” modal will appear. This modal provides two options:
- Continue to Exchange using a Sale Reference Number
- Continue Without Reference
Method A: Exchange with a Sale Reference Number
Use this method when the customer wants to exchange products from a specific previous sale.
- Enter the Sale Reference Number — In the modal, enter the sale reference number into the “Sale Reference (Optional)” field. Then click Continue to Exchange.
- The system will load the sale details — If the reference number is valid, the system will redirect you to the Exchange page and automatically load the information from that sale. Usually, the following details will be filled in automatically: Customer, Store, Biller, Account, Reference Number, Product list from the original sale.
- Select which products will be exchanged — In the Order Product table, all products from the referenced sale will be displayed. To exchange only specific products, simply check the checkbox for each product you want to exchange. Products that are not checked will not be included in the exchange.
In other words:
- Checked products = products included in the exchange/return
- Unchecked products = products not included in the exchange
- Review the return product quantities — Adjust the quantity of the selected return products if needed, depending on your system configuration and permissions.
- Add the new product(s) — Use the New Select Product search box to search by product name, code, barcode, or IMEI and add the new product(s) the customer wants to take.
- Fill in additional information if required — If needed, you can also complete the following fields: Order Tax, Attach Document, Return Discount, Return Note, Staff Note.
- Review the Exchange Calculation — At the bottom of the page, the Exchange Calculation section will automatically calculate:
- Exchange Value: total value of the returned products
- New Products Total: total value of the newly selected products
- New Shipping: shipping cost for the new products, if applicable
- New Grand Total: final total for the new products
- Balance (Customer Payment): whether the customer needs to pay more or should receive money back
- Submit the exchange — After reviewing everything, click Submit to complete the exchange.
Method B: Exchange without a Reference Number
If you do not have a sale reference number, click Continue Without Reference in the modal. A blank Exchange page will open, and all required information must be entered manually.
- Select the customer — Choose the relevant customer from the Customer dropdown.
- Select the store / warehouse — Choose the relevant store or warehouse from the Store dropdown.
- Select the returned product(s) — Use the Return Select Product search box to search for and add the product(s) the customer is returning.
- Set the return quantities — Enter or adjust the quantity for each returned product as needed.
- Select the new product(s) — Use the New Select Product search box to search for and add the product(s) the customer wants to take instead.
In this workflow, there are two separate search boxes:
- Return Select Product — for the old/returned products
- New Select Product — for the replacement/new products
- Add notes, tax, or supporting documents if needed — If necessary, complete the following fields: Order Tax, Attach Document, Return Discount, Return Note, Staff Note.
- Review the calculation — The system will automatically calculate the following based on the returned products and the new products:
- Exchange Value
- New Products Total
- New Shipping
- New Grand Total
- Balance (Customer Payment)
- Submit the exchange — After checking all information, click Submit to complete the exchange.
How the System Calculates the Exchange
The Exchange Calculation section automatically compares the value of the returned products with the value of the new products.
Scenario A: Even Exchange
If the total value of the returned products and the total value of the new products are equal, the Balance will be 0.00.
In this case, no additional payment or refund is required.
Scenario B: Customer Owes Money
If the total value of the new products is higher than the total value of the returned products, the Balance will be positive.
In this case, the customer must pay the difference.
Scenario C: Customer Receives a Refund
If the total value of the returned products is higher than the total value of the new products, the customer should receive the balance amount back as a refund.
Business Workflow Examples
Example 1: Exchange with a Reference Number
A customer wants to exchange a laptop that was purchased earlier.
- The cashier goes to Sale > Sale Exchange
- Enters the sale reference number in the modal
- Clicks Continue to Exchange
- The system loads the products from the previous sale
- The cashier checks the checkbox for the product(s) to be exchanged
- Adds the replacement laptop from New Select Product
- Reviews the calculation and clicks Submit
Example 2: Exchange without a Reference Number
A customer does not have a reference number but wants to return one product and take another.
- The cashier goes to Sale > Sale Exchange
- Clicks Continue Without Reference
- Selects the customer
- Selects the store
- Adds the returned product from Return Select Product
- Adds the replacement product from New Select Product
- Reviews the calculation and clicks Submit
Important Notes
What happens if a reference number is entered?
If a sale reference number is entered, the system loads the product list from that sale. You can then select only the products that should be exchanged by checking their checkboxes.
What happens if no reference number is entered?
If no reference number is entered, the Exchange page opens in blank mode, and you must manually:
- Select the customer
- Select the store
- Search and add the returned product(s)
- Search and add the new product(s)
Separate Search Boxes for Return and New Products
This workflow uses two separate product search fields:
- Return Select Product: for the products being returned
- New Select Product: for the products being taken as replacements
Troubleshooting
Problem: Products do not appear after entering the reference number
Possible Causes:
- The reference number is incorrect
- The sale data could not be found
- No products are linked to that sale
Solution:
- Verify that the reference number is correct
- Copy the reference number directly from the Sale List if possible
- If necessary, use Continue Without Reference and process the exchange manually
Problem: I only want to exchange some of the products, not all of them
Solution: In a reference-based exchange, use the checkboxes in the Order Product table to select only the products that should be exchanged. Unchecked products will remain excluded from the exchange.
Problem: I do not have a reference number
Solution: Use Continue Without Reference and manually select the customer, returned products, and new products.
Related Articles
- 7.1 Managing Standard Returns
Step 1: Add Exchnage with reference number or without reference number.
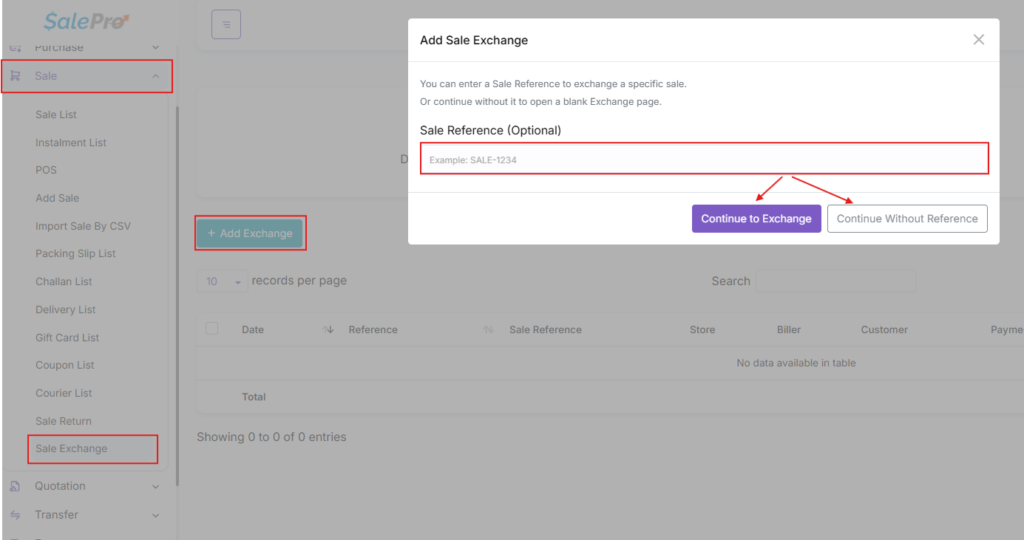
Step 2:
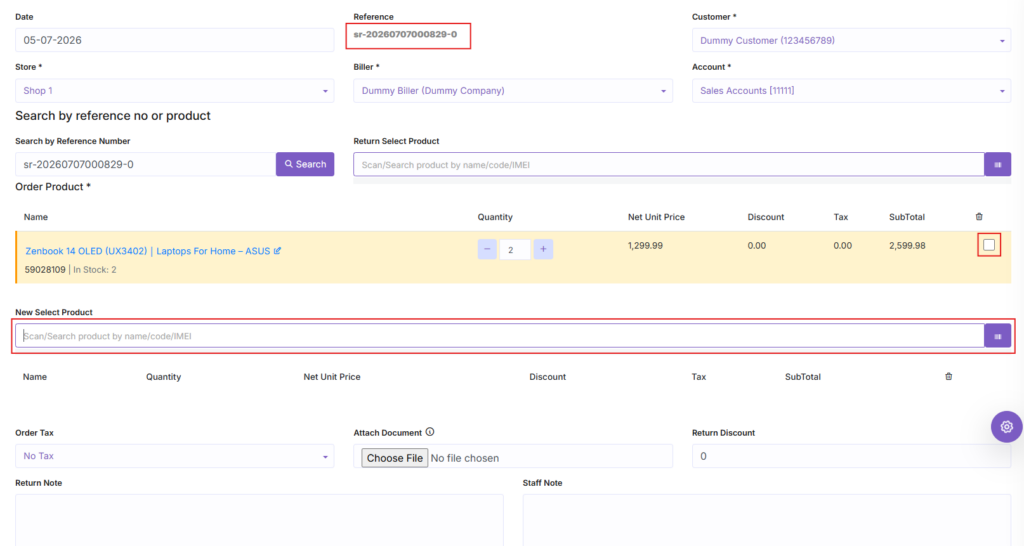
8.1 Income & Expense Tracking
Overview
This article explains how to record daily business costs (like rent or coffee) and miscellaneous income outside of your standard sales inventory.
While SalePro automatically tracks the revenue from your product sales and the costs from your supplier purchases, running a business involves other financial transactions. The Expense module allows you to track overhead costs so your final Profit & Loss report is perfectly accurate.
Prerequisites
- You must create Expense Categories (e.g., Utilities, Rent, Office Supplies) via Expense > Expense Category.
Step-by-Step Instructions
Recording an Expense
- From the left sidebar, navigate to Expense > Add Expense.
- Select the Expense Category from the dropdown.
- Select the Warehouse the expense applies to (Useful if you want to see which of your 3 stores is spending the most on electricity).
- Enter the Amount.
- Select the Account the money was paid from (e.g., Petty Cash, Main Bank).
- Enter a Note describing the expense (e.g., “Bought printer paper”).
- Click Submit.
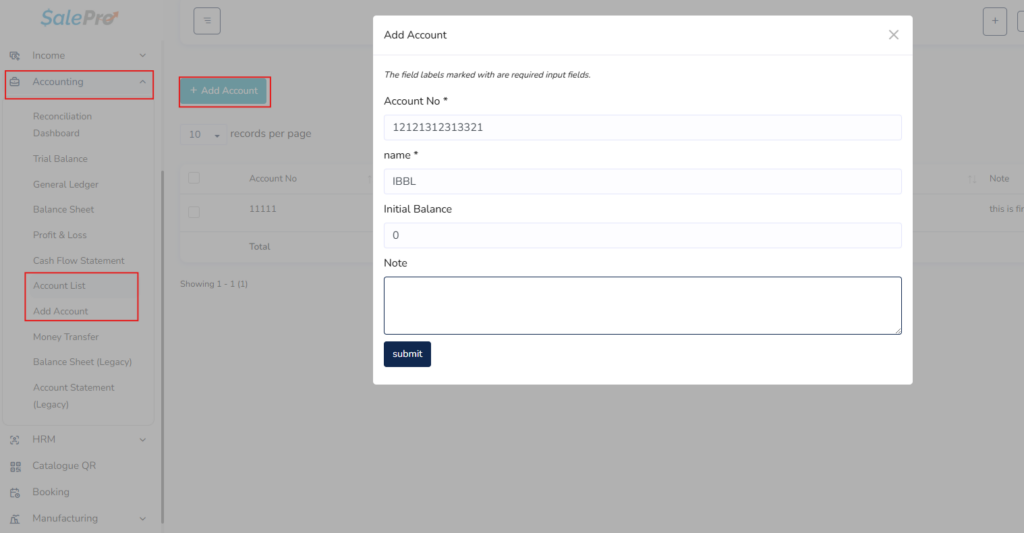
Screenshot: Add Expense modal highlighting the Category and Account dropdowns
Explanation of Key Fields
- Expense Category: Organizes your costs. When you run a tax report at the end of the year, you can see exactly how much you spent on “Travel” versus “Marketing”.
- Account: Determines which ledger is reduced. If you select “Petty Cash”, the system knows there is now less physical money in your store.
Business Workflow
Cashier needs to buy window cleaner → Takes $5 from the physical register → Cashier creates an Expense in SalePro for $5 under “Cleaning Supplies”, paying from “Register Cash” → When the manager counts the drawer at 5 PM, the system expects it to be $5 shorter, preventing an accounting discrepancy.
Examples
- Monthly Rent: On the 1st of every month, the owner logs in, clicks Add Expense, selects “Rent”, types $2,500, and selects the “Main Bank Account”. This ensures the Profit & Loss report for that month reflects the heavy overhead.
Tips
- Attach Receipts: In many versions of SalePro, you can attach a photo or PDF to the expense. Require your staff to take a picture of the physical receipt when they log an expense so your accountant has proof for tax deductions.
Warnings
WARNING: Do not log Inventory Purchases as Expenses. If you pay a supplier for shirts, you must use Purchase > Add Purchase. If you use the Expense module, the money will be deducted from your bank, but the physical shirts will never be added to your warehouse.
Troubleshooting
Problem: I can’t add an expense because the “Account” dropdown is empty.
- Possible Cause: You have not set up your Chart of Accounts in the Accounting module yet.
- Solution: See 8.2 Double-Entry Accounting Setup & Mapping. You must create at least one Account (like “Default Bank”) before you can spend money from it.
Related Articles
See also:
- 8.2 Double-Entry Accounting Setup & Mapping
- 11.1 Sales, Purchases, and Financial Reports
8.2 Double-Entry Accounting Setup & Mapping
Overview
This article explains how to build the financial framework that tracks every penny moving into, out of, and within your business.
SalePro utilizes a double-entry accounting system. This means that every time money moves, it leaves one place and enters another. To use this system, you must create “Accounts” (which represent your real-world bank accounts, cash drawers, and credit cards). This allows you to see exactly where your company’s money is physically sitting at any given moment.
Prerequisites
- You must be logged in as an Administrator or Accountant.
Step-by-Step Instructions
Step 1: Create Your Accounts
- Navigate to Accounting > Account.
- Click Add Account.
- Enter the Account No (e.g., 1001, or the last 4 digits of your real bank account).
- Enter the Name (e.g., Main Chase Checking, Store 1 Cash Register, Petty Cash Box).
- Enter the Initial Balance (The amount of money currently in this real-world account today).
- Click Submit.
- Repeat this process for every distinct pool of money your business controls.
Screenshot: The Account List showing multiple accounts (Bank, Cash Register) and their current balances
Step 2: Map the Default Account To tell the system which account to use by default at checkout:
- Navigate to Accounting > Account List.
- In the table, locate the “Default” column next to your primary account (e.g., Main Cash Register).
- Turn the toggle switch to the ON (Green) position. The system will now default to this account for all standard transactions.
Explanation of the Accounting Logic
When you process a transaction in SalePro, the system updates the relevant Account balance immediately:
- Sale (Paid by Cash): Increases the balance of the “Cash Register” account.
- Purchase (Paid by Bank Transfer): Decreases the balance of the “Main Bank” account.
- Expense (Paid from Petty Cash): Decreases the balance of the “Petty Cash Box” account.
- Payroll: Decreases the designated paying account.
Business Workflow
Setup Phase: Accountant creates “Cash Drawer 1” with $200 initial balance → Creates “Business Checking” with $50,000 initial balance → Creates “Stripe Digital Holding” with $0 balance.
Daily Operations: Cashier makes a $50 cash sale → “Cash Drawer 1” balance rises to $250 → Customer buys online via Stripe for $100 → “Stripe Digital Holding” balance rises to $100.
Examples
- Balancing the Books: At the end of the month, the owner looks at the Accounting > Account list. SalePro says “Main Chase Checking” has $45,210. The owner logs into their actual Chase Bank app on their phone. It says $45,210. The books are perfectly balanced.
Tips
- Separate Cash and Card: Always create separate accounts for physical cash and digital gateways. When a customer pays by credit card, the money isn’t in your physical store; it takes 2 days to reach your bank. Create a “Pending Stripe Funds” account to track this money in limbo.
Warnings
WARNING: Do not delete an Account with a balance. If you close a real-world bank account, you must use the “Money Transfer” feature to move the digital balance in SalePro to another account until the old account reads $0.00. Only then should you consider disabling or deleting it.
Troubleshooting
Problem: My cash register account balance in SalePro is $5,000, but I only have $200 in the physical drawer.
- Possible Cause: You are not recording Bank Deposits. When you take cash out of the drawer to take to the bank, you must record that movement in SalePro.
- Solution: See 8.3 Automated & Manual Journaling to learn how to do a Money Transfer from the Cash Register account to the Bank account.
Related Articles
See also:
- 8.3 Automated & Manual Journaling
- 8.1 Income & Expense Tracking
8.3 Automated & Manual Journaling
Overview
This article explains how to move money between your internal accounts.
As explained in the previous article, SalePro tracks where your money lives. When a cashier sells items all day, the digital “Cash Register” account balloons in value. In the real world, a manager will empty that register and drive the physical cash to the bank. You must tell SalePro that this money has moved from the Register account to the Bank account. This is called a Money Transfer or Journal Entry.
Prerequisites
- You must have at least two Accounts created in the Accounting module (See 8.2 Double-Entry Accounting Setup).
Step-by-Step Instructions
Transferring Money Between Accounts
- From the left sidebar, navigate to Accounting > Money Transfer.
- Click Add Transfer.
- In the From Account dropdown, select where the money is leaving (e.g., Cash Drawer 1).
- In the To Account dropdown, select where the money is going (e.g., Main Bank Checking).
- Enter the Amount being moved (e.g., 1500).
- Click Submit (The system will automatically generate a Reference Number for you)..
Screenshot: Add Money Transfer modal showing From Account, To Account, and Amount fields
Viewing the Balance Sheet
To ensure your transfers were logged correctly, you should check your ledger.
- Navigate to Accounting > Balance Sheet.
- You will see a real-time snapshot of your assets. The “Cash Drawer 1” balance will have decreased by $1,500, and the “Main Bank Checking” balance will have increased by $1,500.
Explanation of the Workflow
This process mirrors your physical banking tasks: End of day → Manager counts $1,500 in the physical register drawer → Manager takes the $1,500 cash to the bank deposit box → Manager logs into SalePro and performs a “Money Transfer” → The SalePro balances now match reality.
Examples
- Stripe Payouts: Over the weekend, customers bought $2,000 worth of goods online via Stripe. The SalePro account “Stripe Holding” shows $2,000. On Tuesday, Stripe automatically deposits that money into the business’s real checking account. The accountant logs into SalePro, goes to Money Transfer, and moves $2,000 from “Stripe Holding” to “Business Checking”.
Tips
- Daily Deposits: Make it a habit to log your Money Transfers at the exact same time you make physical deposits. Doing it daily prevents the cash register balance from looking artificially inflated.
Warnings
WARNING: Check Your Dates: When performing a transfer to reconcile past banking statements, ensure the date of the transfer matches the date the money actually hit your bank. This keeps your monthly financial reports perfectly aligned.
Troubleshooting
Problem: I can’t select my Bank Account in the “To Account” dropdown.
- Possible Cause: The account is inactive, or you accidentally selected it in the “From Account” dropdown as well.
- Solution: Verify the account is active in Accounting > Account. You cannot transfer money from an account to itself.
Related Articles
See also:
- 8.2 Double-Entry Accounting Setup & Mapping
- 11.1 Sales, Purchases, and Financial Reports
9.1 Reward Points System
Overview
This article explains how to configure and use the built-in customer loyalty program.
Retaining an existing customer is cheaper than acquiring a new one. SalePro includes a Reward Points system that automatically grants customers points based on how much money they spend. Customers can then redeem these points on future purchases to receive a discount.
Prerequisites
- Customers must be added to the database. (Walk-in customers cannot accrue points, as there is no profile to attach them to).
Step-by-Step Instructions
Part 1: Configuring the Point Values
Before you can award points, you must define what a point is worth.
- Navigate to Setting > Reward Point Setting.
- Active reward point You MUST check this box to activate the loyalty program.
- Sold Amount Per Point: How much the customer must spend to earn 1 point (e.g., $10).
- Min Earned Point: The minimum points a customer must accrue before they are allowed to redeem them (e.g., 50).
- Per Point Value: How much a point is worth when redeemed (e.g., $0.50).
- Click Submit.
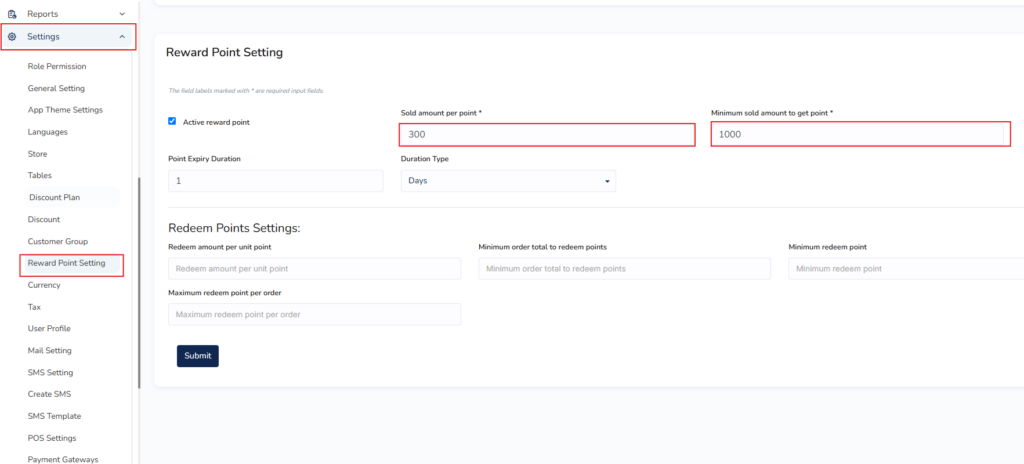
Screenshot: Reward Point Setting form showing the conversion rate fields
Part 2: Earning & Redeeming Points (POS)
- On the POS screen, select a specific Customer (Do not use Walk-in Customer).
- Add items to the cart and process the sale normally.
- The system automatically calculates the points earned and adds them to the customer’s profile.
- To Redeem: The next time that customer comes in, select their name. Their available point balance will appear at the top of the POS screen.
- In the cart, click the Use Points button (or apply them via the Multiple Pay modal).
- The POS calculates the monetary value of those points and subtracts it from the Grand Total.
Part 3: Managing Points Manually If you need to manually give points to a customer (e.g., as a special gift or compensation), or check their point history:
- Navigate to People > Customer List.
- Locate the specific customer and click the Action dropdown.
- Click Add Point to manually increase their balance.
- Click View Points to see a detailed history of how they earned and spent their points.
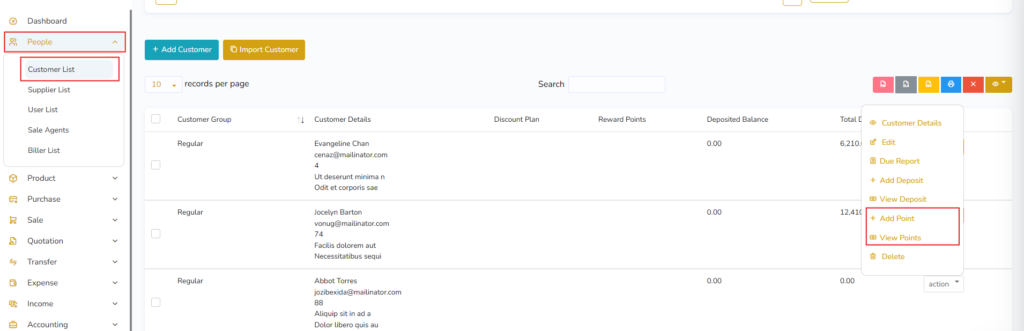
Explanation of Key Fields
- The Math: If Sold Amount Per Point = $10, and Per Point Value = $1. A customer who buys a $100 jacket earns 10 points. The next time they shop, those 10 points give them a $10 discount. Essentially, this is a 10% cashback loyalty program.
Business Workflow
Admin configures point values → Cashier selects “Jane Doe” at checkout → Jane buys $50 worth of goods → Jane earns 5 points → Next week, Jane buys a $20 item → Cashier clicks “Redeem Points” → System applies a $5 discount → Jane pays $15.
Examples
- The Coffee Shop Punched Card: A coffee shop wants to mimic a “Buy 10 coffees, get 1 free” system. A coffee costs $3. They set “Sold Amount Per Point” to $3, and “Per Point Value” to $0.30. After 10 coffees, the customer has 10 points (worth $3.00), which buys them exactly one free coffee.
Tips
- Use Points to Drive Registration: Train your cashiers to say, “If you give me your phone number to create a profile, you’ll earn $5 in reward points today.” This is the easiest way to build a marketing database.
Warnings
WARNING: Changing Values Retroactively: If you change the “Per Point Value” in the settings from $1.00 to $0.10, you instantly devalue every point your customers have already earned. This can lead to very angry customers. Plan your loyalty economics carefully before launching the program.
Troubleshooting
Problem: A customer spent $100 but their receipt says they earned 0 points.
- Possible Cause: The customer was rung up as a “Walk-in Customer”, or the system settings are configured so that points are only awarded on purchases over $200.
- Solution: Verify the Reward Point Settings. Ensure cashiers are actually selecting the customer’s profile before finalizing the sale.
Related Articles
See also:
- 6.1 Customer Management & Groups
- 6.2 The POS Interface
9.2 Gift Cards & Coupons
Overview
This article explains how to generate promotional coupons and sell prepaid gift cards.
Coupons are marketing tools used to drive traffic. You generate a code (e.g., SUMMER20) that gives a percentage or flat discount, which you can print on flyers or post on social media. Gift Cards are prepaid payment methods. A customer gives you $50 today in exchange for a plastic card or digital code. They (or a friend) can return later and use that code as a payment method at the POS.
Prerequisites
- None.
Step-by-Step Instructions
Part 1: Creating a Coupon
- Navigate to Sale > Coupon.
- Click Add Coupon.
- Type a Coupon Code (e.g., BLACKFRIDAY). You can also click Generate for a random code.
- Select the Type (Percentage or Fixed Amount).
- Enter the Value (e.g., 20 for 20%).
- Enter a Minimum Amount (e.g., 50). The coupon will only work if the cart total is above $50.
- Enter an Expired Date.
- Click Submit.
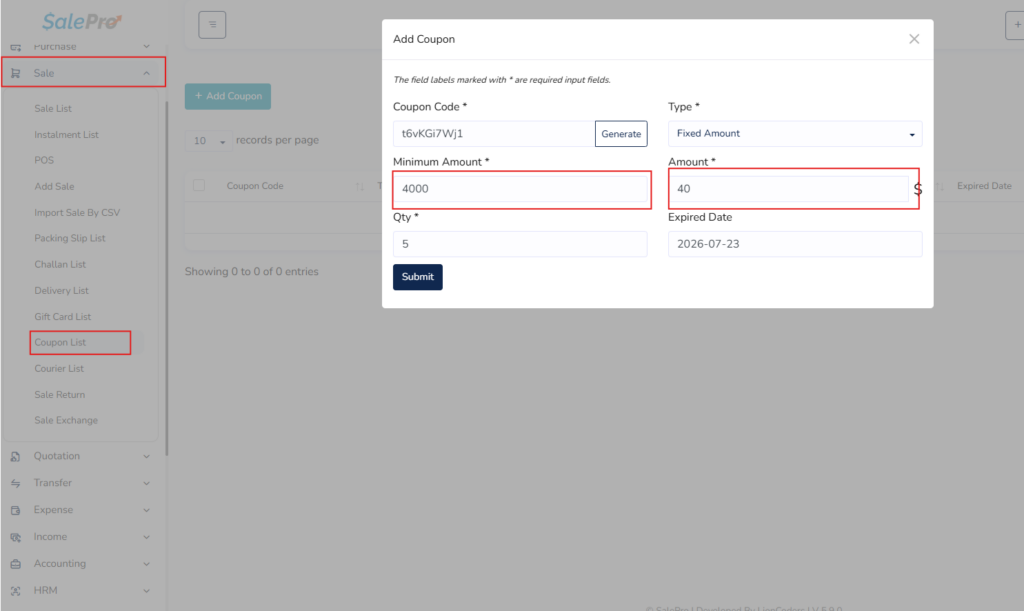
Screenshot: Add Coupon modal highlighting the Type, Value, and Minimum Amount fields
Part 2: Creating and Selling a Gift Card
- Navigate to Sale > Gift Card.
- Click Add Gift Card.
- A random Card No is generated. (If you have physical plastic cards with magnetic stripes or barcodes, scan the physical card into this field instead).
- Enter the Amount (e.g., $100).
- Assign it to a Customer (if known).
- Click Submit.
- Important: Creating a gift card does not put money in your bank. You must still ring up the customer on the POS for a $100 “Custom Payment” or use the backend to record that they paid you $100 for this card.
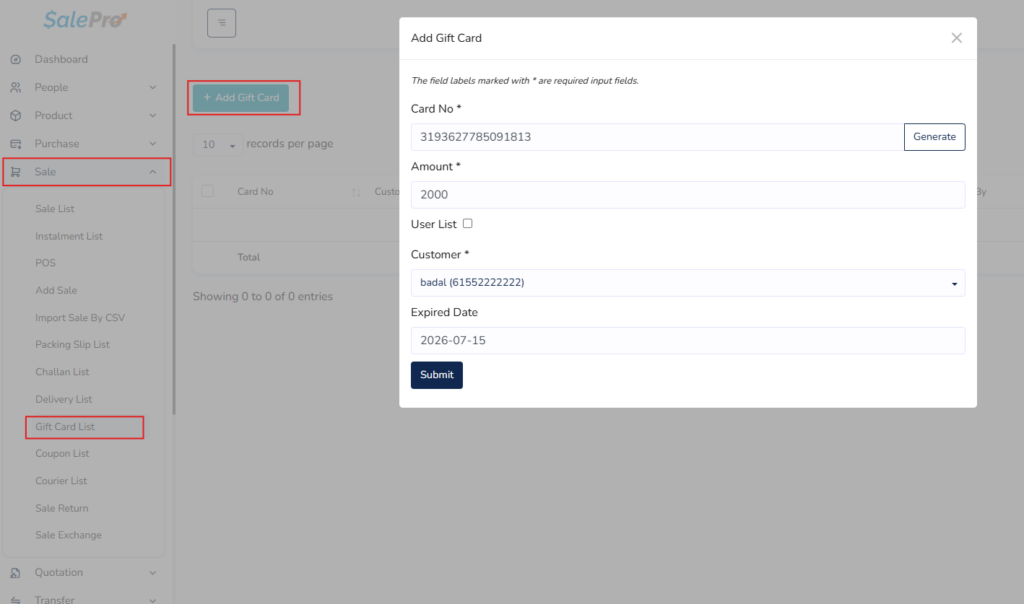
Screenshot: Add Gift Card modal highlighting the Card No and Amount fields
Part 3: Redeeming on the POS
- Add items to the cart.
- For Coupons: Click the Coupon button at the bottom of the cart. Type the code. The discount is applied.
- For Gift Cards: Click the Multiple Pay button. Select Gift Card as the Paying Method. Type or scan the Card No. The system deducts the money from the card’s balance.
Explanation of Key Fields
- Coupon Type – Percentage: A 10% coupon on a $100 cart gives a $10 discount. On a $200 cart, it gives a $20 discount.
- Coupon Type – Fixed Amount: A $10 coupon gives a $10 discount regardless of whether the cart is $50 or $500.
Business Workflow
- Coupon: Manager generates WINTERSALE (20% off) → Posts it on Facebook → Customer walks in, buys a coat, tells the cashier the code → Cashier types it in → 20% is deducted from the total.
- Gift Card: Customer wants to buy a birthday present → Cashier goes to Sale > Gift Card, creates a card for $50, takes $50 cash from the customer → Next week, the birthday boy comes in, buys $40 of goods, pays with the Gift Card → The card now has a $10 remaining balance.
Examples
- Physical Gift Cards: A coffee shop orders 500 plastic cards with barcodes printed on the back. When a customer wants to buy a $25 gift card, the cashier opens the Add Gift Card window, scans the physical plastic card (which fills in the Card No field), sets the amount to $25, and saves it.
Tips
- Limited Quantity Coupons: You can restrict a coupon so it can only be used 50 times total. This is great for “First 50 customers get $10 off!” promotions.
Warnings
WARNING: Gift Card Accounting: Selling a gift card creates a “Liability” in accounting terms (you have cash, but owe goods). Be sure your accountant understands how to pull the Gift Card balance reports to properly balance your end-of-year books.
Troubleshooting
Problem: A coupon code isn’t working on the POS.
- Possible Cause: The coupon has expired, the usage limit was reached, or the cart total is below the “Minimum Amount” threshold set during creation.
- Solution: Check the coupon settings in Sale > Coupon.
Related Articles
See also:
- 6.2 The POS Interface
- 6.5 Payments, Gateways, and Installments
11.1 Sales, Purchases, and Financial Reports
Overview
This article guides you through the financial reporting tools within SalePro.
Running a business requires knowing exactly how much money you are making and losing. SalePro automatically aggregates every sale, purchase, expense, and payroll entry you log into comprehensive, real-time reports. Understanding these reports is critical for managers, owners, and external accountants.
Prerequisites
- You must have data in the system (Sales, Purchases, Expenses) to generate meaningful reports.
- The user must have a Role with “Reports” permissions enabled.
Step-by-Step Instructions
- From the left sidebar, navigate to the Report section.
- A long list of available reports will appear. Click on the report you wish to view (e.g., Profit and Loss).
- At the top of most reports, you will find filters. Use the Date Range, Warehouse, or Customer/Supplier dropdowns to narrow the data.
- Click the Search or Filter button to refresh the data.
- Above the data table, click the CSV or PDF buttons to export the report for your accountant or external software.
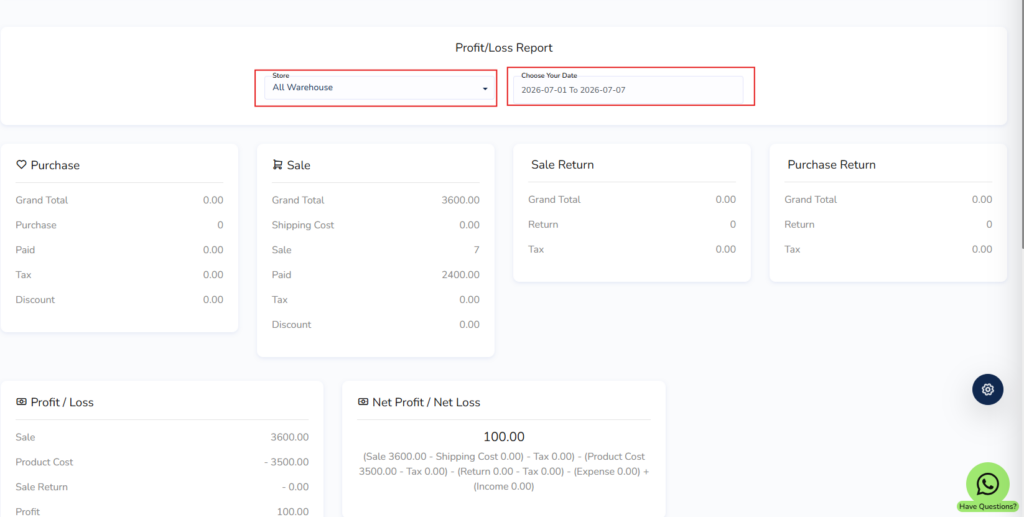
Screenshot: The Profit and Loss report interface highlighting the Date Range filter and Export buttons
Explanation of Key Financial Reports
1. Profit and/or Loss Report
This is the most important report for an owner. It provides a macro view of the business’s health over a selected time period.
- Revenue: Total money generated from Sales.
- Cost of Goods Sold (COGS): The amount you paid suppliers for the specific items you sold.
- Gross Profit: Revenue minus COGS.
- Expenses: Overhead costs (Rent, utilities, payroll).
- Net Profit: Gross Profit minus Expenses. (This is your actual take-home money).
2. Best Seller Report
Visualizes your top-performing products.
- Displays a bar chart or pie chart of the items that generated the most revenue or the highest quantity sold in a given month. Crucial for purchasing decisions (knowing what to reorder).
3. Daily Sale & Daily Purchase Reports
A calendar view of your cash flow.
- Shows a grid of the current month. Each day displays the total revenue generated or total money spent on inventory. Useful for identifying trends (e.g., “We always sell the most on Saturdays”).
4. Due Report (Accounts Receivable / Payable)
Tracks debt.
- Customer Due Report: Lists every customer who owes you money (Sales marked as “Due” or “Partial”). Used by your billing department to make collection calls.
- Supplier Due Report: Lists every supplier you owe money to. Used to ensure you pay your bills on time and maintain good credit terms.
Business Workflow
End of Month Accounting: Accountant logs in on the 1st of the month → Navigates to Profit & Loss → Sets date range to “Last Month” → Clicks PDF Export → Navigates to Tax Report → Exports CSV → Imports CSV into national tax filing software → Business stays compliant.
Examples
- Investigating a Loss: An owner looks at the Profit & Loss report and sees the business lost $1,000 this month despite high sales. They drill down into the Expense Report and discover that $3,000 was spent on “Emergency Repairs” for a delivery van, explaining the sudden drop in net profit.
Tips
- Use Warehouse Filters: If you own three stores, run the Profit & Loss report and filter by “Warehouse A”, then “Warehouse B”. This allows you to see if one specific store is losing money and dragging the rest of the company down.
Warnings
WARNING: Cost Accuracy is Crucial: The Profit and Loss report is only accurate if you enter the correct “Product Cost” when creating purchases. If you set all your costs to $0 because you are lazy, the system will report that 100% of your revenue is pure profit, which will severely mislead you (and your accountant).
Troubleshooting
Problem: The Profit & Loss report shows massive profits, but the bank account is empty.
- Possible Cause: The P&L report calculates based on Sales, not Cash Received. If you have $50,000 in sales, but they are all marked as “Due” (the customers haven’t paid you yet), your profit looks high on paper, but your cash flow is zero.
- Solution: Run the Customer Due Report to see who owes you money and start collecting.
Related Articles
See also:
- 8.1 Income & Expense Tracking
- 8.2 Double-Entry Accounting Setup & Mapping
11.2 Inventory & Staff Reports
Overview
This article covers the logistical and operational reports in SalePro.
While financial reports track money, inventory and staff reports track physical items and human performance. These reports help warehouse managers know when to reorder stock, identify which products are sitting on shelves losing value, and help store managers evaluate which cashiers are processing the most transactions.
Prerequisites
- The user must have a Role with “Reports” permissions enabled.
Step-by-Step Instructions
- From the left sidebar, navigate to the Report section.
- Scroll past the financial reports to locate the Inventory and HR reports.
- Select the desired report (e.g., Product Quantity Alert).
- Use the filters (Warehouse, Date Range) at the top of the screen if available.
- Click Search to generate the data.
- Use the CSV or PDF buttons to export the data.
Explanation of Key Logistical Reports
1. Product Quantity Alert
This is the most critical report for purchasing managers.
- It lists every single product across all warehouses where the current physical stock has fallen below the “Alert Quantity” defined in the product settings.
- Workflow: A manager checks this report every Monday morning and creates Purchase Orders for every item listed to prevent stockouts.
2. Warehouse Stock Chart
Provides a macro view of your physical assets.
- Displays a pie chart showing the total number of items and the total financial value of the inventory sitting in each warehouse.
- Useful for insurance purposes (knowing exactly the dollar value of the goods stored at a specific location in case of fire or theft).
3. Product Expiry Report
Critical for grocery stores and pharmacies.
- Lists all batches of items and their expiration dates, sorted by what is expiring soonest.
- Workflow: A manager checks this report, identifies products expiring in 30 days, and moves them to the front of the store with a 50% off discount sticker to recover some cost before they must be thrown away.
4. User Report
Evaluates employee performance.
- Select a specific user (cashier) from a dropdown. The report shows every sale, purchase, and return processed by that specific human over a given time period.
- Useful for calculating commissions or identifying cashiers who process an unusually high number of returns (which could indicate a training issue or fraud).
Business Workflow
Weekly Operations Audit: Manager runs Product Quantity Alert to place orders → Manager runs User Report to see who the top-performing salesperson was this week → Manager runs Warehouse Stock Chart to ensure Store A doesn’t have 80% of the company’s total inventory value while Store B’s shelves are empty.
Examples
- Sales Commission: A boutique pays its staff a 5% commission on everything they sell. At the end of the month, the owner runs the User Report for “Alice”, sees she generated $10,000 in sales, and adds a $500 bonus to her payroll check via the HRM module.
Tips
- Export for Custom Dashboards: If SalePro doesn’t have a highly specific graph you want to see, export the “Sale Report” to CSV. Open it in Microsoft Excel or Google Data Studio to build your own custom pivot tables and dashboards.
Warnings
WARNING: Data Overload: The “Product Report” (which lists the history of every single item) can take a very long time to load if you have millions of rows of sales data. Always use the Warehouse or Date Range filters to narrow the data before you click search on massive databases.
Troubleshooting
Problem: The Product Quantity Alert report is empty, but I know I’m out of stock of shirts.
- Possible Cause: When the shirt was created in the Product module, the “Alert Quantity” was left at 0.
- Solution: Edit the shirt product and set the Alert Quantity to 10. It will now correctly appear on the report when stock falls below 10.
Related Articles
See also:
- 4.3 Creating & Managing Products
- 4.5 Batches, Expiry & IMEI Tracking
- 3.2 Managing Users & Employees
POS Offline / Online Auto Sync
Overview
The POS can continue working even if the internet connection drops. When the internet is available, the system prepares the POS by saving product information in the browser. If the connection is lost, the cashier can still add products and complete a sale. The sale is saved temporarily on that computer. When the internet comes back, the system automatically sends the saved sale to the server.
POS Screens
Online POS Screen
Below is the POS screen while the system is online. The cloud icon in the top bar shows that the POS is connected.
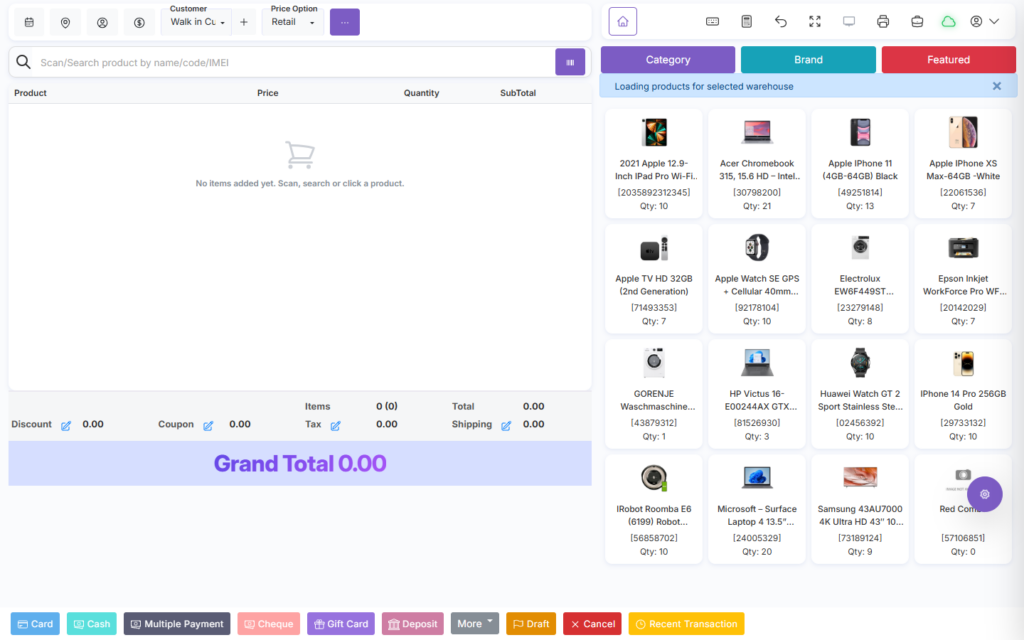
Offline POS Screen
Below is the POS screen while the system is offline. The cloud icon is red, showing disconnected status, and a warning toast notification indicates offline mode.
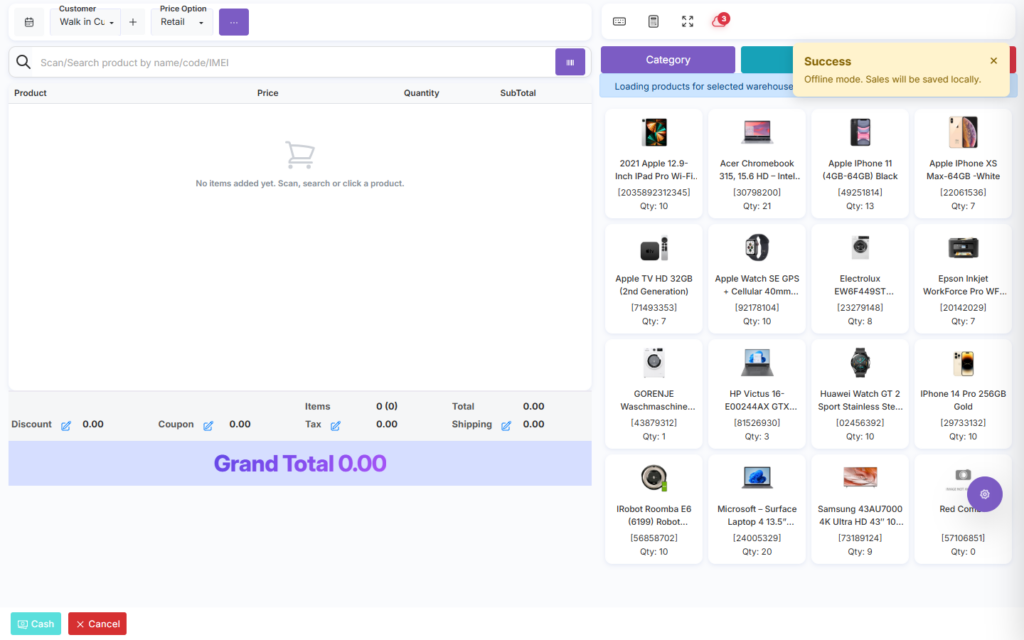
Auto Sync Flow
- Online: POS loads products and prepares them for offline use.
- Offline: POS detects connection loss and switches to offline mode automatically.
- Local Save: Completed sales are saved on the same computer/browser.
- Pending Count: The cloud badge shows how many sales are waiting to sync.
- Back Online: POS detects the connection and sends pending sales to the server automatically.
- Completed: Synced sales become normal sales in the system.
How It Works
1. While Online
- The POS loads normally.
- Product information is saved in the browser for offline use.
- The cloud icon shows online status.
- Sales are submitted directly to the server.
- Stock, payment, invoice, reports, and accounting are updated immediately.
2. When Internet Is Lost
- The POS automatically detects the connection loss.
- The system switches to offline mode.
- Online-only options are hidden.
- The cashier can continue using the available cached product list.
- The cloud icon changes to offline mode.
- The cashier does not need to manually turn on offline mode. It happens automatically.
3. Saving a Sale Offline
- The sale is not sent to the server immediately.
- The sale is saved safely in the browser on that same computer.
- The cloud badge shows how many sales are waiting to sync.
- The cashier can print an offline receipt if needed.
- The POS cart is cleared so the cashier can continue the next sale.
- From the cashier’s side, the process feels almost like a normal sale. The main difference is that the sale waits locally until the internet comes back.
4. When Internet Comes Back
- The POS automatically detects that the system is online again.
- It checks whether there are any pending offline sales.
- If pending sales exist, it starts syncing automatically.
- Sales are sent to the server one by one.
- Successfully synced sales are removed from the pending list.
- If any sale fails to sync, it remains pending and can be retried later.
- No manual upload is needed from the cashier.
5. After Sync Is Completed
- It becomes a normal sale in the system.
- Stock is updated.
- Payment information is saved.
- Reports are updated.
- Accounting-related records are processed.
- The sale can be viewed from the regular sales list.
Important Notes
Receipts vs Records: Offline receipt printing is available, but the final server record is created after sync.
Browser Dependency: Offline sales are saved on the same computer and browser where the sale was made.
Sync Environment: That same browser needs to come back online for the pending sales to sync.
Data Loss Warning: If browser storage is cleared before syncing, pending offline sales may be lost.
Initialization Requirement: The POS should be opened online first so product data can be prepared for offline use.
Repair Addon
View Repair Dashboard
Gain immediate insight into your repair business performance by viewing the Repair Dashboard. This provides a summary of total, pending, in-progress, and completed jobs, along with revenue collected, outstanding dues, and overdue alerts. Access the Repair section to see these key metrics and get a quick overview of operations.
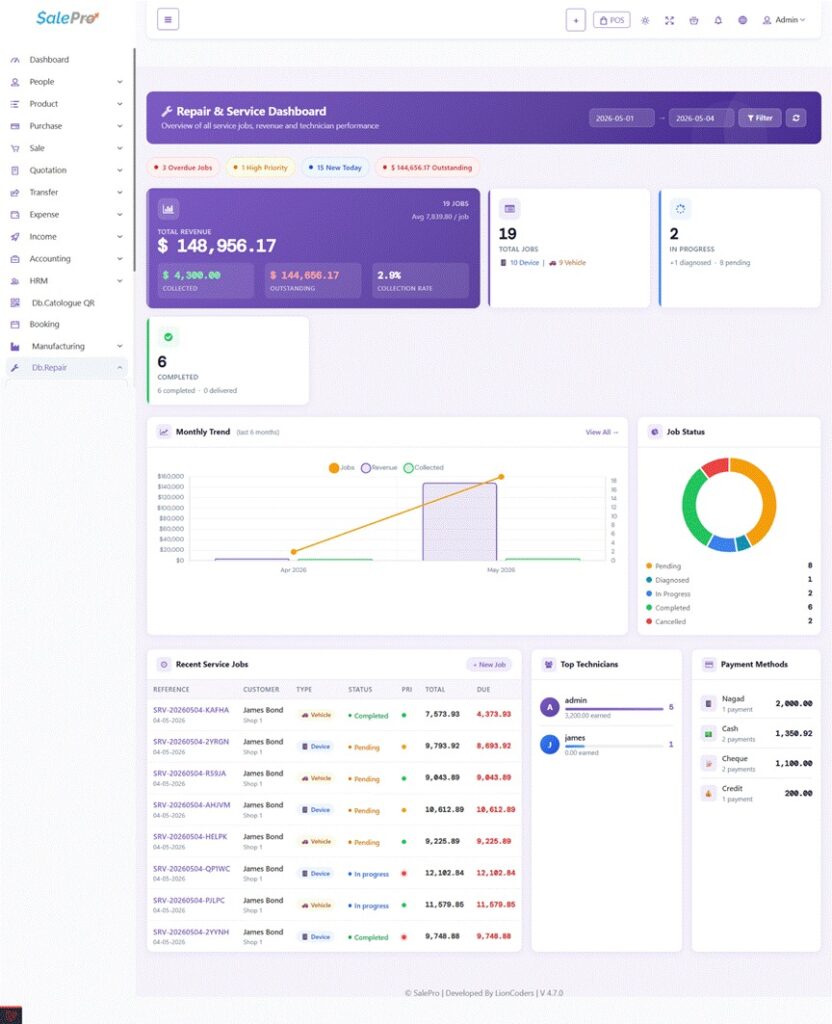
Dashboard Filters
Filter the dashboard data by date range to view performance for a specific period. Use the date range picker at the top of the dashboard to set a custom start and end date. The KPI cards, charts, and recent jobs table will update automatically to reflect the selected period. The dashboard also shows a top technicians summary based on completed jobs within the selected date range.
Service Job Management
View Service Job List
Review all service jobs by viewing the Service Job List. This displays a table detailing each job’s reference number, customer name, service type, title, status, priority, warehouse, total amount, and due amount. Navigate to the Service Jobs section to see the full list, search for specific jobs, filter by status or type, or add a new one.
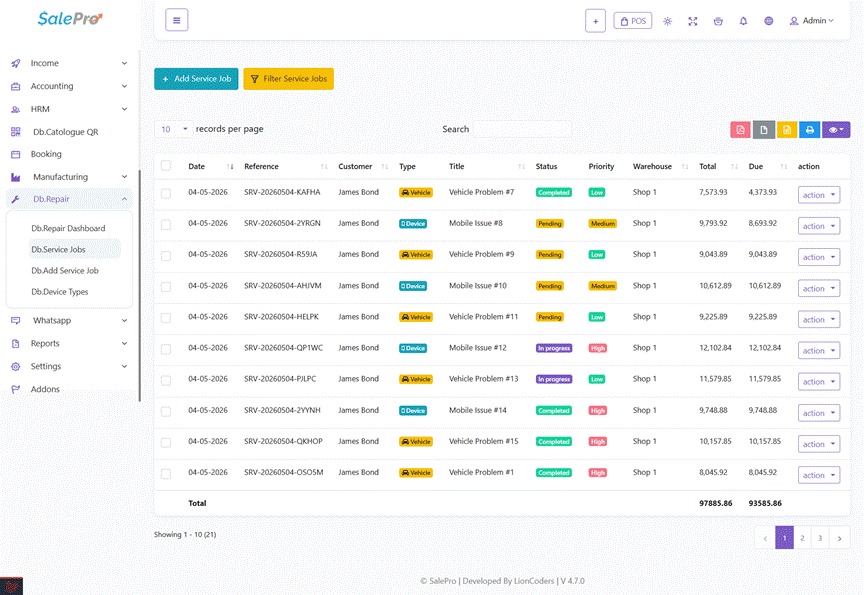
Create New Service Job
Create a new service job for a customer by opening the Add Service Job form. Select the customer, warehouse, and service type (Device or Vehicle). Enter a job title, set the expected delivery date, choose a priority level and status, and optionally assign a technician. Fill in the device or vehicle details in the relevant section, add any internal notes, and submit the form to create the job.
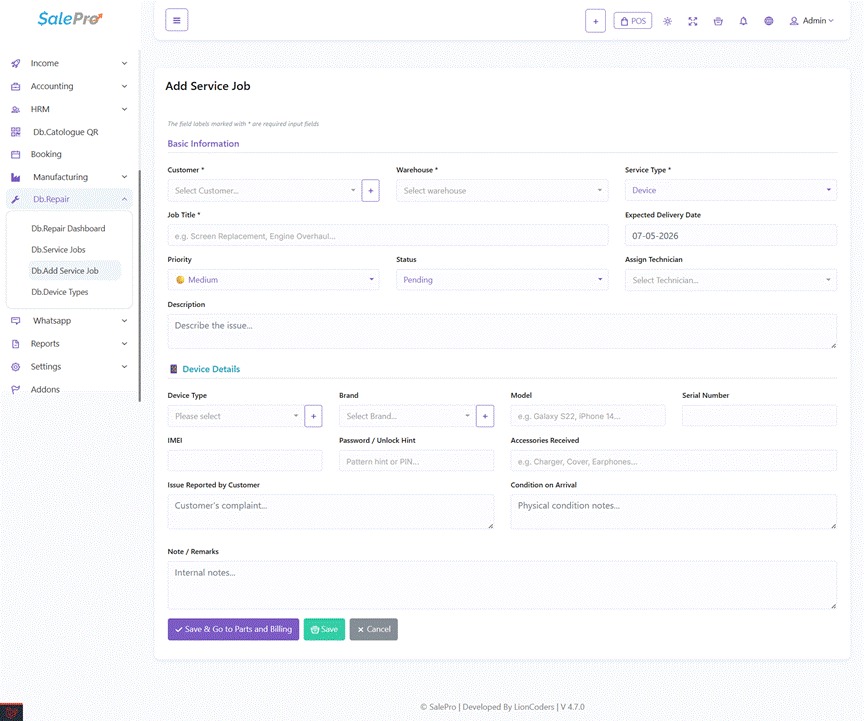
Submit Options
At the bottom of the create form, three action buttons control what happens after saving:
- Save & Go to Parts and Billing — saves the job and immediately proceeds to add parts and charges.
- Save — saves the job and returns to the Service Job list.
- Cancel — discards the form and returns to the list without saving.
Update Existing Service Job
Update the details of an existing service job by editing the job. Modify the title, status, priority, assigned technician, expected delivery date, warehouse, or device and vehicle details. Select the job you wish to change from the Service Jobs list and click Edit, adjust the required fields, and save the changes to update the job record.
View Service Job Details
Access a service job’s complete information by opening the job detail page. Select a job from the Service Jobs list and click View to display all its information. The detail page is divided into two columns.
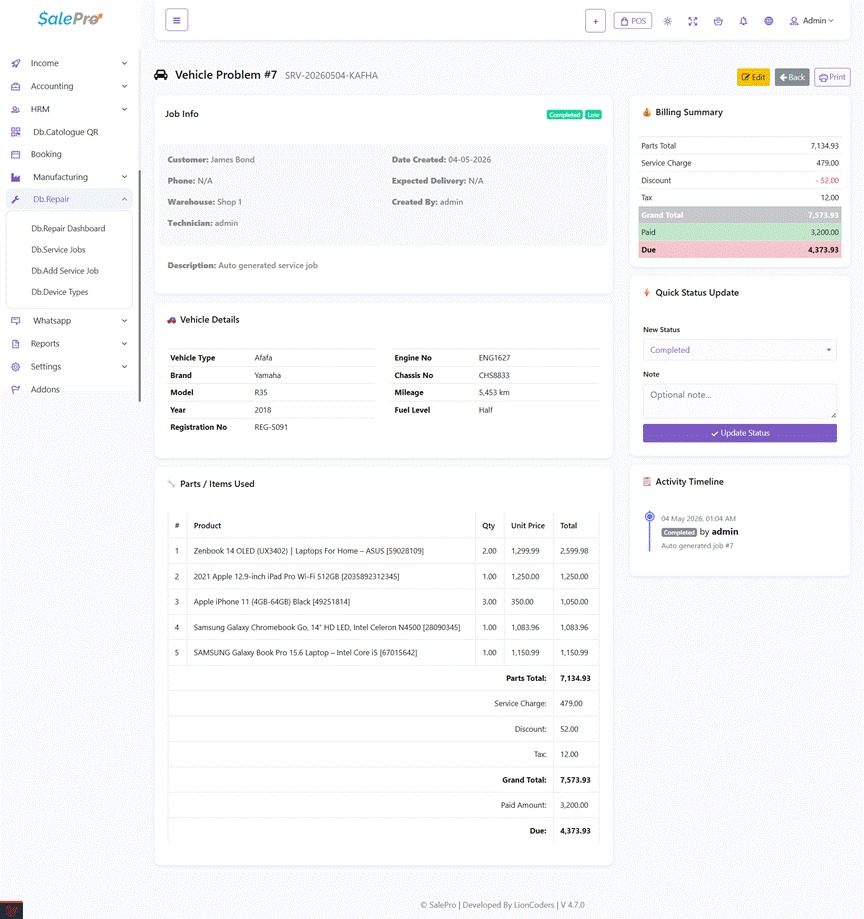
Left Column — Job Information and Records
Job Info Card
Displays the job title, reference number, and current status and priority badges at the top. The card shows two info panels side by side: the left panel lists the customer name, customer phone, assigned warehouse, and assigned technician; the right panel lists the date created, expected delivery date, delivered-on date (if applicable), and the user who created the job. Any description or internal note added to the job is shown below the panels.
Device Details Card (shown when service type is Device)
Displays the device type, brand, model, serial number, and IMEI in a table on the left. The right side shows the password or unlock hint and accessories received, followed by the issue reported by the customer and the physical condition notes on arrival.
Vehicle Details Card (shown when service type is Vehicle)
Displays the vehicle type, brand, model, year of manufacture, and registration number on the left. The right side shows the engine number, chassis number, mileage in kilometres, and fuel level, followed by any condition notes.
Parts and Items Used Card
Lists all spare parts and products added to the job in a table showing the item number, product name and code, quantity, unit price, and line total. The table footer shows the running totals: parts total, service charge, discount, tax, grand total, paid amount, and the current due balance.
Right Column — Billing, Status, and Activity
Billing Summary Card
Provides a concise summary of all financial figures: parts total, service charge, discount (shown in red), tax, grand total, paid amount, and the due balance. The due amount row is highlighted in red when there is an outstanding balance and green when the job is fully paid.
Quick Status Update Widget (hidden when printing)
Allows you to change the job status directly from the detail page without opening the full edit form. Select the new status from the dropdown (Pending, Diagnosed, In Progress, Completed, Delivered, or Cancelled), optionally enter a note explaining the change, and click Update Status. The change is saved and the page refreshes to reflect the new status.
Activity Timeline Card
Shows the complete status history of the job as a vertical timeline. Each entry displays the date and time of the change, the new status as a badge, the name of the user who made the change, and any note attached to that update.
Delete Service Job
Remove a service job from the system by deleting it. Deleting a job automatically restores any parts stock that was deducted and removes the linked sale record. Select the job from the Service Jobs list and click Delete, then confirm the action to permanently remove the job.
Device Details
Enter Device Information
When the service type is set to Device, fill in the device details section of the job form. Select the device type and brand from the dropdowns, enter the model name, serial number, and IMEI if applicable. Provide the customer’s password or unlock hint, list any accessories received with the device, describe the issue as reported by the customer, and note the physical condition of the device on arrival.
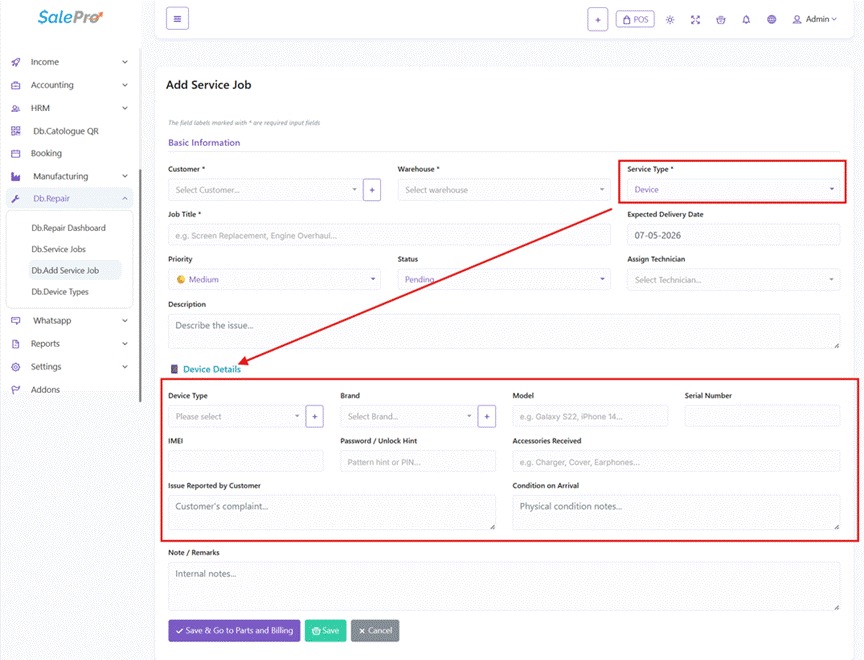
Add New Device Type
Add a new device type without leaving the service job form by clicking the plus button next to the Device Type dropdown. Enter the name of the new device type (for example Smart Watch or Tablet) in the modal that appears and submit. The new type is saved immediately and automatically selected in the dropdown.
Add New Brand
Add a new brand without leaving the service job form by clicking the plus button next to the Brand dropdown. Enter the brand name in the modal that appears and submit. The new brand is saved and automatically selected in both the device and vehicle brand dropdowns.
Vehicle Details
Enter Vehicle Information
When the service type is set to Vehicle, fill in the vehicle details section of the job form. Select the vehicle type and brand, enter the model, year of manufacture, registration number, engine number, and chassis number. Record the current mileage in kilometres and the fuel level on arrival, and add any notes on the vehicle’s physical condition.
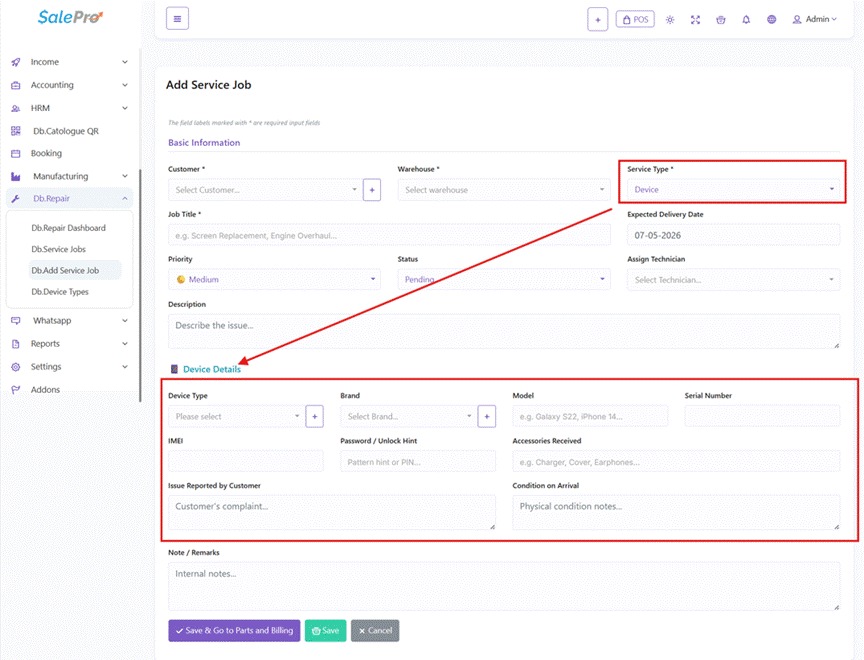
Add New Vehicle Type
Add a new vehicle type without leaving the service job form by clicking the plus button next to the Vehicle Type dropdown. Enter the name of the new vehicle type (for example Motorcycle or Truck) in the modal that appears and submit. The new type is saved and automatically selected in the dropdown.
Customer Management
Select Existing Customer
Select the customer for a service job from the Customer dropdown on the job form. The dropdown supports live search, allowing you to type part of the customer’s name or phone number to quickly find and select them.
Add New Customer
Add a new customer without leaving the service job form by clicking the plus button next to the Customer dropdown. Fill in the customer’s group, name, phone number, and optionally their email, WhatsApp number, address, and city. Submit the modal form to save the new customer, who is then automatically selected for the current job.
Parts and Billing
View Parts and Billing Page
Access the Parts and Billing page for a service job to manage the products used in the repair and set the final charges. Navigate to the Service Jobs list and click Parts and Billing from the action menu, or click Save and Go to Parts and Billing when creating a new job.
The page header shows the job reference number, customer name, warehouse, and current status and priority badges. Quick-access buttons at the top right let you view the full job details, return to the all-jobs list, or open the print modal.
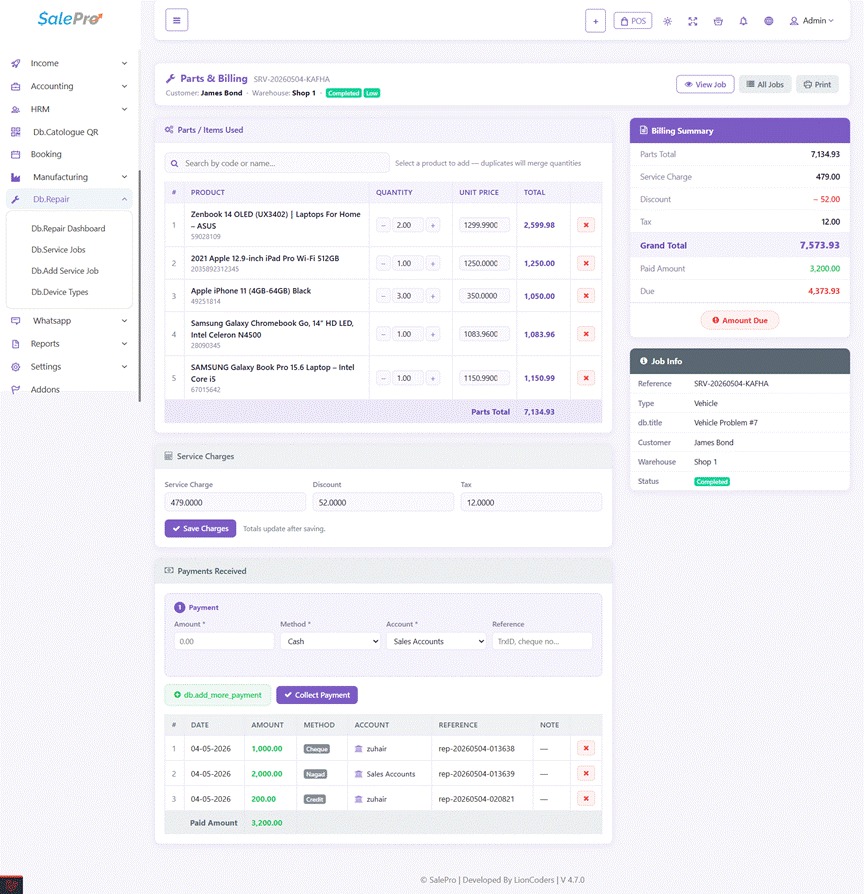
Left Column — Parts, Charges, and Payments
Parts and Items Used Section
Contains a product search bar and the parts table. The search field uses live autocomplete — type a product code or name to see matching results. When a product is selected, it is added to the job automatically and its stock is deducted from the assigned warehouse.
If a product that is already on the job is searched and selected again, the existing row flashes to indicate the duplicate and a notice appears instead of adding a second line.
The parts table shows each item with a quantity stepper (minus and plus buttons with a manual input field), an editable unit price field, and the calculated line total. Changes to quantity or price are saved automatically after a short delay. A delete button on each row removes the part and restores its stock to the warehouse.
Service Charges Section
Contains three input fields below the parts table: Service Charge (for labour or service fees), Discount (amount to deduct from the total), and Tax (amount to add to the total). Click Save Charges to update the grand total. The summary panel on the right updates immediately after saving.
Payments Received Section
Shows the payment collection form and the payment history table. The collection form contains fields for:
- Payment amount
- Payment method (Cash, Cheque, Card, bKash, Nagad, Rocket, or Bank Transfer)
- Account to credit — searchable dropdown
- Optional payment reference note
Click Collect Payment to record the payment. The system validates that the amount does not exceed the current due balance before saving. The payment history table lists each recorded payment with its date, amount, method badge, reference, and note. A delete button on each row removes the payment and recalculates the due balance automatically.
Right Column — Summary and Job Info
Billing Summary Panel
Displays a live summary of all financial figures: parts total, service charge, discount, tax, grand total, paid amount, and due balance. The due row is highlighted in red when there is an outstanding balance and green when the job is fully paid. A status badge at the bottom shows either Fully Paid or Amount Due depending on the current balance.
Job Info Panel
Shows a compact table of key job details: reference number, service type, job title, customer name, warehouse, current status badge, and expected delivery date.
Add Part or Product
Type the product code or name into the search field on the Parts and Billing page, select the correct product from the autocomplete results, and the item is added to the parts table at a quantity of one with its default price. Stock is automatically deducted from the warehouse assigned to the job.
Update Part Quantity or Price
Update the quantity or unit price of a part already added to a job directly within the parts table. Use the minus and plus stepper buttons or type a value into the quantity field to change the quantity. Click into the unit price field and enter a new value to change the price. Both changes save automatically after a short delay and the line total updates immediately. Stock is adjusted accordingly based on the difference.
Remove Part
Remove a part from the service job by clicking the delete button next to it in the parts table. Confirm the action when prompted. The part is removed from the bill and its quantity is returned to the warehouse stock automatically.
Set Service Charge, Discount, and Tax
Set the order-level charges using the fields in the Service Charges section. Enter a service charge for the labour or service fee, a discount amount to deduct, and a tax amount to add. Click Save Charges to apply the changes. The grand total is calculated automatically as the sum of all parts plus the service charge, minus the discount, plus the tax.
Payment Management
Record a Payment
Record a payment for a service job from the Parts and Billing page. Enter the payment amount, select the payment method, choose the account to credit from the searchable account dropdown, and optionally add a payment reference note. Click Collect Payment to save the record. The paid amount and due amount update immediately in the billing summary panel. Multiple partial payments can be recorded against a single job, provided each amount does not exceed the remaining due balance.
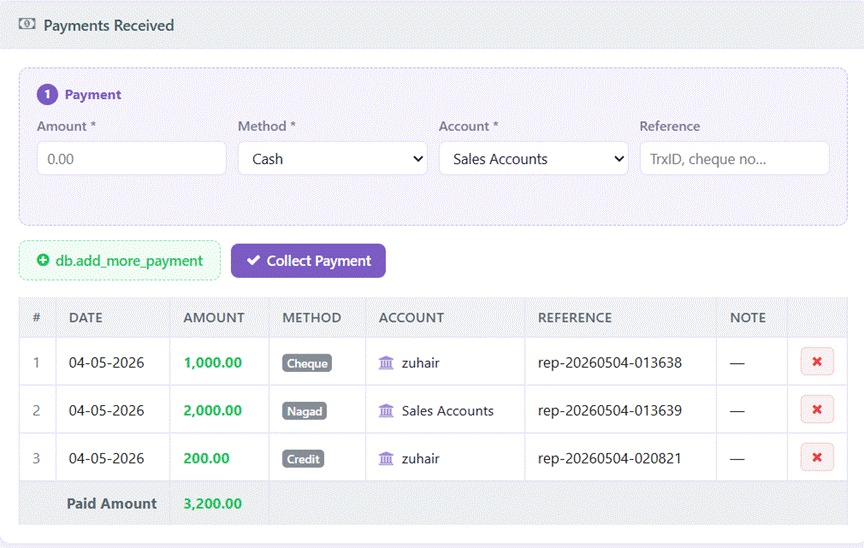
Delete a Payment
Remove an incorrectly recorded payment by clicking the delete button next to the payment entry in the payments table. Confirm the action when prompted and the payment is removed. The due amount is recalculated automatically and the billing summary panel updates immediately.
Payment and Sale Synchronization
Every payment recorded in the Repair Module is automatically synchronized with the SalePro sales system. A linked sale record is created or updated whenever a payment is added or removed, ensuring all repair revenue appears correctly in the main sales and financial reports.
Technician Assignment
Assign Technician to Job
Assign a technician to a service job by selecting them from the Assigned To dropdown on the job create or edit form. The dropdown lists all active users in the system. Select the technician responsible for carrying out the repair and save the job to record the assignment.
View Jobs by Technician
Review the workload of a specific technician by filtering the Service Jobs list. Use the search or filter options on the Service Jobs page to view only the jobs assigned to a particular technician. The Repair Dashboard also shows a top technicians summary based on completed jobs within the selected date range.
Device and Vehicle Type Management
View Device Type List
Review all configured device and vehicle types by viewing the Device Types list. This displays a table of each type’s name, category, description, and status. Navigate to the Device Types section under Repair to see the full list, search for a specific type, or add a new one.
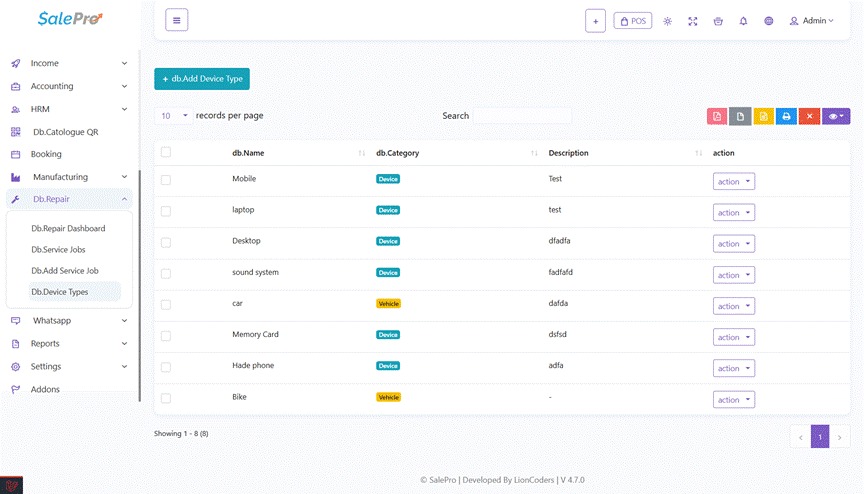
Add New Device or Vehicle Type
Add a new device or vehicle type to the system by opening the Add Type form. Enter the type name, select the category as either Device or Vehicle, and optionally add a description. Submit the form to save the type, which will then be available in the relevant dropdown on the service job form.
Edit Device or Vehicle Type
Update the details of an existing device or vehicle type by editing it. Select the type from the Device Types list and click Edit, modify the name, category, or description, and save the changes to update the type.
Import Device Types
Import multiple device or vehicle types at once by uploading a CSV file. Prepare a CSV file with columns for name, category, and description. Navigate to the Device Types section, click Import, select your CSV file, and submit. The types are created or updated in bulk based on the file contents.
Job Status Management
Update Job Status
Update the current status of a service job as it progresses through the repair workflow. You can do this in two ways:
- Open the job detail page and use the Quick Status Update widget on the right side to change the status and add an optional note without leaving the page.
- Open the full edit form and select the new status from the Status dropdown.
Either method logs the change automatically in the job’s activity timeline.
View Status History
Review the complete status history of a service job by viewing the Activity Timeline on the job detail page. Each status change is recorded with the date and time, the new status displayed as a badge, the name of the user who made the change, and any note added at the time. This provides a full audit trail of the job’s progress.
Available Statuses
Service jobs can be assigned one of the following statuses:
- Pending — newly created, awaiting action.
- Diagnosed — issue has been assessed.
- In Progress — repair work is underway.
- Completed — repair is finished.
- Delivered — device or vehicle has been returned to the customer.
- Cancelled — the job has been cancelled.
Priority Management
Set Job Priority
Set the urgency level of a service job by choosing a priority when creating or editing the job:
- Low — routine jobs with flexible timelines.
- Medium — standard jobs that should be completed within the expected timeframe.
- High — urgent jobs requiring immediate attention. High priority jobs that are not yet completed are flagged on the Repair Dashboard.
Print and Receipt
Print Service Job Receipt
Print a receipt or job summary directly from the Parts and Billing page or the Service Job Detail page by clicking the Print button in the top action bar. A print modal opens showing the site name, job reference number, service type, status, priority, expected delivery date, customer details, warehouse, technician, device or vehicle details, parts table with all totals, and the job title with the created-by information.
Click the Print button inside the modal to open a formatted print view in a new window. The print view uses a clean, printer-friendly layout with a bordered parts table and properly aligned columns. Use your browser’s print function to print or save the document as a PDF.
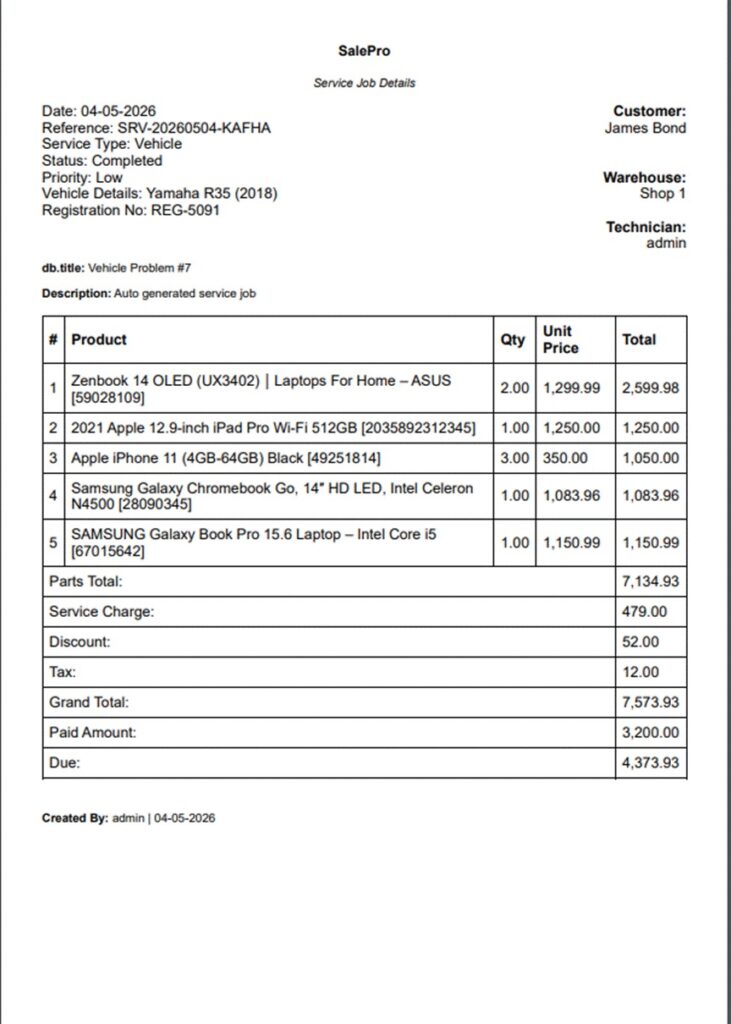
Manufacturing Addon
The Manufacturing module enables complete management of the product creation process. It consists of two main parts — Recipe and Production. In Recipe, you define which ingredients are needed to produce a product. In Production, products are manufactured according to the Recipe, added to stock, and the consumed ingredient stock is automatically deducted.
Module Overview
Two Parts of the Manufacturing Module
- Recipe — Stores the formula specifying which ingredients and what quantities are required to produce a product.
- Production — Records the actual manufacturing process according to a Recipe; adds the finished product to warehouse stock and deducts ingredient stock accordingly.
General Workflow
- Go to Recipe from the Manufacturing menu and create a Recipe for the product.
- Go to Production from the Manufacturing menu and create a new Production entry.
- Select a Recipe — the ingredient list will load automatically.
- Fill in quantity, cost, and other details, then click Submit.
- The finished product stock will be added to the warehouse, and ingredient stock will be deducted.
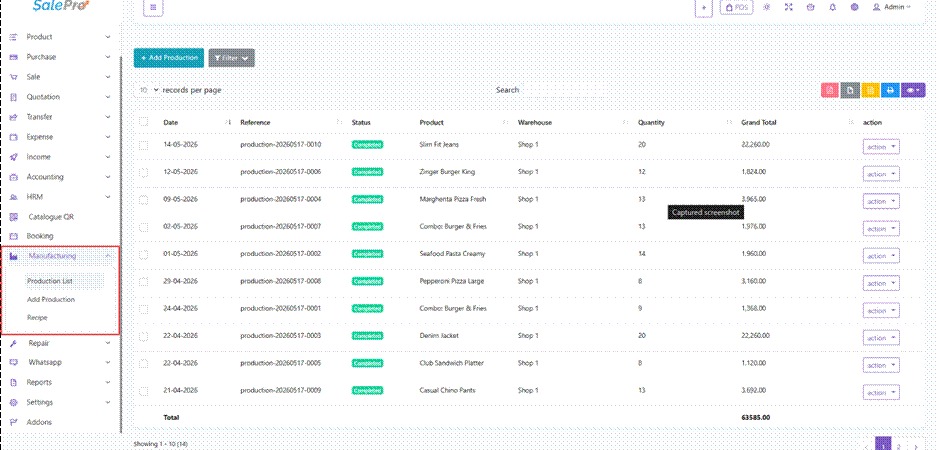
Recipe Module
What is a Recipe?
A Recipe is the formula or blueprint for manufacturing a product. For example: to make ‘Biscuit’, you need 500g flour, 200g sugar, 100g butter — this information is stored as a Recipe.
Viewing the Recipe List
Clicking Recipe from the Manufacturing menu opens the Recipe list page. All products marked as is_recipe = 1 are displayed here. Each row shows:
- Product name and image
- Category
- Unit
- Cost
- Price
- Action buttons — View, Edit, Delete
Creating a New Recipe
Click the Add Recipe button on the Recipe list page to open the Recipe creation form.
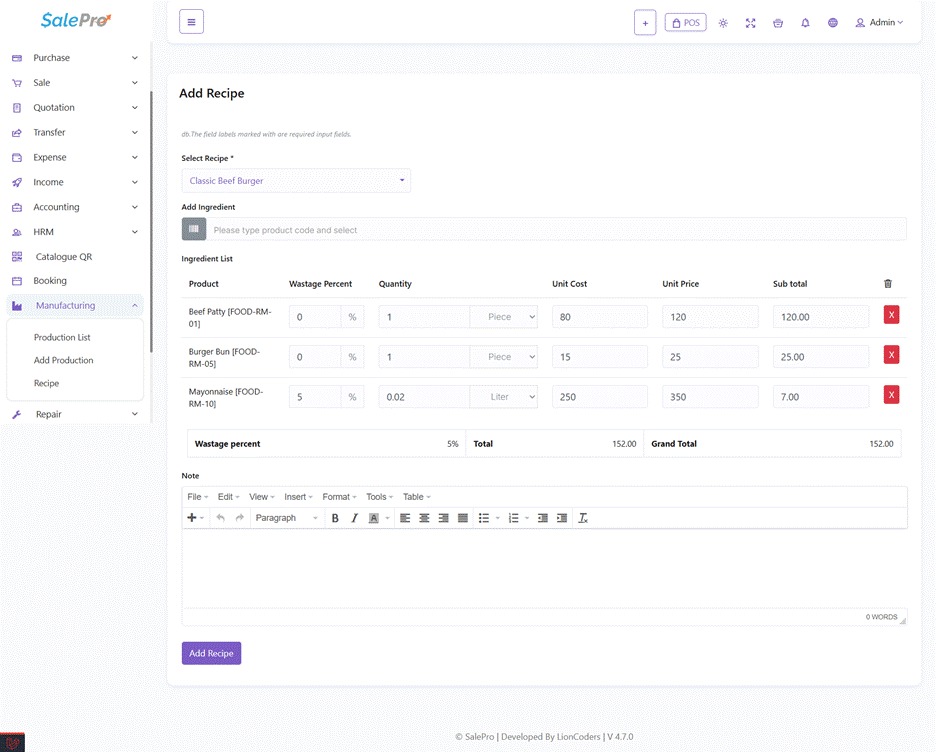
Step 1 — Select a Product
From the Select Recipe dropdown, choose the product for which you want to create a Recipe. Only active Standard and Combo type products are shown here.
Step 2 — Add Ingredients
Type the ingredient product name or code in the search field and select from the autocomplete list. Each added ingredient creates a row in the table below with the following fields:
- Wastage Percent — What percentage of this ingredient will be wasted during production.
- Quantity — How much of the ingredient is needed and in which unit (kg, pcs, litre, etc.).
- Unit Cost — Cost per unit.
- Unit Price — Price per unit.
- Sub Total — Quantity × Price.
Step 3 — Save the Recipe
After adding all ingredients, click the Add Recipe button. The system will mark the product as is_recipe = 1 and save the ingredient information.
📌 Example — Chocolate Cake (1 piece)Ingredient 1: Flour — Qty: 200g, Price: 8.00, Wastage: 5%Ingredient 2: Sugar — Qty: 150g, Price: 7.00, Wastage: 0%Ingredient 3: Cocoa Powder — Qty: 50g, Price: 15.00, Wastage: 2%Ingredient 4: Butter — Qty: 100g, Price: 12.00, Wastage: 0%Once saved, the Chocolate Cake’s Cost will be updated to 42.00 in the product record.
Editing a Recipe
Click the Edit button from the action menu in the list. The existing ingredients will appear in the table. You can change quantities, prices, and wastage, add new ingredients, or remove existing ones using the X button. Click Save to store changes.
Deleting a Recipe
Click the Delete button from the action menu. The is_recipe flag will be removed from the product. The product will no longer appear in the Recipe list, but will remain in the system as a product.
Wastage Percent Calculation
Wastage Percent is the percentage of an ingredient that gets wasted or becomes unusable during the production process. It is stored as Recipe reference information — it does not directly affect stock deduction in Production, but is important for cost planning.
📌 Example — Raw Vegetables: Qty: 1 kg, Wastage: 20%Meaning: Out of 1 kg of vegetables, 200g will be lost during trimming/cutting.Effective usable quantity = 800g.The Recipe shows the total wastage across all ingredients (e.g., Total Wastage = 22%).
Production Module
What is Production?
Production is the recording of the actual manufacturing process according to a Recipe. When a Production entry is created — the finished product stock is added to the warehouse, and the used ingredient stock is deducted from the warehouse.
Viewing the Production List
Clicking Productions from the Manufacturing menu opens the Production list page. Each row shows:
- Date
- Reference Number
- Status badge (Completed)
- Total Cost
- Finished product name
- Quantity
- Warehouse
- Total Tax, Shipping Cost, Production Cost
- Grand Total
- Action buttons — View, Delete
Filtering the Production List
- Starting Date / Ending Date — View Productions within a specific date range.
- Warehouse — Filter Productions by a specific warehouse.
- Status — Filter by status.
- Search bar — Search by reference number or product name.
Creating a New Production
Step 1 — Fill in Basic Information
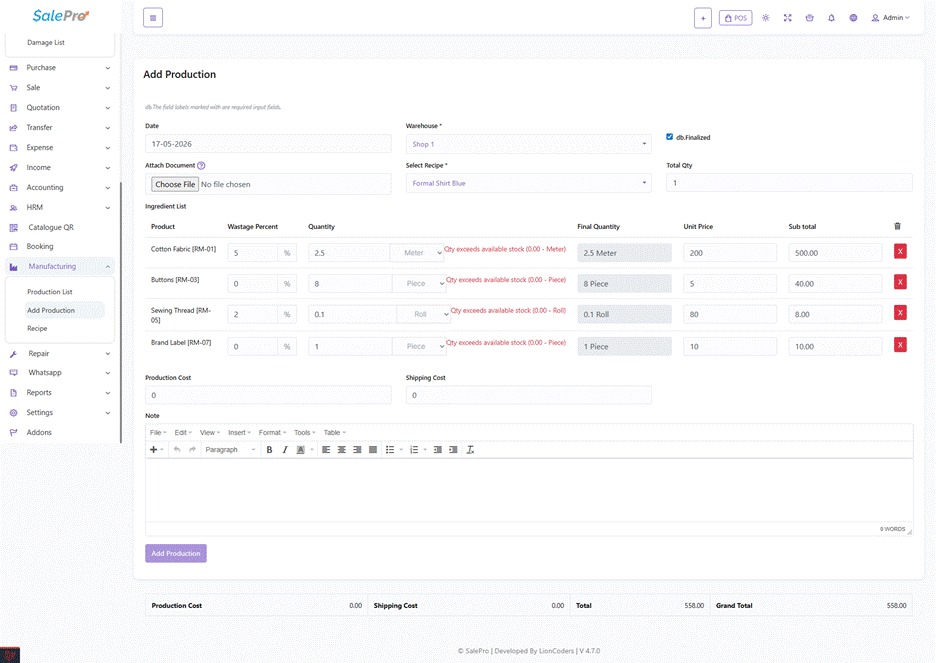
- Date — The Production date. Defaults to today’s date.
- Warehouse — The warehouse where the product will be manufactured and stock added.
- Product — Select a product that has a Recipe. The ingredient list will load automatically upon selection.
- Total Qty — How many units of the product will be manufactured. This quantity will be added to the product’s stock.
Step 2 — Verify the Ingredient List
After selecting a product, the ingredient list from the Recipe loads automatically. For each ingredient, the following information is available:
- Wastage Percent — Ingredient waste percentage (comes from Recipe, can be modified).
- Quantity + Unit — Ingredient quantity and unit selection. Changing the unit triggers automatic conversion.
- Unit Price — Price per unit.
- Sub Total — Quantity × Price.
⚠️ Note: Ingredient current stock will not be visible unless a warehouse is selected.
⚠️ A warning will appear if the entered ingredient quantity exceeds available stock.
⚠️ If you change the unit, the warehouse deduction will use the converted quantity.
Step 3 — Fill in Cost and Other Details
- Production Cost — Labor or other costs involved in manufacturing.
- Shipping Cost — Transportation cost for bringing raw materials.
- Note — Any internal remarks.
- Document — Attached document (optional).
Step 4 — Submit
Clicking the Submit button will automatically trigger the following actions:
- A reference number will be generated (e.g., production-20250506-143022).
- The specified quantity of the finished product will be added to the total product stock.
- The product quantity will be added to the selected warehouse stock.
- Each ingredient’s quantity will be deducted from the warehouse.
- The Production record will be saved.
Calculation Details — With Examples
Sub Total Calculation
Sub Total for each ingredient = Converted Quantity × Unit Price.
Unit Conversion Rules:
- If operator is * — Converted Qty = Quantity × operation_value
- If operator is / — Converted Qty = Quantity ÷ operation_value
📌 Example 1 — Flour: Qty: 5 kg, Unit: kg (operator=*, operation_value=1)Converted Qty = 5 × 1 = 5 kg | Unit Price = 40.00 | Sub Total = 5 × 40 = 200.00Example 2 — Milk: Qty: 2 litre, Unit: ml (operator=/, operation_value=1000)Converted Qty = 2 ÷ 1000 = 0.002 (base unit) | Unit Price = 80.00/litre | Sub Total = 2 × 80 = 160.00
Total Calculation
Total = Sum of all ingredients Sub Totals.
📌 Example:Ingredient 1 (Flour) Sub Total: 200.00Ingredient 2 (Sugar) Sub Total: 90.00Ingredient 3 (Oil) Sub Total: 150.00────────────────────────────────Total = 200 + 90 + 150 = 440.00
Grand Total Calculation
Grand Total = Total + Shipping Cost + Production Cost
📌 Example:Total (Ingredient Cost) = 440.00Shipping Cost = 60.00Production Cost = 100.00────────────────────────────────Grand Total = 440 + 60 + 100 = 600.00
Stock Deduction Calculation
When a Production is submitted, each ingredient’s stock is deducted as follows:
- Deduction = Input Qty × Unit operation_value (when operator is *)
- Deduction = Input Qty ÷ operation_value (when operator is /)
📌 Example — Product: Biscuit — 100 pcs to be produced.Ingredient 1: Flour — 5 kg (unit: kg, operator=*, operation_value=1)→ Deduction = 5 × 1 = 5 kg → Warehouse flour stock decreases by 5 kg.Ingredient 2: Sugar — 2 kg (unit: kg, operator=*, operation_value=1)→ Deduction = 2 × 1 = 2 kg → Warehouse sugar stock decreases by 2 kg.Result: Biscuit stock in warehouse increases by 100 pcs.Flour: Previous stock 50 kg → Now 45 kg.Sugar: Previous stock 20 kg → Now 18 kg.
Complete Example — A Single Production
| Item | Description | Value |
| Finished Product | Chocolate Cake | 50 pcs |
| Warehouse | Main Warehouse | — |
| Ingredient 1 | Flour — 2 kg | 80.00 |
| Ingredient 2 | Sugar — 1 kg | 50.00 |
| Ingredient 3 | Cocoa Powder — 0.5 kg | 75.00 |
| Ingredient 4 | Butter — 1 kg | 120.00 |
| Total | Sum of all ingredients | 325.00 |
| Production Cost | Labor & other costs | 200.00 |
| Shipping Cost | Transportation | 75.00 |
| Grand Total | Total amount | 600.00 |
| Stock Added | Chocolate Cake | +50 pcs |
| Stock Deducted | Flour | −2 kg |
| Stock Deducted | Sugar | −1 kg |
| Stock Deducted | Cocoa Powder | −0.5 kg |
| Stock Deducted | Butter | −1 kg |
Viewing Production Details
Click the View button from the action menu in the Production list to open the Production Detail modal. It shows:
- Date and Reference Number
- Status
- Warehouse name
- Attached document (if any)
- List of all ingredients — name, quantity, unit cost, price, sub total
- Total Tax, Total Cost, Shipping Cost, Grand Total
- Notes and creator name
Deleting a Production
Click the Delete button from the action menu. A confirmation dialog will appear. Upon confirmation, the system will automatically:
- Subtract the specified quantity from the finished product’s total stock.
- Reduce the finished product’s stock in the warehouse.
- Restore all ingredient stock back to the warehouse.
- Delete the Production record.
⚠️ Important: If the current stock of the finished product is less than the Production quantity, deletion will not be permitted.
⚠️ Deletion is also blocked if the warehouse stock is insufficient.
⚠️ This safety mechanism prevents stock from going negative.
Production with Variant Products
If an ingredient is a product with Variants, the specific Variant stock is also deducted separately during Production.
📌 Example — Ingredient: Fabric — Red Color (Variant)Using 5 meters of ‘Fabric — Red’ in Production:→ Red Fabric Variant stock: decreases by 5 meters.→ Red Fabric warehouse stock: decreases by 5 meters.→ The total stock of the parent product ‘Fabric’ also decreases.
Permissions
Manufacturing Module Access
The following conditions must be met to access the Manufacturing module:
- manufacturing addon active — The manufacturing addon must be enabled in the system.
- products-index — Permission to view the Recipe list.
- products-add — Permission to create and edit Recipes.
- products-edit — Permission to edit Recipes.
- products-delete — Permission to delete Recipes.