15. eCommerce Addon#
Installation#
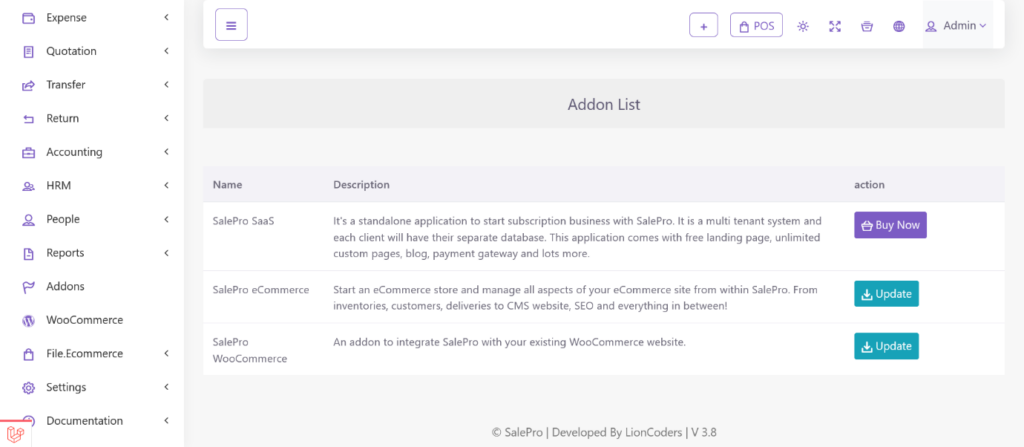
It is presumed that you already have SalePro installed on your server. If you login to SalePro, you should see ‘Addon List’ menu item on your admin panel/dashboard sidebar. Click ‘Addon List’ and on the following page you should see ‘SalePro eCommerce’ listed along with other Add-ons. Unless already installed, it should show ‘Buy Now’ and ‘Install’ button. When installed, it will show ‘Update’ button.
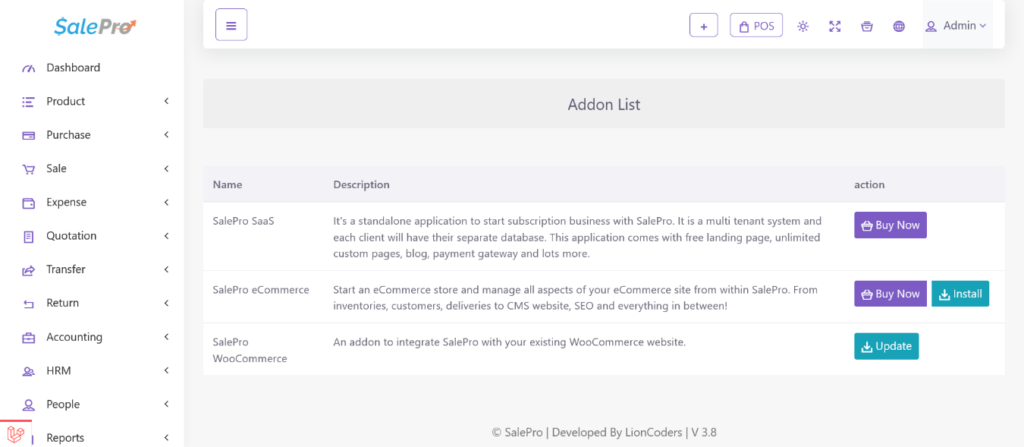
To purchase this addon click the ‘Buy Now’ button. If you have already purchased, click the ‘Install’ button
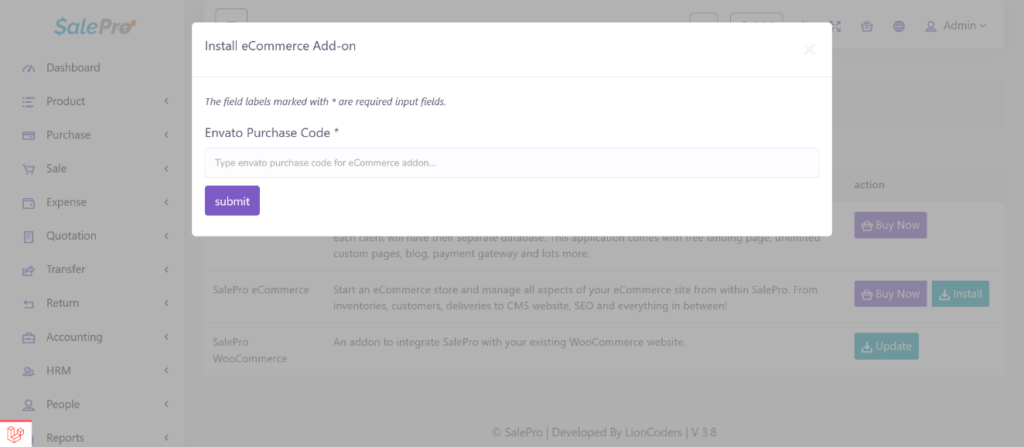
Type your purchase key which you will get from the envato during the purchase. Then click on the submit button. If your purchase key is correct then the addon will be installed automatically and you will see a new option on the left side bar named eCommerce.
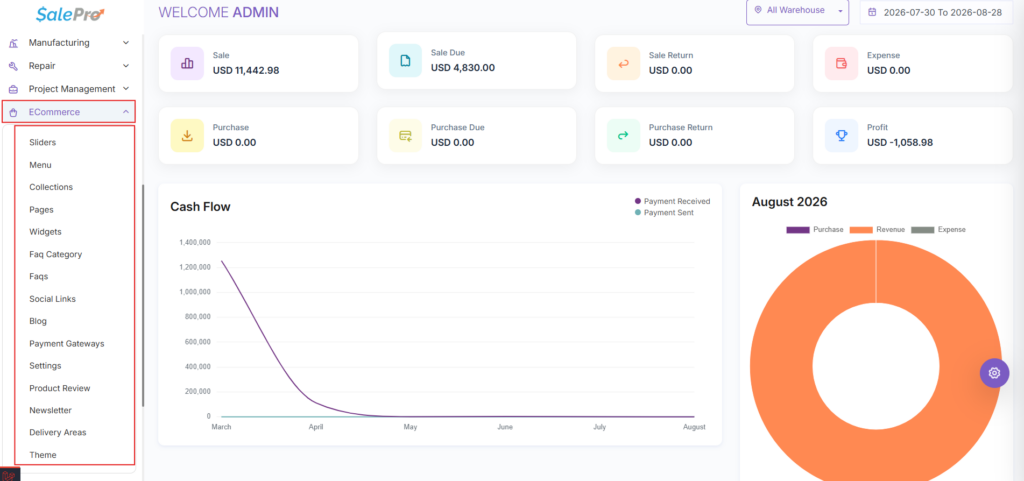
If you go to the eCommerce menu on dashboard sidebar, you’ll see all necessary options to manage an eCommerce store – both backend and CMS/frontend.
Update#
When we release an update you can update it automatically from the addon list page. You’ll have to insert your purchase code for updating the system (just like installation) and updates will be automatically imported to your server and installed
SalePro’s eCommerce module (and the dedicated SalePro eCommerce addon) manages the your eCommerce site-facing content and configuration for online selling. Every section below maps directly to one item in the eCommerce sidebar menu.
15.0 Quick Overview ##
The list below maps every eCommerce sidebar item to its purpose and recommended setup priority.
- 15.1 Sliders — Rotating banner images shown on the homepage. (Setup Step 3)
- 15.2 Menu — Header navigation links for the your eCommerce site. (Setup Step 6)
- 15.3 Collections — Custom hand-picked product groups (e.g., “Flash Sale”). (Setup Step 4)
- 15.4 Pages — Build your homepage and all static pages. (Setup Step 5)
- 15.5 Widgets — Site-wide footer and sidebar content blocks. (Setup Step 7)
- 15.6 Faq Category — Category labels for grouping FAQ entries. (Optional)
- 15.7 Faqs — Question & answer entries on the FAQ page. (Optional)
- 15.8 Social Links — Social media icons shown in header/footer. (Optional)
- 15.9 Blog — Publish news and articles on the your eCommerce site. (Optional)
- 15.10 Payment Gateways — Enable Stripe, PayPal, COD, and others. (Setup Step 8)
- 15.11 Settings — Logo, theme, Inventory & Invoice Setup, shipping — master control. (Setup Step 1 — Do This First)
- 15.12 Product Review — Approve or reject customer-submitted reviews. (Ongoing)
- 15.13 Newsletter — View and export email subscriber list. (Ongoing)
- 15.14 Delivery Areas — Define shipping zones, charges, and estimated days. (Setup Step 9)
- 15.15 Theme — Activate an installed your eCommerce site theme. (Setup Step 2)
FIRST-TIME SETUP ORDER
Step 1 → eCommerce > Settings — branding, Inventory & Invoice Setup, shipping rules
Step 2 → eCommerce > Theme — activate your your eCommerce site theme
Step 3 → eCommerce > Sliders — create banner images
Step 4 → eCommerce > Collections — create product groups
Step 5 → eCommerce > Pages — build homepage + other pages
Step 6 → eCommerce > Menu — create header navigation
Step 7 → eCommerce > Widgets — set up footer content
Step 8 → eCommerce > Payment Gateways — enable checkout methods
Step 9 → eCommerce > Delivery Areas — define shipping zones
15.1 Sliders ##
Menu: eCommerce > Sliders
Sliders are the rotating banner images shown on the your eCommerce site homepage. The eCommerce menu is only visible when the eCommerce module is enabled.
Adding a Slider#
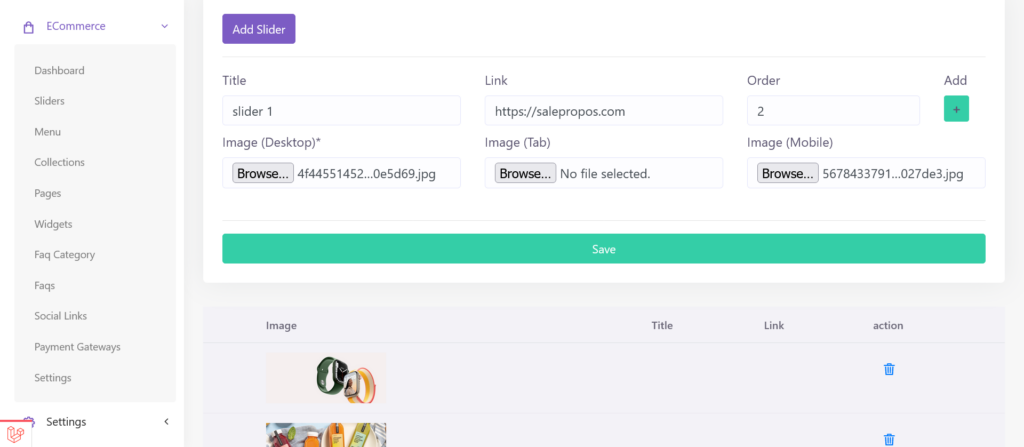
- Click Add Slider to expand the form.
- Enter a Title and a Link — the URL the slide opens when clicked.
- Set the Order — lower number displays first in the rotation.
- Upload Image (Desktop) — required, auto-resized to 1900×970px.
- Optionally upload Image (Tab) and Image (Mobile) for responsive breakpoints.
- Click Save.
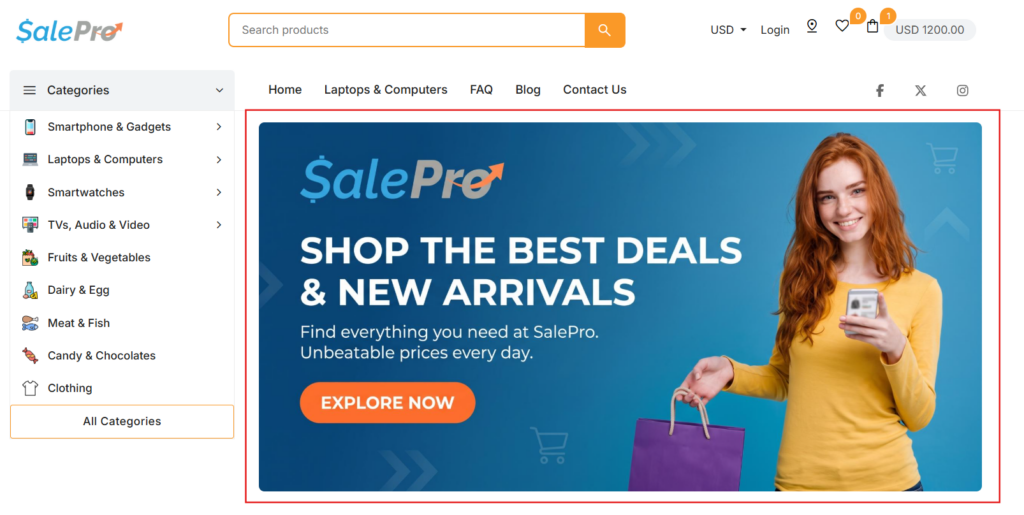
NOTE: Creating a slider here only saves it in the library. To display it on your website, add the Image Slider Widget to your homepage layout in eCommerce > Pages (see 15.4).
Desktop: Large devices – 1090 X 460
Tab: Medium devices – 1090 X 460
Mobile: Small devices – 650 X 460
[ SCREENSHOT: Sliders list view — multiple entries with Order numbers and Edit / Delete actions ]
15.2 Menu ##
Menu: eCommerce > Menu
The your eCommerce site navigation builder — create one or more named menus and populate them with links to categories, collections, brands, pages, blog posts, or custom URLs.
Creating a Menu#
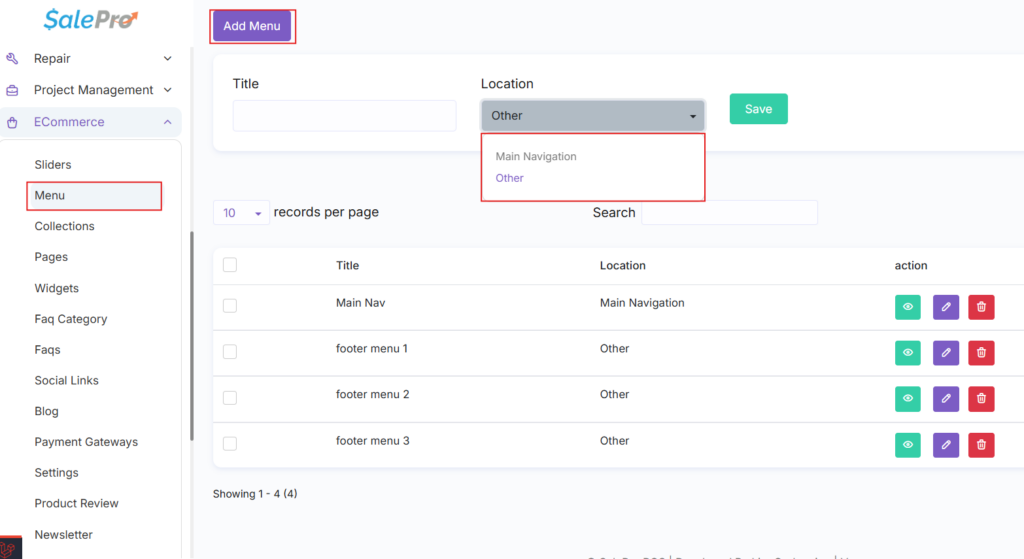
- Click Add Menu, enter a Title, choose Location (Main Navigation / Other), and Save.
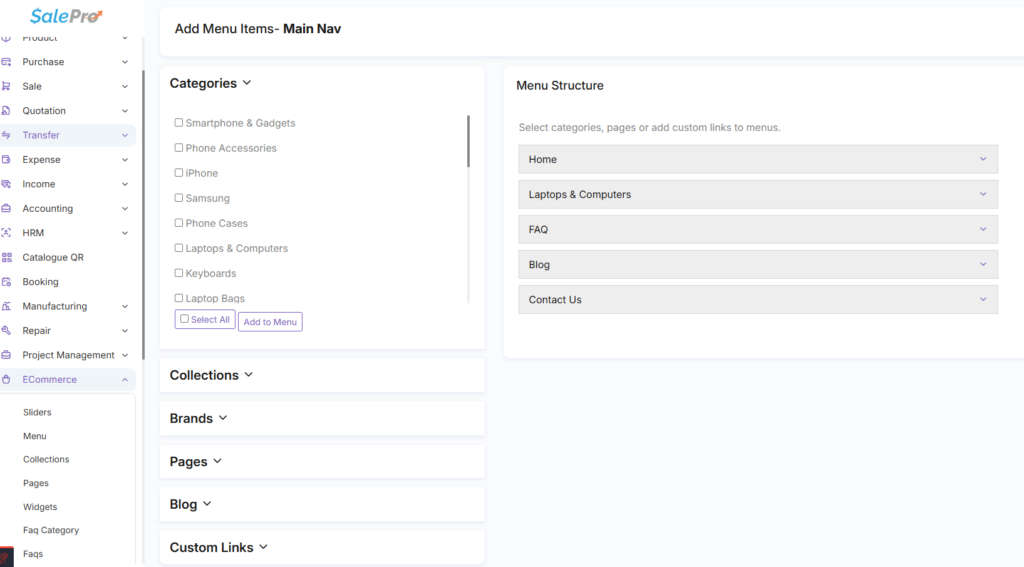
- Click the eye icon on a menu row to open the item builder.
- Add items by choosing a Link Type:
- Category — links to a POS product category page.
- Collection — links to a Collection you created in 15.3.
- Page — links to any static page (About Us, FAQ, etc.).
- Blog — links to your blog listing.
- Custom URL — any URL you type manually.
- Drag items to reorder. Drag an item slightly to the right under a parent to create a dropdown sub-menu.
- Click Save when done.
WARNING: Deleting a menu permanently deletes all of its menu items. There is no undo.
[ SCREENSHOT: eCommerce > Menu — list view with eye icon highlighted on a menu row ]
[ SCREENSHOT: Menu Item Builder — Link Type dropdown open showing all options ]

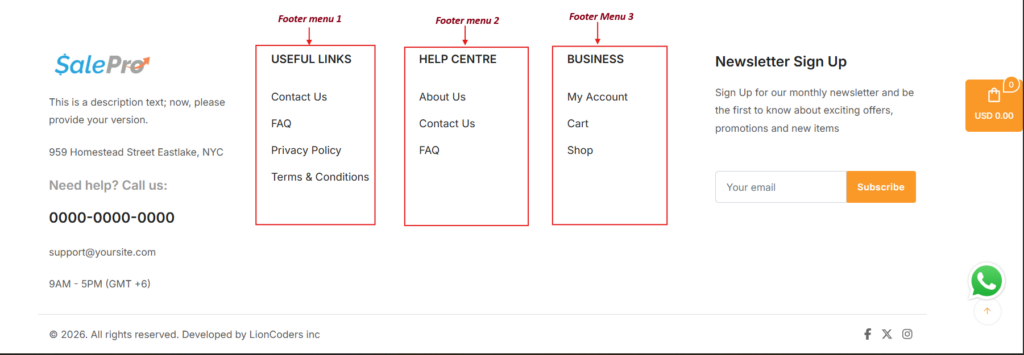
[ SCREENSHOT: Front-end your eCommerce site — header navigation bar with dropdown sub-menu visible and footer menu ]
15.3 Collections ##
Menu: eCommerce > Collections
Collections are curated, manually-built groups of products for the your eCommerce site (e.g., “Summer Sale,” “Staff Picks”) — distinct from Category, which is a structural classification used elsewhere in SalePro.
Creating a Collection#
- Click Add Collection.
- Enter Collection Name (required) — the Permalink auto-fills.
- Optionally set Meta Title and Meta Description for SEO.
- Search and select Products to include using the product search box.
- Click Save as Draft or Publish.
TIP: Use collections to group any products together regardless of their POS Category — perfect for promotions, seasonal bundles, or featured items.
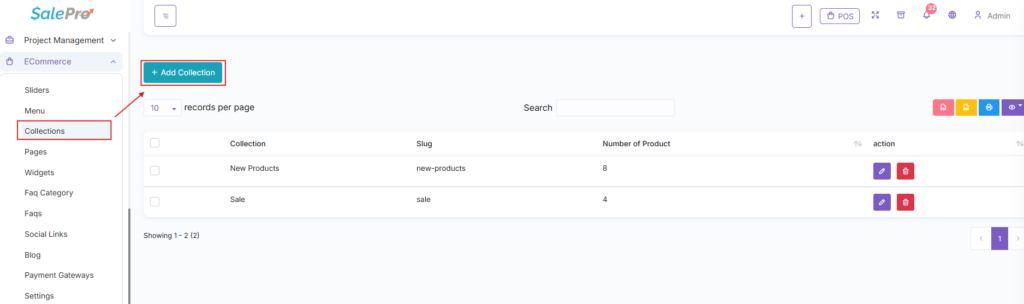
[ SCREENSHOT: eCommerce > Collections — Add Collection form with product search results shown ]
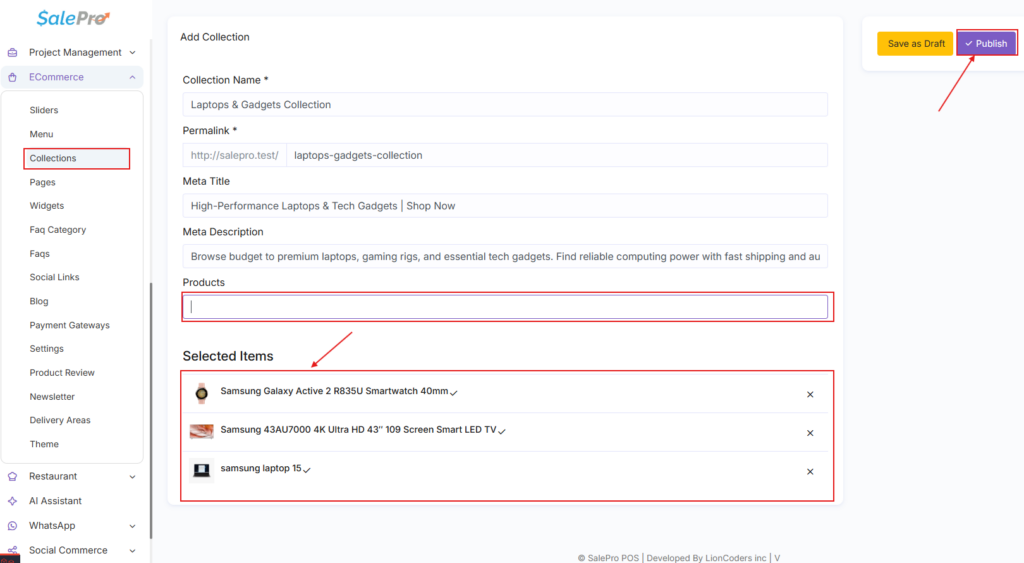
[ SCREENSHOT: Collections list view showing Published and Draft status badges ]
15.4 Pages ##
Menu: eCommerce > Pages
Manages static CMS content for the your eCommerce site — About Us, Terms of Service, Contact, and the Home page — with a drag-and-drop builder for homepage-style layouts.
Page Templates#
- Default — WYSIWYG text editor. Best for About Us, Privacy Policy, Terms of Service.
- Home — Drag-and-drop Widget Builder. Best for your main homepage with product sections.
- Contact — WYSIWYG editor with a contact form automatically included.
- FAQ — WYSIWYG editor with an FAQ accordion automatically included.
Creating a Page#
- Click Add Page. Enter Page Name (required) — the Permalink auto-fills.
- Choose a Template from the list above.
- For Default / Contact / FAQ: write the body in the WYSIWYG Description editor.
- For the Home template: use the drag-and-drop Widget Builder (see 15.4.1 below).
- Fill optional Meta/OG fields for SEO and social sharing.
- Click Save as Draft or Publish.
TIP: Only one page serves as the homepage — chosen under eCommerce > Settings (Home Page dropdown), not on the page itself.
WARNING: On a brand-new page, widgets are held in browser memory and are NOT saved until you click Publish. Do not close the tab before publishing.
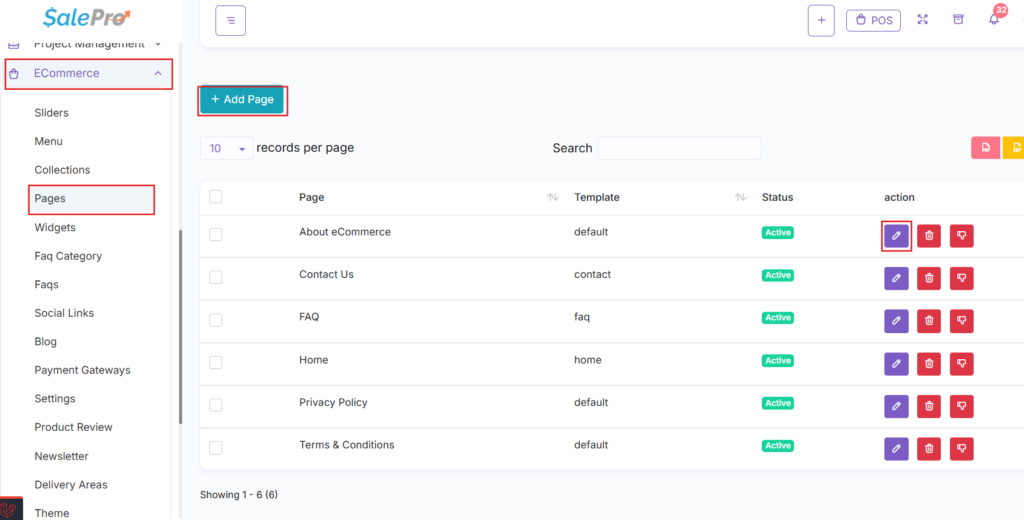
[ SCREENSHOT: eCommerce > Pages — Pages list with Add Page button and status columns ]
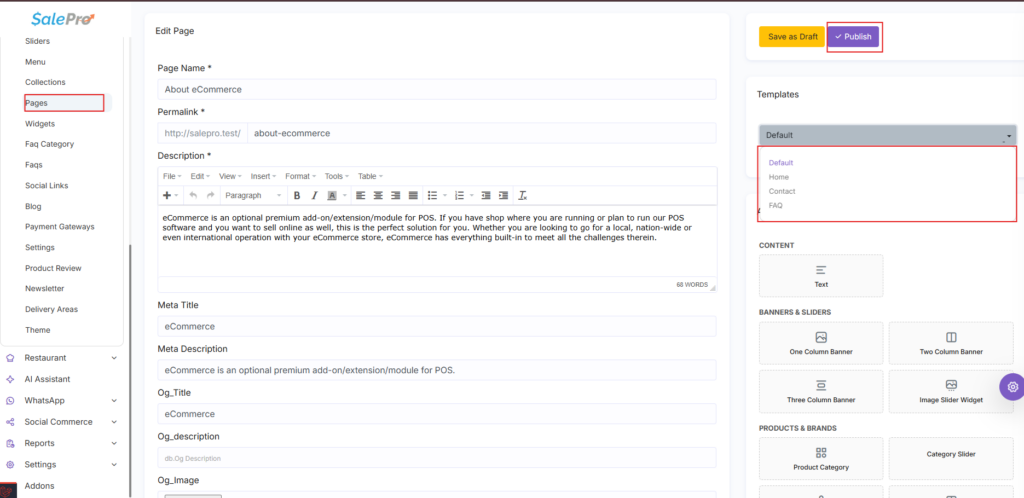
[ SCREENSHOT: Add Page form — Template dropdown open showing Default, Home, Contact, FAQ options ]
15.4.1 How to Build Your Homepage#
Building a dynamic your eCommerce site homepage requires 4 steps. Complete them in order.
Step 1 — Prepare Sliders#
Navigate to eCommerce > Sliders and create at least one slider entry (see 15.1). The slider will be selected inside the widget popup in Step 3.
Step 2 — Prepare Collections#
Navigate to eCommerce > Collections and create collections for any product groups you want on the homepage, for example “New Arrivals” or “Flash Sale” (see 15.3).
Step 3 — Build the Home Page Layout#
- Go to eCommerce > Pages and click Add Page.
- Set Page Name: Home
- Confirm the Permalink/Slug is exactly: home
- Select Template: Home — the WYSIWYG editor disappears and the Widget Builder appears.
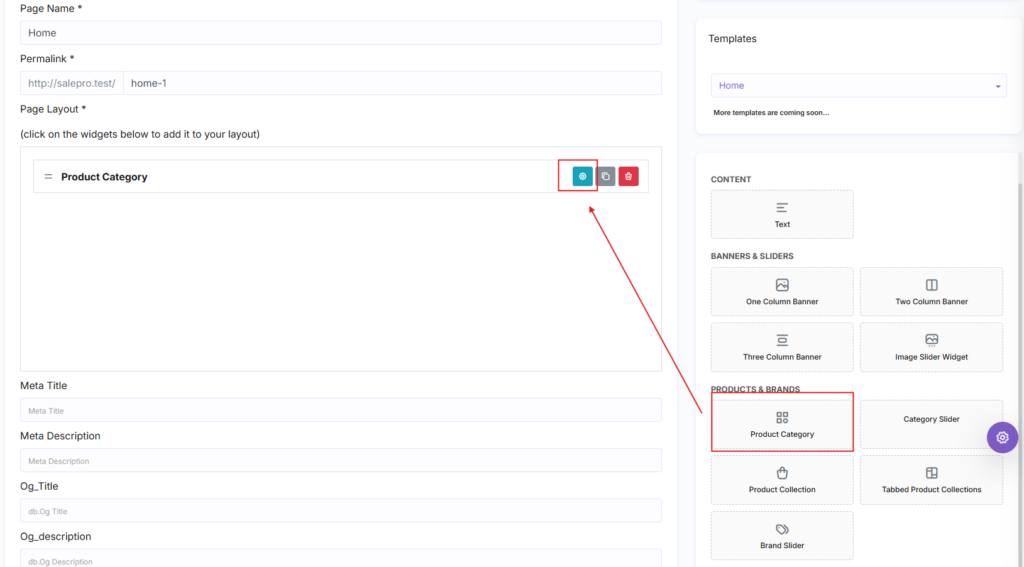
- From the right-side widget panel, drag widgets into the center canvas to arrange your homepage top to bottom.
Available Homepage Widgets#
- Image Slider Widget — Rotating banner slides created in eCommerce > Sliders (15.1).
- 1-Column Banner — One full-width promotional image.
- 2-Column Banner — Two promotional images placed side by side.
- 3-Column Banner — Three promotional images placed side by side.
- Product Category Widget — Product grid pulling from a POS Category.
- Category Slider Widget — Horizontal scrollable row of category icons.
- Product Collection Widget — Product grid from a Collection (see 15.3).
- Tab Product Collection Widget — Tabbed layout displaying multiple Collections.
- Brand Slider Widget — Horizontal row of brand logos.
- Hero Video Banner Widget — Full-width background video section.
- Masonry Product Widget — Pinterest-style responsive product image grid.
- Deal of the Day Widget — Countdown timer highlighting a featured product.
- Recent Blog Widget — Automatically shows the 3 most recently published blog posts.
- Text Widget — Free-form HTML or plain text content block.
For each widget dropped onto the canvas:
- A settings popup appears automatically.
- Fill in Title and Subtitle — displayed as the section heading on the live site.
- Select the Category or Collection to pull products from.
- Click Save on the popup.
- Drag widgets to reorder the layout at any time.
- When the layout is complete, scroll down and click Publish.
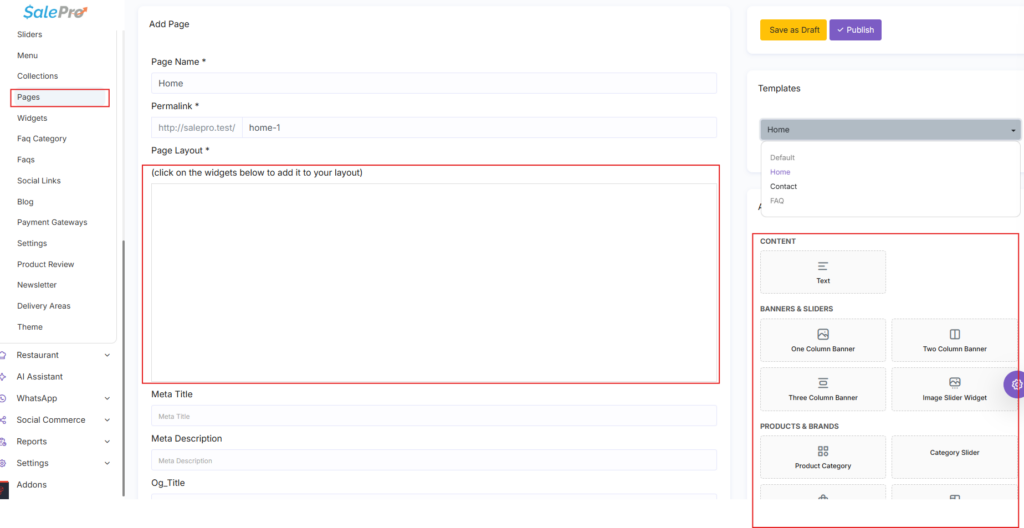
[ SCREENSHOT: Homepage Widget Builder — empty canvas on left, widget panel on right ]
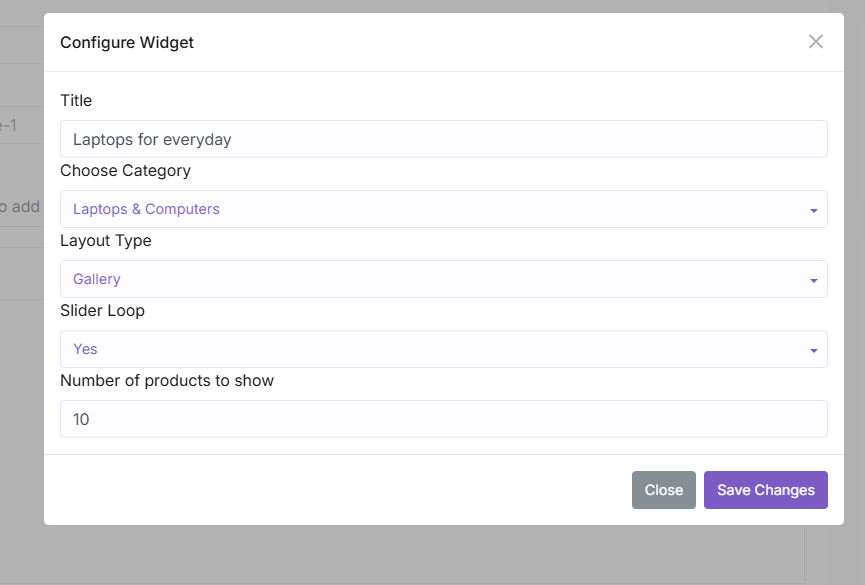
[ SCREENSHOT: Widget Settings popup — Title, Subtitle, and Category/Collection dropdown filled ]
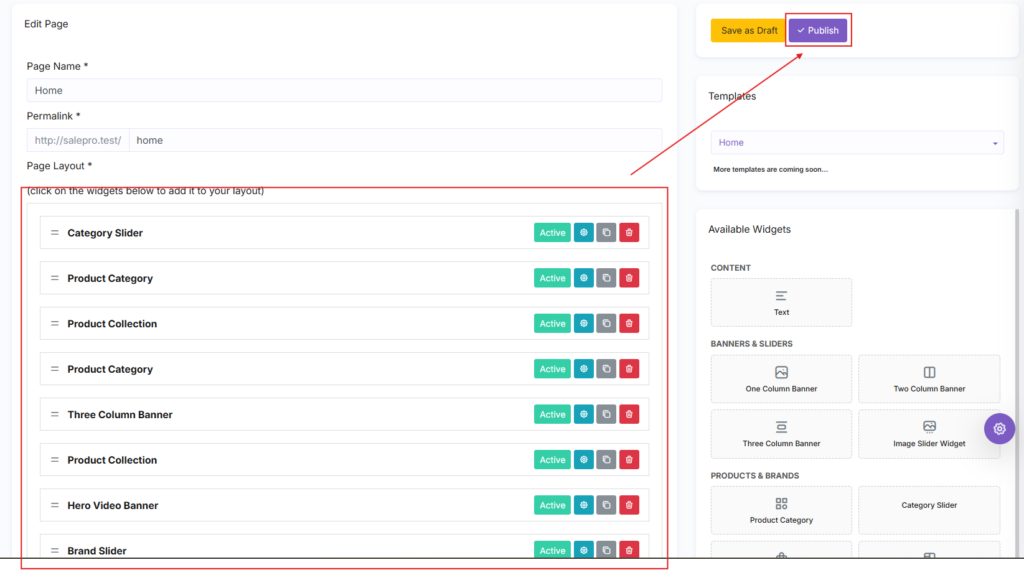
[ SCREENSHOT: Homepage Builder — completed layout with Slider, Banner, and Product Grid stacked ]
Step 4 — Assign the Page as Your Live Homepage#
- Navigate to eCommerce > Settings.
- Locate the Home Page dropdown.
- Select your newly published “Home” page.
- Scroll to the bottom and click Submit.
RESULT: Your website root URL (e.g., yoursite.com) now renders the dynamic homepage you built.
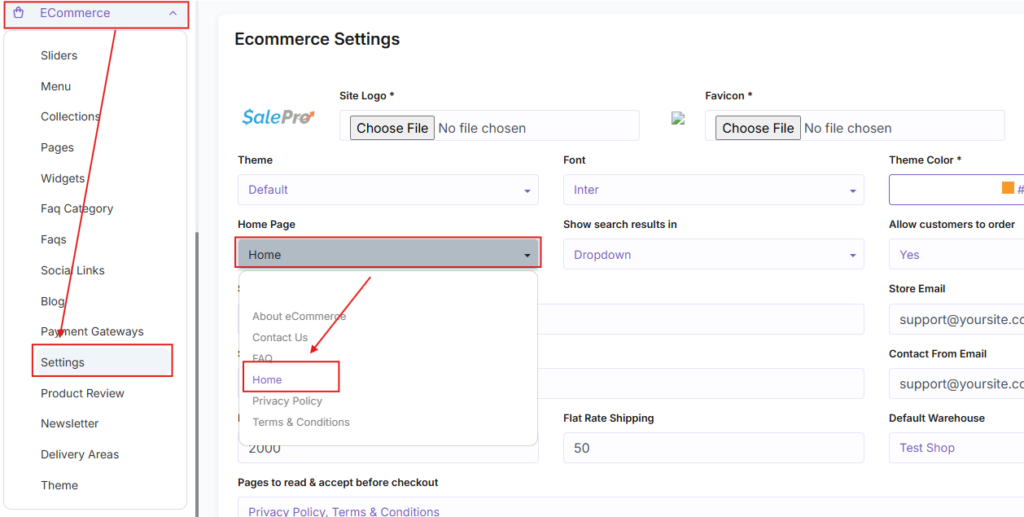
[ SCREENSHOT: eCommerce > Settings — Home Page dropdown with the Home page selected ]
[ SCREENSHOT: Front-end your eCommerce site — completed homepage showing all widget sections ]
15.5 Widgets ##
Menu: eCommerce > Widgets
Separate from the Pages layout builder — these are site-wide content blocks placed into fixed your eCommerce site zones.
Available Zones#
- Footer Top — Row immediately above the main footer. Typically used for Site Features or promotional highlights.
- Footer — Main website footer. Typically used for Custom Menu links and contact info.
- Product Details Sidebar — Sidebar displayed on product detail pages.
Adding Widgets to a Zone#
- Go to eCommerce > Widgets.
- Drag a widget type from the right panel into a zone column on the left.
- Fill in the inline form fields and click Save.
- Drag to reorder widgets within the same zone.
Adding a Footer Navigation Menu#
- First create a menu in eCommerce > Menu (e.g., “Footer Links”).
- In Widgets, drag Custom Menu into the Footer zone.
- Set a Title (e.g., “Quick Links”) and select your footer menu from the dropdown.
- Click Save.
TIP: The footer displays no custom content until you place widgets into a zone here.
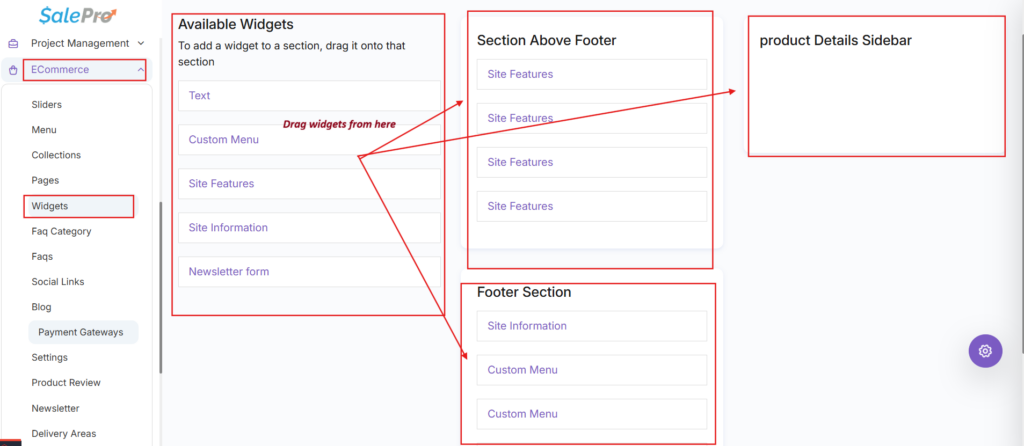
[ SCREENSHOT: eCommerce > Widgets — zone columns on left, widget type panel on right ]
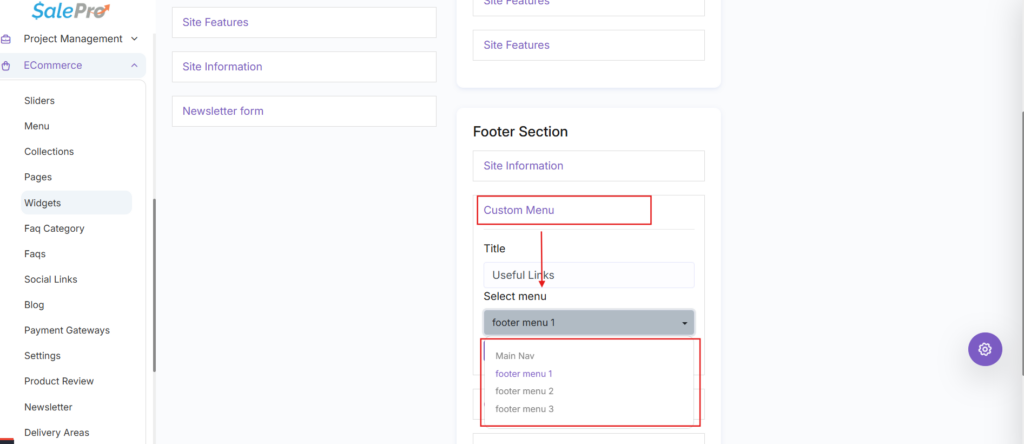
[ SCREENSHOT: Footer zone — Custom Menu widget placed and menu selected ]
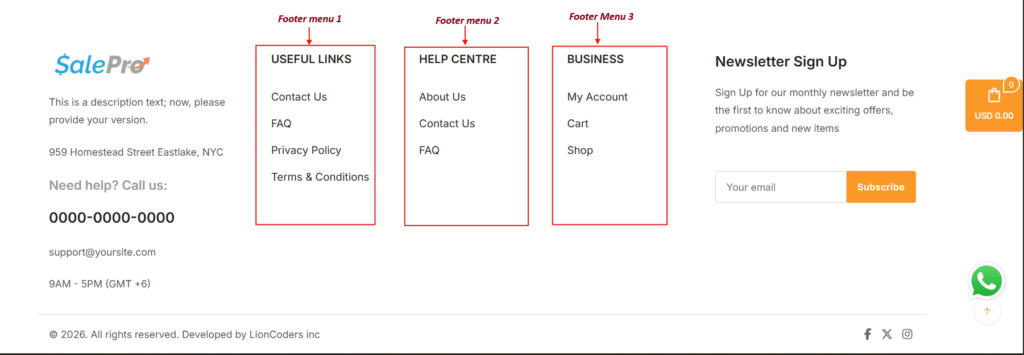
[ SCREENSHOT: Front-end footer — navigation links and site features displayed ]
15.6 Faq Category ##
Menu: eCommerce > Faq Category
Groups FAQ entries (15.7) under named categories for the your eCommerce site FAQ page.
Adding a Category#
- Enter a Name (e.g., “Shipping”, “Returns”, “Payments”).
- Set a numeric Order — lower number displays first.
- Click Save.
WARNING: Deleting a FAQ category permanently deletes every FAQ entry assigned to it.
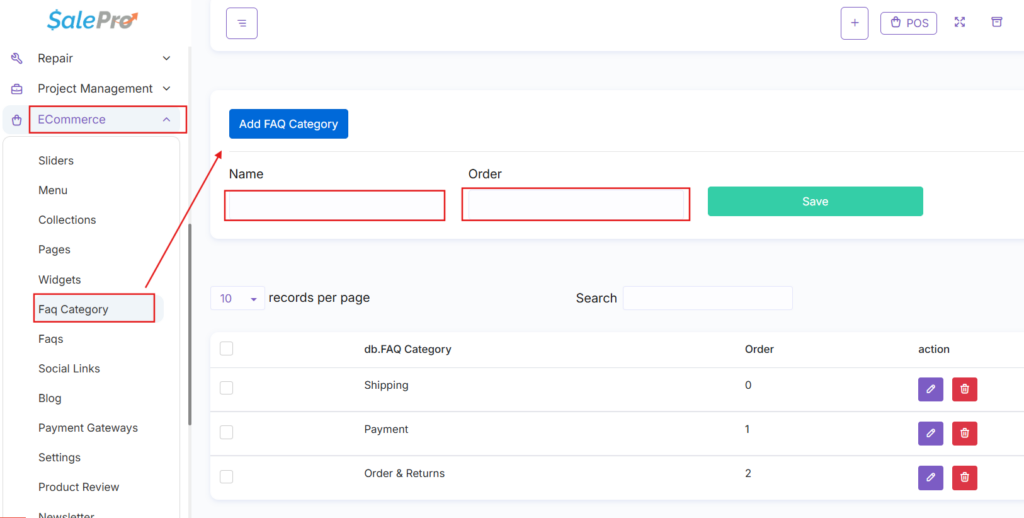
[ SCREENSHOT: eCommerce > Faq Category — list with Add Category form ]
15.7 Faqs ##
Menu: eCommerce > Faqs
The actual question/answer entries shown on the your eCommerce site FAQ page, each linked to a Faq Category.
Adding a FAQ Entry#
- Click Add FAQ.
- Enter Question and Answer.
- Choose a Category, or click the + button to create one inline.
- Set Order and click Save.
TIP: To make the FAQ page reachable, create a Page using the FAQ template (eCommerce > Pages) and add a link to it in your navigation Menu (eCommerce > Menu).
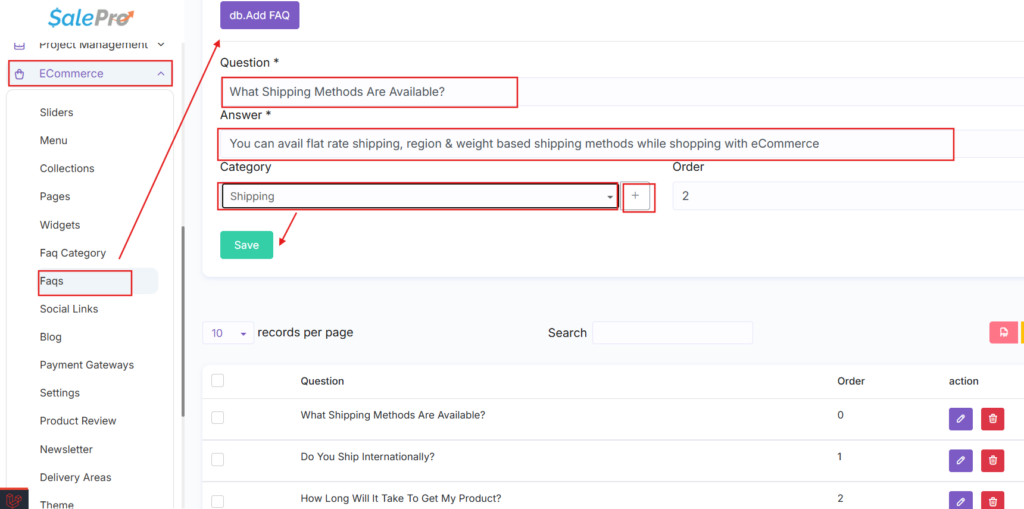
[ SCREENSHOT: eCommerce > Faqs — Add FAQ form with Question, Answer, and Category fields ]
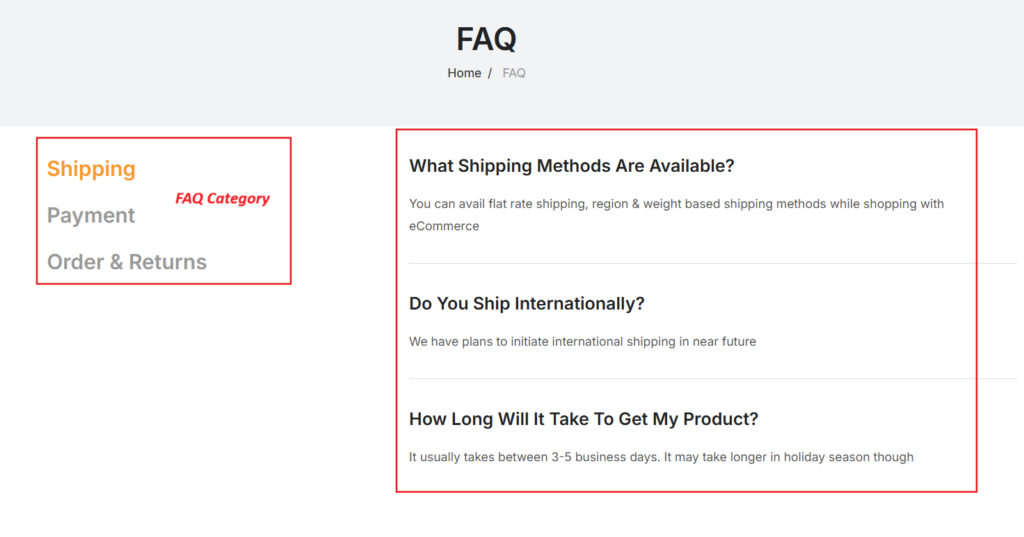
[ SCREENSHOT: Front-end FAQ page — accordion open showing an expanded answer ]
15.8 Social Links ##
Menu: eCommerce > Social Links
Manages the social media icon links displayed in the your eCommerce site header/footer.
Adding a Social Link#
- Enter a Title (e.g., “Facebook”).
- Paste the destination Link (e.g., https://facebook.com/yourpage).
- Choose an Icon — supported platforms: Facebook, Twitter, Pinterest, Instagram, YouTube, LinkedIn, Vimeo, Amazon, TikTok.
- Set Order and click Save.
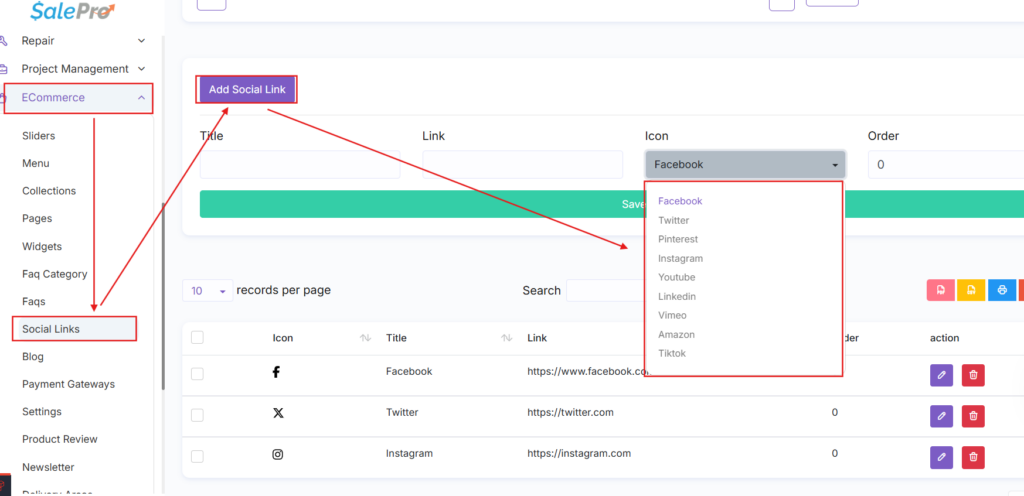
[ SCREENSHOT: eCommerce > Social Links — form with Icon dropdown open ]

[ SCREENSHOT: Front-end your eCommerce site footer — social media icons displayed ]
15.9 Blog ##
Menu: eCommerce > Blog
Manages blog posts shown on the your eCommerce site blog.
Publishing a Blog Post#
- Click Add Post.
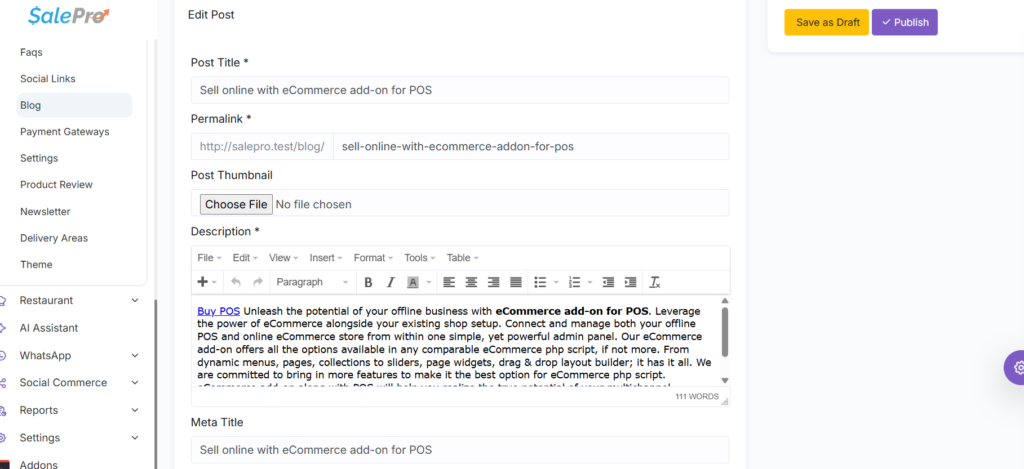
- Enter Post Title (required) — the Permalink auto-fills.
- Upload an optional Post Thumbnail image (shown in blog listing cards).
- Write the body in the Description WYSIWYG editor.
- Optionally set Meta/OG fields for SEO.
- Click Save as Draft or Publish.
TIP: The Recent Blog Widget on the homepage automatically displays your 3 newest published posts — no extra configuration needed after publishing.
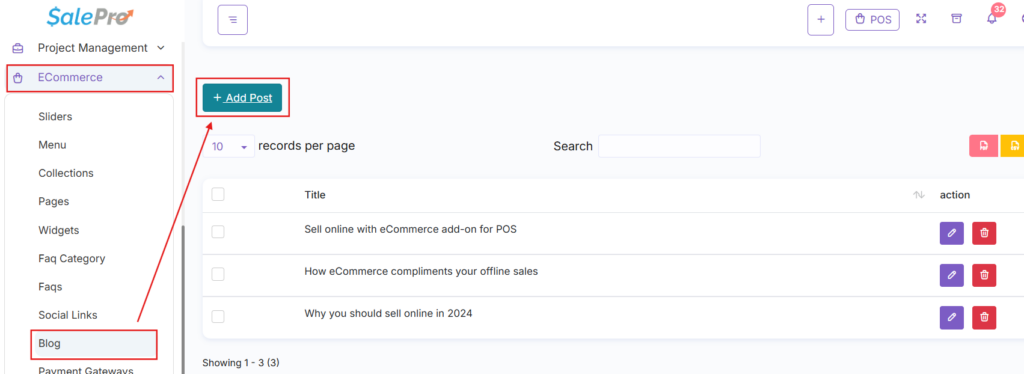
[ SCREENSHOT: eCommerce > Blog — Add Post form with Thumbnail upload and WYSIWYG editor ]
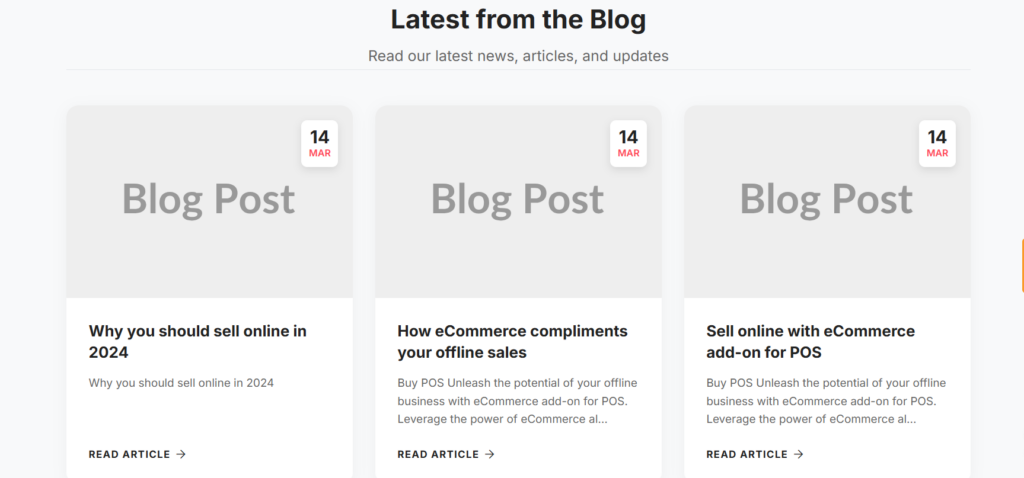
[ SCREENSHOT: Front-end blog listing — post cards with thumbnails and publish dates ]
15.10 Payment Gateways ##
Menu: eCommerce > Payment Gateways
This link points to the same core screen documented under Settings > Payment Gateways (21.18) — it is not a separate eCommerce-only configuration.
Activating a Gateway#
- Available Gateways: Standard options usually include Stripe, PayPal, Razorpay, Paystack, SSLCommerz, Mpesa, etc. (depending on your active modules).
- Each gateway section has a toggle switch — toggle ON to make it available at checkout.
- Set Mode to Sandbox for testing (no real money) or Live for real transactions.
- For online gateways, paste your Public API Key and Secret API Key from your payment provider account.
- Click Submit at the bottom of the page.
How it works at Checkout#
- Any gateway activated here automatically appears in Step 3 (Payment) of the your eCommerce site checkout.
- If an online gateway (like Stripe or PayPal) is selected, the customer is prompted to enter card details or is redirected to the gateway to complete the payment.
- No Active Gateways: If all gateways are turned OFF (and manual methods like WhatsApp/QR are also off), customers will not be able to complete checkout.
TIP: Configuring or activating a gateway here applies globally across SalePro. Note that manual methods like “WhatsApp Order” and “QR Code” are controlled separately from eCommerce > Settings.
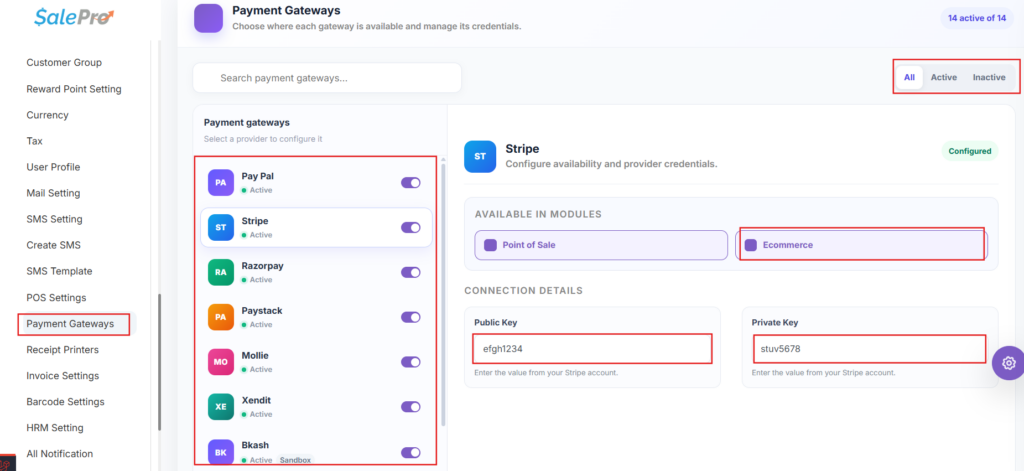
[ SCREENSHOT: Payment Gateways — Stripe section with Activate toggle ON and API key fields ]
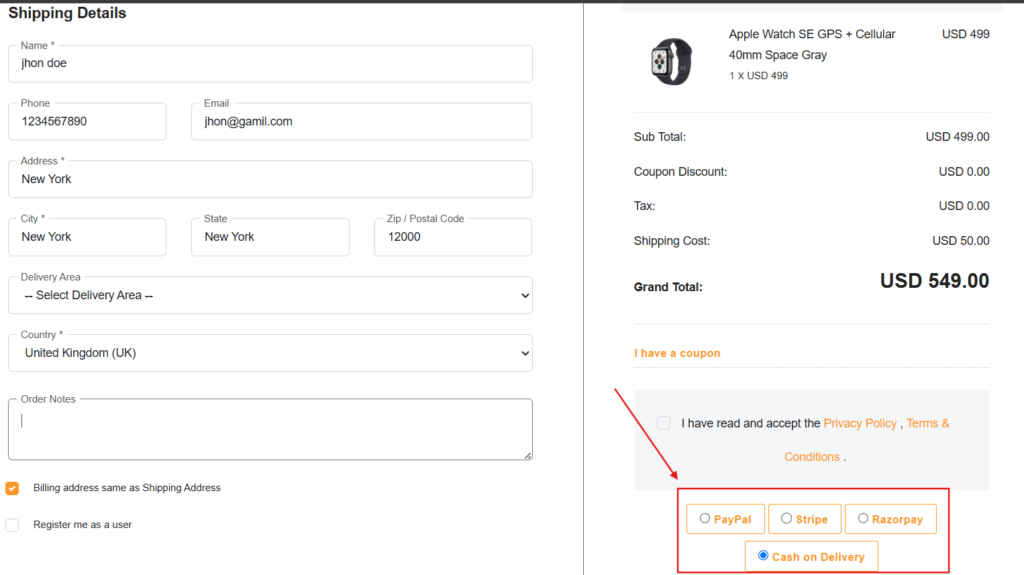
[ SCREENSHOT: Front-end checkout Step 3 — active payment gateway options visible ]
15.11 Settings ##
Menu: eCommerce > Settings
The eCommerce-specific your eCommerce site configuration screen — separate from the core General Setting chapter (21.2). This is the master control panel; configure it before building any pages.
Branding#
- Site Logo — Shown in the website header. Recommended: PNG, 200×60px.
- Favicon — Browser tab icon. Use a 32×32px square image.
- Site Title — Appears in Google search results and browser tabs.
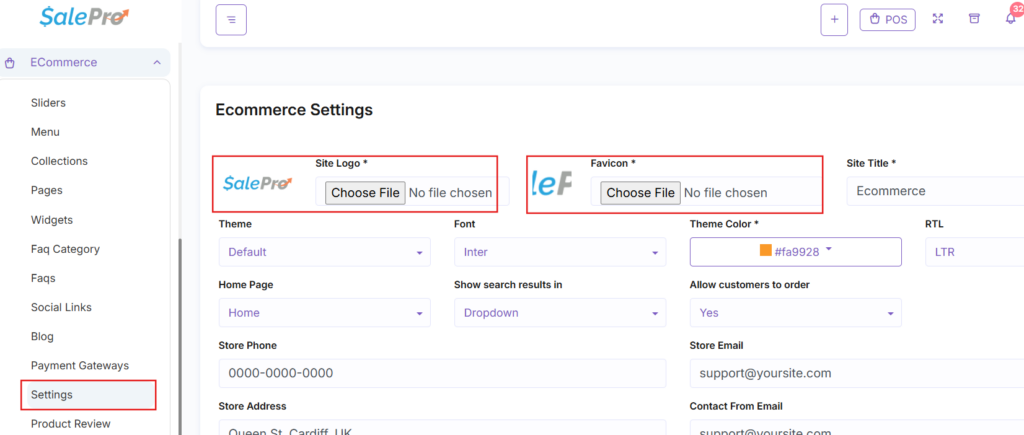
[ SCREENSHOT: Settings — Logo and Favicon upload fields with current logo preview ]
Appearance#
- Theme — Choose Default or Fashion. To activate other installed themes use eCommerce > Theme (15.15) instead.
- Font — Inter or Josefin Sans. Changes typography across the whole website.
- Theme Color — Click a color swatch to globally change button and link colors (e.g., Add to Cart, Checkout).
- RTL — Enable only for right-to-left languages (Arabic, Hebrew).

[ SCREENSHOT: Settings — Theme dropdown, Font dropdown, and Theme Color swatches ]
Homepage#
- Home Page — Select the Page (from 15.4) to use as your website root URL. Must be set here — not on the page itself.
Inventory & Invoice Setup#
- Default Warehouse — Online orders deduct stock from this warehouse in real-time. Must be set or inventory will not sync.
- Default Biller — Their name appears on auto-generated customer PDF invoices for every online order.
CRITICAL: If Default Warehouse and Default Biller are not configured, online orders will fail to sync with the POS. Inventory will NOT be deducted and orders may be oversold.
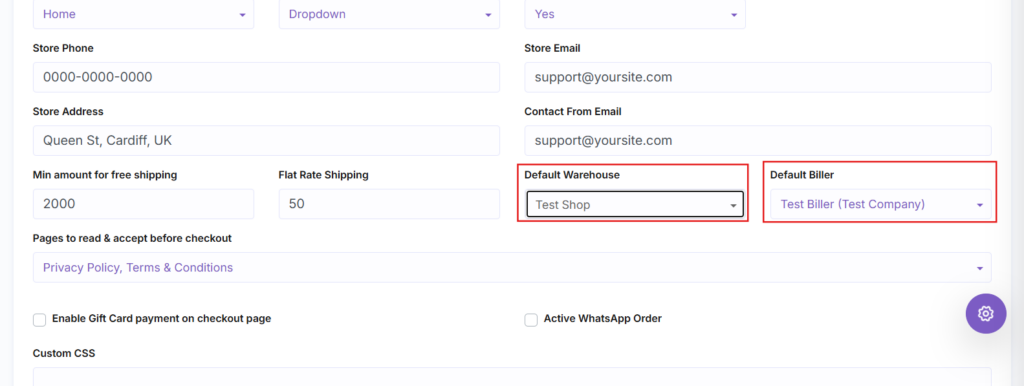
[ SCREENSHOT: Settings — Warehouse and Biller dropdowns with values selected ]
Store Contact Information#
- Store Phone & Email — Displayed in the website header and footer.
- Store Address — Shown on the Contact page and on auto-generated PDF invoices.
- Contact Form Email — All new order notification emails are sent to this address. Leave blank and you will receive no order alerts.
Shipping Rules#
- Flat Rate Shipping — Fixed fee added to every order (e.g., 60).
- Min Amount for Free Shipping — Cart total at which shipping automatically becomes free (e.g., 1000).
Store Behavior#
- Allow Customers to Order — Set No to make the store a display-only catalog with no checkout.
- Gift Card on Checkout — Enable to allow customers to pay using a SalePro POS Gift Card.
- Active WhatsApp Order — Adds an “Order via WhatsApp” button on every product page.
- Show Search Results In — Dropdown shows an inline popup; Full Page opens a dedicated search results page.
- Pages to Read Before Checkout — Select pages (e.g., Terms of Service) customers must accept before completing payment.
Marketing & Tracking Codes#
- Google Analytics Code — Paste your GA4 measurement script to track website traffic.
- Facebook Pixel — Paste your Meta Pixel code to track ad conversions.
- TikTok Pixel — Paste your TikTok Pixel code.
- Chat Code — Paste any live chat embed code (e.g., Tawk.to, Crisp).
- Custom CSS — Apply custom styles without editing server files.
- Custom JS — Inject custom scripts without editing server files.
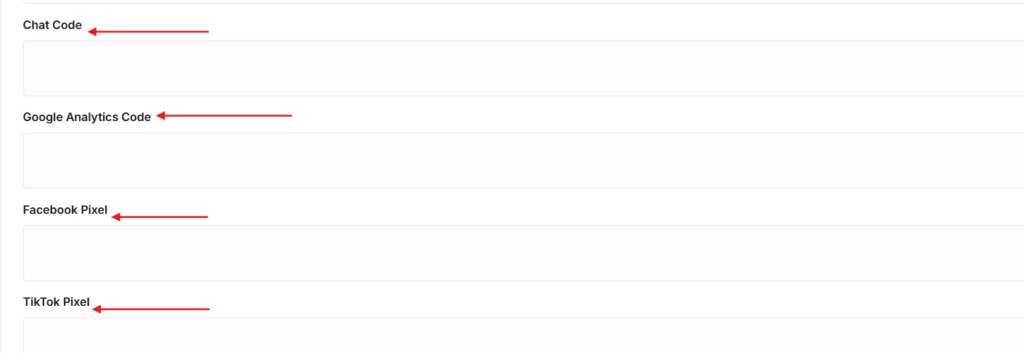
[ SCREENSHOT: Settings — Marketing codes section showing GA4, Facebook Pixel, TikTok fields ]
QR Code for Payments#
- Currency Wise QR Code — Upload your bank’s QR code image for each active currency. The QR code is displayed at checkout so customers can scan and pay via mobile banking.
Click Submit to save all settings.
TIP: The Theme dropdown here only offers Default/Fashion. If a third theme is installed on the server, activate it from eCommerce > Theme (15.15) instead.
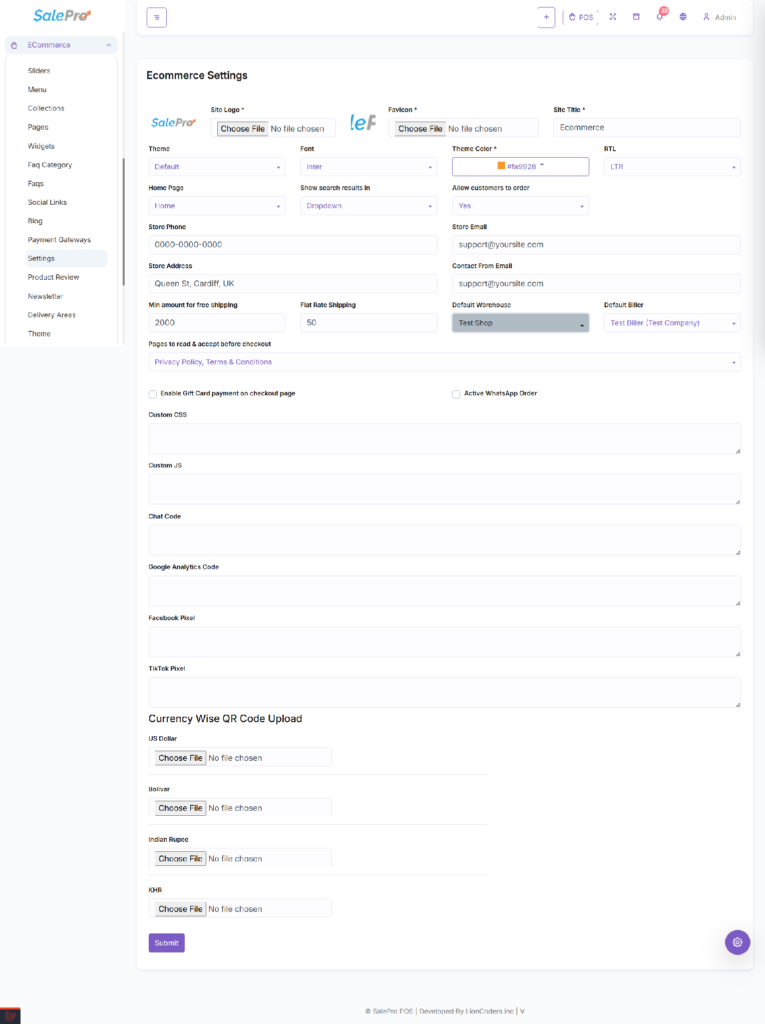
[ SCREENSHOT: Settings — full page scroll view showing all sections ]
15.12 Product Review ##
Menu: eCommerce > Product Review
Displays and moderates customer product ratings and reviews submitted from the your eCommerce site. The list shows: Customer Name, Product, Review text, Rating (1–5 stars), Status, and Date.
Moderating Reviews#
- Every review starts as Pending — not shown on the your eCommerce site until approved.
- Click the Status toggle to move a review from Pending to Approved. The review goes live on the product page instantly.
- Click Delete to permanently remove spam reviews.
NOTE: Approving a review automatically recalculates the product’s overall star rating across the entire your eCommerce site. There is no admin-facing “Create Review” form — reviews only originate from your eCommerce site customers.
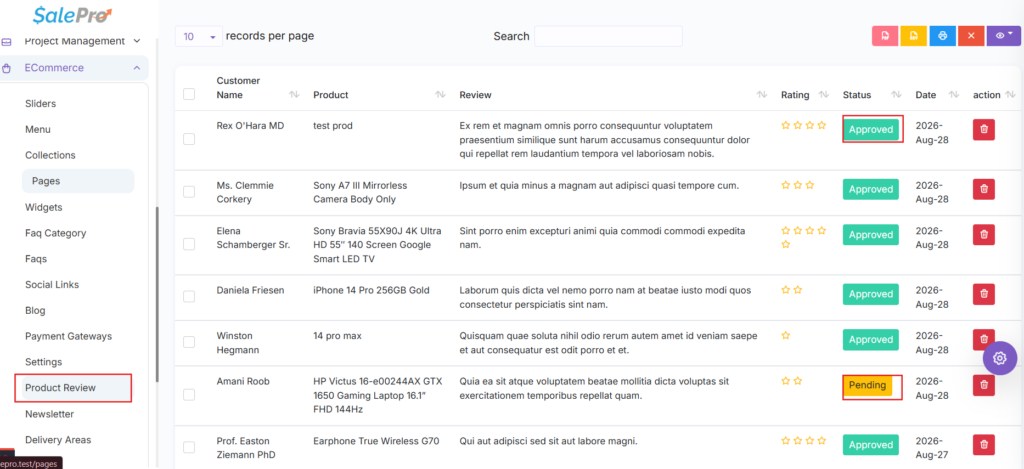
[ SCREENSHOT: eCommerce > Product Review — list with Status toggle showing Pending vs Approved ]
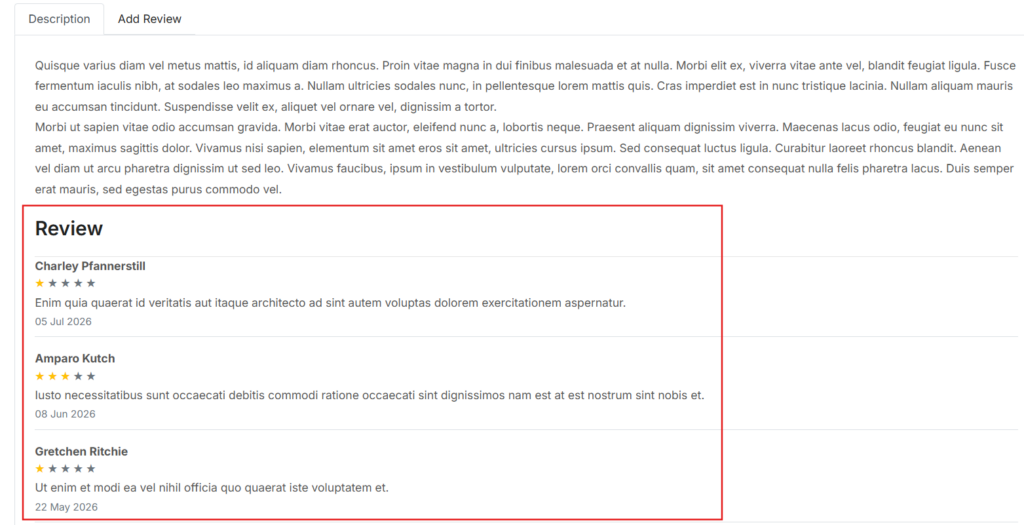
[ SCREENSHOT: Front-end product page — approved star rating and review text displayed ]
15.13 Newsletter ##
Menu: eCommerce > Newsletter
A simple subscriber list of emails collected via the your eCommerce site newsletter signup form. Shows Email and Subscription Date, with a delete action per row.
Exporting Subscribers#
- Click the CSV button at the top of the table to download all subscriber emails.
- Import the CSV into an email marketing platform (e.g., Mailchimp) to send newsletter campaigns.
NOTE: There is no built-in campaign-email feature and no manual add-subscriber option. Subscribers are captured only through the your eCommerce site signup form.
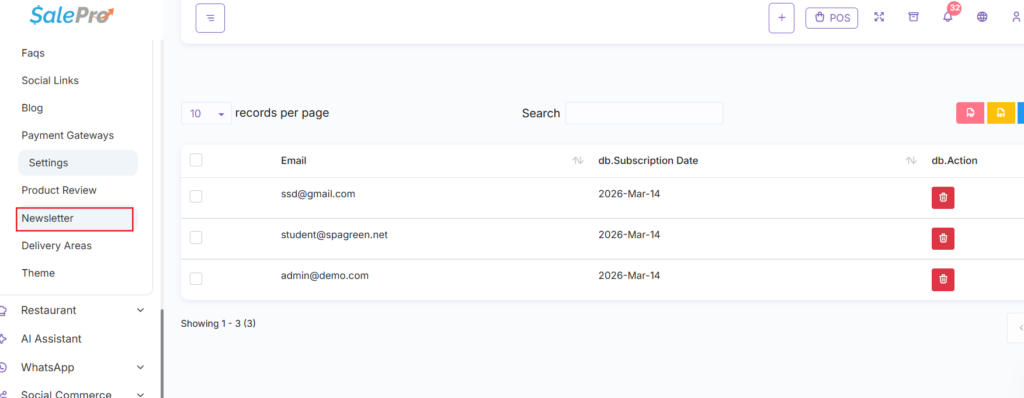
[ SCREENSHOT: eCommerce > Newsletter — subscriber list with CSV Export button highlighted ]
15.14 Delivery Areas ##
Menu: eCommerce > Delivery Areas
Defines named geographic delivery zones with shipping charges and estimated delivery times, used to compute shipping cost at your eCommerce site checkout.
Adding a Delivery Zone#
- Click Add Area.
- Name (required) — Zone label, e.g., “Inside Dhaka”.
- City — City name for reference.
- Zone — Comma-separated zip/postal codes, e.g., 1000, 1205, 1212.
- Delivery Charge (required) — Shipping cost for this zone, e.g., 60.
- Estimated Days (required) — Expected delivery window, e.g., 2–3 days.
- Active toggle — Toggle ON to enable this zone at checkout.
- Note — Optional internal note for admin reference.
- Click Save.
NOTE: If a customer enters a zip code at checkout that does not match any active zone, the checkout button is disabled and they cannot complete the order. Ensure all required zip codes are added here.
NOTE: If the cart total reaches the Free Shipping threshold set in eCommerce > Settings (15.11), the delivery charge becomes 0 automatically, overriding the zone charge.
TIP: Use Bulk Edit to update multiple delivery zones at once in a spreadsheet-style grid and save all changes in one submission.
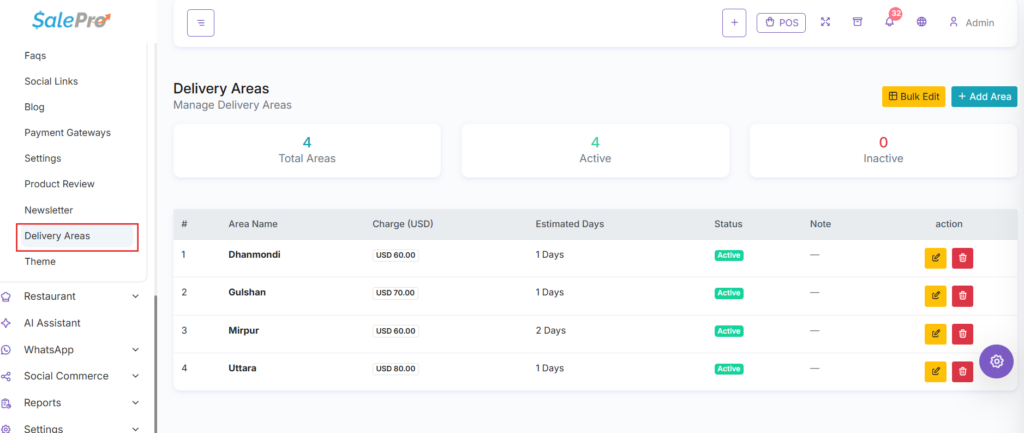
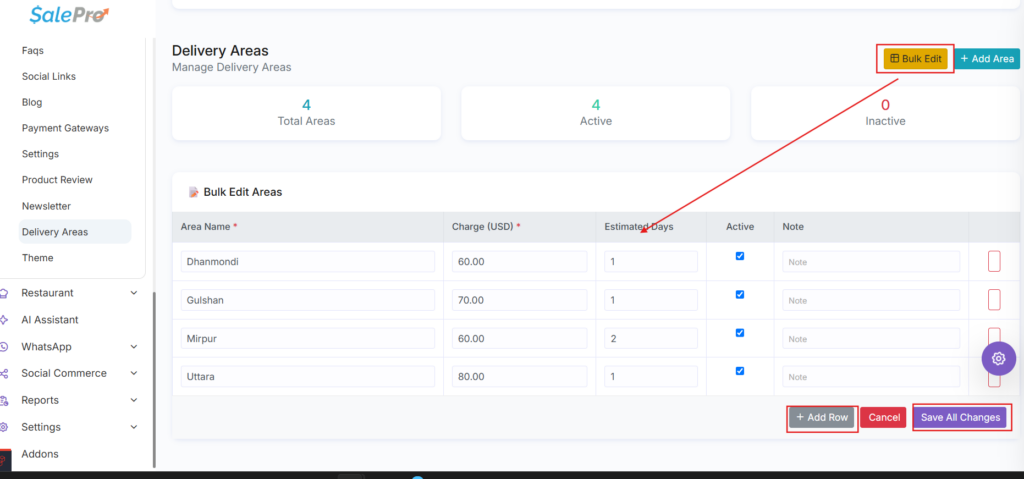
[ SCREENSHOT: Delivery Areas list — multiple active zones showing charges and estimated days ]
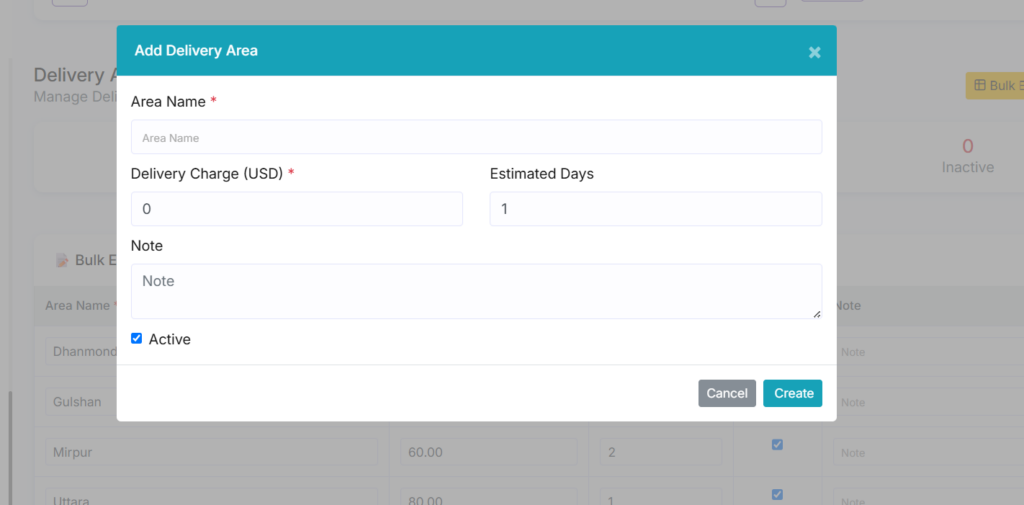
[ SCREENSHOT: eCommerce > Delivery Areas — Add Area form with all fields filled ]
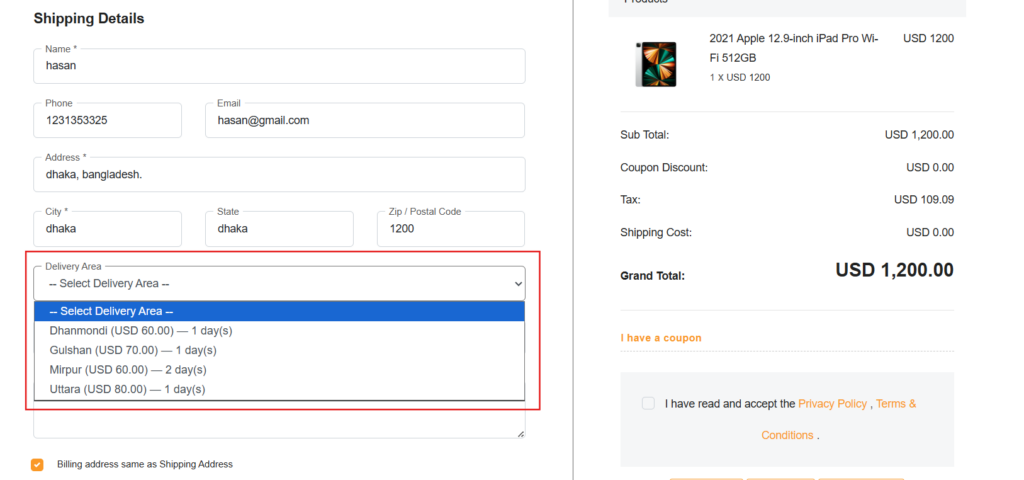
[ SCREENSHOT: Front-end checkout — shipping cost displayed based on customer zip code ]
15.15 Theme ##
Menu: eCommerce > Theme
A your eCommerce site theme switcher — scans the installed theme folders on the server and lets you activate one with a single click.
Switching Themes#
- The card with a blue “Active” badge is the current live theme.
- Click Activate on any other card to switch immediately.
- Accent color and font are configured separately in eCommerce > Settings (15.11).
NOTE: After switching themes, review your homepage layout — widget placement may differ depending on the new theme’s template structure.
See also: 22. Addons — SalePro eCommerce, SalePro WooCommerce
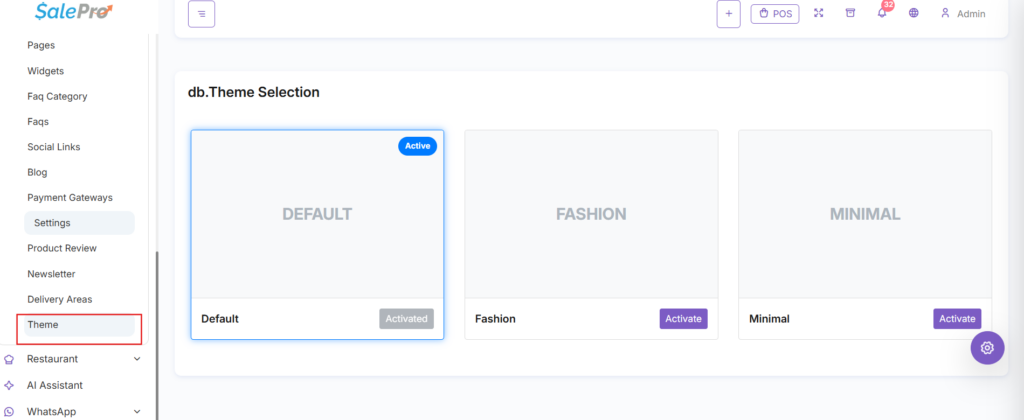
[ SCREENSHOT: eCommerce > Theme — theme cards with Active badge on current theme and Activate button on others ]
Appendix — Troubleshooting Quick Reference ##
- Homepage shows blank or broken page
Cause: Home Page not selected in Settings.
Fix: eCommerce > Settings > Home Page dropdown > select your page > Submit. - Slider not showing on homepage
Cause: Slider was created but not added to the page layout.
Fix: eCommerce > Pages > edit homepage > drag Image Slider Widget > select slider > Save popup > Publish. - Online order placed but inventory not deducted
Cause: Default Warehouse not configured in Settings.
Fix: eCommerce > Settings > set Default Warehouse > Submit. - Checkout button is greyed out for customer
Cause: Customer’s zip code not found in any active Delivery Area.
Fix: eCommerce > Delivery Areas > add the zip code > Save. - Not receiving order notification emails
Cause: Contact Form Email field is empty in Settings.
Fix: eCommerce > Settings > fill Contact Form Email > Submit. - Customer review not visible on product page
Cause: Review status is still Pending (not approved).
Fix: eCommerce > Product Review > click Status toggle to Approved. - Widget missing after page is refreshed
Cause: Page was not published after the widget was added.
Fix: Edit the page > re-add the widget > click Publish. - Footer menu not showing on website
Cause: Footer menu widget not placed in the Widgets zone.
Fix: eCommerce > Widgets > drag Custom Menu into Footer zone > select menu > Save. - Navigation menu link returns 404 error
Cause: Linked POS Category or Page was deleted.
Fix: eCommerce > Menu > edit the broken item > re-link to the correct Category, Page, or URL.
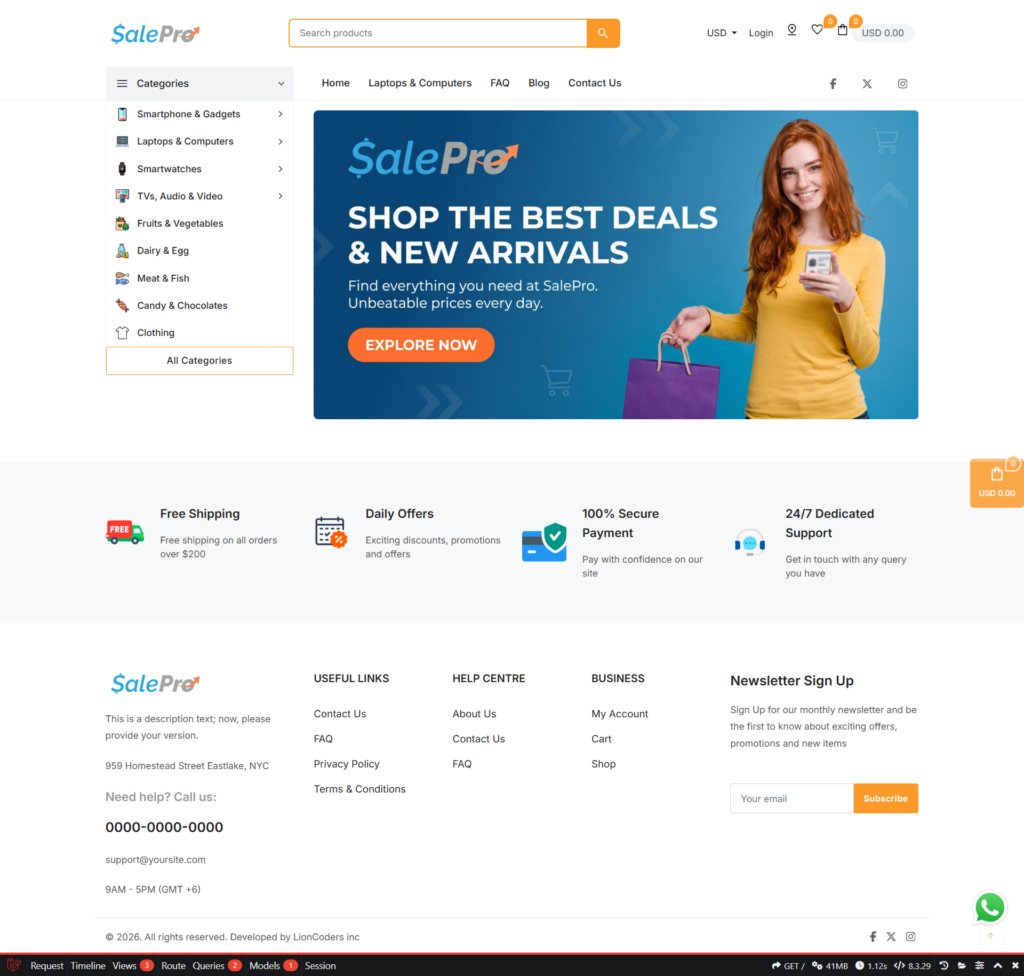
[ SS: Settings page — Home Page dropdown shown empty (before fix) vs. selected (after fix) ]
15.16 Product Setup for eCommerce ##
Menu: Products > Add Product / Products > Product List > Edit
Products are created in the core SalePro POS product module — not inside the eCommerce menu. However, specific fields on each product determine whether and how it appears on the online your eCommerce site. A product will only show on the website if both conditions below are met.
Two Required Conditions for a Product to Appear Online#
- Active (is_active = ON) — The product must be active and not archived in the POS system.
- Publish Online (is_online = ON) — The product must have its “online” toggle enabled. This is a separate switch from the POS active status.
CRITICAL: If a product is active in POS but the Publish Online toggle is OFF, it will NOT appear on the your eCommerce site — regardless of what collection or category it belongs to.
eCommerce-Specific Product Fields#
- Product Name — Shown as the product title on all your eCommerce site pages. Keep it clear and descriptive.
- Slug — Auto-generated from the name. Used in the product URL (e.g., /product/blue-denim-shirt/42). Do not change after publishing as it will break existing links.
- Product Image(s) — Multiple images supported. The first image is used as the primary thumbnail on listing pages. All images appear in the product detail image slider.
- Short Description — A brief 1–3 sentence summary shown directly below the product price on the product detail page. Helps customers make quick buying decisions.
- Product Details / Description — Full long-form content shown in the Description tab on the product detail page. Supports rich HTML (bold, images, tables, etc.).
- Tags — Comma-separated keywords. Used in your eCommerce site search — customers can find the product by typing any matching tag.
- Meta Title — Title shown in Google search results. If left empty, the Product Name is used automatically.
- Meta Description — Summary shown under the meta title in Google results. Also used for Facebook/Twitter share card preview.
- Publish Online (is_online) — Toggle ON to make the product visible on the your eCommerce site. Toggle OFF to hide it from the website without deleting it from POS.
- In Stock — Controls whether the Add to Cart button is shown. See full conditions in 15.17 below.
- Track Inventory — When enabled, the system uses live warehouse stock quantity to determine availability automatically. When disabled, the In Stock toggle is the manual override.
- Selling Price & Promotion Price — If a Promotion Price is set, the your eCommerce site automatically shows the original price crossed out, the discounted price highlighted, and a percentage-off badge (e.g., -25%).
- Variants — If the product has variants (size, colour, etc.), customers must select one before the Add to Cart button becomes active. Each variant has its own price, item code, and stock level.
- Related Products — Enter comma-separated product IDs. These products appear in the “You May Also Like” slider at the bottom of the product detail page.
TIP: Always fill in Short Description, Product Details, and at least one Product Image before publishing. Products with no image show a placeholder box. Products with no description show “No Description Available” — both reduce customer trust and conversion.
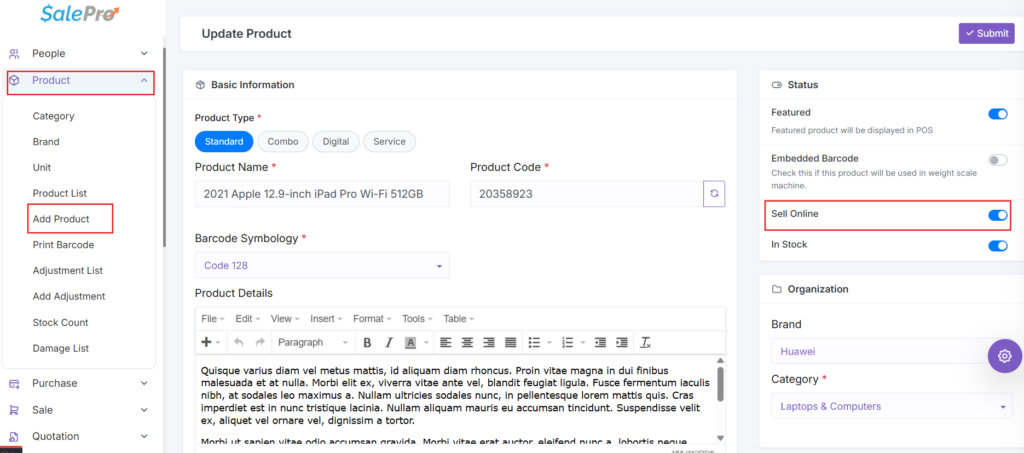
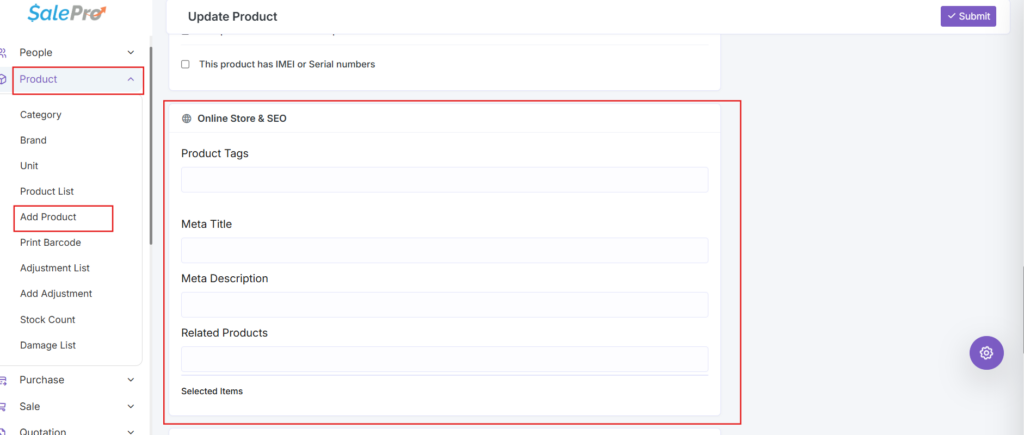
[ SCREENSHOT: Products > Add Product — eCommerce section showing is_online toggle, Short Description, Tags, Meta Title fields ]
15.17 Add to Cart — Conditions & Rules ##
Your eCommerce Site: Product Detail Page > Add to Cart button
The Add to Cart button is controlled by a chain of conditions. Understanding these helps you diagnose quickly when a client reports the button is missing or disabled.
Condition 1 — Global Order Switch#
- Setting: eCommerce > Settings > Allow Customers to Order
- If set to No — the Add to Cart button is completely hidden on every product on the entire your eCommerce site. The store becomes a display-only catalog.
- If set to Yes — the button is shown, subject to the remaining conditions below.
Condition 2 — In Stock Status (Per Product)#
- In Stock = ON — Add to Cart shows with a quantity input. Quantity is capped at 100 by default.
- In Stock = OFF but warehouse stock (qty) is greater than 0 — Add to Cart still shows, and the quantity input max is capped to the exact warehouse stock number.
- In Stock = OFF AND warehouse qty = 0 — The button is replaced with an “Out of Stock” label. No cart action is possible.
NOTE: The In Stock toggle is a manual override. If Track Inventory is enabled on the product, the system reads the live warehouse quantity automatically. If Track Inventory is disabled, only the In Stock toggle controls availability.
Condition 3 — Product Type Compatibility#
- Only products of type Standard, Combo, or Service support the standard Add to Cart flow.
- If a product is a different custom type, the Add to Cart button is disabled with the tooltip: “Ecommerce configuration required”.
Condition 4 — Variant Selection#
- If a product has variants enabled and at least one variant exists — the customer must first click a variant before Add to Cart becomes active.
- If variants are enabled but no variants are configured — the button is permanently disabled with the message: “Ecommerce variant unavailable”. Fix by adding at least one variant to the product in the POS.
- When a variant is selected, the price, item code, and max stock quantity all update live on the page.
Quick Diagnosis — When Add to Cart is Missing#
- Check 1: eCommerce > Settings > Allow Customers to Order = Yes?
- Check 2: Product > is_online toggle = ON?
- Check 3: Product > In Stock = ON, or warehouse stock > 0?
- Check 4: Product type = Standard, Combo, or Service?
- Check 5: If variants are enabled, is at least one variant configured?
WARNING: The most common client complaint is “Add to Cart disappeared”. Check Allow Customers to Order in Settings first — it is a single toggle that hides the button site-wide.
15.18 WhatsApp Order System ##
Enable at: eCommerce > Settings > Active WhatsApp Order
Used at: Your eCommerce Site Checkout > Payment Step
The WhatsApp Order system lets customers place orders by sending a pre-filled WhatsApp message to your store’s phone number — instead of paying online through a gateway. The order is still recorded in SalePro for inventory and order management.
Enabling WhatsApp Order#
- Go to eCommerce > Settings.
- Tick the Active WhatsApp Order checkbox.
- Make sure Store Phone is filled with your WhatsApp-enabled number in international format — for example: 8801XXXXXXXXX (no + or spaces).
- Click Submit.
CRITICAL: If Store Phone is empty or invalid, clicking “Order Via WhatsApp” at checkout will show: “WhatsApp number is not configured” — and the order cannot be placed. Always set Store Phone first.
How It Works — Customer Checkout Flow#
- At checkout Step 3, a green “Order Via WhatsApp” button appears as a payment option.
- Customer selects it and clicks Place Order.
- System validates: Name, Email, Address, and City must all be filled. If not, an error is shown.
- SalePro creates the order in the database and generates an Order Reference number.
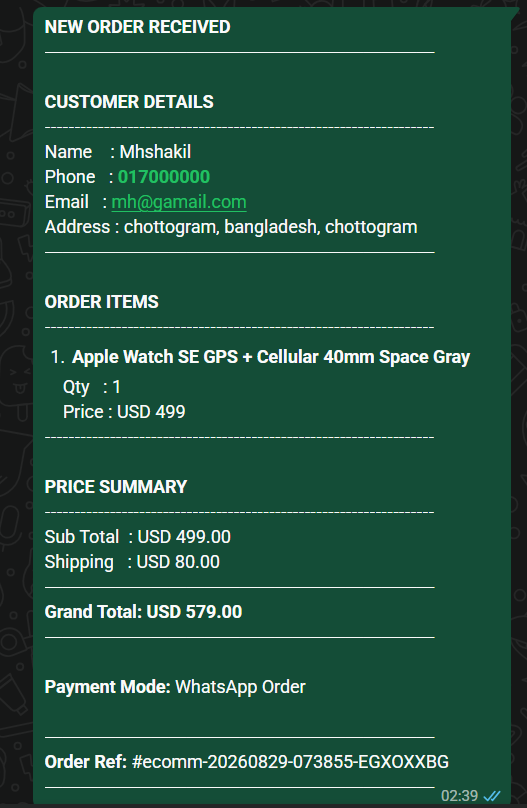
- The customer’s browser automatically opens WhatsApp (web or app) with a pre-filled message containing:
- Customer name, phone, email, full address
- All ordered items with quantity and line price
- Subtotal, shipping cost, and grand total
- Payment mode and any order note entered by the customer
- The system-generated Order Reference number
- Customer sends the message to your store WhatsApp. You receive and confirm manually.
- Customer is redirected to the Order Success page.
Admin Actions After a WhatsApp Order#
- The order appears in the Orders list with payment mode: WhatsApp Order.
- Order status starts as Pending. Change it to Confirmed/Processing/Delivered after verifying the customer’s WhatsApp message.
- No money is processed by SalePro. You collect payment separately (cash, bank transfer, etc.) and confirm manually.
TIP: WhatsApp Order is ideal for markets with low online payment adoption. It keeps orders tracked in SalePro for inventory while using WhatsApp for fast, familiar human confirmation.
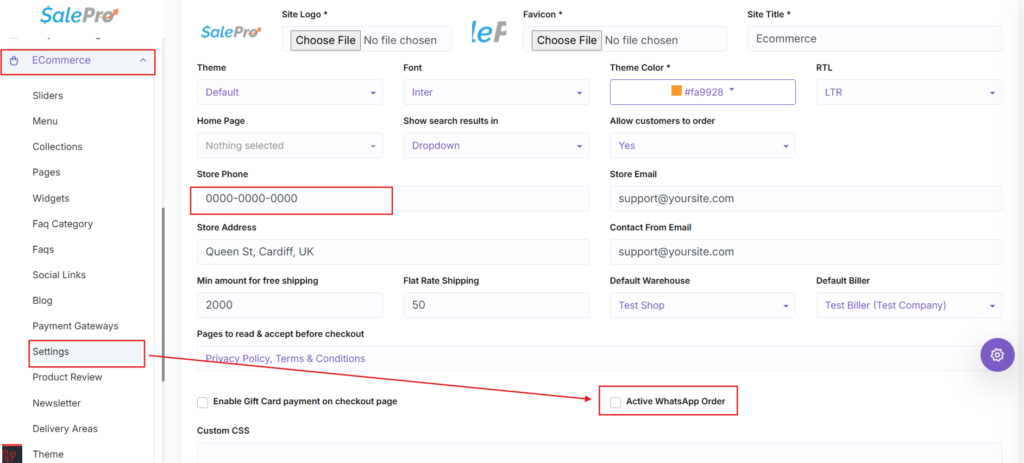
[ SCREENSHOT: eCommerce > Settings — Active WhatsApp Order checkbox checked, Store Phone field filled ]
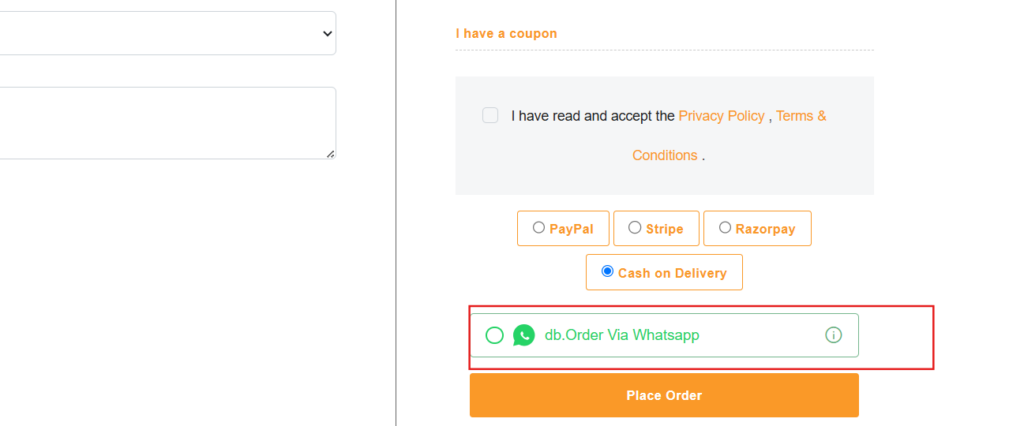
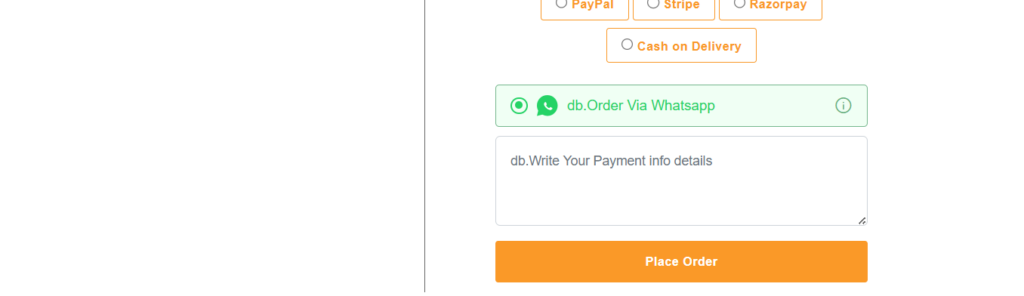
[ SCREENSHOT: Your eCommerce Site checkout Step 3 — green “Order Via WhatsApp” button visible in payment options ]
15.19 QR Code Payment System ##
Setup at: eCommerce > Settings > Currency Wise QR Code Upload
Used at: Your eCommerce Site Checkout > Payment Step
The QR Code payment method lets customers pay by scanning your bank or mobile banking QR code at checkout (e.g., bKash, Nagad, Rocket, or any bank app). No payment gateway API is needed — it is a manual payment channel verified by you after the fact.
Setting Up QR Code Payment#
- Go to eCommerce > Settings.
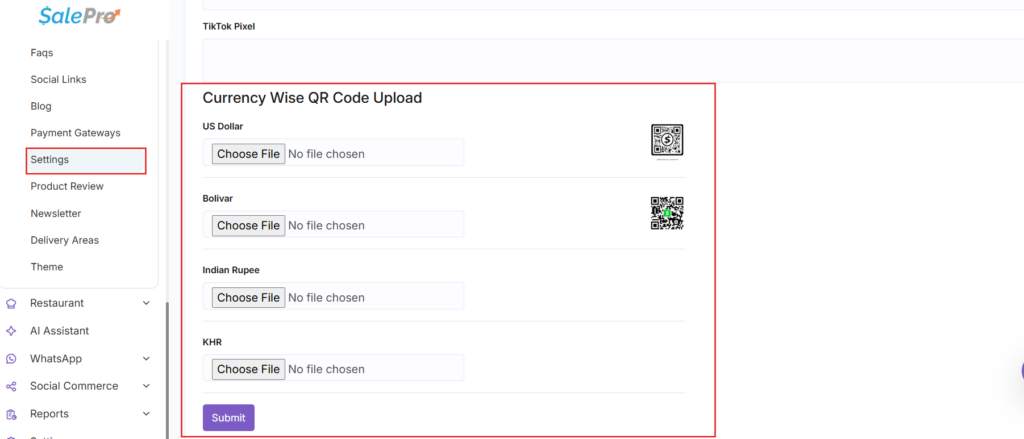
- Scroll to the Currency Wise QR Code Upload section at the bottom.
- For each active currency, click the file upload field and select the QR code image provided by your bank or mobile banking app.
- Recommended format: PNG or JPG. Displayed at 178×178px at checkout.
- Click Submit to save. A thumbnail preview of each uploaded QR image is shown next to the upload field.
NOTE: The “QR Code” payment option only appears at checkout if a QR image has been uploaded for the customer’s currently active currency. If no QR exists for that currency, the option is hidden automatically.
How It Works — Customer Checkout Flow#
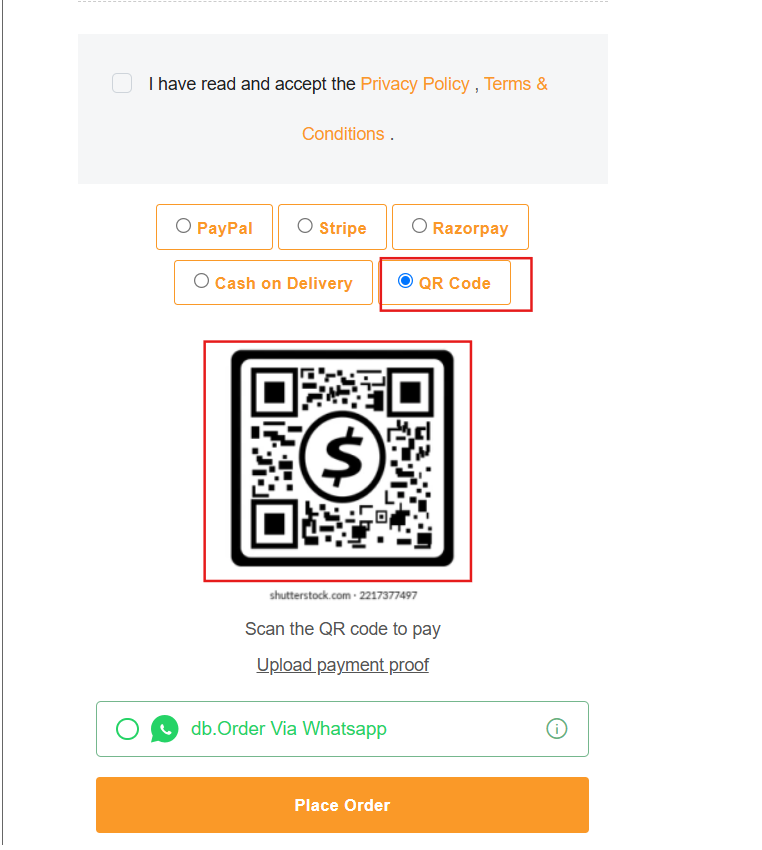
- At checkout Step 3 (Payment), a “QR Code” option appears in the payment method list.
- When the customer selects it, your uploaded QR code image appears below the options.
- The customer opens their banking app, scans the QR code, and transfers the payment amount.
- The customer enters their bank transaction reference or note in the order note field.
- The customer clicks Place Order.
- SalePro records the order with payment mode: QR Code.
Admin Actions After a QR Code Order#
- The order appears in Orders with payment mode: qr_code.
- Check your banking app or statement to verify the customer’s payment using their transaction reference from the order note.
- Once confirmed, update the order status to Confirmed/Processing/Delivered.
- No money flows through SalePro — verification is manual.
TIP: Upload separate QR codes for each currency if you accept multi-currency orders. SalePro automatically shows the correct QR image based on the customer’s active currency selection at checkout.
WARNING: QR Code and WhatsApp Order are both manual payment methods — SalePro processes no money. You are fully responsible for verifying payment before shipping or fulfilling any order placed with these methods.
[ SCREENSHOT: eCommerce > Settings — Currency Wise QR Code section with uploaded QR thumbnail preview ]
[ SCREENSHOT: Your eCommerce Site checkout Step 3 — QR Code option selected with QR image displayed below ]
15.20 Customer Accounts & Dashboard ##
Customers create accounts to track orders, manage addresses, and save preferences. This section is for end-users only — there is no admin panel for managing customer accounts (customers control their own data).
Customer Features Available#
- Profile — View and update personal details (name, email, phone).
- Order History — View all past and current orders with status and details.
- Address Book — Add, edit, set defaults, and delete delivery addresses.
- Wishlist — Save favorite products for later (see section 15.21).
- Order Tracking — Check order status, estimated delivery date, and shipping information.
How Customers Access Their Account#
- Click “My Account” or “Login” in the website header.
- Sign up with email/password or login with existing credentials.
- Once logged in, customers see a dashboard with links to Profile, Orders, Addresses, and Wishlist.
Managing Addresses#
From the Address section, customers can:
- Add a New Address — Click “Add Address” and fill in street, city, zip, and phone.
- Set Default — Mark one address as the default for checkout (saves time on repeat orders).
- Edit — Update an existing address.
- Delete — Remove an address (cannot delete the default address unless another exists).
TIP: Customers with saved addresses can check out faster — the checkout page auto-fills from their default address.
15.21 Wishlist ##
The Wishlist lets customers save favorite products for later without buying them immediately. There is no admin panel — customers manage their own wishlists.
How Customers Use Wishlist#
- On any product page, click the heart icon to add the product to their wishlist.
- The heart fills with color when a product is saved.
- Go to “My Account > Wishlist” to view all saved products.
From the wishlist page, customers can:
- View product details (price, description, stock)
- Add to cart directly from the wishlist
- Remove products from the wishlist
TIP: Customers can add multiple products to their wishlist to compare prices or wait for sales. Wishlist is private — only the customer can see it.
Need a hand?
Our support team can help you continue.
Tell us which step you are on and include a screenshot when possible.